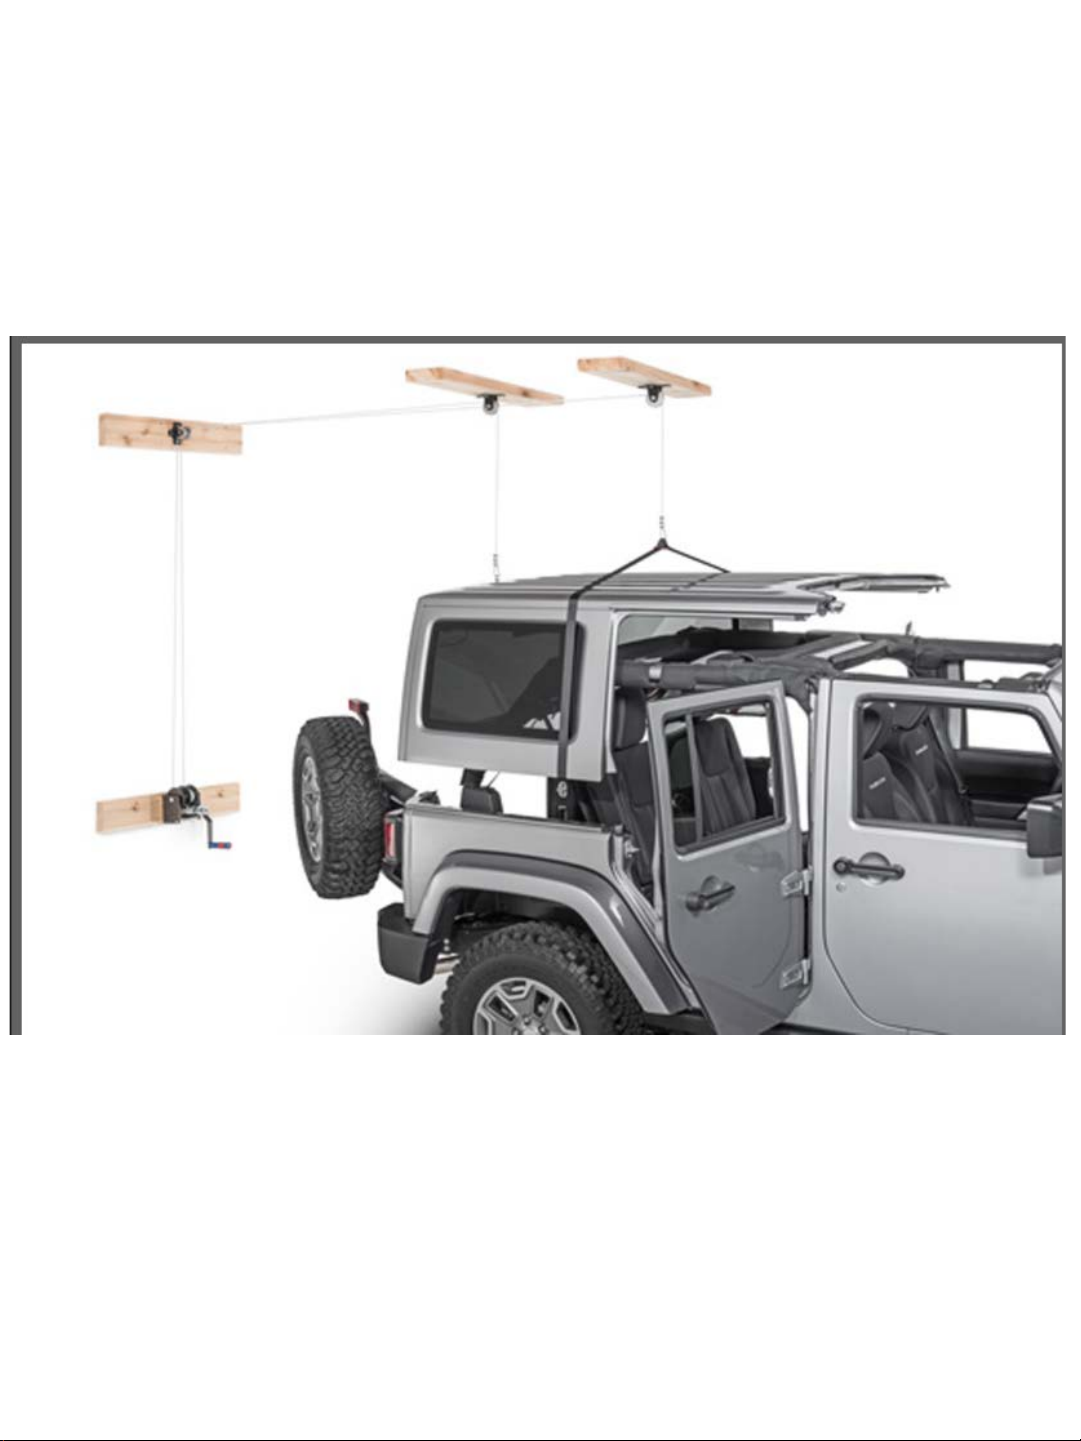
Lange Originals Hoist-A-Top Simple User manual

TOP
A
HOIST
®
Addendum for JL Jeep Hoists
This is to explain the procedure to put the rear hook on the Jeep top. Due to the
unique shape, and tolerances between the glass and the top edges of the window
frame the rear hook must be set in place before attaching to the frame.
Step 1: Before attaching the rear hook to the lifting mechanism. Carefully place
the hook in the gap between the rear window and the Jeep top from underneath
with the window open. (Fig. 1)
Fig. 2
Fig. 1
Fig. 3
Step 2: Close the window after the hook is nested on the top (Fig. 2) and attach
the thimbal and cable that you have set-up following the included instructions
(Fig. 3) to the quick-link. Thread the quick link closed. Reverse process when
putting top back on.
SIMPLE
Quick Link

Hoist-A-Top
Simple®
Installation Instructions
Call toll free 1-866-284-7428
Langeoriginals.com
Copyright Lange Originals
1

Safety Requirements
Please Read!!!
Please thoroughly read and understand these instructions before
installing your Hoist-A-Top® and before lifting your top.
When installing the Hoist-A-Top® remember safety first! Make sure you
use proper safety equipment when installing this product. Use gloves
and eye protection. Be careful on ladders. If you are unsure about
installing this product consult a professional or call us at the factory.
Cautions:
•Make sure your garage or structure is capable of supporting the
weight of your top. If there is any question about your structure’s
integrity, consult a professional.
•Before lifting your top make sure that all hardware is properly
fastened to the center of your studs in your wall and ceiling. Wire
clamps must be checked and tightened regularly.
•Do a dead weight lift to initially test your installation.
•Upon lifting your top for the first time and subsequent times
thereafter visually and check that all hardware including but not
limited to wire clamps , elevator bolts, hooks , wire cable, crank
hoist, and lifting strap. Make sure all are tight and in good working
order.
•Lange Originals is not responsible for damage or personal injury due
to improper installation, custom installation that doesn't follow the
instructions, or neglect to inspect equipment prior to using
equipment.
If you need help for any reason DO NOT CALL YOUR DEALER Please
contact us direct at the factory. We can help with missing parts or for
help with installation.
Call toll free 1-866-284-7428 or email at contact1@langeoriginals.com
Call toll free 1-866-284-7428
Langeoriginals.com
Copyright Lange Originals
2

X4 x4
X14 x2
X2 x2
x2 x2
Parts list:
1 strap
2 single line pulleys
1 double line pulley
1 43 foot cable
1 crank unit
2 rubber coated hooks (black for JK and YJ
Red for TJ)
One hardware bag containing:
4 wire cable clamps
2 wire thimbles
14 wood screws for attaching pulleys
2 elevator bolts
2 wing nuts
2 flat washers
2 standard 5/16 nuts
2 3 inch lag screws for attaching crank to
the wall
Tools and supplies needed:
9/16 socket
11/16 socket
5/16 socket or nut driver
Electric screw gun
Stud finder (optional)
Level (optional)
2x6 8 feet . (If your studs are not at 16
inch centers you will need a longer 2x6.)
3.5 to 4 inch long screws to attach the 2x6
to your wall and ceiling. (approx. 20)
Call toll free 1-866-284-7428
Langeoriginals.com
Copyright Lange Originals
3

Section A
Installation of the
crank unit
1. Remove the spool from
the crank unit using the
11/16 and 9/16 socket
2. Cut one section of 2x6
to 20 inches. Mount it
to your wall using at
least 4 screws (at least
two in each stud)
aprox. 50 inches above
the floor.
3. Mount your crank unit
to the center of the 2x6
using the 2 3 inch lag
screws and washers
provided.
Call toll free 1-866-284-7428
Langeoriginals.com
Copyright Lange Originals
4
3 inch Lag screws & washers
Spool

Section B
Pulley installation
Determine if your studs run
perpendicular or Parallel with
your garage door. If your
studs run perpendicular to
(or the opposite direction as
your garage door) please see
section D.
1. With the mounting
screws provided, mount
the double pulley and
one of the single pulleys
in the center of your 2x6.
2. Mount the second single
pulley ½ inch left of
center on the 2x6. This
will allow the second
cable to run along the
ceiling without
interfering with the other
cable.
3. Mount the 2x6 with the
double pulley in the top
corner of the wall or the
ceiling directly above the
crank unit. See page 6
4. Measure the distance
from the wall to the back
of your jeep where you
plan to lift the top.
Mount the 2x6 with the
single pulley centered at
this point. (this will be
the rear of the Jeep or
the hook side) see page 6
5. From the center of the
middle 2x6 measure over
34 inches and install the
2x6 with the single pulley
that is left of center. (This
will be the strap side)see
page 6
Call toll free 1-866-284-7428
Langeoriginals.com
Copyright Lange Originals
•Hint:
•It may be easier to put in the screws when the wheels
are removed
5
½ inch left of center
Wall or ceiling
First ceiling pulley
Second pulley

Call toll free 1-866-284-7428
Langeoriginals.com
Copyright Lange Originals
6
Strap (long cable) Hook (short cable)
Four door strap hole
Two door strap hole

Section C
Installing the lifting
hardware
1. Unclip the wire bundle and stretch out
the wire. The cable is 43 feet in total.
23 feet for the right side of the drum
(the strap side) and 20 feet for the left
side of the drum (the hook side)
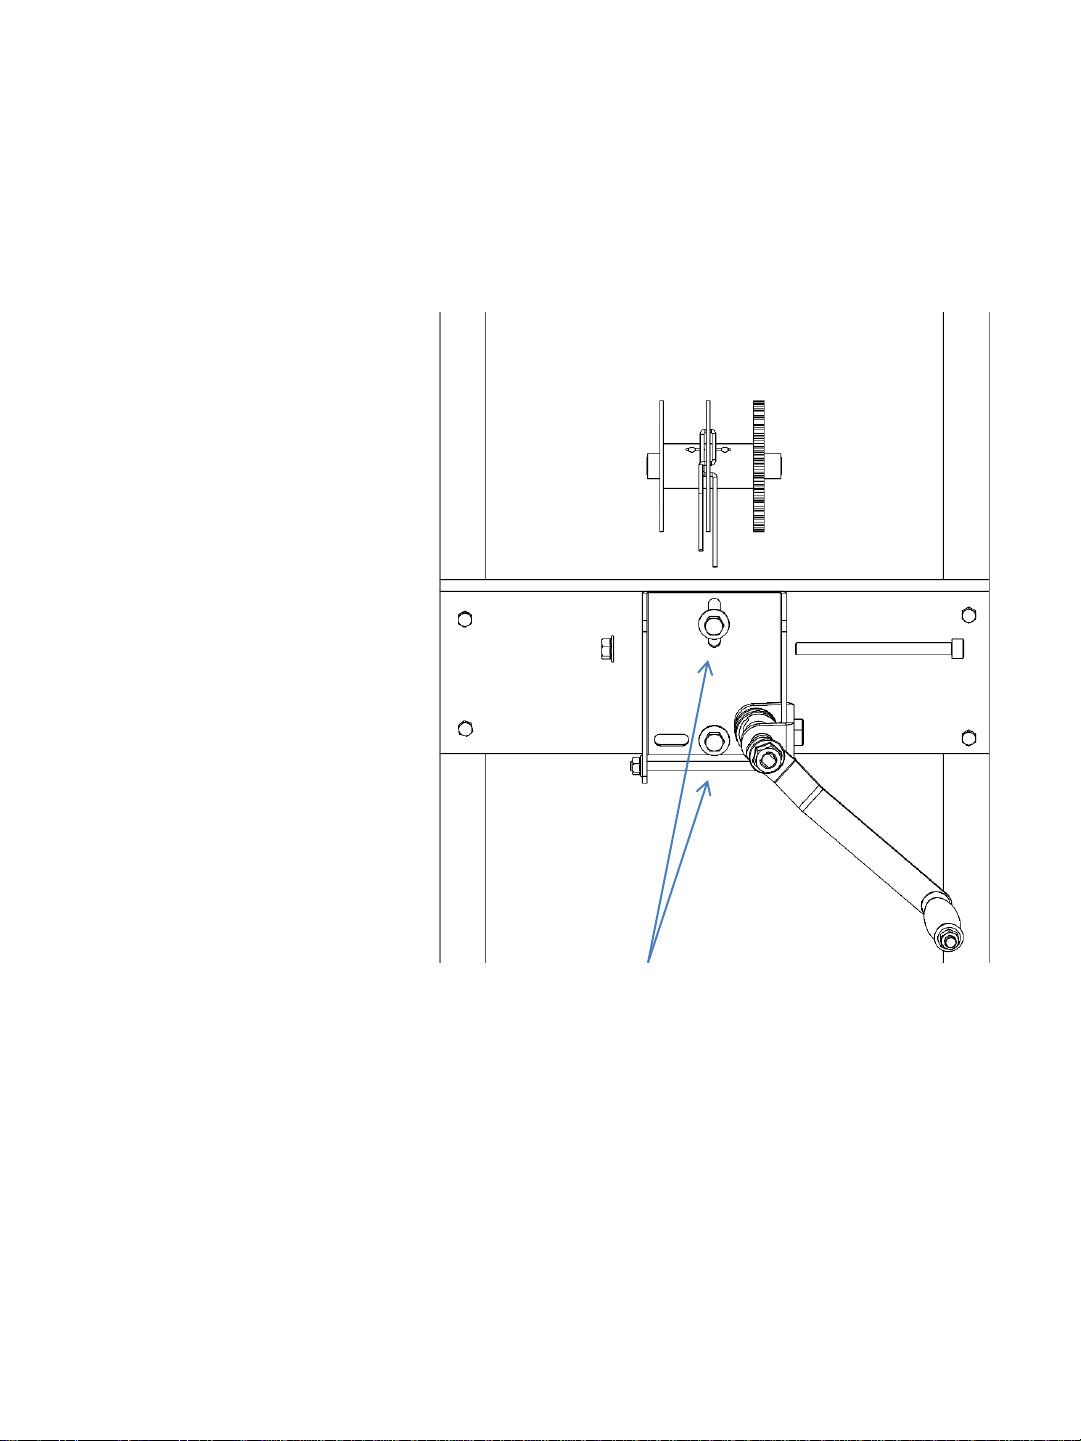
2. Mark the cable at the 23 foot line with
a marker or piece of tape. Center your
mark in one of the large holes and
lace one of each side of the cable
through the two smaller holes. You
should finish with the longer cable on
the right side of the spool.
3. Loop both wire ends through the
double pulley in the corner of the
ceiling. Take care that the cables don’t
cross and that the long side stays on
the right pulley and the shorter side
stays left.
4. Pull the left side cable through the
middle single pulley in the ceiling. This
line will be for the hook.
5. Pull the right side cable through the
front pulley (this should be the pulley
that was installed ½ inch left of center)
This cable will attach to your front
strap.
6. Attach the Smart Hook® to the cable
coming from the center pulley(left
cable) use the Red hook for a TJ (1997-
2006) Jeep or the black hook for JK
(2007-present) or YJ (1987-1995) Jeep.
Please see illustration to the right for
proper wire nut installation.
7. Install the lifting strap on the front
cable (right).
8. Install elevator bolts into the holes on
the Jeep top. If you have a 4 door JK
this will be the last holes on the front.
If you have a 2 door JK, TJ YJ or CJ this
will be the second hardware hole from
the front door.
Call toll free 1-866-284-7428
Langeoriginals.com
Copyright Lange Originals
7
CAUTION:
Tighten all bolts securely
Before lifting top!!

Section D
Lifting your top and
Storage
1. Before you lift your top Test
all connections make sure
hardware is secure in the
ceiling and bolts are tight.
2. Back your jeep into the lifting
position . The rear Smart Hook®
should hang in the middle of the
window and barely touches the
glass.
3. Release all hardware holding
down the hardtop and remove
the Freedom Top® panels. Take
care to unplug your wiring
harness in the back of the jeep.
4. With one hand or with the help
of a friend, by the rollbar at the
top, slightly Lift one front corner
of your top and slide the lifting
strap in between your top and
the body of the Jeep. Slip the
grommet over the elevator bolt.
Hand tighten the wing nut To
hold the strap in place. Repeat
on the other side. *note the 2
door will use the second set of
holes in from the door see page
6 to locate proper holes*
5. Open your rear window and put
the year appropriate hook
between the glass and your top.
Carefully close your rear window.
6. Turn your crank clockwise to
begin lifting your top.
7. You may need to adjust the
length of the cable attached to
the Smart hook®, or to the lifting
strap by loosening the wire
clamps and adjusting the length
of the cable.
8. Do not over lift your top and put
undue pressure on the pulleys.
Call toll free 1-866-284-7428
Langeoriginals.com
Copyright Lange Originals
8

Section E
Perpendicular beam
installation
•Hint:
•It may be easier to put in the screws when the wheels
are removed
If your beams run
perpendicular to your
garage door you need
to run your 2x6 piece
differently
1. Cut your 2x6
approximately 50
inches long.
2. With the provided
hardware attach
both single pulleys
on the 2x6 34
inches from each
other. Make the
first pulley on
center and the
second pulley ½
inch left of center.
This will allow the
cables to run next
to each other
without
interference.
3. Mount the double
pulley on a 20 inch
2x6. You can
mount your double
pulley on the
celling or at the
top of the wall.
Attach your 2x6 to
three studs in line
with the double
pulley in the
corner of the wall.
4. Proceed to section
C.
Call toll free 1-866-284-7428
Langeoriginals.com
Copyright Lange Originals
9
34 inches
Mount third pulley (strap pulley) ½ inch left of center
Middle pulley (hook)

Call toll free 1-866-284-7428
Langeoriginals.com
Copyright Lange Originals
10
34 inches
Aprox 50 inches
This distance is only limited by the
remaining length of your cable
4 door hole Two door hole

Warranty
We want you to be as happy as we are with our products. Give us a call if you’re having trouble
and more than likely we’ll be able to help you with it. We have been lifting tops for 26 years now
and have heard about anything. 9-5 MST is the best time to catch us, but if we miss you leave a
message and we’ll get right back to you.
We honor a one year warranty from the date of purchase on this product if installed and
operated according to these instructions. This warranty is invalid if purchased through an
unapproved third party or a unregistered dealer. This warranty covers parts if found defective but
does not include: abuse or damage due to neglect or misuse. Liability for any application for the
product is limited to the replacement or repair of the product itself and does not cover
consequential damage or injury. Use at your own risk.
Please call customer service at 1-866-284-7428 for warranty returns and help. If your product is
out of warranty and you need a part, give us a call we can replace most items at a moderate cost
to our customers.
About Lange Orignals ®
Lange is a family started, owned and run business. Our first Hoist-A-Top was invented when
removing a hard top on our new jeep someone slipped and dropped the top, an idea was
planted. Original prototypes were made from wood and then metal. We started with a 2x2
advertisement in a 4x4 magazine, and now ship our products world-wide. We appreciate your
business and support; It’s put young people through school, braces on teeth, and roofs over our
heads. If there is anything we can do to continue to have your business, please let us know.
Call toll free 1-866-284-7428
Langeoriginals.com Copyright
Lange Originals
11
Table of contents
Popular Chain Hoist manuals by other brands

WilTec
WilTec XPOtool 62596 instruction manual

Ingersoll-Rand
Ingersoll-Rand LV Series Installation and operation manual

HADEF
HADEF 29/06ES Installation, operating and maintenance instructions

Austlift
Austlift MAXIBINDER 202705 user manual

Ingersoll-Rand
Ingersoll-Rand SM Series Installation and operation manual

YATO
YATO YT-5890 manual

Comeup
Comeup GTD-650 instruction manual

little mule
little mule FEL Series Operating, Maintenance & Parts Manual

ACI Hoist & Crane
ACI Hoist & Crane NECH Series Operation manual

Steinberg Systems
Steinberg Systems SBS-FZ 3000/3GM user manual

William Hackett
William Hackett L4 manual

Silverline
Silverline 442463 manual