6) MINI CHOCOLATE STICK AND LOLLIPOPS DECORATING IDEAS:
After creating your chocolate sticks, you may decorate them with hazelnut pieces*, wafers, cereal, etc. To do so, pour some pieces of hazelnut*, water and cereal
(according to your personal preference) into the big bowl. Next, apply a sticky sweet substance (jam, honey, spread*, icing gel, etc.) to the top of your mini chocolate
stick, then dip it into the big bowl to stick on pieces of hazelnut*, wafers, cereal, etc.
You can also decorate them thanks to sugar decorations (not included). To do so, pour some sugar decorations in the big bowl and use the tong-clip to gently take the
mini-decorations one by one from the big bowl and place them on the sticky sweet substance in the desired place. The sticky material will hold the decorations in
place on your creations.
*We recommend buying ingredients adapted to your children’s health, some can cause allergies.
You can now eat your creations, or put them in a box and give them as a gift. For the chocolates, use the aluminium squares and for the lollipops, use the plastic bags
included (insert the lollipop stick into the hole, peel the tab off the top of the bag and close it securely by pressing the adhesive part against the other side of the bag).
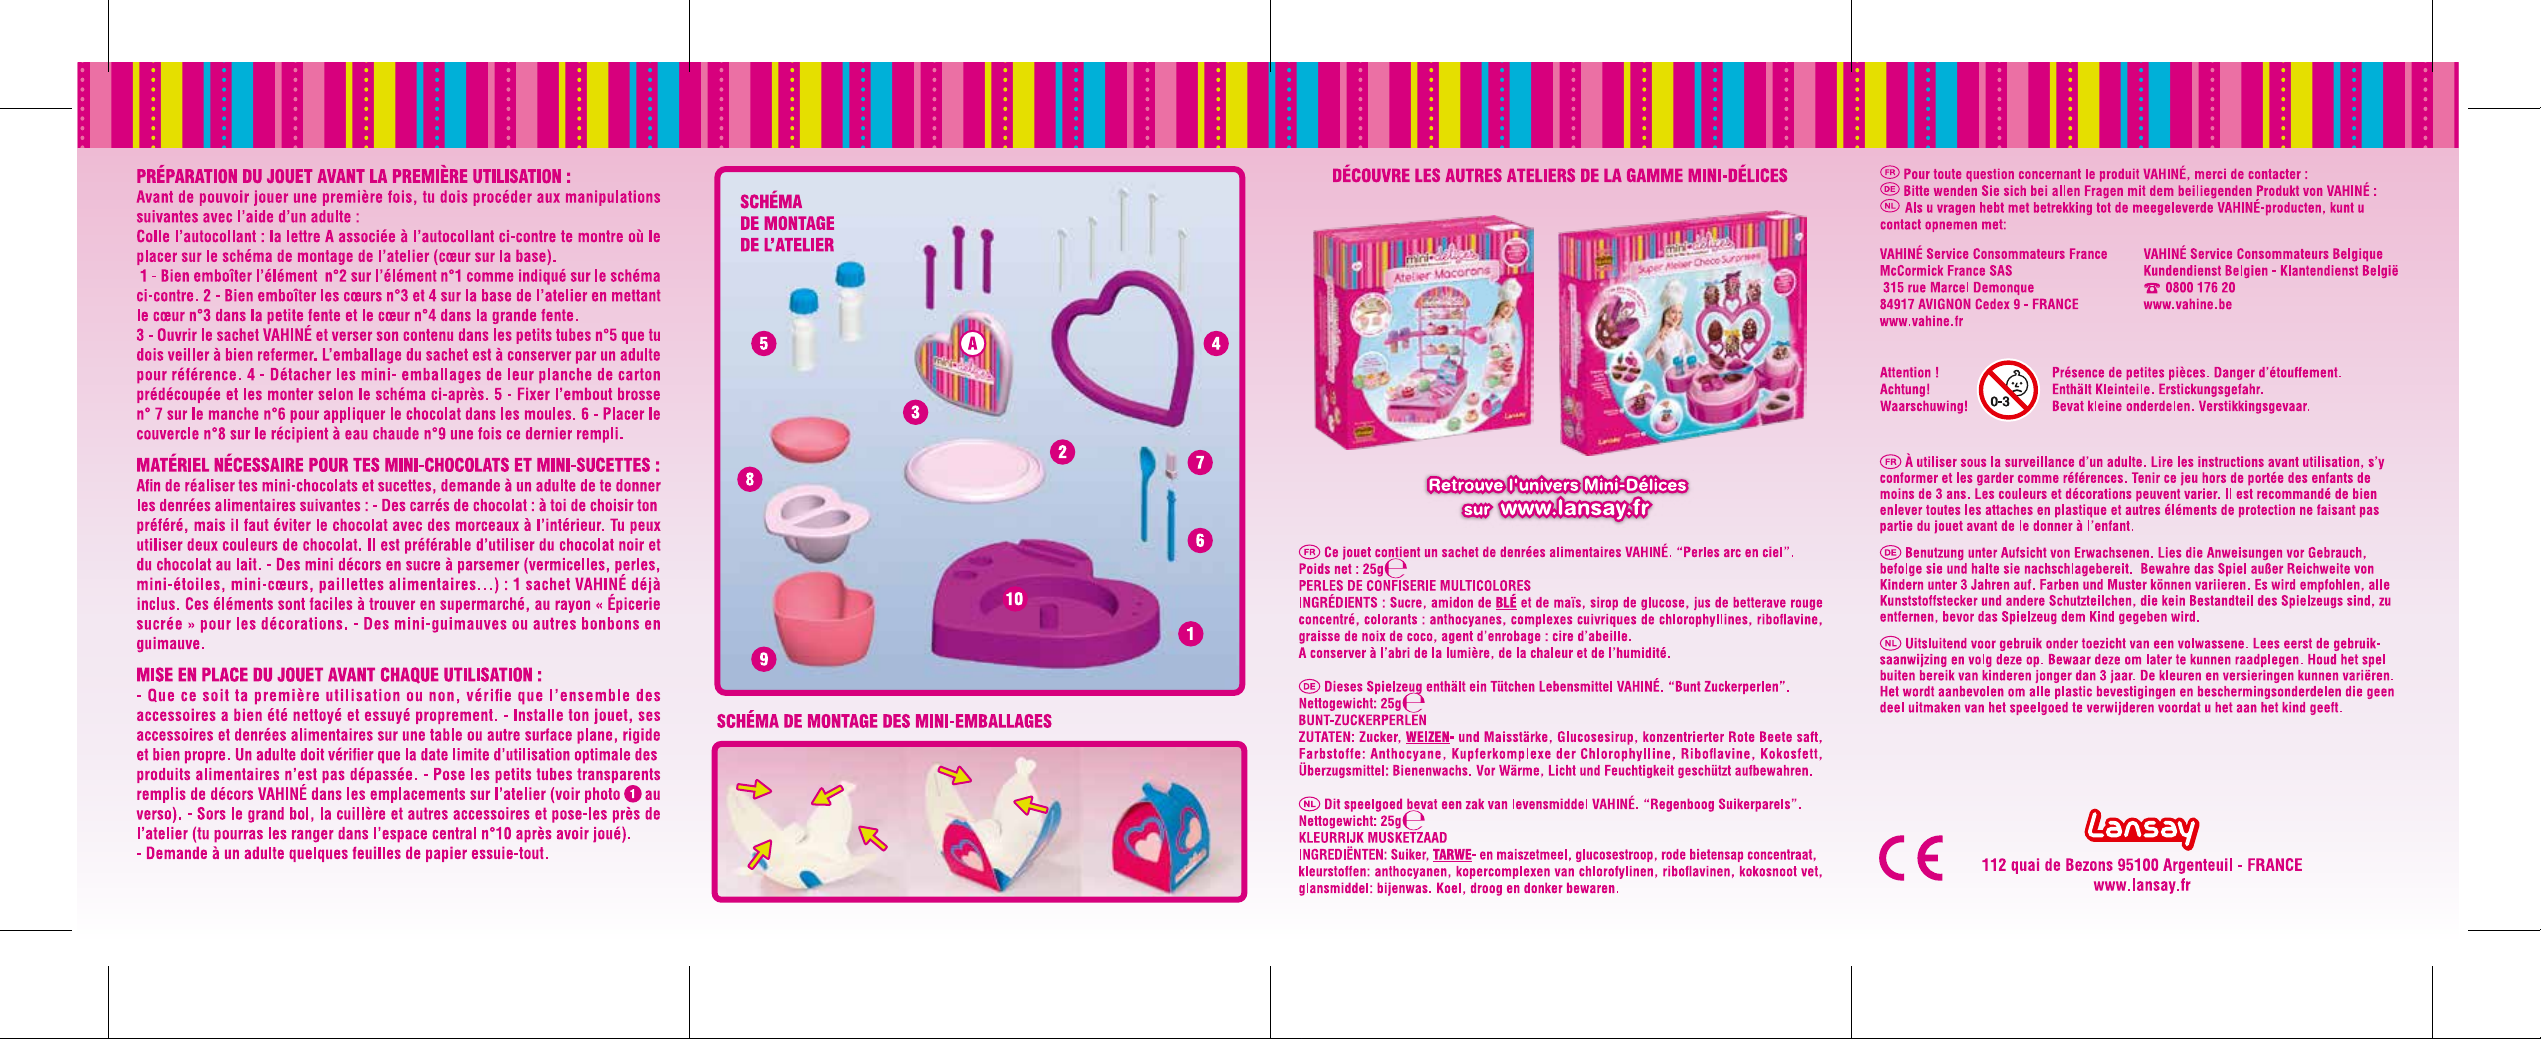
Before presenting them, you may display your creation on your workshop or in the holes of heart-shaped displays number 3 and 4 (see diagram on the colored version
manual).
The sweet decorations shown here are not included and the creations have not been made only using the kit contents.
Now it's your turn! Make your own mini-treats!
1) CREATING SIMPLE MINI CHOCOLATES WITH MARSHMALLOWS:
When the chocolate has melted, place clear mold tray number. 1, on the base of the workshop (see on the picture on the left). When
the chocolate is all melted, take the silicone brush and baste the bottom of the mold with 1 or 2 mm of chocolate. Then set the mold
tray on a flat and uncluttered space in the refrigerator for around 15 minutes. Then take the tray out of the refrigerator and set a
mini marshmallow or piece of marshmallow in the center of the mold and fill it to the brim with melted chocolate. Using your finger,
spin the mold tray to easily make marshmallow-centred mini-chocolates. Then move on to the step described in paragraph 5 below.
2) CREATING SIMPLE MINI CHOCOLATES:
When the chocolate has melted, place clear mold tray number. 2 or 3, on the base of the workshop (see on the picture on the left).
Using the mini tongs, place the little sugar decorations at the bottom of the heart shape mold. This means that they will be at the
top of the chocolate when you turn it out of the mold. When the chocolate is all melted, start to pour it carefully into the mini molds
using the spoon. Finish filling the mold to the brim, using the spoon at all times. Also fill the other shapes of the mold to the brim.
Using your finger, spin the mold tray to easily make mini-chocolates. Then move on to the step described in paragraph 5 below.
3) CREATING MINI CHOCOLATE LOLLIPOPS:
When the chocolate has melted, place the mold tray number. 2, on the base of the workshop (see on the picture on the left). When
the chocolate is all melted, pour it carefully into each mold, using the spoon. Once the bottoms of the molds are filled, add the lollipop
sticks as shown on the picture on the left. Then finish by filling the molds to the brim as shown on the picture on the left.
4) CREATING MINI CHOCOLATE STICKS:
When the chocolate has melted, place the mold tray number. 3, on the base of the workshop (see on the picture on the left). When
the chocolate is all melted, pour it carefully into each mold, using the spoon. Once the bottoms of the molds are filled, add the sticks
as shown on the schema on the colored version manual. Then finish by filling the molds to the brim as shown on the picture on the
left.
5) FINALIZATION OF THE CREATIONS
Place the tray with your creations on a flat and uncluttered space in the refrigerator for around 40 minutes. Tip: when the chocolate
is cooling in the refrigerator, an adult can empty and clean the water container and spoons (this is easier when the chocolate is still
melted a little).
After 40 minutes, you can take your tray out of the refrigerator. Check that the chocolate has hardened completely. Carefully remove
your chocolates or lollipops from the molds: we recommend that you do this with an adult the first time, as it's easier.
WARNING! The chocolates you make must be eaten on the same day. After that, you can keep them to display them but you must not eat them. If you want
to keep them for a few days, make sure you keep them in a cool, dry place and do not leave them within reach of a small child who might eat them.
WARNING! The stick for the lollipops and flat stick can be reused but be careful not to chew on them, to keep them in good condition and to protect your
teeth. Clean the stick for the lollipops and the flat stick properly after each use and throw them away at the first sign of deterioration.
STORAGE AND CLEANING AFTER EACH USE (TO BE DONE WITH AN ADULT):
- Store any remaining decorations in the big bowl in their little tubes and close them tightly using the plug. - Once you have finished with your chocolates,
you must carefully clean the toy and its accessories with an adult. An adult can clean them with washing up liquid to remove any sugar and grease residue.
Warning! Do not put in the dishwasher. Clean all of the parts with a soft cloth before storing everything in a clean place.
Even more Mini-Licious products on
www.lansay.fr
Even more Mini-Licious products on
www.lansay.fr
EXPLORE THE OTHER WORKSHOPS
IN THE MINI-DELICE RANGE
112 quai de Bezons
95100 Argenteuil - FRANCE
www.lansay.fr
WARNING! Not suitable for children under 36 months. Contains small parts. Choking hazard.
For use under adult supervision. Read the instructions before use, follow them and keep them for reference. Keep this
game out of reach of children under 3 years old. Colours and contents may vary from those shown. Please remove all
plastic tags, ties, and any other protective elements which do not make up part of the toy, before giving it to the child.