Lanxiang Model Aircraft P-50 Warhawk User manual

A R/C model airplane is not a toy and is not suitable for flyer under 14
years old.Read the instructions carefully before any use.
If you are a beginner,it is necessary to let an experienced airplane pilot assist you.
lan xian g res erve s the r ight t o modify th e spec ifi cati on or
pri ntin g err ors wi tho ut pri or no tice .
-40P-40
Remote Control Model
-40P-40
W a r h a w k

If you have any questions in regarding to the safe operation, or possible
please call your local hobby shop for professional advice.
precautions
Radio-controlled models are very demanding and potentially dangerous
They call for a high level of technical knowledge and skill from the operator.
Please always keep this instruction manual ready at hand for quick reference,
even after completing the assembly.
machines.
12
Note: SHENZHEN LANXIANG MODEL AIRCRAFT CO.,LTD
will not take any responsibility for damage or accident caused by
the improper use of this model.
Thank you for purchasing P- 40.
The P-40 is an electric propeller which is ideal for the
intermediate or advanced Flyer.
In order to fly the P-40, please make sure you read through the
carefully before attempting to operate the model for the first time.
instructions
7.Do not attempt to catch the
model while flying.
8.Not recommended for children under 14years old,
Children under years old should only operate this
model under the guidance of a responsible adult.
14
-14
9.Do not store this model in a high-temperature
or humidity area or in direct sunlight.
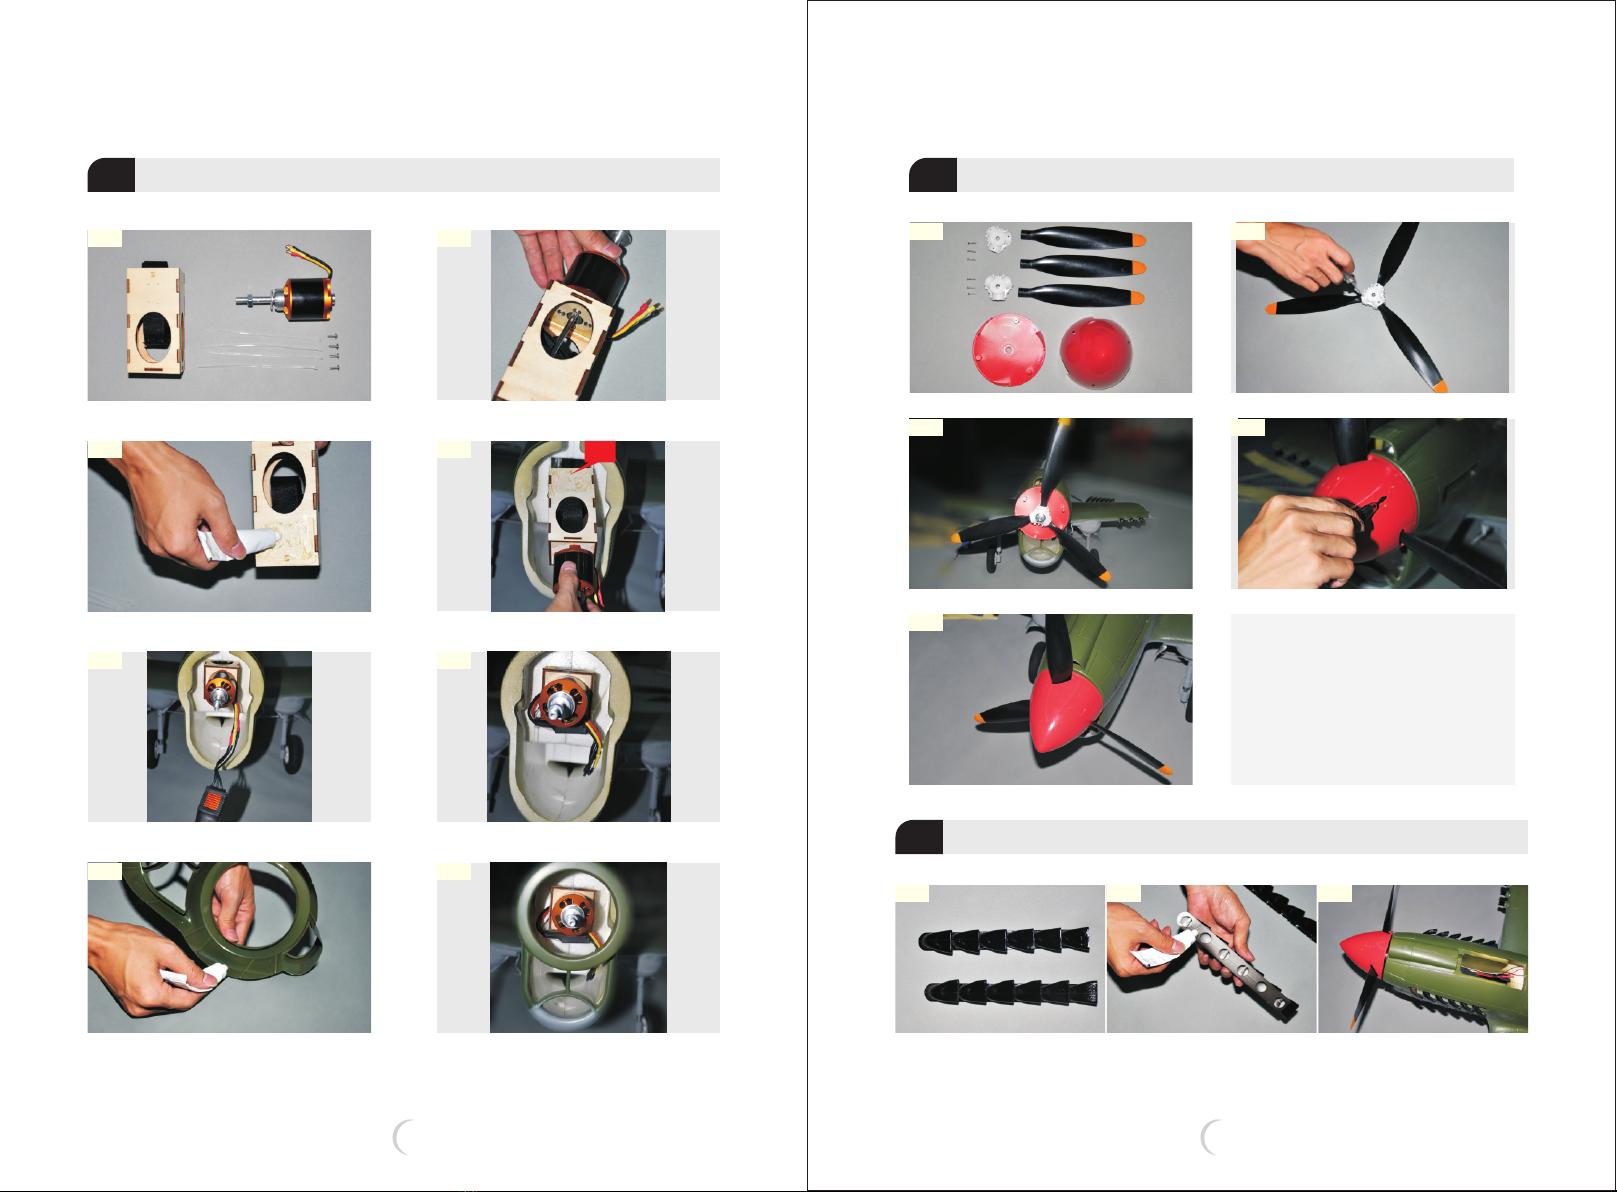
6. use genuine accessories as
replacment for damaged parts.
Only
Accessories
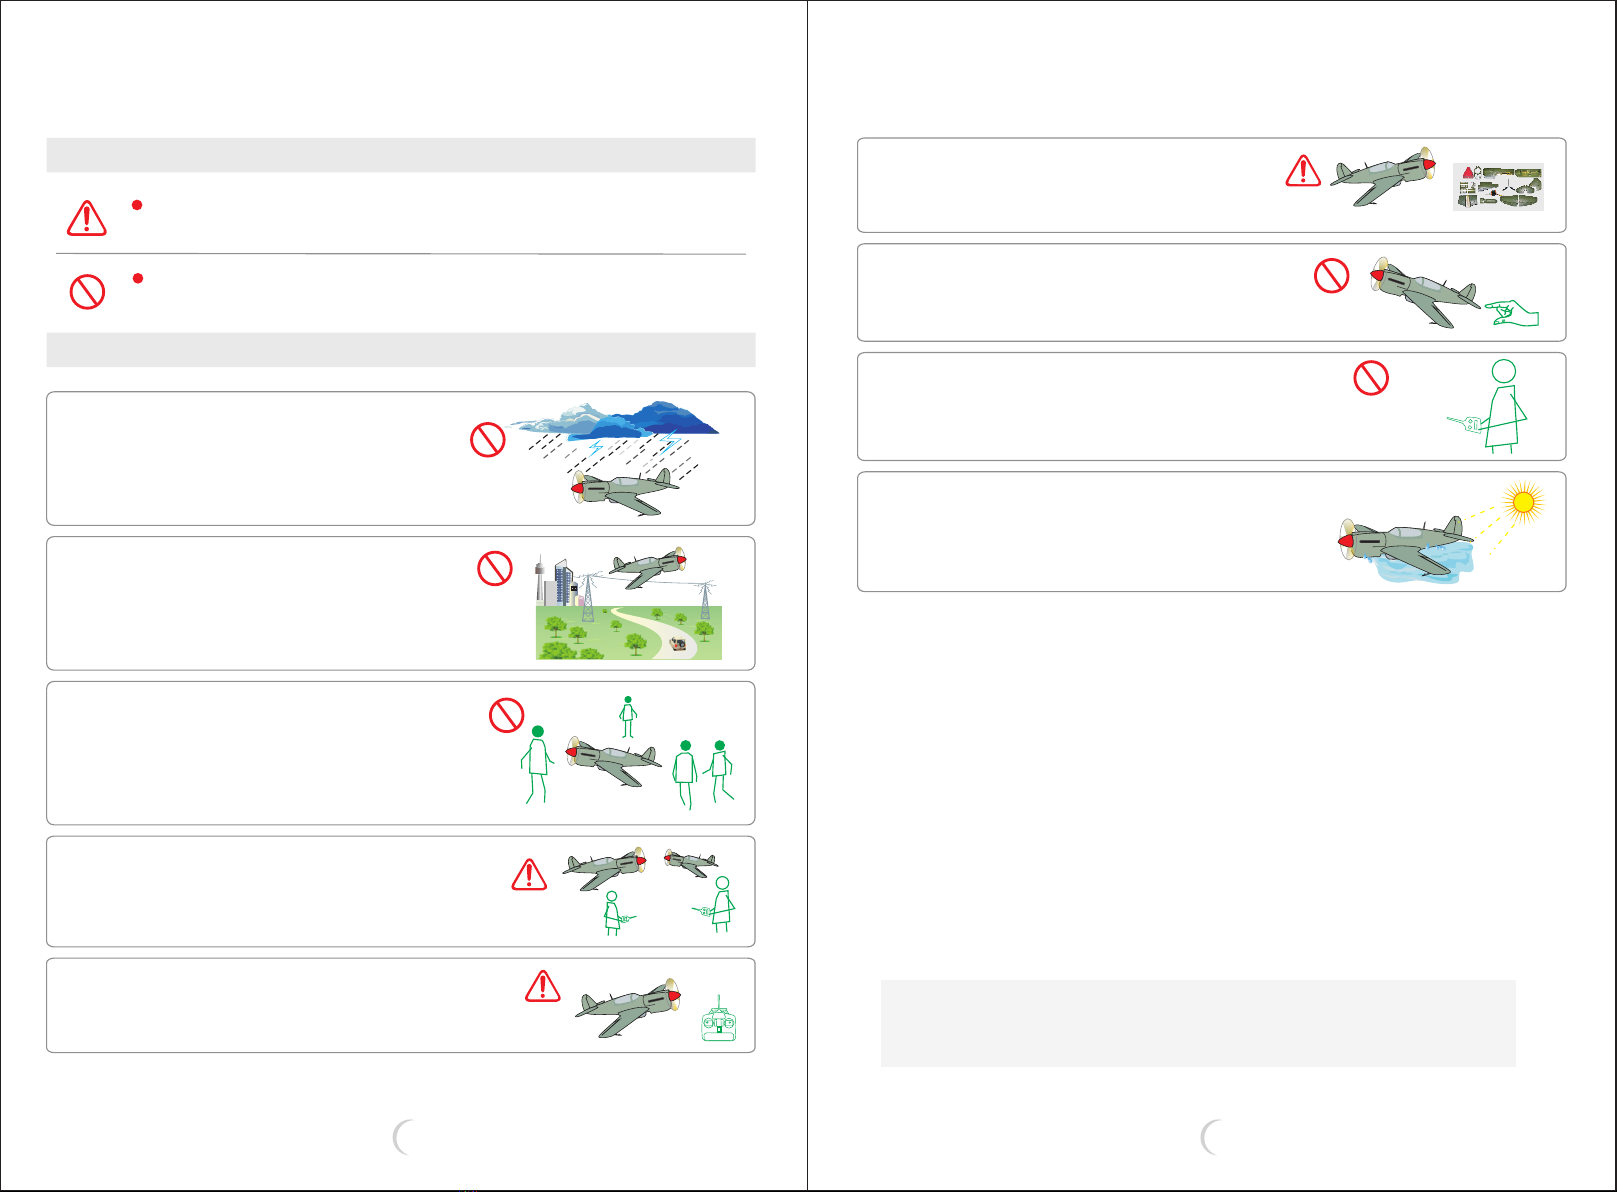
1.Do not fly in thunderstorm,
strong winds or bad weather.
4. Do not fly in where the same frequency
model plane is flying nearby.
5 . Make sure that the model as well as
the control system is in the good state
before the plane takes off.
3 .Never fly the Model where are crowds of
people. Give yourself plenty of room flying,
as the plane can travel at a high rate of speed .
Remember you are responsible for the safety
of others.
2 .Never fly the Model where are crowds of
power lines overhead ,automobiles or near
highways ,subways.
Meaning of the icons.
WARNING!:this symbol indicates where caution is essential to
avoid injury to yourself or others .
PROHIBITED: this symbol points out actions that you should NOT do
to avoid possible damage or accidents.
Safety instructions
LANXIANG MODEL AIRCRAFT CO.,LTD
P - 4 0
Inst r uct i on Ma n ual

4
3
P - 4 0
Inst r uct i on Ma n ual
LANXIANG MODEL AIRCRAFT CO.,LTD
67
89
1
2312
Description:
The kits include:
Radio:12CH RC
Brushless ESC:50A
Servos:7×9g
screw servo:3pcs
Brushless motor:Φ50×60mm 290KV
Battery : 22.2V 6S 25C 4000mAh
2000mm
General View schedule:(1 3).~
1
2Vertical fin parts Installation:(4~12)
Length:1711mm
Wingspan:2000mm
Wing area:67.25dm2
Propeller diameter:18in
Flying weight:4500g
Thrust:≥5600g
4
Need a 950mm long signal cable to connect the
LED tail lights and 2 red LED lights which flash
slowly.
5
Put some glue on the signal line and then put
it into the groove for anti-shedding.
10 11
Need two 1.7 × 30mm screws and two M2
screw nuts to fix the rudder angle.
Set it up with some glue on the rudder angle to
make it more firm.
Light wire installation omitted. Glue the edge of the transparent shade,
covered with LED lights.
Shade installation omitted. Connected to the 5V voltage test LED is light up.

6
5
15
16
14
19
21
20
P - 4 0
Inst r uct i on Ma n ual
LANXIANG MODEL AIRCRAFT CO.,LTD
3Horizontal tail parts Installation:(13~21)
13
Need four 1.7×22mm screws ,
two 40mm linkages.
Need servos with 400mm wire, one
forward direction ,one reverse direction.
Set the reverse direction one on the left
side.
Need 400mm Y wire to connect with
elevator servos.
24 25
26 27
28 29
Wings parts Installation:(22 32)~
4
22
Need two 1.7×27mm screws , two 1.7×25mm
screws, two 36mm linkages.
23
Need 2 servos with 200mm wire, connecting
with the long light LED and the 450mm power
line which is from the servos. Each servo
connects with 2 LED. Please notice that the
left wing is the red LED and the right wing is
the green LED.
17
18
Gluse the interface of servo and foam.

7
32
33 34
35
37
36
38
8
P - 4 0
Inst r uct i on Ma n ual
LANXIANG MODEL AIRCRAFT CO.,LTD
30 31
46
40
44
39
43
41
45
5Wing flaps parts Installaiton:(33 47)~
Need eight 2×6mm screws to fix the rudder
angle of wing flaps. Two 36mm linkages.
Need servos with 300mm wire, one forward
direction ,one reverse direction. Set the
reverse direction one on the left side.
42
Need 600mm extended line to connect
with the servos of aileron.
47
Need two Y wire to connect with the servos
of wing flap and aileron.

10
9
P - 4 0
Inst r uct i on Ma n ual
LANXIANG MODEL AIRCRAFT CO.,LTD
48 49
50 51
52 53
54 55
6Landing gear parts Intallation:(48 51)~
First put way the landing gear when push
around the signal line of landing gear server,
then buried the lines inside the groove.
7Landing gear cover parts Installation:(52~60)
Need four 200mm cotton thread, four 60mm
plastic tubes.
Fixture of cotton thread
(1)Pictures of plastic intallation:(56 57)~
(2)Fixture of cotton thread and cover:(58 59)~
56
58
60
57
59
Wing decorating parts Installation:(61 63)~
8
62 63
61

12
11
P - 4 0
Inst r uct i on Ma n ual
LANXIANG MODEL AIRCRAFT CO.,LTD
68
72
67
71
66
70
6564
69
73
9The back landing gear parts Installation:(64 75)~
77
79
81
76
78
80
74 75
10 The hack landing gear cover parts
Installation:(76~81)
Installation position of cotton thead
Fix the cover when back landing
gear is packed up.
Copper sleeve with pliers to clamp
control line stuck.

P - 4 0
Inst r uct i on Ma n ual
LANXIANG MODEL AIRCRAFT CO.,LTD
8382
11 Front and back fuselage connection:(82 83)~
12 The wing and fuselage connection:(84 86)~
Tail wing parts Installation:(87 97)~
13
85 86
Need four M3×54mm screws
to fix the wings .
84
87 88
90
89
92
94
96
91
93
95
97
Rudder connection:
(98~100)
14
99 10098
Copper sleeve with pliers to clamp
control line stuck
13 14

16
15
P - 4 0
Inst r uct i on Ma n ual
LANXIANG MODEL AIRCRAFT CO.,LTD
106
108
105
107
101
103
Dynamic parts Installation:(101 108)~
15
102
104
s
111 112
109 110
Dynamic parts Installation:(109 113)~
16
113
Notice: Fairing up after installation, power
when the power unit testing (to ensure
solidification of the glue under the conditions
tested), if the motor spin up and found a big
shock, pls immediately turn off the throttle,
the battery power, open the fairing,Another
point of rotation to install, minimal vibration
transferred so far.
Muffler parts Installation:(114 116)~
17
115 116
114

1817
P - 4 0
Inst r uct i on Ma n ual
LANXIANG MODEL AIRCRAFT CO.,LTD
117
119
Battery cover parts Installation:(117 125)~
18
118
Cut a crossing on the foam
120
Glue on the magnet, inserted into the foam.
121
125
122
123 124
126 127
Canopy parts Installation:(126 147)~
19
130 131
132 133
128 129
135
134

20
19
P - 4 0
Inst r uct i on Ma n ual
LANXIANG MODEL AIRCRAFT CO.,LTD
137136
140 141
142 143
138 139
145
144
147146
151 152
154
153
Bombs parts installation:(148 150)~
20
Outside parts of wing connection:(151 156)~
21
150149148

22
21
P - 4 0
Inst r uct i on Ma n ual
LANXIANG MODEL AIRCRAFT CO.,LTD
156155
157 158
159 160
Decorating parts Installation:(157 160)~
22
Beautify parts:(161 172)~
23
161 162
163 164
166
165
170
172
169
171
167 168

23 24
P - 4 O
Inst r uct i on Ma n ual
LANXIANG MODEL AIRCRAFT CO.,LTD
Connection of signal line and receiver:(173 181)~
24
173 174
176175
180179
181
177 178
Battery Installation:(182 184)~
25
183
182 184
Function test:(185 187)~
26
185
OFFOFF
OFFOFF
OFFOFF
186
187

25
P - 4 0
Inst r uct i on Ma n ual
LANXIANG MODEL AIRCRAFT CO.,LTD
1.Check carefully that every part of the plane is installed properly.
2 Always check that there are no other pilots using the same
frequency in the same area.
.
3.
battery, make sure that the battery is fully charged.
Please switch on the power of the transmitter before connecting the
4.Check that the plane responds properly to the control signals.
5.Extend the transmitter antenna all the way and test the range of the
radio signal.with the transmitter and model switched on, step back
around 20m and test the interference.if there is no interference,
the plane is ready to fly.
P-40 Pre-Flight Check
Phenomenon Typical error
Motor do not work
The battery is not full charged
thebattery of the transmitter is
in low power.
There is some broken circuit in
the plane
Can not fly in a line
Charge the battery replace the
battery in the transmitter.
Contact your local dealer.
The rudder is not in the center of the
fuselage the main wing is not installed
in the center.
The nose landing gear is twisterd.
Adjust the trim on the transmitter
reassemble the main wing.
Verify the nose landing gear.
Can not climb The battery is not fully charged.
Elevator is tillted downward.
Charge the battery.Adjust the
trim on the transmitter.
The battery of the transmitter is in
low power.
The antenna is not fully extended.
Replace the battery of transmitter.
Extend the antenna fully.
Short control distance
Problem Solving
Solutions
26
27 Main part:(188)
28 Servo distribution map
Retract Servo
Retract Servo
Retract Servo
Aileron servo
Aileron servo
Flap servo
Flap servo
Rudder
Servo
Lift servo
Table of contents
Other Lanxiang Model Aircraft Toy manuals
Popular Toy manuals by other brands

Eduard
Eduard Brassin F-16 late seat manual

marklin
marklin 37006 user manual

Flight Model
Flight Model F172 Silence Twister 50CC Assembly manual

Faller
Faller BLACK FOREST FARM WITH STRAW ROOF manual

Little Tikes
Little Tikes Stack n' Style Wood Dollhouse Assembly instructions

Mega Bloks
Mega Bloks SKYLANDERS SWAP FORCE manual

Eduard
Eduard Su-17UM3K interior Assembly instructions

PASCO
PASCO ME-6992B instruction manual

LEXIBOOK
LEXIBOOK SW100BB instruction manual

Aircraft in Miniature Limited
Aircraft in Miniature Limited Historic Wings Bristol Boxkite 1910 Assembly instructions

SNAP CIRCUITS
SNAP CIRCUITS FLYING SAUCER manual

FMS
FMS P-40B flying tiger operating instructions