LaScoota 99 User manual

2
AGES
lb
UP TO
HANDLE
ADJUSTS
3
REMOVABLE
SEAT
2
KICK SCOOTER
USER MANUAL
TM

Dear customer,
Thank you for choosing
the LaScoota Kick Scooter!
You have received a
quality product, backed
by our excellent customer
support. Before riding
your new scooter, please
review the attached
instructions carefully.
Store them in a safe place
so you can refer back to
them as needed.
Ride safely, and enjoy!
©2018 LaScoota
All Rights Reserved.
2 3

4 5
IMPORTANT
BEFORE USING THE SCOOTER, PLEASE READ ALL INSTRUCTIONS AND SAFETY
NOTICES. EXPLAIN ALL POTENTIAL RISKS TO YOUR CHILD, AND MAKE SURE TO
SUPERVISE WHILE HE OR SHE RIDES THE SCOOTER.
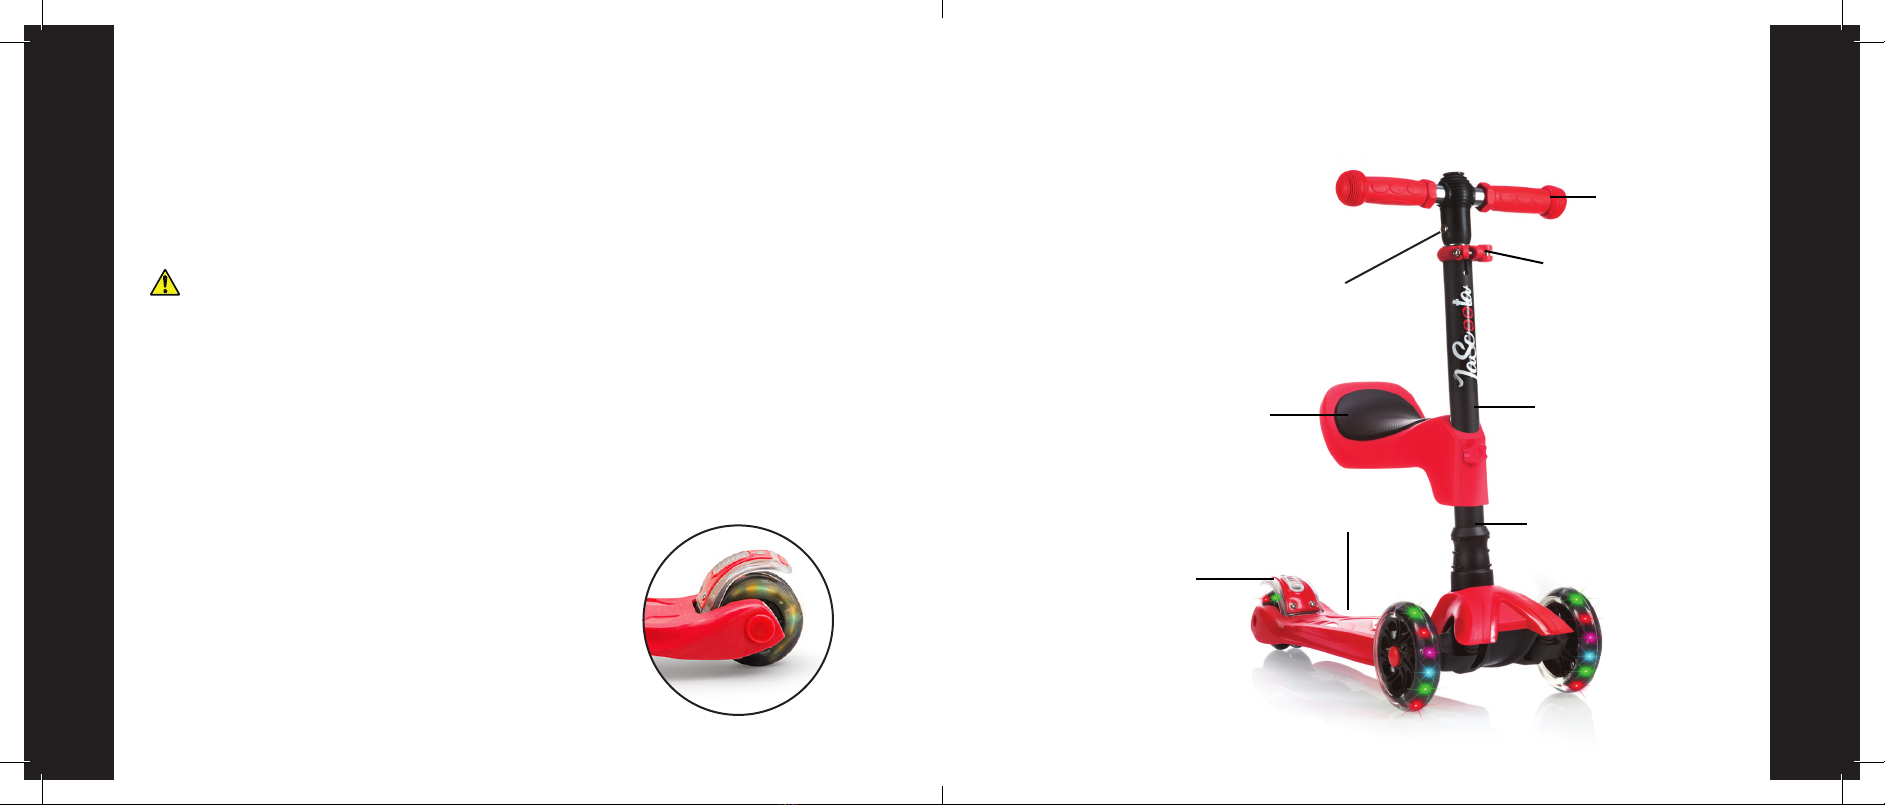
• Ensure that the steering rod is fully engaged and all screws are tight.
Check that the wheels are secure and show no sign of wear.
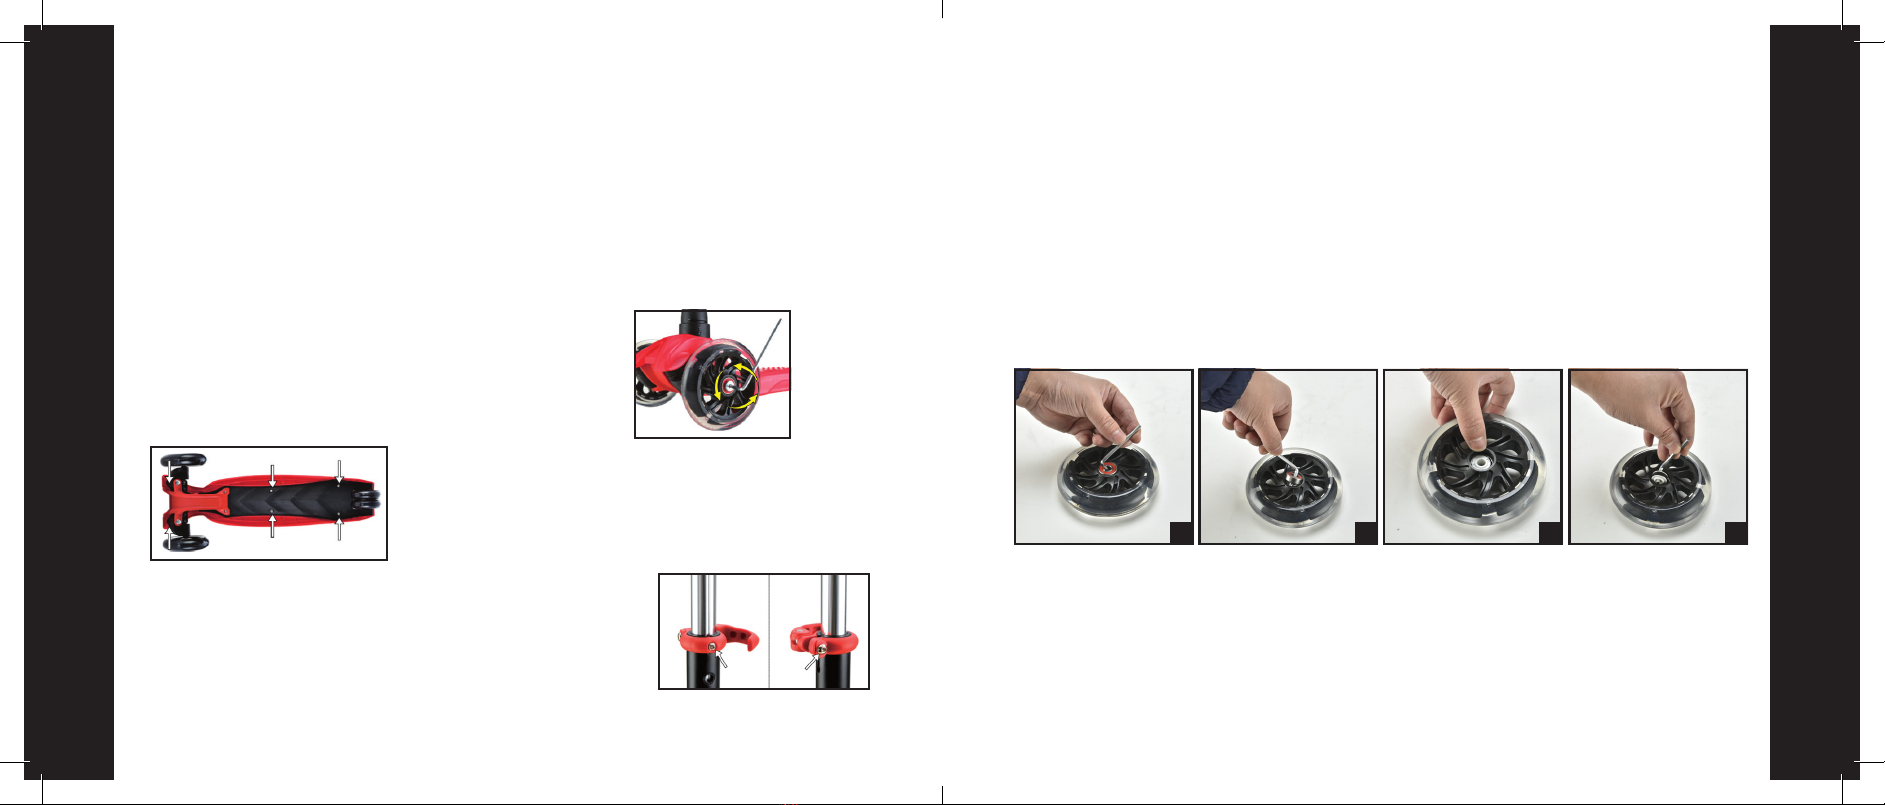
• Unscrewing the axle screws loosens them and may cause the screws
to detach on their own. Therefore, always check the axle screws and
tighten them, if necessary, before riding.
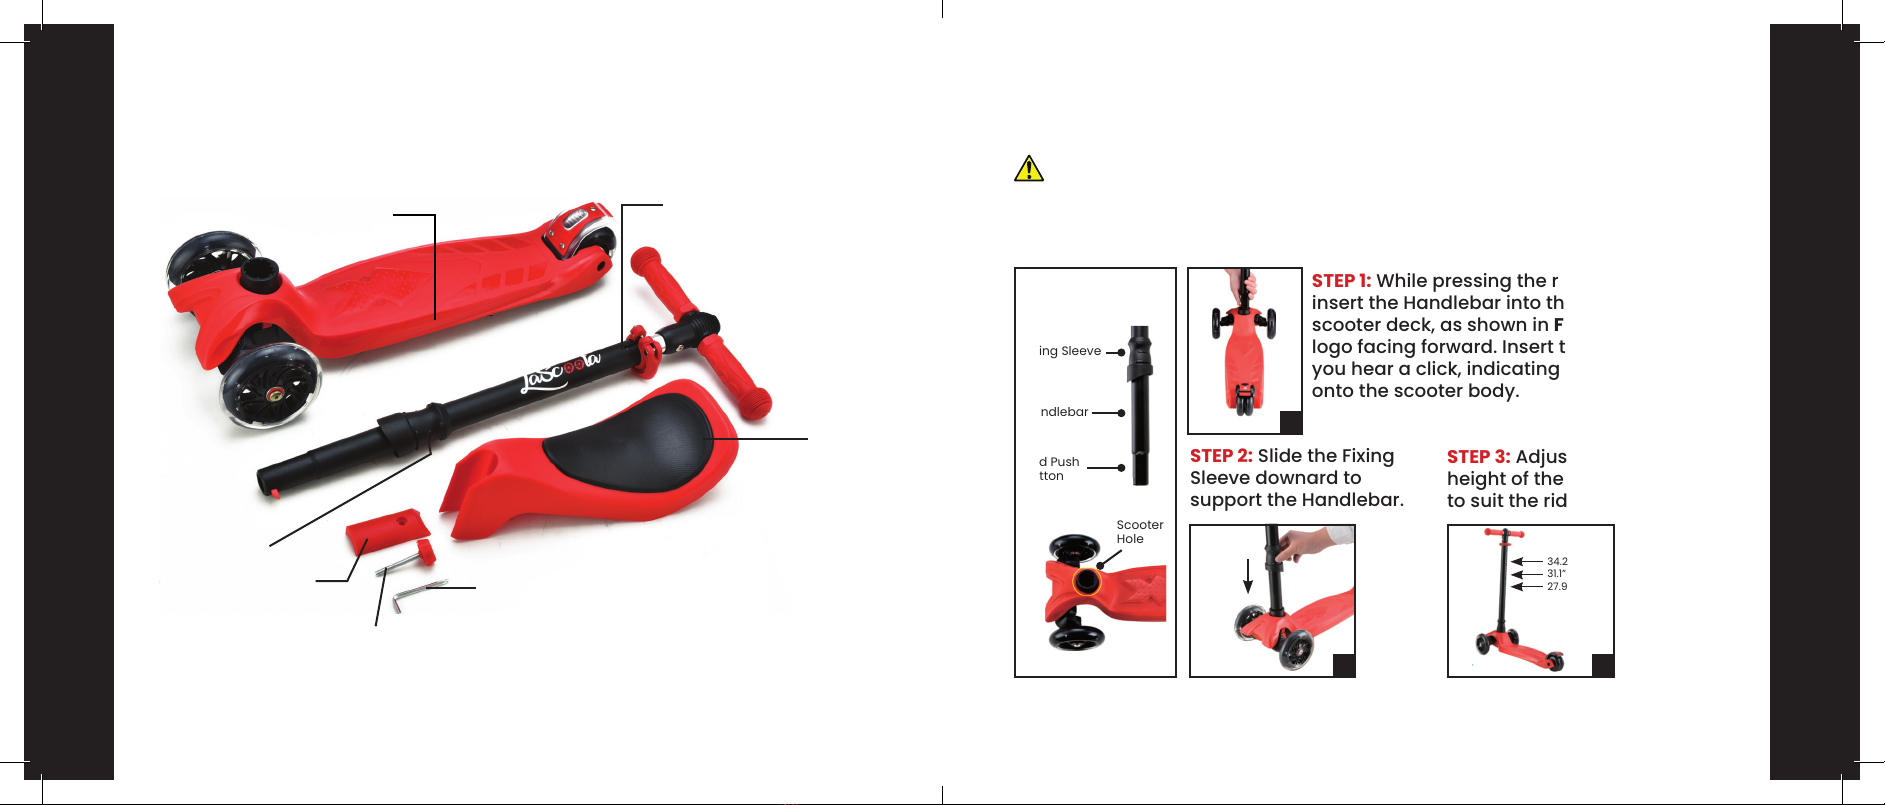
• Adult assembly required.
• Ride carefully; falls or collisions could injure the rider or others.
• Flat rubber-soled shoes, helmets and protective gear for knees, elbows,
wrists, and palms are recommended.
• Avoid prolonged brake use, as this can cause the brake to become hot;
avoid skin contact.
• Maximum permissible weight: 130lb. Only one child should ride at a
time.
• Product specifications are subject to change wihtout notice.
SAFETY INSTRUCTIONS
• Practice riding your scooter. We recommend practicing in an empty
parking lot or open asphalt play area. Ensure that the rider does not
attempt any experiments or risky maneuvers not suited to his or her age or
skill level.
• Ride only on level ground. The brake is not designed to deaccelerate from
fast downhill speeds.
• Hazardous conditions: Do not ride in traffic; in the dark; on wet, oily, sandy,
rough or uneven surfaces; or at speeds exceeding 3mph.
• Dangerous surfaces: Curbstones and cobblestones affect the rider’s
balance, so consider dismounting when passing over these or similarly
uneven surfaces. Be alert to grooves in the pavement, such as train tracks
or manhole covers, which can trap wheels and cause them to lock.
• Product parts safety: Modifying the scooter in any way puts your safety
at risk, and voids the product warranty. Metal parts can corrode with age,
especially when used near the sea or left outdoors.
• Pedestrian paths: Keep to the correct side of pedestrian paths. Look out for
pedestrians, wheelchair users, bikers, rollerbladers, and animals.
• Always observe traffic rules and regulations.
• Caution should be taken to avoid finger injuries when folding or unfolding
scooter.

6
SCOOTER FEATURES
Model Number: 99
Recommended Age: 3+ years
Maximum Weight: 130 lbs.
7
Handle Grip
Collar Clamp
Adjustable Seat Height
Adjustable T-Bar
Handlebar/Steering
Rod
Rear Brake
Non-Slip Deck Fixing Sleeve
RIDING INSTRUCTIONS
To ride, grasp the handles of the T-shaped steering bar. To get started,
stand with one leg on the board and push off with the other foot. Once you
are underway, place both feet spread apart on the scooter’s deck, at an
approximately 45° angle to the direction of travel.
WARNING! Do not attempt stunts, tricks, jumps, curb-grinding, or
backwards riding on your scooter, as it is not made to withstand such abuse.
Racing and stunts also increase the risk of losing control of the scooter.
Aggressive riding diminishes your maneuvaribility and control. Take all
necessary precautions and practice in a safe area.
UNDERSTANDING THE SCOOTER BRAKE
The scooter’s brake is a friction brake, designed for reduction of speed on
flat surfaces only. Brake at low speeds by gently pushing a foot against the
back wheelplate. Faster speeds will require more
pressure, but be careful: braking too hard can
cause you to slow or stop abruptly, which can
cause you to fall. Practice braking at walking speed.
NOTE: The brake and protection plate can become
hot.

PACKAGE CONTENTS
8
SCOOTER ASSEMBLY
Warning! Keep kids at a safe distance to avoid accidental injury during
assembly.
STEP 1: While pressing the red push button,
insert the Handlebar into the hold on the
scooter deck, as shown in Figure A, with the
logo facing forward. Insert the Handlebar until
you hear a click, indicating that it has locked
onto the scooter body.
STEP 2: Slide the Fixing
Sleeve downard to
support the Handlebar.
STEP 3: Adjust the
height of the Handlebar
to suit the rider.
9
Scooter Body
Fixing Sleeve
Fixing Sleeve
Handlebar
Red Push
Button
34.2” (max)
31.1” (mid)
27.9” (min)
Scooter
Hole
Screw
Allen Key
Seat
Front Cover of Seat
Handlebar/Steering
Rod
PARTS LIST
A
B C

SCOOTER DISASSEMBLY
Warning! Keep kids at a safe distance to avoid accidental injury during
assembly.
STEP 1: Pull the fixing sleeve up-
ward from the position shown
in Figure A until it reaches the
position shown in Figure B.
STEP 2: Locate the red push button on the left side of the scooter (Figure C). Press
the red push button with one hand, while pulling with the other hand to disengage
the handlebar from the hole in the scooter body (Figure B). This will require some
force, as the handlebar is held securely in place for maximum safety while riding.
10
SEAT ASSEMBLY
Warning! Keep kids at a safe distance to avoid accidental injury during
assembly.
STEP 1: Place seat at the desired height. (Figure A)
STEP 2: Align the screw and screw cover with the hole
in the scooter rod.
(Figure B)
STEP 3: Turn the screw clockwise. (Figure C)
STEP 4: Tighten the screw to ensure safety. (Figure D)
11
AA
B
CDE
C
D
B

SEAT DISASSEMBLY
Warning! Keep kids at a safe distance to avoid accidental injury during
disassembly.
STEP 1: Turn the screw
counterclockwise. (Figure A) STEP 2: Remove the screw and the screw
cover, and then the seat. (Figure B)
12
HEIGHT ADJUSTMENT
Warning! Always tighten the collar clamp after adjusting height.
STEP 1: Loosen the
lever of the collar
clamp.
STEP 2: Locate the
tiny ball, push in
and then proceed
to step 3 to push
up or down.
13
A B
A
B
C
STEP 3: Adjust
the height of the
handles. Then
tighten the collar
clamp to secure the
handles.
27.9” (min)
31.1” (mid)
34.2” (max)

MAINTENANCE
WHEEL MAINTENANCE
With time, the wheels can wear down or become damaged, particularly
when used on rough surfaces. The back wheel, where the brake applies
pressure, is especially affected. The wheels should be checked regularly for
signs of wear, and replaced if necessary.
14 15
REMOVE OR CHANGE COLLAR CLAMP
1. Loosen both screws as indicated in the diagram.
2. Pull the collar clamp upwards to remove it.
3. After replacing the collar clamp, tighten the screws
as shown.
REPLACING THE MAGNET ON THE LIGHT UP WHEELS MECHANISM
Please Note: The lights on this product work for a limited time. However, you
can replace the mechanism so you can enjoy your scooter to the max once
again! Please contact us and we will send you a complimentary replacment
magnet which can be used to replace the magnet in your wheels. This magnet
produces the lights in the wheels. Follow the simple and quick instructions
below to replace the magnet.
To install the replacement magnet, First, remove the center screw of the wheel
by turning it. The wheel will detach itself from the base.
LEFT WHEEL: To remove the left wheel, sue the
Allen key to run the screw COUNTER-CLOCKWISE.
RIGHT WHEEL: To remove the right wheel, sue the
Allen key to turn the screw CLOCKWISE.
DECK REPLACEMENT
Check deck for a tight fit after riding about 3
miles.
1. Loosen all 6 screws indicated in the diagram.
2. Replace deck and tighten all screws.
Step 1: With the Allen key provided in the
package of the scooter, remove the red
screw. As shown (Figure A and B), The
magnet will now be visible.
Step 2: Remove the magnet (Figure C),
Replace it with your new magnet, cover
it with the red screw and close it by
turning the center screw (Figure D).
B C DA

We want you to be 100%
satisfied.
If you notice any problem with your
scooter, if you need replacement
parts, or if you have any questions or
comments, please don’t hesitate to
contact us!
Contact us at [email protected]
Visit us at www.LaScoota.com
16
WARRANTY
This product is backed by a three-month warranty against any defects in
material or workmanship. During the warranty period, any defect determined
to be a result of materials or workmanship will be repaired or replaced by an
equivalent scooter. For repairs or replacements, please contact your local
seller or distributor.
WARRANTY EXCLUSIONS:
1. This warranty applies to initial customers only.
2. Improper attempts at repair or modifications to the scooter.
3. External damages, such as impact from curbs, rails, or obstales.
4. Improper useage, negligent handlingm or normal wear and tear.
NO PERSON, SELLER, OR DISTRIBUTOR SHALL BE ALLOWED TO MODIFY OR
SUPPLEMENT THE TERMS OF THIS WARRANTY.
YOUR SATISFACTION
GUARANTEED.
17
A FINAL SAFETY NOTE
Your scooter is a wholesome and fun piece of equipment, and is very safe when
used correctly. However, as with any sporting product, there remains a minimal
risk of injury, and we recommend protecting your hands, elbows knees and
head.
For the best grip, wear flat shoes with a rough sole. Always adjust speed ot the
rider’s skill level and the conditions. When in doubt, dismount and proceed with
caution.
Table of contents