LAUMAS JOLLY4 Instruction Manual

Installation user’s manual
version 3.3
JOLLY4
4 different operating modes selectable
2014/30/EU (EMC) - 2014/35/EU (LVD)
DATA TO BE FILLED OUT BY
THE INSTALLER (Page 1)
ENGLISH ENGLISH ENGLISH ENGLISH

SYMBOLS
Here are the symbols used in the manual to draw the reader's attention:
Caution! Risk of electric shock.
Caution! This operation must be performed by skilled personnel.
Pay particular attention to the following instructions.
Further information.
WARRANTY
24 months from the date of the delivery note. Warranty covers only failures of defective components (due to construction
defects or defects in materials) and includes replacement or repair of the components and related labor costs.
Warranty is automatically forfeited in the event of:
- tampering, deletion, removal of the identification label and/or serial number of the product
- misuse, transformation, alteration, repair of products not carried out by Laumas personnel
Laumas provides a 1-year warranty from the date of the delivery note on defects in material or manufacture of the battery.
GUIDELINES FOR PROPER DISPOSAL
This symbol on the product or packaging indicates that:
-This is electrical/electronic equipment and cannot be disposed of as municipal solid waste, but must be delivered
to a recycling center
-Improper use or disposal can pollute the environment or damage human health
-Non-compliance with these guidelines will be penalized in accordance with the regulations in force in the country
of destination
-It is recommended to dispose of the packing and packaging as required by local regulations

TABLE OF CONTENTS
OPERATING MODE........................................................................................................................................1
TECHNICAL FEATURES................................................................................................................................2
ELECTRICAL CONNECTIONS......................................................................................................................3
TEST : LOAD CELL SIGNAL (MV) - INPUTS/OUTPUTS.......................................................................... 4
INSTRUMENT START-UP..............................................................................................................................5
THEORETICAL INSTRUMENT CALIBRATION.............................................................................................5
TARE ZERO-SETTING...................................................................................................................................5
INSTRUMENT CALIBRATION CHECK AND CORRECTING DISPLAYED WEIGHT..................................6
WEIGHT INDICATOR WITH FOUR ALARM THRESHOLDS........................................................................ 7
LOADING: BATCHING OF 2 PRODUCT ......................................................................................................8
LOADING: BATCHING OF 3 PRODUCT.......................................................................................................9
LOADING: BATCHING OF 4 PRODUCT.....................................................................................................11

- 1 -
THE INSTRUMENT IS SUPPLYED WITH CALIBRATION: 10000 KG, SENSITIVITY
2mV/V; RESOLUTION =1 . OPERATING MODE SELECTION BY THE INSTALLER.
SELECTING THE OPERATING MODE
Switch off the instrument, then turn on by keeping pressed and (at the same time), the
“JOL.4=0” message appears ; you can select the following operating mode by using the arrows :
1 = 4SEt Weight indicator with four alarm thresholds
2 = 2CAr Loading: batching of 2 products (Slow + Cycle end)
3 = 3CAr Loading: batching of 3 products (Cycle end)
4 = 4CAr Loading: batching of 4 products
Then press ENTER to restore the instruments, the selected operating mode appears followed by the
version’s number .
If you press ENTER while “JOL.4=0” is displayed, the “JOL.4 ” message will appear again
and the instrument will be DEACTIVATED.
In case of automatic reset, when the instrument switches on, the “JOL.4” message appears
ad no command is accepted; select the operating mode again.
______________________________________________________________________________
TO BE FILLED OUT BY THE INSTALLER (ALSO THE INSTRUMENT’S LABEL):
4SEt 2CAr 3CAr 4CAr
CELL: ____________________ nU-U: ____________ rISO: ____________ dECP: ______
______________________________________________________________________________

- 2 -
TECHNICAL FEATURES
The instrument is able to read up to 19.999 divisions, when the 9.999 value is reached
the visualized weight will restart again from 0 and will start blinking in order to inform
that the above mentioned value has been passed.
POWER 230 Vac +/- 10% ; 50/60 Hz ; 5 VA consumption
LOAD CELLS SUPPLY 5 Vdc / 60 mA
LOAD CELL CONNECTIONS max 4 load cells (350 ohm) or max 8 load cells (700 ohm)
INTERNAL DIVISIONS 20000
DISPLAY RANGE - 999 ; +19999
MEASURING RANGE - 4 mV + 16.5 mV
READING RESOLUTION x 1, x 2, x 5
CONVERSION RATE 10 readings/sec
LOAD CELLS SIGNAL READING (mV) see Test page 2 – connection checks
LOGIC OUTPUTS 4 RELAYS free contacts max 115Vca 2A
LOGIC INPUTS 2
UNIT OF MEASURE kg or t
FRONT PANEL PROTECTION IP64
DISPLAY semi-alphanumeric display 4 digits, 20 mm in seven segments
DECIMAL POINT (selectable) xxxx ; xxx.x ; xx.xx ; x.xxx
HUMIDITY (condensate free) max 90%
STORAGE TEMPERATURE -20° + 70° C
OPERATING TEMPERATURE -10° + 50° C

- 3 -
ELECTRICAL CONNECTIONS
WARNING: The procedures here below described have to be carried out by
specialized personnel only. Be sure to switch off the instrument before carrying out
any connections at all.
Connect the load cells by means of a terminal board in a water-proof junction box connecting the
leads having the same colour; perform the same operation for the shields. By means of a shielded
4-wire cable with a section not lower than 0,5 mmq connect the terminal board to the JOLLY
instrument. The cable routing shall be far away from the power cables and possibly protected by a
metal pipe.
1112 13141516 1718
N3 4 5 6 7 8 910
L
EXCITAT. +
EXCITAT. -
SIGNAL +
SIGNAL -
230
Vac
SET4 / CYCLE END
START
STOP
LOAD CELL
NET/GROSS
ZERO-SETTING
For 4SET version:
SET3 / SLOW
SET1
SET2
Connect the
shielded cable
to the ground

- 4 -
“ CELL ” (LOAD CELLS ALARM) : It appears when one or two signal wires are
disconnected, or the signal of the load cells is higher than 20mV.
TEST : LOAD CELL SIGNAL (mV) - INPUTS/OUTPUTS
Switch the instrument on by keeping pressed the key, the LOAD CELLS VALUE ( expressed
in mV) will appear .
Press , the “1 ” message appears, press ENTER to close / open the relay 1, by
ensuring the changeover from “” to “ _ _ _ ” when the relative input changes from open
to closed.
Press , the “2 ” message appears, press ENTER to close / open the relay 2, by
ensuring the changeover from “” to “ _ _ _ ” when the relative input changes from open
to closed.
Press , the “3 ” message appears, press ENTER to close / open the relay 3.
Press , the “ _ _ _ 4 ” message appears, press ENTER to close / open the relay 4.
Press to exit until the weight is displayed.

- 5 -
INSTRUMENT START-UP:
Switch on the instrument and wait for about 5 minutes until all the components will reach a steady
temperature. Verify that the displayed weight is positive and that it increases if one subjects the
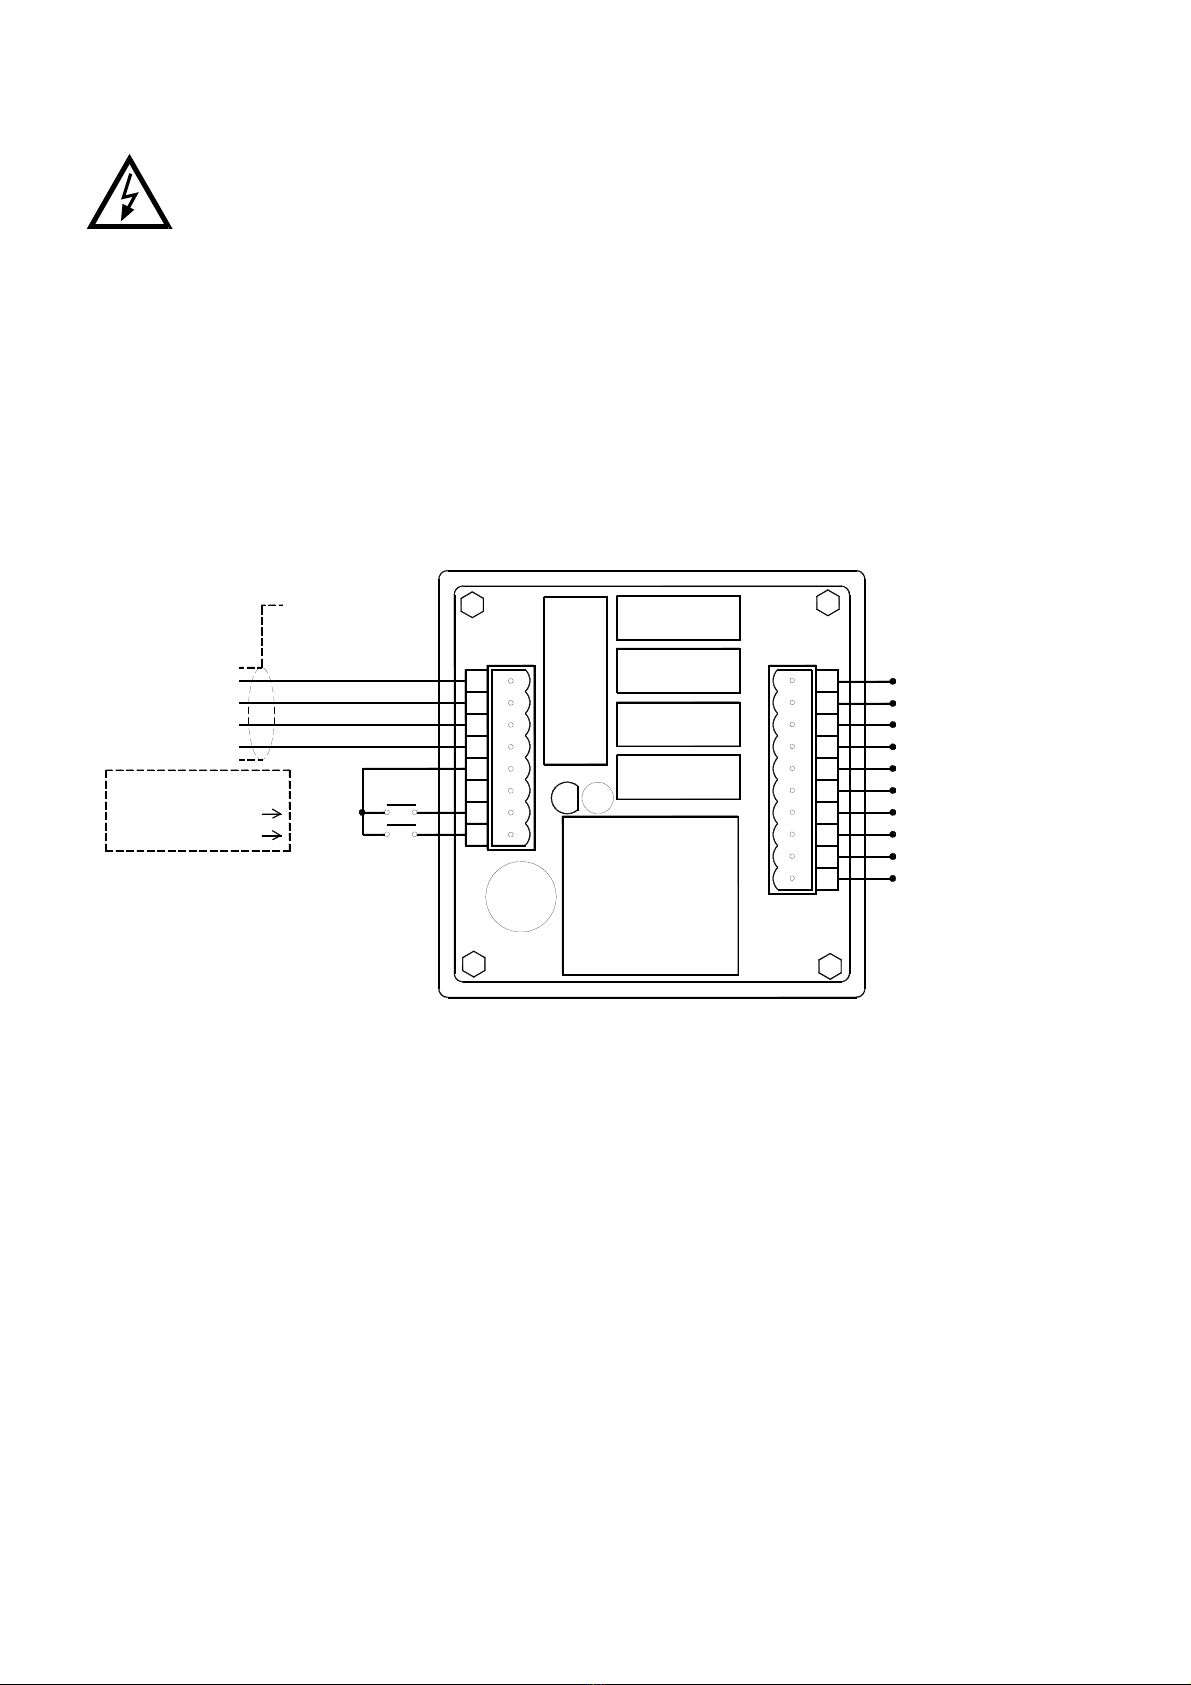
container to a force weight. In case a negative value is displayed check the load cells connections
and their correct installation ( direction of charge ). Check also that the container is correctly
installed ( tubes position, links, etc.).
If the “JOL.4” message appears, select the desired operating mode, see page 1.
THEORETICAL INSTRUMENT CALIBRATION:
Switch off the instrument, then turn on by keeping pressed the MENU key, the “C.0.S.c.”, message
appears, press ENTER and the following will appear:
“dECP” , set the number of decimals (max. 3 decimals) using the and keys. Confirm
with ENTER , the following will appear:
“CELL” , set 10% of the system’s full scale by using the and keys (for example with 3
load cells of 100 kg ; full scale = 100 x 3 = 300.0 kg ; 10% of 300.0 kg = 30.0 kg).
Confirm with ENTER , the following will appear:
“nU-U” , set the load cell sensitivity expressed in mV/V (normally 2,000) using the and
keys. Confirm with ENTER , the following will appear:
“rISO” , set the system resolution by using the and keys: x 1, 2, 3, 4, 5 . Confirm with
ENTER , the following will appear:
“unit”, set the unit of measure using the and keys: 0 = kg; 1 = t.
Confirm with ENTER , the following will appear:
“tArE” , set the tare value, if you knows it, by using the and keys. Confirm with ENTER
and “C.0.S.c.” message appears again.
Press MENU to exit.
TARE ZERO-SETTING:
Make sure that the container is empty and press the key, the "tArE " message will be displayed,
keeping pressed press the ENTER key at the same time and the tare will be set to zero.
By pressing , after 1 second, the tare value appears.
It is also possible to set the tare to the zero by using the ZERO-SETTING EXTERNAL
CONTACT (ONLY FOR “4SEt” OPERATING ); in this case the LED of DOSA key will start
blinking.
WARNING: TURNING OFF THE INSTRUMENT, THE DIVISIONS SET TO ZERO BY
EXTERNAL CONTACT WILL BE LOST.

- 6 -
INSTRUMENT CALIBRATION CHECK:
Make sure that the container is empty and that the instrument displays zero. Place a significant
quantity of product in the container (at least 50% of the maximum quantity of product that is to be
weighed but in any case less than 9,999) and make sure that the instrument displays the correct value.
- If there is a significant difference between the displayed value and effective amount ( greater
than 1-2% ) check that this is not caused by a mechanical fault and check the electrical connections
of the cell and the cell loading position.
- If the difference is not significant but around 1-2 %, then proceed to CORRECTING
DISPLAYED WEIGHT FROM KEYBOARD.
CORRECTING DISPLAYED WEIGHT FROM KEYBOARD:
When the weight is displayed, press . The display will show “CAL I”.Hold down the key
and press ENTER. The display will show the weight value blinking. Use the and keys to
correct it and set the value of the real quantity loaded in the container. Press ENTER to confirm. The
display will show “CAL I “ for an instant, then the correct value will appear.
If the display shows " CAL l ", this means that incorrect values have been set for the
parameters “CELL” and “nU-U”. Repeat the calibration (see THEORETICAL
CALIBRATION) restoring the laboratory setting.

- 7 -
“ 4SEt ” PROGRAM
Weight indicator with four alarm thresholds
The instrument will be set to zero by pressing the DOSA key or closing the external button NET/GROSS
(the Led of DOSA key will light up) this function allows to the operator to load additional quantities of
product.
To display the gross weight press again the DOSA key or closing the external button NET/GROSS for
more 3 seconds (the related Led will light off).
The condition of relays changes because of gross weight.
For weight lower than the programmed SET values, relays are activated (normally closed contacts). For
weight equal or greater than the programmed SET values, relevant relays are deactivated.
The relay changeover is performed for decreasing weight according to the hysteresis values (“VOL.1” e
“VOL.2”, “VOL.3”, “VOL.4”) .
If “SEt. 1 = 100” and “VOL. 1 = 10”, an increasing weight will set the relay to 100, a decreasing
weight will set the relay to 90.
“ 4SEt ” PROGRAMMING
Press the MENU key (the related Led will blink), the following will appear:
“SEt.1”, program the weight for SET 1(max 9999) by using the and keys, then confirm with
ENTER, the following will appear:
“SEt.2”, program the weight for SET 2 by using the and keys, then confirm with ENTER, the
following will appear:
“SEt.3”, program the weight for SET 3 by using the and keys, then confirm with ENTER, the
following will appear:
“SEt.4”, program the weight for SET 4 by using the and keys, then confirm with ENTER, the
following will appear:
“VOL.1”, program the istheresys for SET 1 by using the and keys, the condition of the relay
will change for decreasing weight when the weight will be equal to the programmed SET 1 value (“SEt.
1”) minus the one programmed in this constant.
“VOL.2”, program the istheresys for SET 2 by using the arrows keys, then confirm with ENTER, the
following will appear:
“VOL.3”, program the istheresys for SET 3 by using the arrows keys, then confirm with ENTER, the
following will appear:
“VOL.4”, program the istheresys for SET 4 by using the arrows keys, then confirm with ENTER, the
following will appear:
“FiLt” , program the filter to reduce the weight oscillations, set a value included between 0,1 and 9,9
seconds by using the and the keys.
Confirm with ENTER to exit. By pressing MENU you can exit in any moment.

- 8 -
“ 2CAr ” PROGRAM
Loading: batching of 2 products
By closing the START contact or the DOSA key, the instrument checks that the sum of the weight
present in the container and the value programmed in the “set1” and “set 2” parameters is not higher
than the maximum weight (if it is higher than the max weight the “P¯ ¯ ¯” message appears for 3
seconds and the batching can not start). Then the instrument checks that the weight present in the
container (negative or positive) is lower than the minimum weight, in this case “P_ _ _” appears for 3
seconds and the batching can not start. Once all the conditions are met, the instrument executes the
autotare ( if enabled), “zero” appears and the Led of DOSA key will light up.
The SET1 relay will be activated. When the SET1 value less the “slow” value is reached, the
instrument will close the SLOW contact (led 3). The SET1 relays will be closed. When the SET1
value less the “VOL1” value is reached, the instrument will open the “slow” contact and the SET1
contact. After “PAUS” time has elapsed, the instrument executes the autotare and closes the SET2
contact (led 2), when the SET2 value less the “slow” value is reached, the instrument will close the
SLOW contact (led 3), when the SET2 value less the “VOL2” value is reached, the “slow” contact
and the SET2 contact.
After “PAUS” time has elapsed, the instrument closes the cycle end contact (led 4), the gross weight
will appears.
When the unloading phase starts, when the minimum weight is reached and the safe time emptying
time has elapsed (t.Sic - max 9,9 secondi ) the cycle end contact will be opened and the related Led
and the Led of DOSA key will switch off.
Press STOP to interrupt the batching in any moment; otherwise by pressing DOSA (the “Alt ”
message appears) the batching will be temporarily interrupted; press the ENTER key to start again
the batching, by pressing the DOSA key again you can stop the batching definitely.
In case of a power failure, the batching will not complete automatically on power
restoral – the operator will have to complete it or unload manually.
“ 2CAr ” PROGRAMMING
Press the MENU key (only if the Led of DOSA key is switch off), the relevant Led begins to blink, the
following will appear:
“SEt.1”, program the weight for SET 1(max 9999) by using the arrows keys, then confirm with
ENTER, the following will appear:
“SEt.2”, program the weight for SET 2 by using the arrows keys, then confirm with ENTER, the
following will appear:
“LEnt”, (for Set.1 and Set.2) program the slow value by using the arrows keys, then confirm with
ENTER, the following will appear:
“VOLO”, set the “fall” value (product in "fall" at the stop of the extractor ). 0=manual fall or 1=automatic
fall (The instrument will calculate on itself the fall value) by using the arrows keys, then confirm with
ENTER, the following will appear:

- 9 -
“VOL.1”, program the “fall” value by using the arrows (if the automatic fall has been selected, the fall
value calculated by the instrument appears). If the power break down this value will be lost. Confirm with
ENTER, the following will appear:
“VOL.2”, value of “fall” 2 . Confirm with ENTER, the following will appear:
“AtAr”, program 0= autotare disabled or 1 = autotare enabled , by using the arrows, then confirm
with ENTER, the following will appear:
“P _ _ _” , program the min. weight (max 9999) by using the arrows;normally 20 is programmed, then
confirm with ENTER, the following will appear:
“P”, program the maximum weight (max 9999) by using the arrows, then confirm with ENTER,
the following will appear:
“PAUS”, (max 9,9 sec.) Set the time between a product stop and the next start or the end-of-cycle
completion with return to the gross weight; this step is shown by flashing leds. Set the value using
the arrows, then confirm with ENTER. the following will appear:
“tSIC", The instrument waits for this time during the unloading phase, after reaching the minimum
weight and before opening the cycle-end contact, to obtain a perfect emptying of the scale. Set a
value expressed in seconds (max 9,9 sec.) by using the arrows, then confirm with ENTER, the
following will appear:
“FiLt” , filter to reduce the weight oscillations, program a value included between 0,1 and max 9,9
seconds.
Confirm with ENTER to exit.
By pressing MENU you can exit in any moment.
“ 3CAr ” PROGRAM
Loading: batching of 3 products (Cycle end)
By closing the START contact or the DOSA key, the instrument checks that the sum of the weight
present in the container and the value programmed in the “set1”, “set 2” and “set3” parameters is not
higher than the maximum weight (if it is higher than the max weight the “P¯ ¯ ¯” message appears
for 3 seconds and the batching can not start). Then the instrument checks that the weight present in
the container (negative or positive) is lower than the minimum weight, in this case “P_ _ _” appears
for 3 seconds and the batching can not start. Once all the conditions are met, the instrument
executes the autotare ( if enabled), “zero” appears and the Led of DOSA key will light up.
The SET1 relay will be activated. When the SET1 value less the “vol1” value is reached, the
instrument will open the SET1 contact (led 1). After “PAUS” time has elapsed, the instrument
executes the autotare and closes the SET2 contact (led 2), when the SET2 value less the “vol2”
value is reached, the the SET2 contact will be opened, after “PAUS” time has elapsed, the
instrument executes the autotare and closes the SET3 contact (led 3), when the SET32 value less
the “vol3” value is reached, the SET3 contact will be opened, then the instrument closes the cycle
end contact (led4), the gross weight will appears.

- 10 -
When the unloading phase starts, when the minimum weight is reached and the safe time emptying
time has elapsed (t.Sic - max 9,9 secondi ) the cycle end contact will be opened and the related Led
and the Led of DOSA key will switch off.
Press STOP to interrupt the batching in any moment; otherwise by pressing DOSA (the “Alt ”
message appears) the batching will be temporarily interrupted; press the ENTER key to start again
the batching, by pressing the DOSA key again you can stop the batching definitely.
In case of a power failure, the batching will not complete automatically on power
restoral – the operator will have to complete it or unload manually.
“ 3CAr ” PROGRAM
Press the MENU key (only if the Led of DOSA key is switch off), the relevant Led begins to blink, the
following will appear:
“SEt.1”, program the weight for SET 1(max 9999) by using the arrows keys, then confirm with
ENTER, the following will appear:
“SEt.2”, program the weight for SET 2 by using the arrows keys, then confirm with ENTER, the
following will appear:
“SEt.3”, program the weight for SET 3 by using the arrows keys, then confirm with ENTER, the
following will appear:
“VOLO”, set the “fall” value (product in "fall" at the stop of the extractor ). 0=manual fall or 1=automatic
fall (The instrument will calculate on itself the fall value) by using the arrows keys, then confirm with
ENTER, the following will appear:
“VOL.1”, program the “fall” value by using the arrows (if the automatic fall has been selected, the fall
value calculated by the instrument appears). If the power break down this value will be lost. Confirm with
ENTER, the following will appear:
“VOL.2”, value of “fall” 2 . Confirm with ENTER, the following will appear:
“VOL.3”, value of “fall” 3 . Confirm with ENTER, the following will appear:
“AtAr”, program 0= autotare disabled or 1 = autotare enabled , by using the arrows, then confirm
with ENTER, the following will appear:
“P _ _ _ “, program the min. weight (max 9999) by using the arrows; normally 20 is programmed, then
confirm with ENTER, the following will appear:
“P“, program the maximum weight (max 9999) by using the arrows, then confirm with ENTER,
the following will appear:
“PAUS”, (max 9,9 sec.) Set the time between a product stop and the next start or the end-of-cycle
completion with return to the gross weight; this step is shown by flashing leds. Set the value using
the arrows, then confirm with ENTER. the following will appear:
“tSIC”, The instrument waits for this time during the unloading phase, after reaching the minimum
weight and before opening the cycle-end contact, to obtain a perfect emptying of the scale. Set a

- 11 -
value expressed in seconds (max 9,9 sec.) by using the arrows, then confirm with ENTER, the
following will appear:
“FiLt” , filter to reduce the weight oscillations, program a value included between 0,1 and max 9,9
seconds.
Confirm with ENTER to exit.
By pressing MENU you can exit in any moment.
“ 4CAr ” PROGRAM
Loading: batching of 4 products
By closing the START contact or the DOSA key, the instrument checks that the sum of the weight
present in the container and the value programmed in the “set1”, “set 2”, “set3” and “set4”
parameters is not higher than the maximum weight (if it is higher than the max weight the “P¯ ¯ ¯”
message appears for 3 seconds and the batching can not start). Then the instrument checks that
the weight present in the container (negative or positive) is lower than the minimum weight, in this
case “P_ _ _” appears for 3 seconds and the batching can not start. Once all the conditions are met,
the instrument executes the autotare ( if enabled), “zero” appears and the Led of DOSA key will light
up.
The SET1 relay will be activated. When the SET1 value less the “vol1” value is reached, the
instrument will open the SET1 contact (led 1). After “PAUS” time has elapsed, the instrument
executes the autotare and closes the SET2 contact (led 2), when the SET2 value less the “vol2”
value is reached, the SET2 contact will be opened, after “PAUS” time has elapsed, the instrument
executes the autotare and closes the SET3 contact (led 3), when the SET3 value less the “vol3”
value is reached, the SET3 contact will be opened, after “PAUS” time has elapsed, the instrument
executes the autotare and closes the SET4 contact (led 4), when the SET4 value less the “vol4”
value is reached, the SET4 contact will be opened. After “PAUS” time has elapsed, the instrument
closes the cycle end contact, the gross weight will appears and Led of DOSA key will switch off.
After “PAUS” time has elapsed, the instrument closes the cycle end contact (led 4), the gross weight
will appears and Led of DOSA key will switch off.
Press STOP to interrupt the batching in any moment; otherwise by pressing DOSA (the “Alt ”
message appears) the batching will be temporarily interrupted; press the ENTER key to start again
the batching, by pressing the DOSA key again you can stop the batching definitely.
In case of a power failure, the batching will not complete automatically on power
restoral – the operator will have to complete it or unload manually.
“ 4CAr ” PROGRAM
Press the MENU key (only if the Led of DOSA key is switch off), the relevant Led begins to blink, the
following will appear:
“SEt.1”, program the weight for SET 1(max 9999) by using the arrows keys, then confirm with
ENTER, the following will appear:

- 12 -
“SEt.2”, program the weight for SET 2 by using the arrows keys, then confirm with ENTER, the
following will appear:
“SEt.3”, program the weight for SET 3 by using the arrows keys, then confirm with ENTER, the
following will appear:
“SEt.4”, program the weight for SET 4 by using the arrows keys, then confirm with ENTER, the
following will appear:
“VOLO”, set the “fall” value (product in "fall" at the stop of the extractor ). 0=manual fall or 1=automatic
fall (The instrument will calculate on itself the fall value) by using the arrows keys, then confirm with
ENTER, the following will appear:
“VOLO”, set the “fall” value (product in "fall" at the stop of the extractor ). 0=manual fall or 1=automatic
fall (The instrument will calculate on itself the fall value) by using the arrows keys, then confirm with
ENTER, the following will appear:
“VOL.2”, value of “fall” 2 . Confirm with ENTER, the following will appear:
“VOL.3”, value of “fall” 3 . Confirm with ENTER, the following will appear:
“VOL.4”, value of “fall” 4 . Confirm with ENTER, the following will appear:
“AtAr”, program 0= autotare disabled or 1 = autotare enabled , by using the arrows, then confirm
with ENTER, the following will appear:
“P _ _ _” , program the min. weight (max 9999) by using the arrows; normally 20 is programmed, then
confirm with ENTER, the following will appear:
“P”, program the maximum weight (max 9999) by using the arrows, then confirm with ENTER,
the following will appear:
“PAUS”, (max 9,9 sec.) Set the time between a product stop and the next start or the end-of-cycle
completion with return to the gross weight; this step is shown by flashing leds. Set the value using
the arrows, then confirm with ENTER. the following will appear:
“FiLt” , filter to reduce the weight oscillations, program a value included between 0,1 and max 9,9
seconds.
Confirm with ENTER to exit.
By pressing MENU you can exit in any moment.

On our website www.laumas.com there are videos on the guidelines for correct installation of
weighing systems and video tutorials on configuring our transmitters and weight indicators.
All Laumas product manuals are available online. You can download the manuals in PDF format
from www.laumas.com by consulting the Products section or the Download Area.
Registration is required.
Think about the environment before you print!
CERTIFICATION OF THE ENVIRONMENTAL MANAGEMENT SYSTEM
in accordance with UNI EN ISO 14001.
Laumas contributes to environmental protection by saving on paper consumption.
Table of contents
Other LAUMAS Accessories manuals
Popular Accessories manuals by other brands

Honeywell
Honeywell Lyric RF6GB installation instructions

LEGRAND
LEGRAND WattStopper UT-300 Series installation instructions

Siemens
Siemens SIWAREX WL200 Series operating instructions

LU-VE
LU-VE F31HC Series Installation, Operation, Service and Maintenance Instructions

Schwaiger
Schwaiger HOME4YOU ZHS19 user manual

Philips
Philips SVC1112/10 user manual

Zeiss
Zeiss N HBO 103 operating manual

ekwb
ekwb EK-FB ASUS Maximus XI EXTREME installation manual

Quark-Elec
Quark-Elec AS06 user manual

Dräger Medical
Dräger Medical Air-Shields Isolette C400 QT operating instructions

Masimo
Masimo M-LNCS Series Instructions for use

Interlogix
Interlogix VE700 series Installation sheet