LAUMAS WDESK-R User manual

ENGLISH ENGLISH ENGLISH ENGLISH
Installation and User Manual
version 1.08
WDESK-R/L
WINOX-R/L/2L
Unload
2014/30/EU
EN55022:2010 EN61000-6-2:2005 EN61000-6-4:2007
SYSTEM IDENTIFICATION

KEY TO SYMBOLS
Below are the symbols used in the manual to draw the reader's attention:
Warning! Risk of electrocution.
Warning! This operation must be performed by skilled workers.
Read the following indications carefully.
Further information.
GUARANTEE
24 months from the delivery document date. The guarantee covers only defected parts and includes the replacement parts and
labour. All shipping and packing costs are paid by the customer. It is possible to have the repair in guarantee on condition that the
returned product has not been transformed, damaged or repaired without authorization. No guarantee is applicable on returned
products without the original label and/or serial number. No guarantee against misuse.
Batteries: Laumas provides 1 year guarantee from the date of delivery note, against material defects or battery manufacturing faults.
Disposal of Waste Equipment by Users in Private Households in the European Union
This symbol on the product or on its packaging indicates that this product must not be disposed of with
your other household waste. It is your responsibility to dispose of your waste equipment by handing it
over to a designated collection point for the recycling of waste electrical and electronic equipment. The
separate collection and recycling of your waste equipment at the time of disposal will help preserve
natural resources and protect human health and the environment. For more information about where you
can drop off your waste equipment for recycling, please contact your local waste disposal Authority or
the equipment retailer.

TABLE OF CONTENTS
USER WARNINGS................................................................................................................. 1
RECOMMENDATIONS FOR CORRECT INSTALLATION OF WEIGHING INSTRUMENTS. 1
RECOMMENDATIONS FOR CORRECT INSTALLATION OF THE LOAD CELLS ............... 1
LOAD CELL INPUT TEST (QUICK ACCESS) .........................................................................3
LOAD CELL TESTING.............................................................................................................3
MAIN SPECIFICATIONS OF THE INSTRUMENT.................................................................. 4
BUFFER BATTERY..................................................................................................................6
AFTER A BLACKOUT ........................................................................................................... 6
TECHNICAL SPECIFICATIONS ............................................................................................ 7
ELECTRICAL CONNECTIONS.............................................................................................. 8
BASIC INFORMATION.............................................................................................................8
WIRING DIAGRAM...................................................................................................................8
CHANGING VOLTAGE 115VAC / 230VAC (WDESK) ..................................................................... 9
KEY TO P, Q, X TYPE CONNECTORS............................................................................................ 9
KEY TO D TYPE CONNECTORS................................................................................................... 10
INTRODUCTION TO THE OPERATION .............................................................................. 12
KEYS, LED AND SYMBOLS FUNCTIONS.......................................................................... 13
MENU MAP .......................................................................................................................... 15
SYSTEM PARAMETERS ....................................................................................................... 15
BATCHING CONSTANTS...................................................................................................... 16
INSTRUMENT COMMISSIONING........................................................................................ 17
PROGRAMMING OF SYSTEM PARAMETERS .................................................................. 18
THEORETICAL CALIBRATION ............................................................................................. 18
TARE WEIGHT ZERO SETTING.................................................................................................... 19
ZERO VALUE MANUAL ENTRY.................................................................................................... 19
REAL CALIBRATION (WITH SAMPLE WEIGHTS)............................................................... 20
FILTER ON THE WEIGHT...................................................................................................... 21
ANTI PEAK..................................................................................................................................... 21
ZERO PARAMETERS............................................................................................................ 22
RESETTABLE WEIGHT SETTING FOR SMALL WEIGHT CHANGES ......................................... 22
AUTOMATIC ZERO SETTING AT POWER-ON............................................................................. 22
ZERO TRACKING .......................................................................................................................... 22
SETTING UNITS OF MEASURE............................................................................................ 23
OUTPUTS AND INPUTS CONFIGURATION ......................................................................... 24
SEMI-AUTOMATIC TARE (NET/GROSS).............................................................................. 25
SEMI-AUTOMATIC ZERO (WEIGHT ZERO-SETTING FOR SMALL VARIATIONS) ............ 25
ANALOG OUTPUT(ONLY FOR INSTRUMENTS WHERE THIS OPTION IS AVAILABLE) .. 26
SERIAL COMMUNICATION SETTING .................................................................................. 27
RS232 SERIAL COMMUNICATION ............................................................................................... 29
RS485 SERIAL COMMUNICATION ............................................................................................... 29
DIRECT CONNECTION BETWEEN RS485 AND RS232 WITHOUT CONVERTER...................... 29

WEIGHT READING VIA SERIAL PORT ................................................................................ 30
WEIMOD MODE ............................................................................................................................. 30
WEIRIP MODE................................................................................................................................ 31
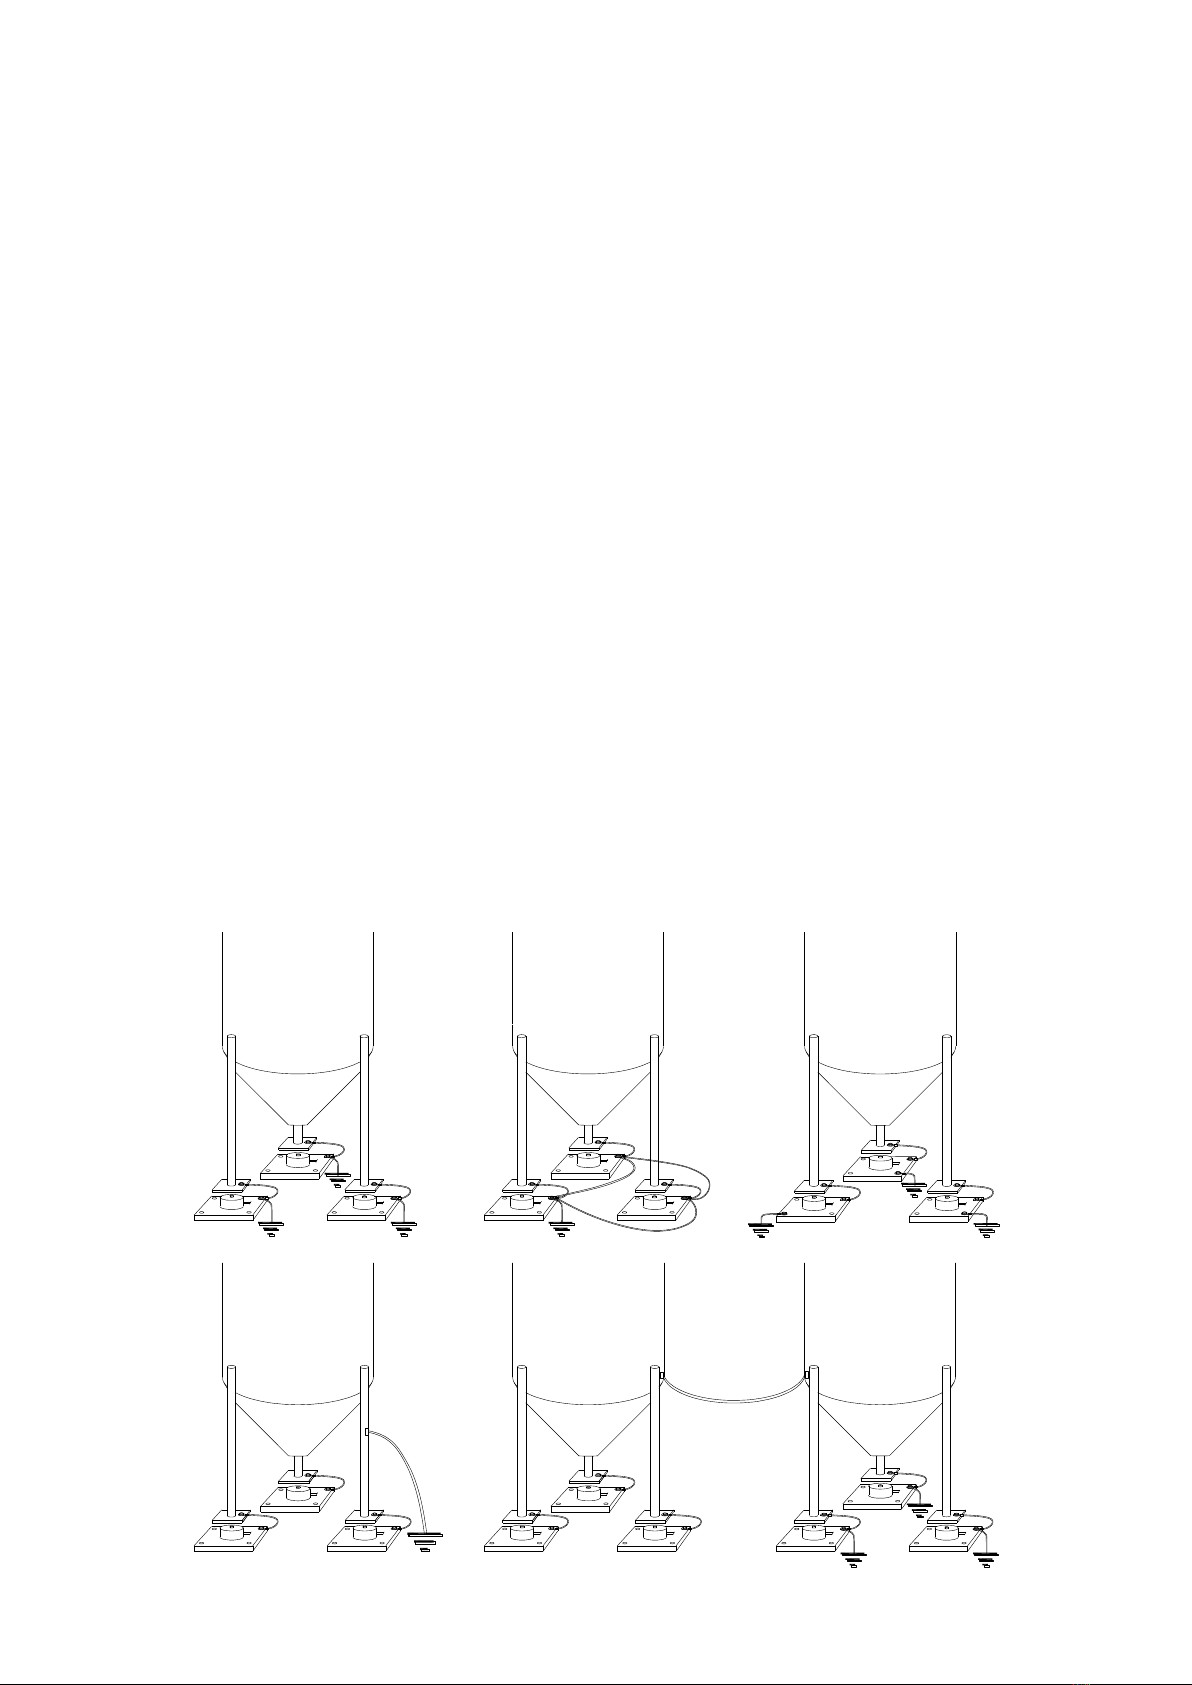
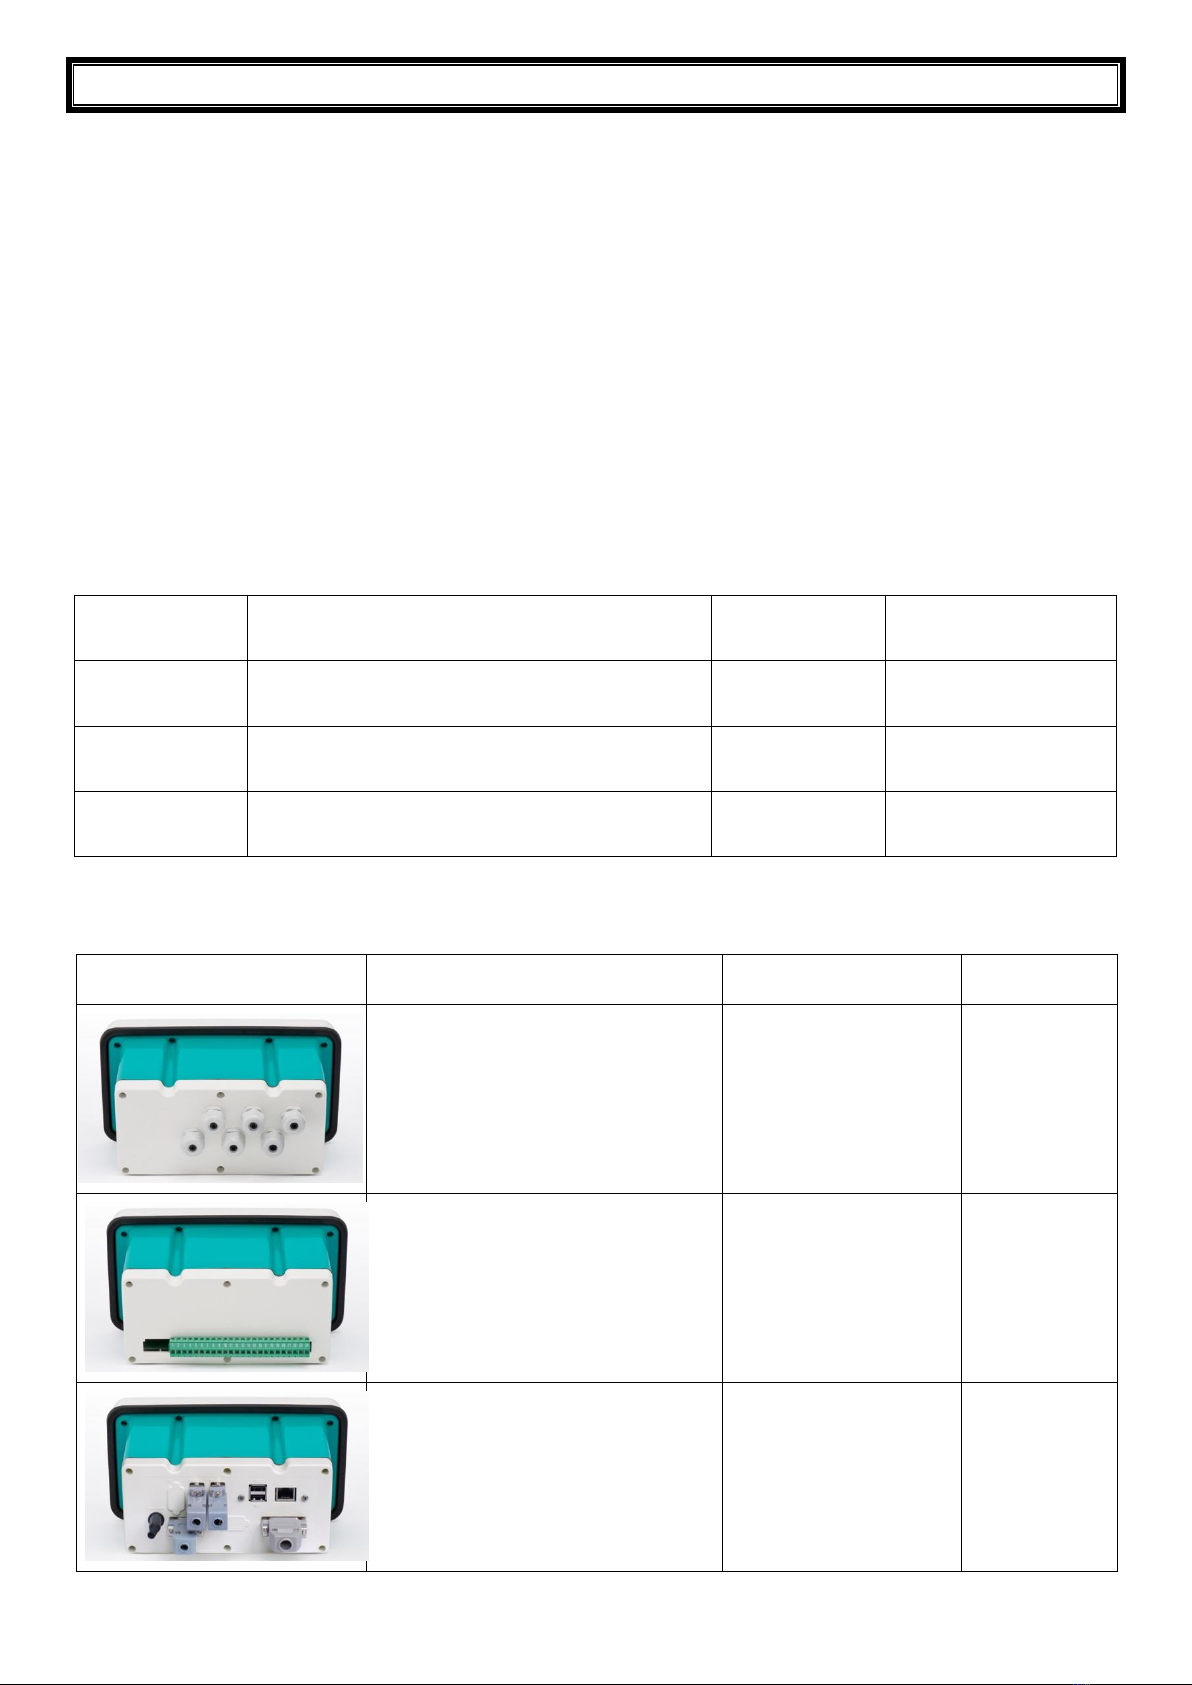
RS485 CONNECTION .................................................................................................................... 32
RS232 CONNECTION .................................................................................................................... 33
ALARM RELAY CLOSURE.................................................................................................... 34
TEST....................................................................................................................................... 34
ENERGY SAVING .................................................................................................................. 35
DATE AND TIME SETTING.................................................................................................... 35
OPERATION SETTINGS........................................................................................................ 36
INFO MENU............................................................................................................................ 36
PROGRAMMING OF BATCHING CONSTANTS ................................................................. 37
MINIMUM WEIGHT................................................................................................................. 37
MAXIMUM WEIGHT ............................................................................................................... 37
SAFE EMPTYING TIME ......................................................................................................... 37
WAITING TIME....................................................................................................................... 37
NO PRODUCT UNLOAD TIME .............................................................................................. 37
FALL....................................................................................................................................... 38
TOLERANCE.......................................................................................................................... 38
SLOW..................................................................................................................................... 39
TAPPING FUNCTION............................................................................................................. 39
CONSUMPTION FOR EACH FORMULA............................................................................... 39
PRINT AT CYCLE END.......................................................................................................... 39
NUMBER OF BATCHING PRINTOUTS ................................................................................. 40
CHECKING PC PRESENCE .................................................................................................. 40
WAITING CONFIRMATION FROM PC (SLAVE) ................................................................... 40
SWITCHING OF THE ALARM/TOLERANCE RELAY ON WEIGHT ...................................... 40
BIG BAG UNLOADING .......................................................................................................... 40
FORMULAS PROGRAMMING............................................................................................. 41
DELETING FORMULAS......................................................................................................... 41
BATCHING........................................................................................................................... 42
AUTOMATIC LOADING ......................................................................................................... 43
BATCHING START FROM EXTERNAL CONTACT .............................................................. 44
DISPLAYING DURING BATCHING ....................................................................................... 44
BATCHING STOP .................................................................................................................. 44
RESUME BATCHING AFTER A POWER CUT...................................................................... 44
CONSUMPTION................................................................................................................... 45
CONSUMPTION DELETION .................................................................................................. 45
ALARMS .............................................................................................................................. 46
PRINTING EXAMPLES........................................................................................................ 48
RESERVED FOR THE INSTALLER..................................................................................... 50
MENU LOCKING.................................................................................................................... 50
MENU UNLOCKING............................................................................................................... 50

TEMPORARY MENU UNLOCKING ....................................................................................... 50
SETTING UNLOCK PASSWORD .......................................................................................... 50
DATA DELETION AND PROGRAM SELECTION ................................................................. 50
KEYPAD OR DISPLAY LOCKING......................................................................................... 52
DECLARATION OF CONFORMITY - EU............................................................................. 53

- 1 -
USER WARNINGS
RECOMMENDATIONS FOR THE PROPER USE OF WEIGHING INSTRUMENT
-Keep away from heat sources and direct sunlight
-Repair the instrument from rain (except special IP versions)
-Do not wash with water jets (except special IP versions)
-Do not dip in water
-Do not spill liquid on the instrument
-Do not use solvents to clean the instrument
-Do not install in areas subject to explosion hazard (except special Atex versions)
RECOMMENDATIONS FOR CORRECT INSTALLATION OF WEIGHING INSTRUMENTS
The terminals indicated on the instrument’s wiring diagram to be connected to earth must
have the same potential as the weighed structure (same earthing pit or earthing system). If
you are unable to ensure this condition, connect with an earthing wire the terminals of the
instrument (including the terminal –SUPPLY) to the weighed structure.
The cell cable must be individually led to its panel input and not share a conduit with other cables;
connect it directly to the instrument terminal strip without breaking its route with support terminal
strips.
Use “RC” filters on the instrument-driven solenoid valve and remote control switch coils.
Avoid inverters in the instrument panel; if inevitable, use special filters for the inverters and separate
them with sheet metal partitions.
The panel installer must provide electric protections for the instruments (fuses, door lock switch
etc.).
It is advisable to leave the equipment always switched on to prevent the formation of condensation.
MAXIMUM CABLE LENGTHS
-RS485: 1000 metres with AWG24, shielded and twisted cables
-RS232: 15 metres for baud rates up to 19200
-Analog current output: up to 500 metres with 0.5 mm2 cable
-Analog voltage output: up to 300 metres with 0.5 mm2cable
RECOMMENDATIONS FOR CORRECT INSTALLATION OF THE LOAD CELLS
INSTALLING LOAD CELLS: The load cells must be placed on rigid, stable in-line structures; it
is important to use the mounting modules for load cells to compensate for misalignment of the
support surfaces.
PROTECTION OF THE CELL CABLE: Use water-proof sheaths and joints in order to protect the
cables of the cells.
MECHANICAL RESTRAINTS (pipes, etc.): When pipes are present, we recommend the use of
hoses and flexible couplings with open mouthpieces with rubber protection; in case of hard pipes,
place the pipe support or anchor bracket as far as possible from the weighed structure (at a distance
at least 40 times the diameter of the pipe).

- 2 -
CONNECTING SEVERAL CELLS IN PARALLEL: Connect several cells in parallel by using - if
necessary - a watertight junction box with terminal box. The cell connection extension cables must
be shielded, led individually into their piping or conduit and laid as far as possible from the power
cables (in case of 4-wire connections, use cables with 4x1 mm2minimum cross-section).
WELDING: Avoid welding with the load cells already installed. If this cannot be avoided, place the
welder ground clamp close to the required welding point to prevent sending current through the load
cell body.
WINDY CONDITIONS - KNOCKS - VIBRATIONS: The use of weigh modules is strongly
recommended for all load cells to compensate for misalignment of the support surfaces. The system
designer must ensure that the plant is protected against lateral shifting and tipping relating to:
shocks and vibration; windy conditions; seismic conditions in the installation setting; stability of the
support structure.
EARTHING THE WEIGHED STRUCTURE: By means of a copper wire with suitable cross-section,
connect the cell upper support plate with the lower support plate, then connect all the lower plates to
a single earthing system. Electrostatic charges accumulated because of the product rubbing against
the pipes and the weighed container walls are discharged to the ground without going through or
damaging the load cells. Failure to implement a proper earthing system might not affect the
operation of the weighing system; this, however, does not rule out the possibility that the cells and
connected instrument may become damaged in the future. It is forbidden to ensure earthing system
continuity by using metal parts contained in the weighed structure.
FAILURE TO FOLLOW THE INSTALLATION RECOMMENDATIONS WILL BE CONSIDERED
A MISUSE OF THE EQUIPMENT
OK OK
NO NO
NO
OK

- 3 -
LOAD CELL INPUT TEST (QUICK ACCESS)
From the weight display, press for 3 seconds; the response signal of the load cells is displayed,
expressed in mV with four decimals.
LOAD CELL TESTING
Load cell resistance measurement (use a digital multimeter):
-Disconnect the load cells from the instrument and check that there is no moisture in the cell
junction box caused by condensation or water infiltration. If so, drain the system or replace it if
necessary.
-The value between the positive signal wire and the negative signal wire must be equal or similar
to the one indicated in the load cell data sheet (output resistance).
-The value between the positive excitation wire and the negative excitation wire must be equal or
similar to the one indicated in the load cell data sheet (input resistance).
-The insulation value between the shield and any other cell wire and between any other cell wire
and the body of the load cell must be higher than 20 Mohm.
Load cell voltage measurement (use a digital multimeter):
-Take out the load cell to be tested from underneath the container, or alternatively, lift the
container support.
-Make sure that the excitation of two wires of the load cell connected to the instrument (or
amplifier) is 5 VDC ±3%.
-Measure the response signal between the positive and the negative signal wires by directly
connecting them to the tester, and make sure that it is comprised between 0 and 0.5 mV.
-Apply load to the cell and make sure that there is a signal increment.
IF ONE OF THE ABOVE CONDITIONS IS NOT MET, PLEASE CONTACT THE TECHNICAL
ASSISTANCE SERVICE.
3 s

- 4 -
MAIN SPECIFICATIONS OF THE INSTRUMENT
Indicator with 6-wire load cell input installable on table, panel front, wall or column; 6-key membrane
keypad with buzzer, real-time clock/calendar with buffer battery.
Two serial ports (RS485 and RS232) for connection to: PC/PLC up to 32 instruments (max 99 with
line repeaters) by ASCII Laumas or ModBus R.T.U. protocol, remote display, printer. Optional:
integrated Profibus DP, DeviceNet, CANopen, Profinet IO, Ethernet/IP, Ethernet TCP/IP,
Modbus/TCP output.
Instruments with P, D type connectors: included switching power supply plug 24 V 450 mA, input
100÷240 VAC, 3 meters long cable.
The instrument can be connected to a CLM serie intelligent junction box or to a weight transmitter.
Display:
Model
Display
Digit height
LED or signalling
symbols
WDESK-R
WINOX-R
Red LED, 6 digits, 7 segments,
semi-alphanumeric
20 mm
16
WDESK-L
WINOX-L
Backlit LCD, 6 digits, 7 segments,
semi-alphanumeric
20 mm
max 46
WINOX-2L
Large backlit LCD, 6 digits, 7 segments,
semi-alphanumeric
40 mm
max 46
Dimensions:
WDESK
Version
Max. encumbrance
Drilling
P- PG9 cable gland
IP67 protection rating
Power supply included
122x226x164 mm
(connectors included)
96x186 mm
Q- Removable terminal strip
(panel front)
Front panel IP67 protection
rating
122x226x152 mm
(connectors included)
92x186 mm
D–D-Sub tray
IP40 protection rating
Power supply included
122x226x189 mm
(connectors included)
96x186 mm

- 5 -
X- Atex cable gland
IP67 Atex II3GD version
(areas 2 -22)
IP67 protection rating
122x226x164 mm
(connectors included)
96x186 mm
Wall installation with bracket
(can also be installed on table)
122x230x250 mm ca.
(bracket included)
WINOX
Type of connectors
Max. encumbrance
Drilling
P- PG9 cable gland
IP68 protection rating
Power supply included
206x286x108 mm
(connectors included)
160x248 mm
Q- Removable terminal strip
(panel front)
Front panel IP68 protection
rating
206x286x96 mm
(connectors included)
160x248 mm
D–D-Sub tray
(table)
IP40 protection rating
Power supply included
206x286x85 mm
(connectors included)
X- Atex cable gland
IP68 Atex II3GD version
(areas 2 -22)
IP68 protection rating
206x286x108 mm
(connectors included)
160x248 mm
Wall installation with bracket
(can also be installed on table)
206x286x187 mm ca.
(bracket included)

- 6 -
BUFFER BATTERY
The instrument is equipped with an internal battery that allows to keep active the internal clock even
in the event of power failure.
At the first start and after long periods of inactivity, leave the instrument on for at least 12
hours to fully charge the battery.
AFTER A BLACKOUT
After a blackout the instrument DOES NOT come on again automatically, you have to press ON.
To guarantee an automatic restart after a blackout, disable the ON key as follows:
-disconnect power supply and open the instrument;
-identify flat connectors coming from the keypad on the main board;
-extract the 4-pole connector;
-short-circuit the following pins using the unused jumper inside the instrument:
▫WDESK: the two pins further in compared to the main board (see picture to the left);
▫WINOX: the two outer pins compared to the main board (see picture to the right);
-connect the 4-pole flat to the two pins still free complying with initial orientation.
WDESK
WINOX

- 7 -
TECHNICAL SPECIFICATIONS
POWER SUPPLY and CONSUMPTION (VDC)
12/24 VDC ±10%; 6 W (standard)
POWER SUPPLY and CONSUMPTION (VAC)
115/230 VAC; 50-60 Hz; 6 VA
(optional only for WDESK-P, WINOX-P)
NO. OF LOAD CELLS IN PARALLEL and SUPPLY
max 8 (350 ohm); 5 VDC / 120 mA
LINEARITY / ANALOG OUTPUT LINEARITY
< 0.01% F.S.; < 0.01% F.S.
THERMAL DRIFT / ANALOG OUTPUT THERMAL
DRIFT
< 0.0005% F.S./°C; < 0.003% F.S./°C
A/D CONVERTER
24 bit (16000000 points)
MAX DIVISIONS
(with measurement range: ±10 mV = sens. 2 mV/V)
±999999
MEASUREMENT RANGE
±39 mV
MAX SENSITIVITY OF USABLE LOAD CELLS
±7 mV/V
MAX CONVERSIONS PER SECOND
300 conversions/second
DISPLAY RANGE
±999999
NO. OF DECIMALS / DISPLAY INCREMENTS
0÷4 / x 1 x 2 x 5 x 10 x 20 x 50 x 100
DIGITAL FILTER / READINGS PER SECOND
10 levels / 5÷300 Hz
RELAY OUTPUTS
N. 5 - max 115 VAC; 150 mA
(N. 4 –analog output version)
DIGITAL INPUTS
N. 3 - optoisolated 5 - 24 VDC PNP
(N. 2 –analog output version)
SERIAL PORTS
RS485, RS232
BAUD RATE
2400, 4800, 9600, 19200, 38400, 115200
HUMIDITY (non condensing)
85%
STORAGE TEMPERATURE
-30°C +80°C
WORKING TEMPERATURE
-20°C +60°C
OPTOISOLATED ANALOG OUTPUT (OPTIONAL)
16 bit - 65535 divisions
0÷20 mA; 4÷20 mA (max 300 ohm);
0÷10 V; 0÷5 V; ±10 V; ±5 V (min 10 kohm)
RELAY OUTPUTS
N. 5 - max 30 VAC, 60 VDC; 150 mA
(N. 4 –analog output version)
WORKING TEMPERATURE
-20°C +50°C
Equipment to be powered by 12-24 VDC LPS or Class 2 power source.

- 8 -
ELECTRICAL CONNECTIONS
BASIC INFORMATION
-It is recommended that the power supply negative pole be grounded (WDESK-D, WINOX:
connect the earthing system to the dedicated external terminal ).
-It is possible to supply up to eight 350 ohm load cells or sixteen 700 ohm load cells.
-For 4-wire load cells, make a jumper between EX- and REF- and between EX+ and REF+.
-Connect terminal “– SUPPLY” to the RS485 common of the connected instruments in the event
that these receive alternating current input or that they have an optoisolated RS485.
-In case of an RS485 network with several devices it is recommended to activate the 120 ohm
termination resistance on the two devices located at the ends of the network, as described in
section RS485 SERIAL CONNECTION.
-Option E/EC: selects the first 12 formulas.
WIRING DIAGRAM
)The IN3 input can have the following
functions:
-APPROVAL
-SEMI-AUTOMATIC ZERO (default)
-NET/GROSS WEIGHT
-AUTOMATIC LOAD during batching
(1) If the analog output is present (ANALOG
OUTPUT OPTION) the following are no
longer available:
-IN3 input
-ALARM/TOLERANCE output
-E/EC options
WARNING: connect power supply specified on the plate found on the back of the instrument.
In 115 V and 230 V versions, terminals “+ SUPPLY” and “– SUPPLY” generate continuous voltage
at 24 VDC only to be used as power supply for instrument inputs.
(1)ANALOGOUTPUT OPTION
12
EC OPTION
3
21
7
68
5
410
11
9
8
E OPTION
1 32 4 5 671411910 1312 1615
4
to instrument
Current output:
max load 300 ohm
Voltage output:
min load 10 kohm
Buttons not included in the supply
1 2 3 4 5 678 9 10 1112 13 14 15 16 17 18 19 20 21222324
12-24 VDC
supply
RS485
IN 3
INPUT
supply
5-24 VDC
toINCOMMMON
ALARM/TOLERANCE
to E-EC OPT.
-
+
SUPPLY +
SUPPLY -
TXD
RXD
PRESET
SET
CYCLE END
LOAD
OUT COMMON
STOP
EXCITATION -
REF./SENSE +
IN COMMON
EXCITATION +
REF./SENSE -
SIGNAL -
SIGNAL +
RS232
LOAD CELLS
6-WIRE load cell
connection
INPUTS
supply
5-24 VDC
OUTPUTS
max 115 VAC
150 mA
2 3 4
+ 0-10 VDC
- COMMON
+ 0-20 4-20 mA
19 20 2122 23 24
EXCIT. -
EXCIT. +
SIGNAL -
SIGNAL +
4-WIRE load cell connection
8
84
+ -
WARNING!
115 V / 230 V OPTIONS
(WDESK-P / WINOX-P)
L115/230
VAC
N
7SUPPLY
OUT + 24 VDC
OUTPUT
8SUPPLY
OUT -

- 9 -
CHANGING VOLTAGE 115VAC / 230VAC (WDESK)
Access instrument board by removing the six bottom screws and work on the welding side: join the
red points using a stiff wire.
KEY TO P, Q, X TYPE CONNECTORS
Terminal
Signal
Terminal
Signal
1
14
OUTPUT No. 4: LOAD
2
INPUT No. 3: selectable
(+VDC min 5 V max 24 V)
otherwise:
+ANALOG OUTPUT
(0÷20 o 4÷20 mA)
15
OUTPUT COMMON
3
OUTPUT No. 5: ALARM/TOLERANCE
otherwise:
+ANALOG OUTPUT (0÷10 V)
16
INPUT No. 1: START
(+VDC min 5 V max 24 V)
4
E/EC OPTION
otherwise:
-ANALOG OUTPUT COMMON
17
INPUT No. 2: STOP
(+VDC min 5 V max 24 V)
5
RS485: -
18
INPUT COMMON (-VDC 0 V)
6
RS485: +
19
-LOAD CELL EXCITATION (-Exc)
LOAD CELL SHIELD
7
+SUPPLY (12/24 VDC)
115/230 VAC optional version:
+OUTPUT (24 VDC)*
20
+LOAD CELL EXCITATION (+Exc)
8
-SUPPLY (12/24 VDC)
RS232, RS485: SHIELD, GND
E/EC OPTION: GND
115/230 VAC optional version:
-OUTPUT (24 VDC)*
RS232, RS485: SHIELD, GND
E/EC OPTION: GND
21
+LOAD CELL REF/SENSE
9
RS232: TXD
22
-LOAD CELL REF/SENSE
10
RS232: RXD
23
-LOAD CELL SIGNAL (-Sig)
230 VAC
230
115
115
115 VAC
230
115
115

- 10 -
11
OUTPUT No. 1: PRESET
24
+LOAD CELL SIGNAL (+Sig)
12
OUTPUT No. 2: SET
L
PHASE (115/230 VAC optional ver.)
13
OUTPUT No. 3: CYCLE END
N
NEUTRAL (115/230 VAC optional ver.)
GROUND (115/230 VAC optional ver.)
*) Use only as power supply for instrument inputs.
To access the terminal strip on the WDESK instruments with cable glands, you need to
remove the bottom of the instrument unscrewing the six screws.
KEY TO D TYPE CONNECTORS
Connector
Pin
Signal
Internal
terminal
Internal
colour
P1
Power supply
+SUPPLY (12/24 VDC)
7
red
-SUPPLY (12/24 VDC)
8
black
D1
Female
Load cell
1
-LOAD CELL EXCITATION (-Exc)
19
black
2
-LOAD CELL REF/SENSE
22
yellow
3
4
5
LOAD CELL SHIELD
19
6
+LOAD CELL EXCITATION (+Exc)
20
red
7
+LOAD CELL REF/SENSE
21
blue
8
-LOAD CELL SIGNAL (-Sig)
23
white
9
+LOAD CELL SIGNAL (+Sig)
24
green
D3
Male
I/O
Analog output
E/EC option
1
OUTPUT No.1: PRESET (max 24 V)
11
yellow
2
OUTPUT No.2: SET (max 24 V)
12
blue
3
OUTPUT No.3: CYCLE END (max 24 V)
13
white
4
OUTPUT No.4: LOAD (max 24 V)
14
green
5
OUTPUT No. 5: ALARM/TOLERANCE
(max 24 V)
otherwise:
+ANALOG OUTPUT (0÷10 V)
3
orange
6
OUTPUT COMMON (max 24 V)
15
purple
7
INPUT No.1: START (+VDC min 5 V max 24 V)
16
grey
8
INPUT No.2: STOP (+VDC min 5 V max 24 V)
17
pink
9
INPUT No. 3: selectable
(+VDC min 5 V max 24 V)
otherwise:
+ANALOG OUTPUT (0÷20 o 4÷20 mA)
2
brown
10
INPUT COMMON (-VDC 0 V)
18
white/blue

- 11 -
11
E/EC OPTION
otherwise:
-ANALOG OUTPUT COMMON
4
red
12
E/EC OPTION: GND
ANALOG OUTPUT: SHIELD
8
black
13
14
15
D4
Male
RS232 serial port
1
2
RS232: RXD
10
yellow
3
RS232: TXD
9
blue
4
5
RS232: SHIELD, GND
8
black
6
7
8
9
D5
Male
RS485 serial port
with 24 VDC
output
1
+OUTPUT (24 VDC)*
7
red
2
-OUTPUT (24 VDC)*
8
black
3
4
RS485: +
6
yellow
5
RS485: SHIELD, GND
8
black
6
RS485: -
5
blue
7
RS485: -
5
blue
8
9
RS485: +
6
yellow
*) Not available if the instrument is battery powered.
Use only if the instrument is connected to the provided 24 VDC power supply.
Maximum load: 5 W.

- 12 -
INTRODUCTION TO THE OPERATION
The instrument is able to extract automatically a settable amount of product from the weighing
structure, driving the batching organ (including two-speed) through the PRESET and SET contacts.
The instrument has the following features:
-Maximum 99 settable formulas (see section FORMULAS PROGRAMMING);
-Batching resume after blackout (see section RESUME BATCHING AFTER A POWER CUT);
-Automatic fall calculation (see section FALL);
-Tolerance error control (see section TOLERANCE);
-Precision batching through slow function (see section SLOW);
-Precision batching through tapping function (see section TAPPING FUNCTION);
-Consumption storage (see section CONSUMPTION);
-Print of batching data (see section PRINT AT CYCLE END);
-Management of batching with big bags (see section BIG BAG UNLOADING);
-Alarm contact (see section ALARM RELAY CLOSURE);
-Product AUTOMATIC LOADING in the weighed structure (see section AUTOMATIC LAODING);
BATCHING START:
-via keypad, setting formula and cycle number to be performed;
-via external contact (see section BATCHING START FROM EXTERNAL CONTACT).
For further information on the batching sequence, see section BATCHING.
CONSUMPTION STORAGE:
The instrument, at the end of every batching, stores the consumed amount for each formula.
Consumption value can be viewed directly on instrument display in standby mode.
AUTOMATIC LOADING FUNCTION:
If set the minimum and maximum weight values, when the weight reaches the minimum the LOAD
contact is closed, and remains closed until the weight reaches the maximum set value. In this way
it’s possible to perform the automatic loading of the weighed structure.
INSTRUMENT CALIBRATION:
The instrument calibration can be performed both with THEORETICAL CALIBRATION, setting the
instrument full scale and the load cells sensitivity (see section THEORETICAL CALIBRATION), and
with REAL CALIBRATION through SAMPLE WEIGHT (see section REAL CALIBRATION (WITH
SAMPLE WEIGHTS)).
ALARM MANAGEMENT:
If an alarm occurs during the batching, the instrument shows the alarm on the display, closes the
related contact (if enable) and waits for operator intervention to abort or continue the batching.

- 13 -
KEYS, LED AND SYMBOLS FUNCTIONS
TASTI
KEY
Short press
Long press (3 s)
Into menus
Power-on
Power-off
Semi-automatic zero
Tare resetting
Cancel or return to
previous menu
Gross Net
Net Gross
Select figure to be modified
or go to previous menu
item.
Batching start / stop
Print menu
mV load cell test
Modify selected figure or
go to next menu item.
Setting formulas and batching
constants
Formula selection for
START input (EC not
present)
Confirm or enter in
submenu
+
Setting general parameters
(press immediately
followed by )
LED: WDESK-R, WINOX-R
LED
Function
POWER
power supply available
NET
net weight (semi-automatic tare)
zero (deviation from zero not more than ±0.25 divisions)
stability
kg
unit of measure: kg
g
unit of measure: g
W1
not used
W2
W3
INPUT 1
LED lit: input 1 closed
INPUT 2
LED lit: input 2 closed
INPUT 3
LED lit: input 3 closed
P1
LED lit: output 1 closed
P2
LED lit: output 2 closed
P4
LED lit: output 3 closed
P8
LED lit: output 4 closed
0

- 14 -
R5
LED lit: output 5 closed
Into menus LEDs light up in sequence to indicate that it is not displaying a weight.
SYMBOLS: WDESK-L, WINOX-L, WINOX-2L
WDESK-L
WINOX-L
WINOX-2L
Symbol
Function
LED POWER
power supply available
1
not used
2
gross weight
3
net weight (semi-automatic tare)
4
stability
5
zero (deviation from zero not more than +/-0.25 divisions)
6
not used
7
batching in progress
8
value displayed is not a weight
9
not used
10
not used
11
not used
12
not used
13
unit of measure reading
14
the number displayed indicates that the corresponding input is closed
15
the number displayed indicates that the corresponding output is closed
16
not used
Into menus symbol 8 is on to indicate that it is not displaying a weight.
678 9 10 11
16 15 14
12
4
13
5
3
2
1
678 9 10
11
16 15 14
12
13
3
2541

- 15 -
MENU MAP
Into menus changes are applied right after pressing the ENTER key (no further confirmation is
required).
SYSTEM PARAMETERS
+
3 s
3 s
optional
optional
optional
1
1 WDESK-R / WINOX-R
2 WDESK-L / WINOX-L
2
This manual suits for next models
4
Table of contents
Other LAUMAS Accessories manuals
Popular Accessories manuals by other brands

Trotec
Trotec PV4-MID-PS operating manual

tomado
tomado TEB1301W instruction manual

Panasonic
Panasonic MA3X720 (MA720) Specification sheet

Cornelius
Cornelius Door Latch installation instructions

La Crosse Technology
La Crosse Technology TX145R manual

Delta Electronics
Delta Electronics Brake Modules BUE Series instruction sheet

Tejovat Smart Home Products
Tejovat Smart Home Products TJ-SH-DP1500 user manual

BEBE CONFORT
BEBE CONFORT Shape of You Instructions for use

Leviton
Leviton T6525-I quick start guide

Watts
Watts Climatic Control CC-H manual

Honeywell
Honeywell WSK-HEAT-ROR Installation and maintenance instructions

DLS
DLS BP Installation