LawnMaster CLBC4009K User manual

CLBC4009K
Operators Manual
Read all safety rules and instructions carefully before operating this tool.
Distributed By Cleva North America 601 Regent Park Court Greenville, SC 29607 (866)-384-8432
40V-9" Li-Ion Cordless Brush Cutter CLBC4009K
EN p. 2

Type Cordless, Battery-Powered
Rated No Load Speed 7000 r/ Min
Max. cutting capacity 9’’
Cutting device Metal Blade,4 Teeth
Weight 9.2 Lbs Without Battery
2
CONTENTS
PRODUCT SPECIFICATIONS
GENERAL SAFETY RULES
SYMBOLS
KNOW YOUR CORDLESS BRUSH CUTTER
ASSEMBLY
BATTERY PACK AND CHARGER
OPERATION
CARE AND MAINTENANCE
TROUBLESHOOTING
ENVIRONMENTALLY SAFE BATTERY DISPOSAL
WARRANTY
EXPLODED VIEW
PARTS LIST
NOTES
2
2
3-8
9-10
11-12
13-15
16
16-19
19-20
21
22
23
24
25
26
CONTENTS
PRODUCT SPECIFICATIONS
40V LITHIUM-ION CORDLESS BRUSH CUTTER

3
GENERAL SAFETY RULES
Child Safety
• Tragic accidents can occur if the operator is not aware of the presence of children.
• Keep children out of the brush cutting area and under the watchful care of a
responsible adult.
• Do not allow children under the age of 16 to operate this brush cutter.
Children who are 16 years of age and older must read and understand the
operating instructions and safety rules in this manual, and must be trained
and supervised by a parent.
• Stay alert, and turn the brush cutter off if a child or any other person enters the
mowing area.
• Look behind and down for small children before and while moving backwards.
• Use extreme care when approaching blind corners, doorways, shrubs, trees,
or other objects that may obscure your view of a child who may run into the
path of the brush cutter.
• Never allow children or others who are no familiar with the operating instructions
to use the brush cutter . Local regulations may stipulate the minimum age of
the user of this type of machinery.
Work Area Safety
• Keep work area clean and well lit. Cluttered or dark areas invite accidents.
• Do not operate power tools in explosive atmospheres, such as in the presence
of flammable liquids, gases or dust. Power tools create sparks which may
ignite the dust or fumes.
• Keep children and bystanders away while operating a power tool.
Distractions can cause you to lose control.
Electrical Safety
• Power tool plugs must match the outlet. Never modify the plug in any way.
Do not use any adapter plugs with earthed (grounded) power tools.
Unmodified plugs and matching outlets will reduce risk of electric shock.
• Avoid body contact with earthed or grounded surfaces, such as pipes, radiators,
ranges and refrigerators. There is an increased risk of electric shock if your
body is earthed or grounded.
• Do not expose power tools to rain or wet conditions. Water entering a power
tool will increase the risk of electric shock.
• Do not abuse the cord. Never use the cord for carrying, pulling or unplugging
the power tool. Keep cord away from heat, oil, sharp edges or moving parts.
Damaged or entangled cords increase the risk of electric shock.

4
GENERAL SAFETY RULES
• When operating a power tool outdoors, use an extension cord suitable for outdoor
use. Use of a cord suitable for outdoor use reduces the risk of electric shock.
• If operating a power tool in a damp location is unavoidable, use a residual
current device (RCD) protected supply. Use of an RCD reduces the risk of
electric shock.
Personal Safety
• Stay alert, watch what you are doing and use common sense when operating a
power tool. Do not use a power tool while you are tired or under the influence
of drugs, alcohol or medication. A moment of inattention while operating power
tools may result in serious personal injury.
• Use personal protective equipment. Always wear eye protection. Protective
equipment such as dust mask, non-skid safety shoes, hard hat, or hearing
protection used for appropriate conditions will reduce personal injuries.
• Prevent unintentional starting. Ensure the switch is in the off-position before
connecting to power source and/or battery pack, picking up or carrying the tool.
Carrying power tools with your finger on the switch or energising power tools
that have the switch on invites accidents.
• Remove any adjusting key or wrench before turning the power tool on.
A wrench or a key left attached to a rotating part of the power tool may result in
personal injury.
• Do not overreach. Keep proper footing and balance at all times. This enables
better control of the power tool in unexpected situations.
• Dress properly. Do not wear loose clothing or jewelry. Keep your hair, clothing
and gloves away from moving parts. Loose clothes, jewelry or long hair can be
caught in moving parts.
• If devices are provided for the connection of dust extraction and collection facilities,
ensure these are connected and properly used. Use of dust collection can reduce
dust related hazards.
Power Tool Use And Care
• Do not force the power tool. Use the correct power tool for your application.
The correct power tool will do the job better and safer at the rate for which it
was designed.
• Do not use the power tool if the switch does not turn it on and off. Any power
tool that cannot be controlled with the switch is dangerous and must be repaired.
• Disconnect the plug from the power source and/or the battery pack from the
power tool before making any adjustments, changing accessories, or storing

5
GENERAL SAFETY RULES
power tools. Such preventive safety measures reduce the risk of starting the
power tool accidentally.
• Store idle power tools out of the reach of children and do not allow persons
unfamiliar with the power tool or these instructions to operate the power tool.
Power tools are dangerous in the hands of untrained users.
• Maintain power tools. Check for misalignment or binding of moving parts,
breakage of parts and any other condition that may affect the power tool’s
operation. If damaged, have the power tool repaired before use. Many accidents
are caused by poorly maintained power tools.
• Keep cutting tools sharp and clean. Properly maintained cutting tools with
sharp cutting edges are less likely to bind and are easier to control.
• Use the power tool, accessories and tool bits etc. in accordance with these
instructions, taking into account the working conditions and the work to be
performed. Use of the power tool for operations different from those intended
could result in a hazardous situation.
Battery Tool Use And Care
• Recharge only with the charger specified by the manufacturer. A charger that
is suitable for one type of battery pack may create a risk of fire when used
with another battery pack.
• Use power tools only with specifically designated battery packs. Use of any
other battery packs may create a risk of injury and fire.
• When battery pack is not in use, keep it away from other metal objects, like
paper clips, coins, keys, nails, screws or other small metal objects, that can
make a connection from one terminal to another. Shorting the battery terminals
together may cause burns or a fire.
• Under abusive conditions, liquid may be ejected from the battery; avoid contact.
If contact accidentally occurs, flush with water. If liquid contacts eyes, additionally
seek medical help. Liquid ejected from the battery may cause irritation or burns.
Service
• Have your power tools serviced by a qualified repair person using only identical
replacement parts. This will ensure that safety of the power tool is maintained.
Training
• Read the instructions carefully. Be familiar with the controls and the proper
use of the product.
• Never allow people unfamiliar with these instructions or children to use the
product. Local regulations can restrict the age of the operator.

6
GENERAL SAFETY RULES
• Keep in mind that the operator or user is responsible for accidents or hazards
occurring to other people or their property.
Preparation
• Never operate the product while people, especially children, or pets are nearby.
• Wear eye protection and stout shoes at all times while operating the product.
Operation
• Use the product only in daylight or good artificial light.
• Never operate the product with damaged guards or shields or without guards
or shields in place.
• Keep hands and feet away from the cutting device at all times and especially
when switching on the motor.
• Before using the product and after any impact, check for signs of wear or
damage and repair as necessary.
• Always disconnect the product from the power supply (i.e. remove the plug
from the power supply or the battery pack)
• whenever leaving the product unattended;
- before clearing a blockage;
- before checking, cleaning or working on the product;
- after striking a foreign object;
- whenever the product starts vibrating abnormally.
• Take care against injury to feet and hands from the cutting device.
• Always ensure that the air vents are kept clear of debris.
• Never use replacement parts or accessories not provided or recommended
by the manufacturer.
• Wear slip-resistant foot protection and protective clothing when using this product.
• Always keep proper footing and operate the product only when standing on a
fixed, secure and level surface. Change working positions regularly to avoid
tiredness and ensure a comfortable working position at all times.
• The use of this product may be restricted due to national regulations.
Maintenance And Storage
• Disconnect the product from the power supply (i.e. remove the plug from the
power supply or the battery pack) and check for damage after use.
• Disconnect the product from the power supply (i.e. remove the plug from the power
supply or the battery pack) before carrying out maintenance or cleaning work.
• Use only the manufacturer’s recommended replacement parts and accessories.

7
GENERAL SAFETY RULES
• Inspect and maintain the product regularly. Have the product repaired only by
an authorized service center or similar qualified specialist.
• When not in use, store the product out of the reach of children.
Brush Cutter Blade Safety Warnings
• Only use brush cutter blades if you have knowledge of how to use and handle them.
• Pay attention to the maximum rotational speed. The maximum rotational speed
marked on the brush cutter blade shall not be exceeded. Where stated, the
speed range shall be adhered to.
• Do not use working brush cutter blades which are cracked. Scrap of brush
cutter blades which bodies are cracked. Repairing is not permitted.
• Clamping surfaces shall be cleaned to remove dirt, grease, oil and water.
• Do not use loose rings or sleeves to «make up» bore sizes on brush cutter blades.
• Pay attention that fixed rings for securing the brush cutter blades have the
same diameter and at least 1/3 of the cutting diameter.
• Ensure fixed rings are parallel to each other.
• Handle brush cutter blades with care. Store them in the original packaging or
in special boxes. Wear gloves for handling and to reduce injuries.
• Ensure all guards are correctly fixed before using brush cutter blades.
• Before use, make sure that the brush cutter blade complies with technical
requirements of the power tool and correctly fixed.
• Use the supplied brush cutter blade only for cutting of wood, never for metal.
• Blade thrust may occur when the spinning blade contacts an object that it does
not immediately cut.
• A blade thrust can be violent enough to cause the unit and/or operator to be
propelled in any direction, and possibly lose control of the unit.
• Blade thrust can occur without warning if the blade snags, stalls or binds.
• Blade thrust is more likely to occur in areas where it is difficult to see the
material being cut.
Vibration And Noise Reduction
• To reduce the impact of noise and vibration emission, limit the time of operation,
use low-vibration and low-noise operating modes as well as wear personal
protective equipment.
• Take the following points into account to minimize the vibration and noise
exposure risks:

8
GENERAL SAFETY RULES
• Only use the product as intended by its design and these instructions.
• Ensure that the product is in good condition and well maintained.
• Use correct cutting attachments for the product and ensure they in good condition.
• Keep tight grip on the handles/grip surface.
• Maintain this product in accordance with these instructions and keep it well
lubricated (where appropriate).
• Plan your work schedule to spread any high vibration tool use across a longer
period of time.
Emergency
Familiarize yourself with the use of this product by means of this instruction manual.
Memorize the safety directions and follow them to the letter. This will help to
prevent risks and hazards.
• Always be alert when using this product, so that you can recognize and handle
risks early. Fast intervention can prevent serious injury and damage to property.
• Switch off and disconnect from the power supply if there are malfunctions.
Have the garden power tool checked by a qualified professional and repaired,
if necessary, before you operate it again.
Residual Risks
Even if you are operating this product in accordance with all the safety
requirements, potential risks of injury and damage remain. The following dangers
can arise in connection with the structure and design of this product:
• Health defects resulting from vibration emission if the product is being used over
long periods of time or not adequately managed and properly maintained.
• Injuries and damage to property due to broken cutting attachments or the
sudden impact of hidden objects during use.
• Danger of injury and property damage caused by flying objects.

SYMBOLS
9
On the product, the rating label and within these instructions you will find among others he following
symbols and abbreviations. Familiarise yourself with them to reduce hazards like personal injuries
and damage to property.
n
o
DNOITANALPXE/NOITANGISENEMA
SLOBMY
V Volts Voltage
A Amperes Current
Hz Hertz Frequency (cycles per second)
W
hrs
/min Per Minute
Designates that this tool is in compliance with
Lithium-Ion battery recycling program requirements
Safety Alert Symbol Precautions that involve your safety.
Eye and Head Protection
Gloves
Safety Footwear
Wear non-slip safety footwear when using this equipment.
Wear non-slip, heavy-duty protective gloves when
handling the pole saw and the blade.
Kickback
Electric Shock
No Hands Symbol
Keep Bystanders Away Keep all bystanders at least 50' (15 m) away.
Failure to use in dry conditions and to observe safe
practices can result in electric shock.
DANGER! Beware of kickback.
Risk of Electrocution DANGER! Risk of electrocution!
Failure to keep your hands away from the blade will
No Load Speed
Class II Construction
Lithium-Ion Battery
Recycling
Read the Operator’s Manual
Rational speed, at no load
Double-insulated construction
Hours
Watts Power
Time
Revolutions, strokes, surface speed, orbits etc.,
per minute
Wear eye and head protection when operating this
equipment.
To reduce the risk of injury, user must read and
understand operator’s manual before using this product.
10
The following signal words and meanings are intended to explain the levels of risk associated with
this product.
SERVICE
Servicing requires extreme care and knowledge and should be performed only by a qualified service
technician. For service we suggest you return the product to your nearest
AUTHORIZED
SERVICE CENTER for repair. When servicing, use only identical replacement parts.
WARNING
To avoid serious personal injury, do not attempt to use this product until you have read this Owner's
Manual thoroughly and understand it completely. If you do not understand the warnings and
instructions in this Owner's Manual, do not use this product. Call the Toll-free Helpline
(866)-384- 8432 for assistance. The operation of any power tool can result in foreign objects being
thrown into your eyes, which can result in severe eye damage. Before operating a power tool, always
wear safety goggles, safety glasses with side shields, or a full face shield when needed.
We recommend a Wide Vision Safety Mask for use over eyeglasses or standard safety glasses with
side shields. Always use eye protection that is marked to comply with ANSI Z87.1.
WARNING
The operation of any power tool can result in foreign objects being thrown into your eyes,
which can result in severe eye damage. Before beginning power tool operation, always
wear safety goggles or safety glasses with side shields and, when needed, a full face shield.
DANGERIndicates an imminently hazardous situation, which, if not
avoided, will result in death or serious injury.
WARNING Indicates a potentially hazardous situation, which, if not avoided,
could result in death or serious injury.
CAUTIONIndicates a potentially hazardous situation, which, if not avoided,
may result in minor or moderate injury.
CAUTION(Without Safety Alert Symbol) Indicates a situation that may
result in property damage.
SYMBOLS
SAVE THESE INSTRUCTIONS
SYMBOL SIGNAL MEANING
We recommend Wide Vision Safety Mask for use over eyeglasses or standard safety glasses with
side shields. Always use eye protection which is marked to comply with ANSI Z87.1.

KNOW YOUR CORDLESS BRUSH CUTTER
Know Your Product ( Fig. 1-1.1 )
11
Fig. 1
1
2
3
4
5
7
13
10
11
8
12
15
14
9d
9a
9b
9c
9e
9
6a
6b
6
19
18
15
14
20 21
16
17
1a

KNOW YOUR CORDLESS BRUSH CUTTER
1. Battery Dock
1a. Slot
2. Rear Handle
3. ON / OFF Switch
4. Lock-Off Button
5. Upper Shaft
6. Control Handle
6a. Lock-Off Button
6b. On / Off Switch
7. Front Handle (Bike Handle)
8. Bracket
9. Shoulder Harness
9a. Snap Clip
9b. Metal Tool Support Clasp
9c. Clasp Release Bar
9d. Hip Protection Pad
9e. Plastic Locking Buckle
10. Locking Collar
11. Lower Shaft
12. Motor Housing
13. Air Vents
14. Safety Guard
15. Brush Cutter Blade
16. Locking Washer
17. Nut
18. Spindle
19. Backing Flange
20. Multi Tool
21. Spindle Lock Rod
Unpacking
• Unpack all parts and lay them on a flat, stable surface.
• Remove all packing materials and shipping devices if applicable.
• Make sure the delivery contents are complete and free of any damage. If you find that parts are
missing or show damage do not use the product but contact your dealer. Using an incomplete or
damaged product represents a hazard to people and property.
• Ensure that you have all the accessories and tools needed for assembly and operation. This also
includes suitable personal protective equipment.
You Will Need
(Items Not Supplied)
• Suitable personal protective
Equipment
• Battery pack 40LB4001
• Charger 40LC01-ETL
(Item Supplier)
• Multi tool
• Spindle lock rod
• Shoulder Harness
• Brush Cutter Blade
• Upper Handle Assembly
• Lower Brush Cutter Assembly
• Front Handle
• Safety Guard
• Hardware pack (Backing Flange,
Locking Washer and Nut)
12

ASSEMBLY
Assembling The Front Handle (Bike Handle) ( Fig. 2-3 )
NOTE: The 2 screws needed for attaching the bike handle to the upper shaft are found already in
the bike handle holes. They must be removed for installation.
• Align the respective handle (7) with the bracket (8) on the upper shaft (5) (Fig. 2).
• Attach the handle to the bracket on the upper shaft and fasten it with screws (Fig. 3).
Shaft Assembly ( Fig. 4-5 )
• Align the upper shaft (5) with the lower
shaft (11). The triangle-shaped recesses
(A) must face each other (Fig. 4).
• Insert the upper shaft (5) into the lower
shaft (11).
• Fasten both shafts with the locking sleeve
(10) (Fig. 5).
Safety Guard ( Fig. 7 )
NOTE: The 3 screws for attaching the guard to the motor housing
are found already in the motor housing. They must be
removed for installation.
• Attach the safety guard (15a) to the motor housing (12) using the
3 supplied screws. (12a) (Fig. 7).
Follow the assembly instructions step-by-step and use the pictures provided as a visual guide to easily
assemble the product! Do not connect the product to power supply before it is completely assembled!
WARNING
The product must be fully assembled before operation! Do not use a product that is only partly
assembled or assembled with damaged parts!
Fig. 2
8
7
screws
5
11
A
10
Fig. 3
Fig. 4 Fig. 5
13
12
15a
12a
Fig. 7
Padded Shoulder Straps (9e) Padded Shoulder Straps (9e)
Adjustable
Strap (9j) Adjustable
Strap (9j)
Adjustable
Strap (9j) Plastic
Protective
Sheet (9g)
Hip Protection
Pad (9d)
Strap
Crossover (9h)
Front View Shoulder Harness (9)
Hip Protection Pad (9d)
Back View Shoulder Harness (9)
Plastic Snap
Lock Buckle (9f)
Adjustable
Strap (9j)
Metal Tool
Support Clasp (9b)
Clasp Release
Bar (9c)
ASSEMBLY
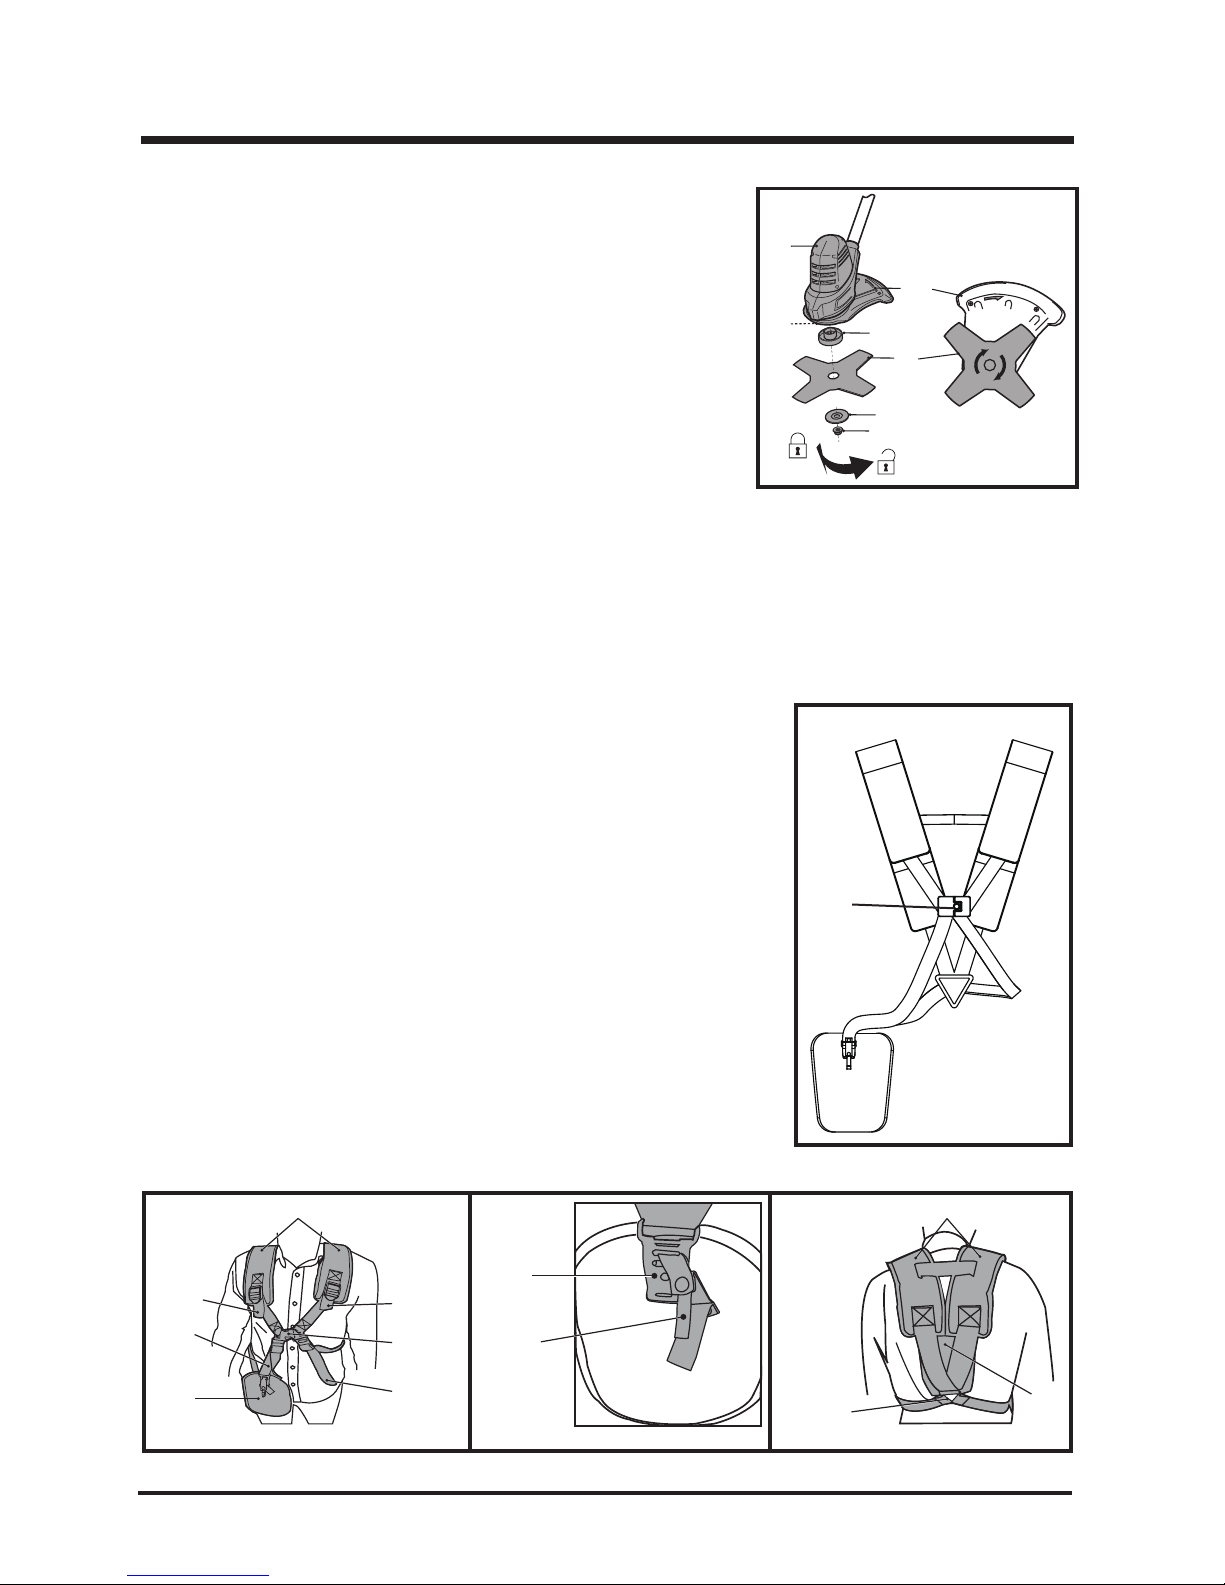
Brush Cutter Blade ( Fig. 8 )
• Make sure that the safety guard (15a) has been attached properly.
• Rotate the backing flange (19) until its hole is aligned with the
notch in the motor housing (12).
• Insert the spindle lock rod (23) into the hole to lock the spindle (18).
• Loosen the nut (21) clockwise and remove it together with the
locking washer (20).
• Remove the blade protection cover from the brush cutter blade
(18) before operation.
• Fit the brush cutting blade (15) onto the spindle (18) ensuring
that the directional arrows on the safety guard (14) and the cutting blade (15) match.
Ensure that the brush cutter blade sits flush on the extruded ring on the backing flange (19).
• Place the locking washer (20) onto the cutting blade (15).
• Secure the cutting blade (15) with the nut (21) using multi tool (22) (Fig. 8).
• Remove the spindle lock rod (23).
Wearing Shoulder Harness (9) ( Fig. 10-12 )
The shoulder harness (9) helps the operator to carry the product.
NOTE: The shoulder harness (9) should be worn similar to a backpack.
• Padded straps (9e) should be placed over the shoulder with the
plastic snap-lock buckle (9f) positioned in front at users chest.
• Hip protection pad (9d) with metal tool support clasp (9b) and clasp
release bar (9c) should facing
outward and be positioned on right
side of users body if done correctly
• Once positioned properly as shown; lock the snap-lock buckle (9f)
at users chest.
• The thin hard plastic protective sheet (9g) and “strap” crossover (9h)
should be located at users back.
• Adjust all straps (9j) so that the tension is distributed evenly on
shoulders.
Fig. 11
Fig. 12
Fig. 11a
14
12
18 19
20
21
15
15a
Fig. 8
Fig. 10
9f
Shoulder Harness (9)
ASSEMBLY
15
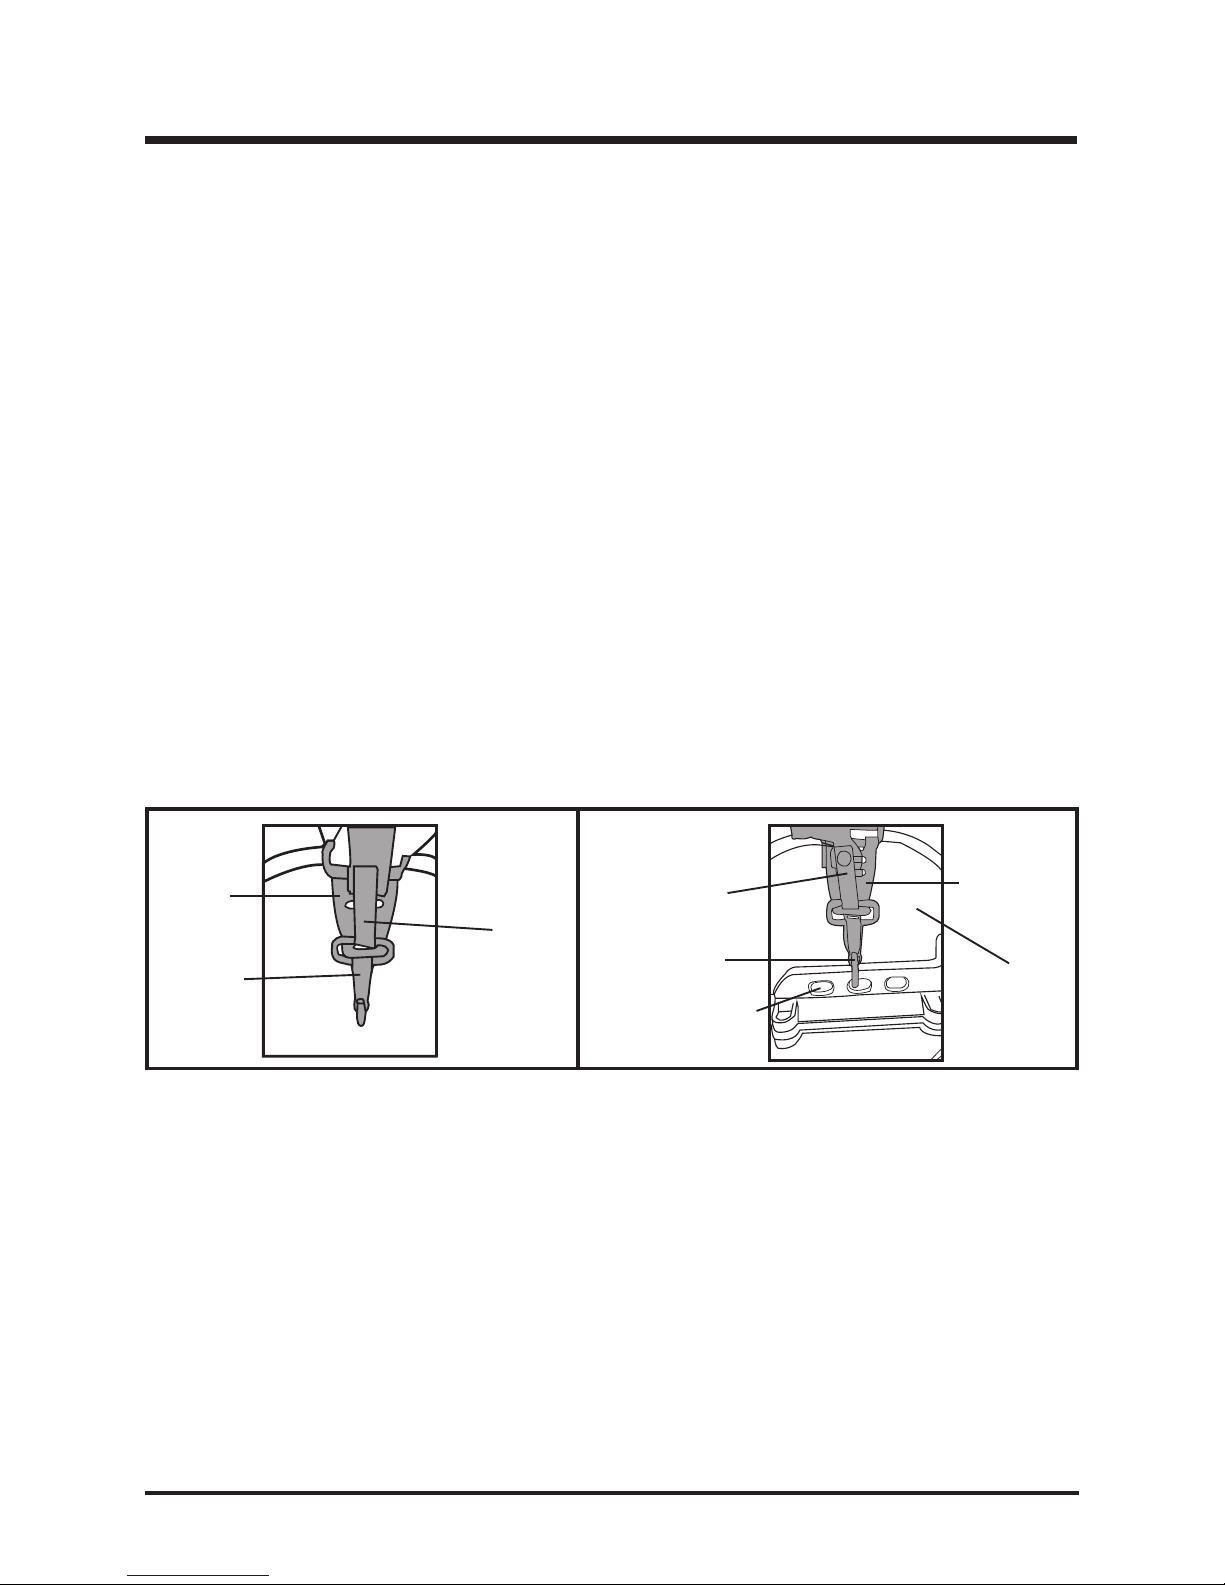
Attaching Tool ( Figs. 13-14 )
• Adjust length of shoulder harness (9) straps so that the metal tool support clasp (9b) is approximately
15cm below your waist; secure the product to the harness by using the snap clip (9a).
• Place snap clip (9a) over the flange on the metal tool support clasp (9b)
• Insert the clasp release bar (9c) into the slot opening on the base of the metal tool support clasp (9b).
• Attach the snap clip (9a) to one of the three height adjustment positions (B) to make most comfortable
for your height and securing tool.
• In case of emergency hold the upper shaft with the left hand, and use the right hand to pull the
red nylon ribbon that is attached to the clasp release bar (9c) upward which will release the clasp
release bar (9c) from the tool.
• The clasp release bar (9c) will release the product from the snap clip (9a) automatically once red
nylon ribbon has been pulled upward.
To remove the shoulder harness (9) from one of the three height connection positions (B), press
open the snap clip (9a).
• Before performing any work, ensure that the angle of the cutting head is parallel to the surface
being cut (Fig. 19).
Fig. 13 Fig. 14
Metal Tool
Support
Clasp (9b)
Snap Clip
(9a)
Clasp Release
Bar (9c)
Clasp Release
Bar (9c)
Metal Tool
Support
Clasp (9b)
Hip
Protection
Pad (9d)
Snap Clip (9a)
Height Adjustment
Positions (B)
BATTERY PACK AND CHARGER
OPERATION
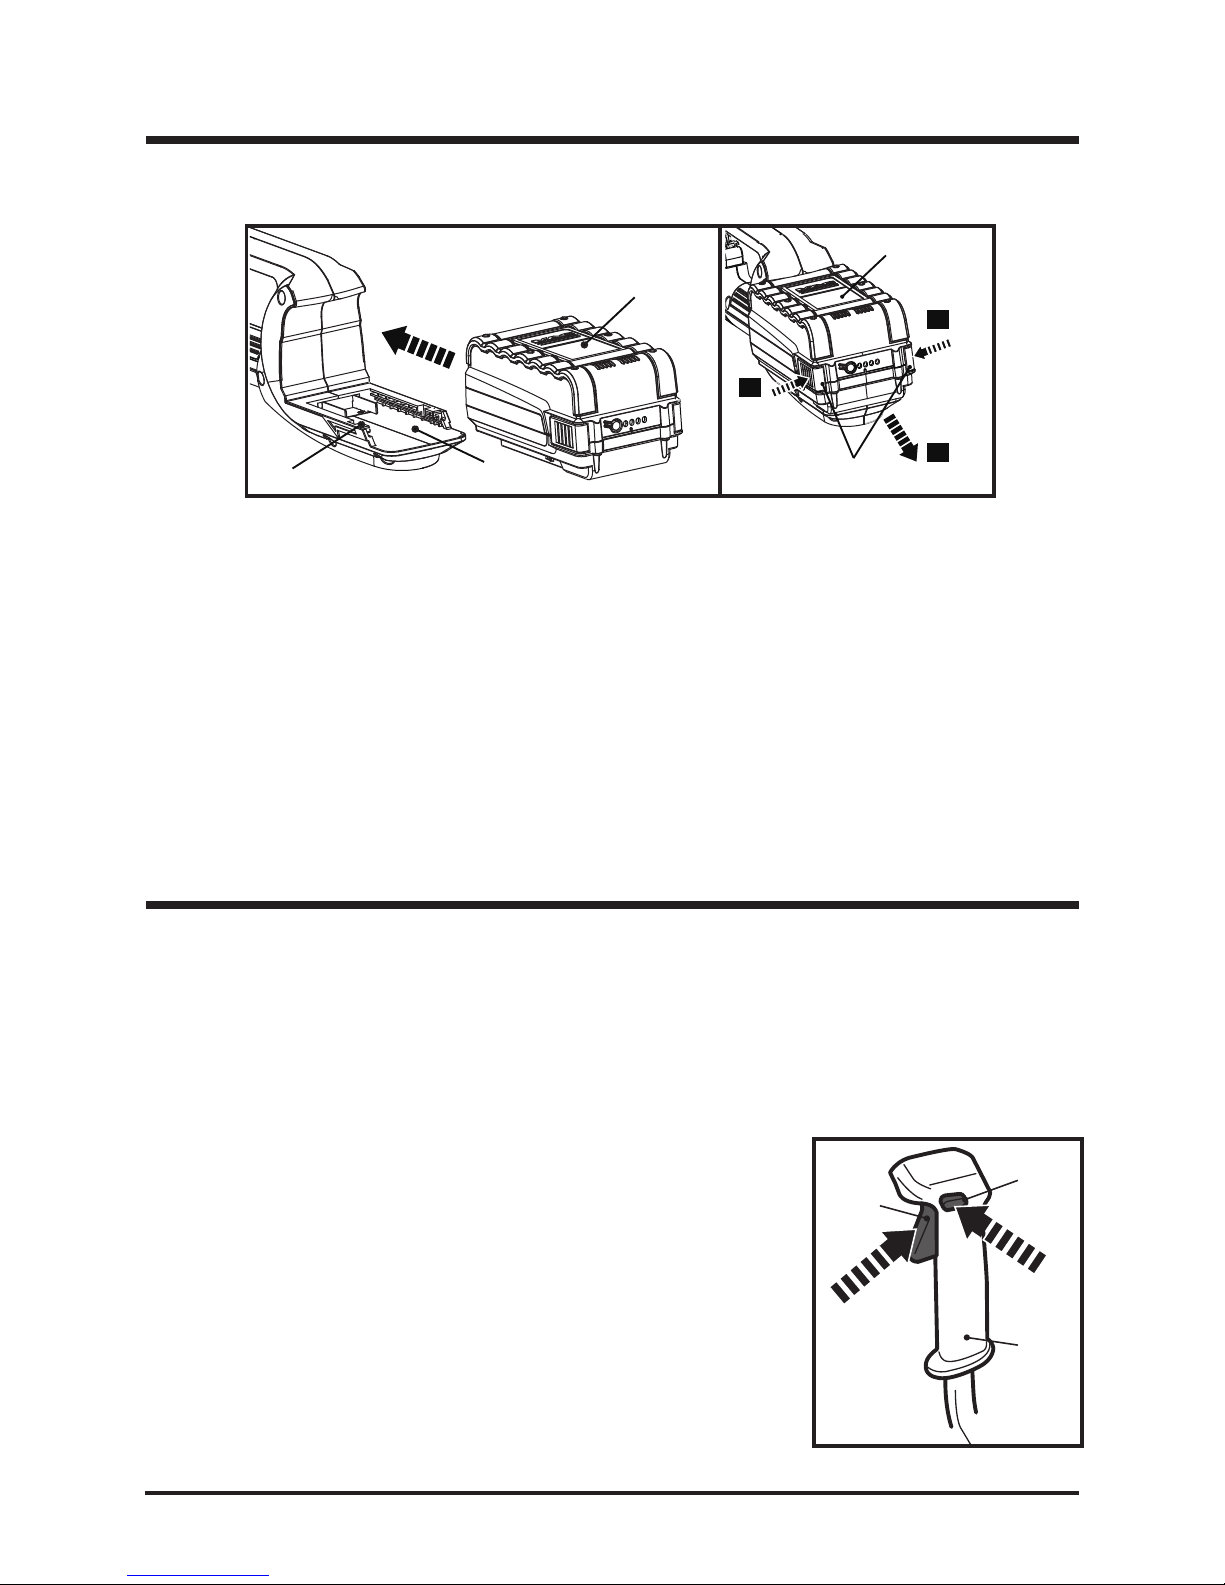
Connect Battery Pack
• Make sure the on/off switch is in its off position.
• Attach the battery pack to the product. Ensure it snaps in place.
• Your product is now ready to be used.
NOTE: Please consult the instructions for use supplied with battery pack and charger for more details.
Intended Use
This cordless brush cutter is designated with rated voltage of
36V d.c.. It is designed only to be used
with battery packs 40LB4001. For safety reasons it is essential to read the entire instruction manual
before first operation and to observe all the instructions therein. This product is intended for private
domestic use only, not for any commercial trade use. It must not be used for any purposes other than
those described.
ON / OFF Switch (Bike Handle)
1. Press the lock-off button and hold it in position (Fig. 17, STEP 1).
2. Press the on/off switch to switch the product on (Fig. 17, STEP 2).
The lock-off button can then be released.
3. Release the on/off switch to switch the product off.
Fig. 15 Fig. 16
Fig. 17
16
1
A
1a 2.
1.
1.
A
B
6b
6a
6
STEP 1
STEP 2

17
OPERATION
General Operation
• Check the product, its battery pack and charger as well as accessories for damage before each
use. Do not use the product if it is damaged or shows wear.
• Double check that accessories or cutting device are properly fixed.
• Always hold the product by its handles. Keep the handles dry and free from lubricant to ensure
safe support.
• Ensure that the air vents are always unobstructed and clear. Clean them if necessary with a soft
brush. Blocked air vents may lead to overheating and damage the product.
• Switch the product off immediately if you are disturbed while working by other people entering the
working area. Always let the product come to complete stop before putting it down.
• Do not overwork yourself. Take regular breaks to ensure you can concentrate on the work and
have full control over the product.
Cutting ( Fig.18 )
• Attach the cutting blade to cut heavier weeds, brush and similar Vegetation.
• Hold the product firmly so that it sits with a gap between the product and your right side.
• Stand upright, do not lean forward and pay attention to posture. Keep both feet apart to help retain
your balance.
• Never hold the cutting head higher than your hip (Fig. 18); the higher you hold the cutting head
will increase the risk of objects being thrown.
Inspect the blade regularly for damage, cracks or breaks! Always replace a damaged blade!
Kickback (blade thrust): When working with the brush cutter blade there is always a risk of kickback
(blade thrust) if the cutting device comes into contact with a hard object! Kickback (blade thrust) will
cause the sudden stalling of the cutting device, which in turn results in the cutting device being forced
in the opposite direction to the rotation of the brush cutter blade! Ensure that you retain a firm grip
with both hands at any sign of such kickback (blade thrust), pay attention and retain a firm stance
to avoid injuries!
• It is best to use the brush cutter like a scythe (smoothly sweeping the blade to the right and left)
at ground level when cutting grass and thinning young stands.
• Exercise extreme caution when using this method of cutting. The higher cutting attachment is off
the ground, greater the risk of injury is from cuttings being thrown sideways.
WARNING
To avoid hazards, remove the battery pack when the user wants to transport the product in another
area to prevent a random start.
WARNING
Avoid contact with stones, wire, glass etc. that may cause injury to the user!

18
OPERATION
Tips ( Fig. 19)
• Pay special attention when performing the work close to trees and fences. The cutting head could
damage sensitive bark, and damage fence posts (Fig. 19).
• Carefully maneuver the product around objects, such as trees and fences, ensuring it does not
come into contact with them.
Operation On Slopes
• Start on the low side of a slope, and work upward. This will reduce your risk of slipping and falling,
and it will give you a cutting angle that will better enable you to direct debris away from you.
• Do not let the cutting line or blade dig into the slope, because that can cause stones and dirt to
be thrown at you.
• Do not raise the cutting attachment above waist level during operation, because that would increase
the risk of thrown objects striking your face.
• Avoid steep slopes that would require holding the cutting attachment above waist level.
Avoid slippery slopes that might cause you to lose your balance.
After Use
• Switch the product off, remove the battery back and let it cool down.
• Check, clean and store the product as described below.
Fig. 18 Fig. 19
• To avoid grass wrapping around the blade when cutting very long grass, cut a top section first
using a side to side motion, but never above users waist. Repeat this method in several stages
until the material is has been sufficiently cut. Then cut at the bottom of the grass.
• Cutting wild growth and scrub; it is best to lower the brush blade down onto the growth to achieve
shredding effect – do not use the cutting attachment above waist height.
• Exercise extreme caution when using this method of cutting. The higher the cutting attachment is
off the ground, the greater the risk of injury from cuttings being thrown sideways.
• Carefully lower the blade from above when cutting long undergrowth, wild growth and scrub.
19
OPERATION
CARE AND MAINTENANCE
WARNING
To Reduce The Risk Of Injury Or Damage:
• Always switch the product off, remove the battery pack and let the product cool down before
performing inspection, maintenance and cleaning work!
• Only perform repairs and maintenance work according to these instructions! All further works must
be performed by a qualified specialist!
• Do not use chemical, alkaline, abrasive or other aggressive detergents or disinfectants to clean
this product as they might be harmful to its surfaces.
• Wear safety gloves when working on the cutting device and close to it! Use appropriate tools to
remove debris e.g. a brush or wooden stick! Never use your bare hands!
• Wear safety gloves when working on the cutting device and close to it! Use appropriate tools to
remove debris e.g. a brush or wooden stick! Never use your bare hands!
• Always use original spare parts for replacement. The cutting device must be replaced by an
identification blade. Do not attach any other type of cutting device!
• Please consult the instructions for use supplied with the battery pack and charger for more detail.
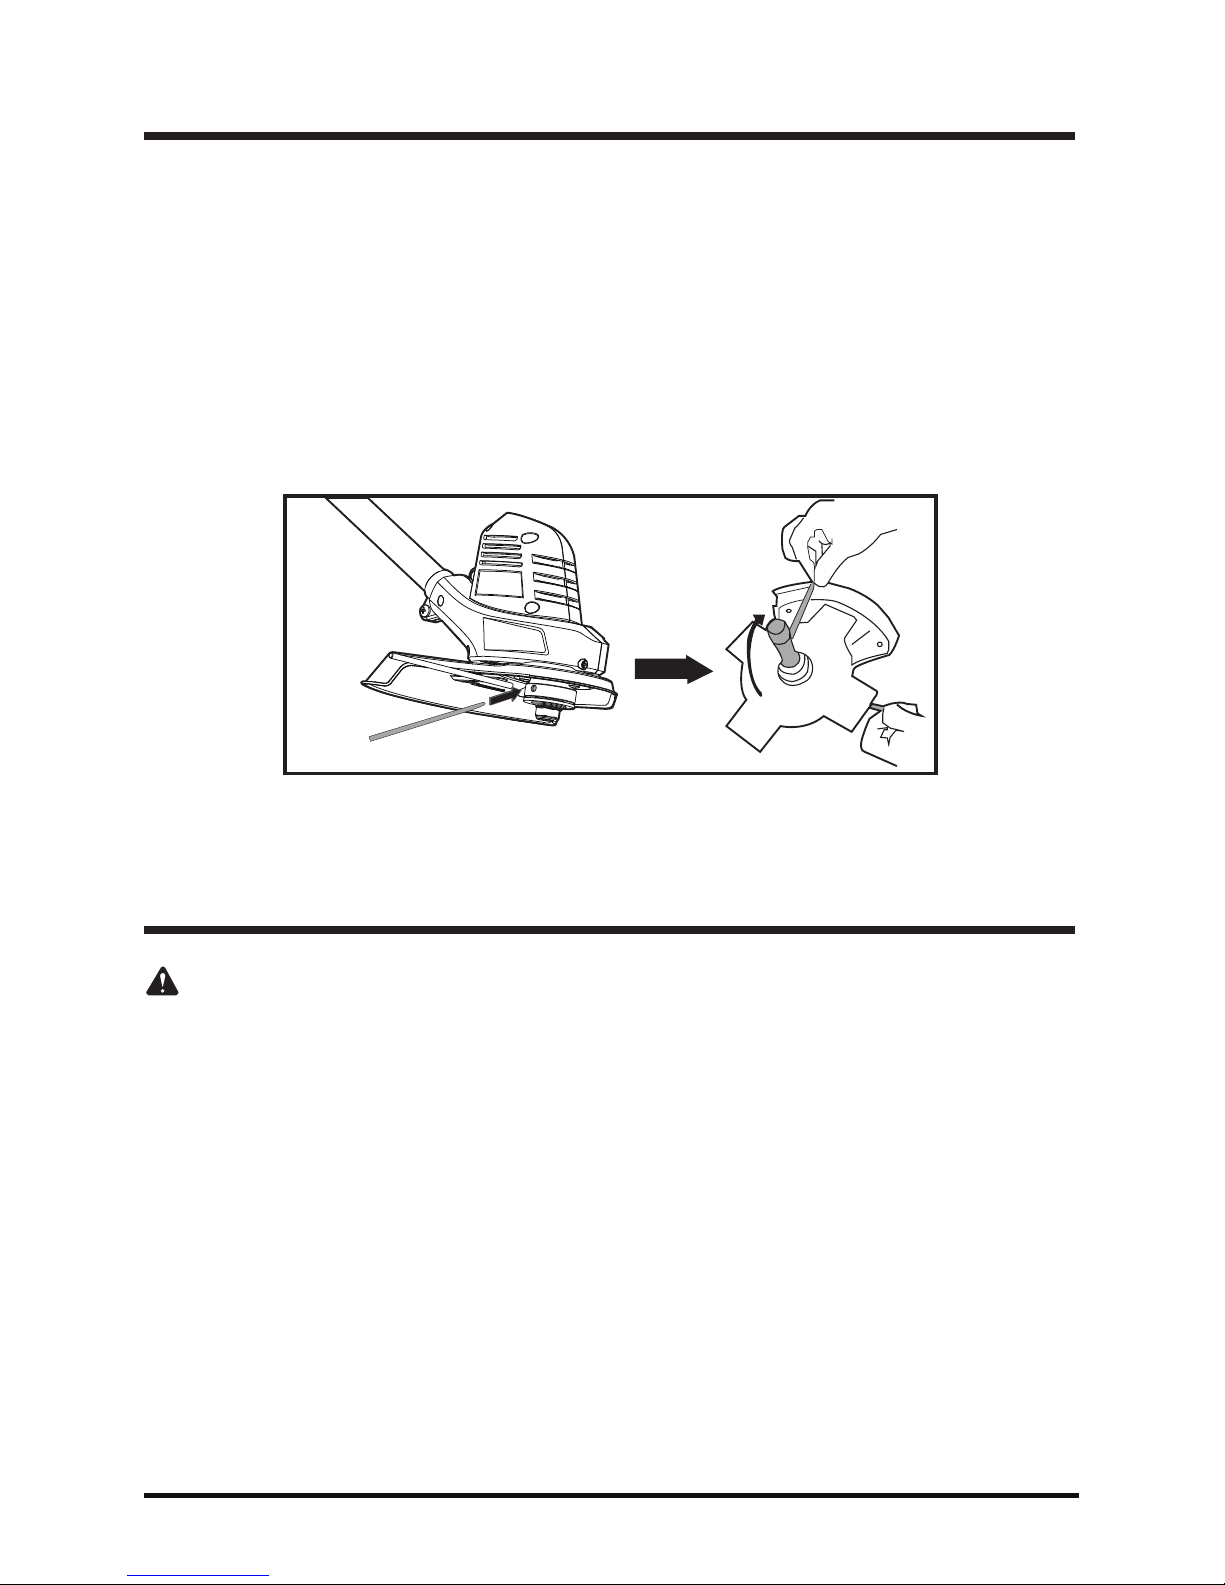
Fig. 20
Replacing The Blade ( Fig. 20)
• Replace the cutting blade with a one of the same type when it is worn or shows damage.
Remove the battery before replacing the blade.
• Removing the worn or damaged blade:
1. To lock the axle, push spindle lock rod (21) sideways into the hole provided on the motor housing
(12) and on the backing flange ( 19 ).
2. Unscrew the fixing nut(17) clockwise with the aid of the multi tool (20) and remove the locking
washer (16) and the brush blade (15).
• Refit the brush cutter blade to the spindle as described in section “Assembly – Brush cutter blade”.

20
CARE AND MAINTENANCE
General Care
• Keep the product clean. Remove debris from it after each use and before storage.
• Regular and proper cleaning will help ensure safe use and prolong the life of the product.
• Inspect the product before each use for worn and damaged parts. Do not operate it if you find
broken and worn parts.
General Cleaning
• Clean the product with a dry cloth. Use a brush for areas that are hard to reach.
• In particular clean the air vents after every use with a cloth and brush.
• Remove stubborn dust with high pressure air (max. 3 bar).
Brush Cutter Blade
• Keep the cutting blade clean and free of debris.
• Replace the cutting blade with a one of the same type when it is worn or shows damage.
• Refit the brush cutter blade to the spindle as described in section “Assembly – Brush cutter blade”.
Safety Guard
• Keep the safety guard clean and free of debris.
• Replace the safety guard with one of the same type when it is worn or shows damage.
Repair
This product does not contain any parts that can be repaired by the consumer. Contact an authorized
service center or a similarly qualified person to have it checked and repaired.
Storage
• Clean the product as described above.
• Store the product and its accessories in a dry, frost-free place.
• Always store the product in a place that is inaccessible to children. The ideal storage temperature
is between 10 and 30°C.
• We recommend using the original package for storage or covering the product with a suitable cloth
or enclosure to protect it against dust.
Transportation
• Switch the product off and remove the battery pack before transporting it anywhere.
• Attach the blade cover to the brush cutter blade. Attach other transportation guards, if applicable.
• Always carry the product by its gripping handles.
• Protect the product from any heavy impact or strong vibrations which may occur during transportation
in vehicles.
• Secure the product to prevent it from slipping or falling over.
Table of contents
Other LawnMaster Brush Cutter manuals


