LB Altimeters ALTISET II User manual

ALTISET II
- Rev. 1.01 Page 1 of 16
ALTISET II MANUAL
LB Altimeters
ALTISET II is a trademark of LB Altimeters, Denmark
LB Altimeters operates a policy of continuous development
Therefore, we reserve the right to make changes and improvements to any of the
products described in this guide without prior notice
www.LBAltimeters.com
WARNING
The
ALTISET II,
and all compatible units, are intended to be a backup device and must not be relied upon as your primary means of maintaining altitude awareness.
Use the
ALTISET II
, and all compatible units, at your own risk
Altimeters may give erroneous readings if you are tumbling or the altimeter is in a burble (wake). Chest mount altimeters are more vulnerable to this problem
compared to hand/wrist mounted altimeters. If you are in doubt about how this limitation affects your skydiving, consult a licensed instructor
DO NOT use this equipment unless you are currently participating in, or have successfully passed, an approved skydiving course
Please read ALL instructions carefully prior to use
Any
ALTISET II
compatible unit must be switched
ON
prior to entering the airplane

ALTISET II
- Rev. 1.01 Page 2 of 16
CONTENTS
CONTENTS .......................................................................................................................................................................................... 2!
INTRODUCTION.................................................................................................................................................................................... 3!
Features......................................................................................................................................................................................... 3!
Functions ....................................................................................................................................................................................... 3!
DESCRIPTION ...................................................................................................................................................................................... 3!
TURN UNIT ON / OFF ............................................................................................................................................................................. 3!
Turn unit ON.................................................................................................................................................................................... 3!
Turn unit OFF................................................................................................................................................................................... 3!
DISPLAY ............................................................................................................................................................................................ 4!
Startup .......................................................................................................................................................................................... 4!
Main window................................................................................................................................................................................... 4!
Value window .................................................................................................................................................................................. 4!
Battery Indicator ............................................................................................................................................................................. 4!
MENU OVERVIEW.................................................................................................................................................................................. 5!
ALL SETTINGS .................................................................................................................................................................................. 5!
ALFA SETTINGS ................................................................................................................................................................................ 5!
ECHO SETTINGS................................................................................................................................................................................ 5!
NAVIGATING MENUS / INPUT VALUES ....................................................................................................................................................... 5!
ALL SETTINGS...................................................................................................................................................................................... 6!
Basic Settings ................................................................................................................................................................................. 6!
ALFA SETTINGS.................................................................................................................................................................................... 7!
Date / Time..................................................................................................................................................................................... 7!
ALFA Setup ..................................................................................................................................................................................... 7!
Turn OFF ALFA ................................................................................................................................................................................. 8!
Return ALFA to Factory Default settings ................................................................................................................................................ 8!
Reset ALFA...................................................................................................................................................................................... 8!
ECHO SETTINGS ................................................................................................................................................................................... 9!
Memory Bank Selection ..................................................................................................................................................................... 9!
Warning Altitude Selection ................................................................................................................................................................ 9!
ECHO Setup....................................................................................................................................................................................10!
Test ECHO ......................................................................................................................................................................................10!
Turn OFF ECHO ................................................................................................................................................................................10!
Return ECHO to Factory Default settings...............................................................................................................................................10!
Reset ECHO ....................................................................................................................................................................................11!
FUNCTIONALITY ..................................................................................................................................................................................12!
IR Mode Activation – ALFA and ECHO ...................................................................................................................................................12!
IR Mode Activation – MIL AltiTrack......................................................................................................................................................12!
MAINTENANCE....................................................................................................................................................................................13!
Reset ALTISET II..............................................................................................................................................................................13!
Battery Change...............................................................................................................................................................................13!
Trouble Shooting ............................................................................................................................................................................13!
SPECIFICATIONS .................................................................................................................................................................................14!
WARRANTY ........................................................................................................................................................................................15!
WAIVER OF LIABILITY...........................................................................................................................................................................15!
QUICK START & ROAD MAP ....................................................................................................................................................................16!

ALTISET II
- Rev. 1.01 Page 3 of 16
INTRODUCTION
The
ALTISET II
remote control is an optional accessory developed by LB Altimeters, compatible with Military
AltiTrack, ALFA and ECHO altimeters. It can be used to change settings on a single or multiple compatible units,
accurately and efficiently by a single operator.
The
ALTISET II
remote control must be in line of sight within 30 cm/10 inch of the IrDA transceiver.
Features
-IrDA communication
-OLED menu screen
-Water proof and shock resistant aluminum casing with reinforced glass
-Intuitive menu system for ease of use
Functions
-User selection of Basic Settings for all compatible units:
omBar Offset
oBacklight Settings
-User selection of Settings for ALFA:
oFeet / meter and mph / kmh
oDate / Time
oJump Counter
oRESET / Turn OFF
-User selection of Settings for ECHO:
oFeet / meter
oPre-set Modes:
§Tandem
§Student
§Expert
oWarnings
oRESET / Turn OFF
DESCRIPTION
1 Back / Value Down
2 Scroll Menu / Confirm Value
3 Forward / Value Up
4 OLED Display
5 IrDA port
6 IR indicator - LINKED
7 Battery indicator - BATT
8 Battery compartment
9 Reset button
TURN UNIT ON / OFF
Turn unit ON
With the unit OFF, press any button to turn unit ON and enter main window
Turn unit OFF
The
ALTISET II
automatically returns to the main window if no button has been pressed within 1 minute, and IR transmit is not active
The
ALTISET II
automatically switches OFF if no button has been pressed within 2 minutes, and IR transmit is not active

ALTISET II
- Rev. 1.01 Page 4 of 16
DISPLAY
Startup
When turning ON
ALTISET II
, the unit will display the main window
Main window
The main window is the default window after the unit is turned ON, and starting point for any actions
1 Headline / Current Window
2 Menu Item 1
3 Menu Item 2
4 Menu Item 2
5 Menu Forward / Value
Value window
The value window appears when selecting a numeric value for any Settings
1 Headline / Current Setting
2 Value of Setting
Battery Indicator
The battery indicator BATT will flash when the battery level is low.
The batteries must be replaced as soon as possible
2
3
1
5
4
1
2

ALTISET II
- Rev. 1.01 Page 5 of 16
MENU OVERVIEW
The
ALTISET II
menu system consists of 3 separate areas, which include the following (use road map for reference)
ALL SETTINGS
ALFA SETTINGS
ECHO SETTINGS
mBar Offset
Backlight ON/OFF
Backlight Intensity
Date / Time
Setup
Turn unit OFF
Factory Default
Reset Unit
Warnings
Setup
Test Sound
Turn unit OFF
Factory Default
Reset Unit
NAVIGATING MENUS / INPUT VALUES
Menus on the
ALTISET II
are navigated using the 3 buttons on the front of the
ALTISET II
:
Use center button
to scroll through menu
Use right button to
move forward to a menu
or select a value
Use left button to
return to a previous menu
Values on the
ALTISET II
are changed and confirmed using the 3 buttons on the front of the
ALTISET II
:
Press and hold left button
to decrease value
Press and hold right
button to increase value
Press center button
to confirm value

ALTISET II
- Rev. 1.01 Page 6 of 16
ALL SETTINGS
ALL
Settings are used to
setup the basic Settings for all compatible LB altimeters
Turn on
ALTISET II
or use to return to main window
Press to scroll to select ALL
Press to move forward to ALL Settings
Basic Settings
The following values can be changed:
MBAR: OFFSET mBar value
BACKLIGHT: Backlight ON / OFF
INTENSITY: Backlight intensity level (1-10)
Press to scroll to each individual value
Press to select and enter value
Press or to change the value
Press to confirm
Once all values have been entered, press to scroll to select TRANSMIT
Press to start IrDA transmission, and point towards LB altimeter set in IrDA transceiver mode

ALTISET II
- Rev. 1.01 Page 7 of 16
ALFA SETTINGS
ALFA Settings are used to
setup the ALFA digital Altimeter
Turn on
ALTISET II
or use to return to main window
Press to scroll to select ALFA
Press to move forward to ALFA Settings
Date / Time
Press to scroll to select DATE / TIME
Press to move forward to Date / Time Settings
The following values can be changed:
YEAR: The current year
MONTH: The current month
DAY: The current day
HOUR: The current hour
MINUTE: The current minute
Press to scroll to each individual value
Press to select and enter value
Press or to change the value
Press to confirm
Once all values have been entered, press to scroll to select TRANSMIT
Press to start IrDA transmission, and point towards any
ALFA
set in IrDA transceiver mode
ALFA Setup
Press to scroll to select SETUP
Press to move forward to ALFA Setup
The following values can be changed:
COUNTER: Daily Counter
ALT.UNIT: Feet / meter
SPEED: Mph / Kmh
DIVE TYPE: Dive Type
Press to scroll to each individual value
Press to select and enter value
Press or to change the value
Press to confirm
Once all values have been entered, press to scroll to select TRANSMIT
Press to start IrDA transmission, and point towards any
ALFA
set in IrDA transceiver mode

ALTISET II
- Rev. 1.01 Page 8 of 16
Turn OFF ALFA
Selecting this option will turn
ALFA
OFF
Press to scroll to select OFF
Press to start IrDA transmission, and point towards any
ALFA
set in IrDA transceiver mode
Return ALFA to Factory Default settings
Selecting this option will return
ALFA
to Factory Default settings
Press to scroll to select FACTORY D.
Press to start IrDA transmission, and point towards any
ALFA
set in IrDA transceiver mode
Reset ALFA
Selecting this option will reset
ALFA, with IrDA active
Press to scroll to select RESET WITH IR
Press to start IrDA transmission, and point towards any
ALFA
set in IrDA transceiver mode

ALTISET II
- Rev. 1.01 Page 9 of 16
ECHO SETTINGS
ECHO
Settings are used to
setup the ECHO digital Altimeter
Turn on
ALTISET II
or use to return to main window
Press to scroll to select ALFA
Press to move forward to ALFA Settings
Memory Bank Selection
Press to scroll to select WARNINGS
Press to move forward to WARNINGS
The following menus can be selected:
STUDENT: Enter Warning altitudes for Student Memory Bank
TANDEM: Enter Warning altitudes for Tandem Memory Bank
EXPERT : Enter Warning altitudes for Expert Memory Bank
After making changes, Memory Banks can be transmitted individually from inside their
respectivemenu, or all at once by moving back to the Memory Bank Selection
Press to scroll to each individual Memory Bank
Press to select the individual Memory Bank
Press or to move back or forward between Memory Banks
To transmit all Memory Banks, press to scroll to select TRANSMIT ALL
Press to start IrDA transmission, and point towards any
ECHO
set in IrDA transceiver mode
Warning Altitude Selection
Press to scroll to select one of the 12 Warning altitudes for the selected Memory Bank
Press to move forward and input value for the selected Warning altitude
The following Warnings can be selected in each Memory Bank:
Flight1 – Flight4: Enter Warning altitudes for Aircraft Alarms
H-speed1 – H-speed4: Enter Warning altitudes for Freefall Alarms
Canopy1– Canopy4 Enter Warning altitudes for Canopy Alarms
If no value is added, the Warning will disabled.
Press to scroll to each individual Warning
Press to select and enter the individual altitude
Press or to change the altitude
Press to confirm
Once all values have been entered, press to scroll to select TRANSMIT for current Memory Bank
Press to start IrDA transmission, and point towards any
ECHO
set in IrDA transceiver mode

ALTISET II
- Rev. 1.01 Page 10 of 16
ECHO Setup
Press to scroll to select SETUP
Press to move forward to ALFA Setup
The following values can be changed:
Mode: Current Mode/Memory Bank
LED FLASH: Turn LED ON/OFF
SCROLL: Turn Altitude Scroll ON/OFF
ALT. UNIT: Feet / Meter
PITCH: Dive Type
GUIDE: Canopy Guide ON/OFF
Press to scroll to each individual value
Press to switch value, or select and enter value
Press or to change the value
Press to confirm (if applicable)
Once all values have been entered, press to scroll to select TRANSMIT
Press to start IrDA transmission, and point towards any
ECHO
set in IrDA transceiver mode
Test ECHO
Selecting this option will test the
ECHO Warnings
Press to scroll to select TEST
Press to start IrDA transmission, and point towards any
ECHO
set in IrDA transceiver mode
Turn OFF ECHO
Selecting this option will turn
ECHO
OFF
Press to scroll to select OFF
Press to start IrDA transmission, and point towards any
ALFA
set in IrDA transceiver mode
Return ECHO to Factory Default settings
Selecting this option will return
ECHO
to Factory Default settings
Press to scroll to select FACTORY D.
Press to start IrDA transmission, and point towards any
ECHO
set in IrDA transceiver mode

ALTISET II
- Rev. 1.01 Page 11 of 16
Reset ECHO
Selecting this option will reset
ECHO, with IrDA active
Press to scroll to select RESET WITH IR
Press to start IrDA transmission, and point towards any
ECHO
set in IrDA transceiver mode

ALTISET II
- Rev. 1.01 Page 12 of 16
FUNCTIONALITY
IR Mode Activation – ALFA and ECHO
Activate/Deactivate IR Mode on ALFA and ECHO digital altimeters, for communication with
ALTISET II
remote control
Press and hold for 5 seconds
IR will flash on LCD, and IR mode is active for 2 minutes
Activate IR Mode on
ALFA / ECHO
Activate IR Mode on
ALTISET II
Point the
ALTISET II
at the IR port on
ALFA
/
ECHO
ALFA / ECHO
adjusts to the
ALTISET II
preset parameters
Press to exit IR mode
IR Mode Activation – MIL AltiTrack
Activate/Deactivate IR Mode on MIL AltiTrack digital altimeter, for communication with
ALTISET II
remote control
Press and hold left front button for 5 seconds
OLED displays ‘IR ACTIVE’ and IR mode is active for 2 minutes
Activate IR Mode on MIL
AltiTrack
Activate IR Mode on
ALTISET II
Point the
ALTISET II
at the IR port on the
MIL AltiTrac
k
MIL AltiTrack
adjusts to the
ALTISET II
preset altitude and/or backlight
Press to exit IR mode
ALTISET II
- Rev. 1.01 Page 13 of 16
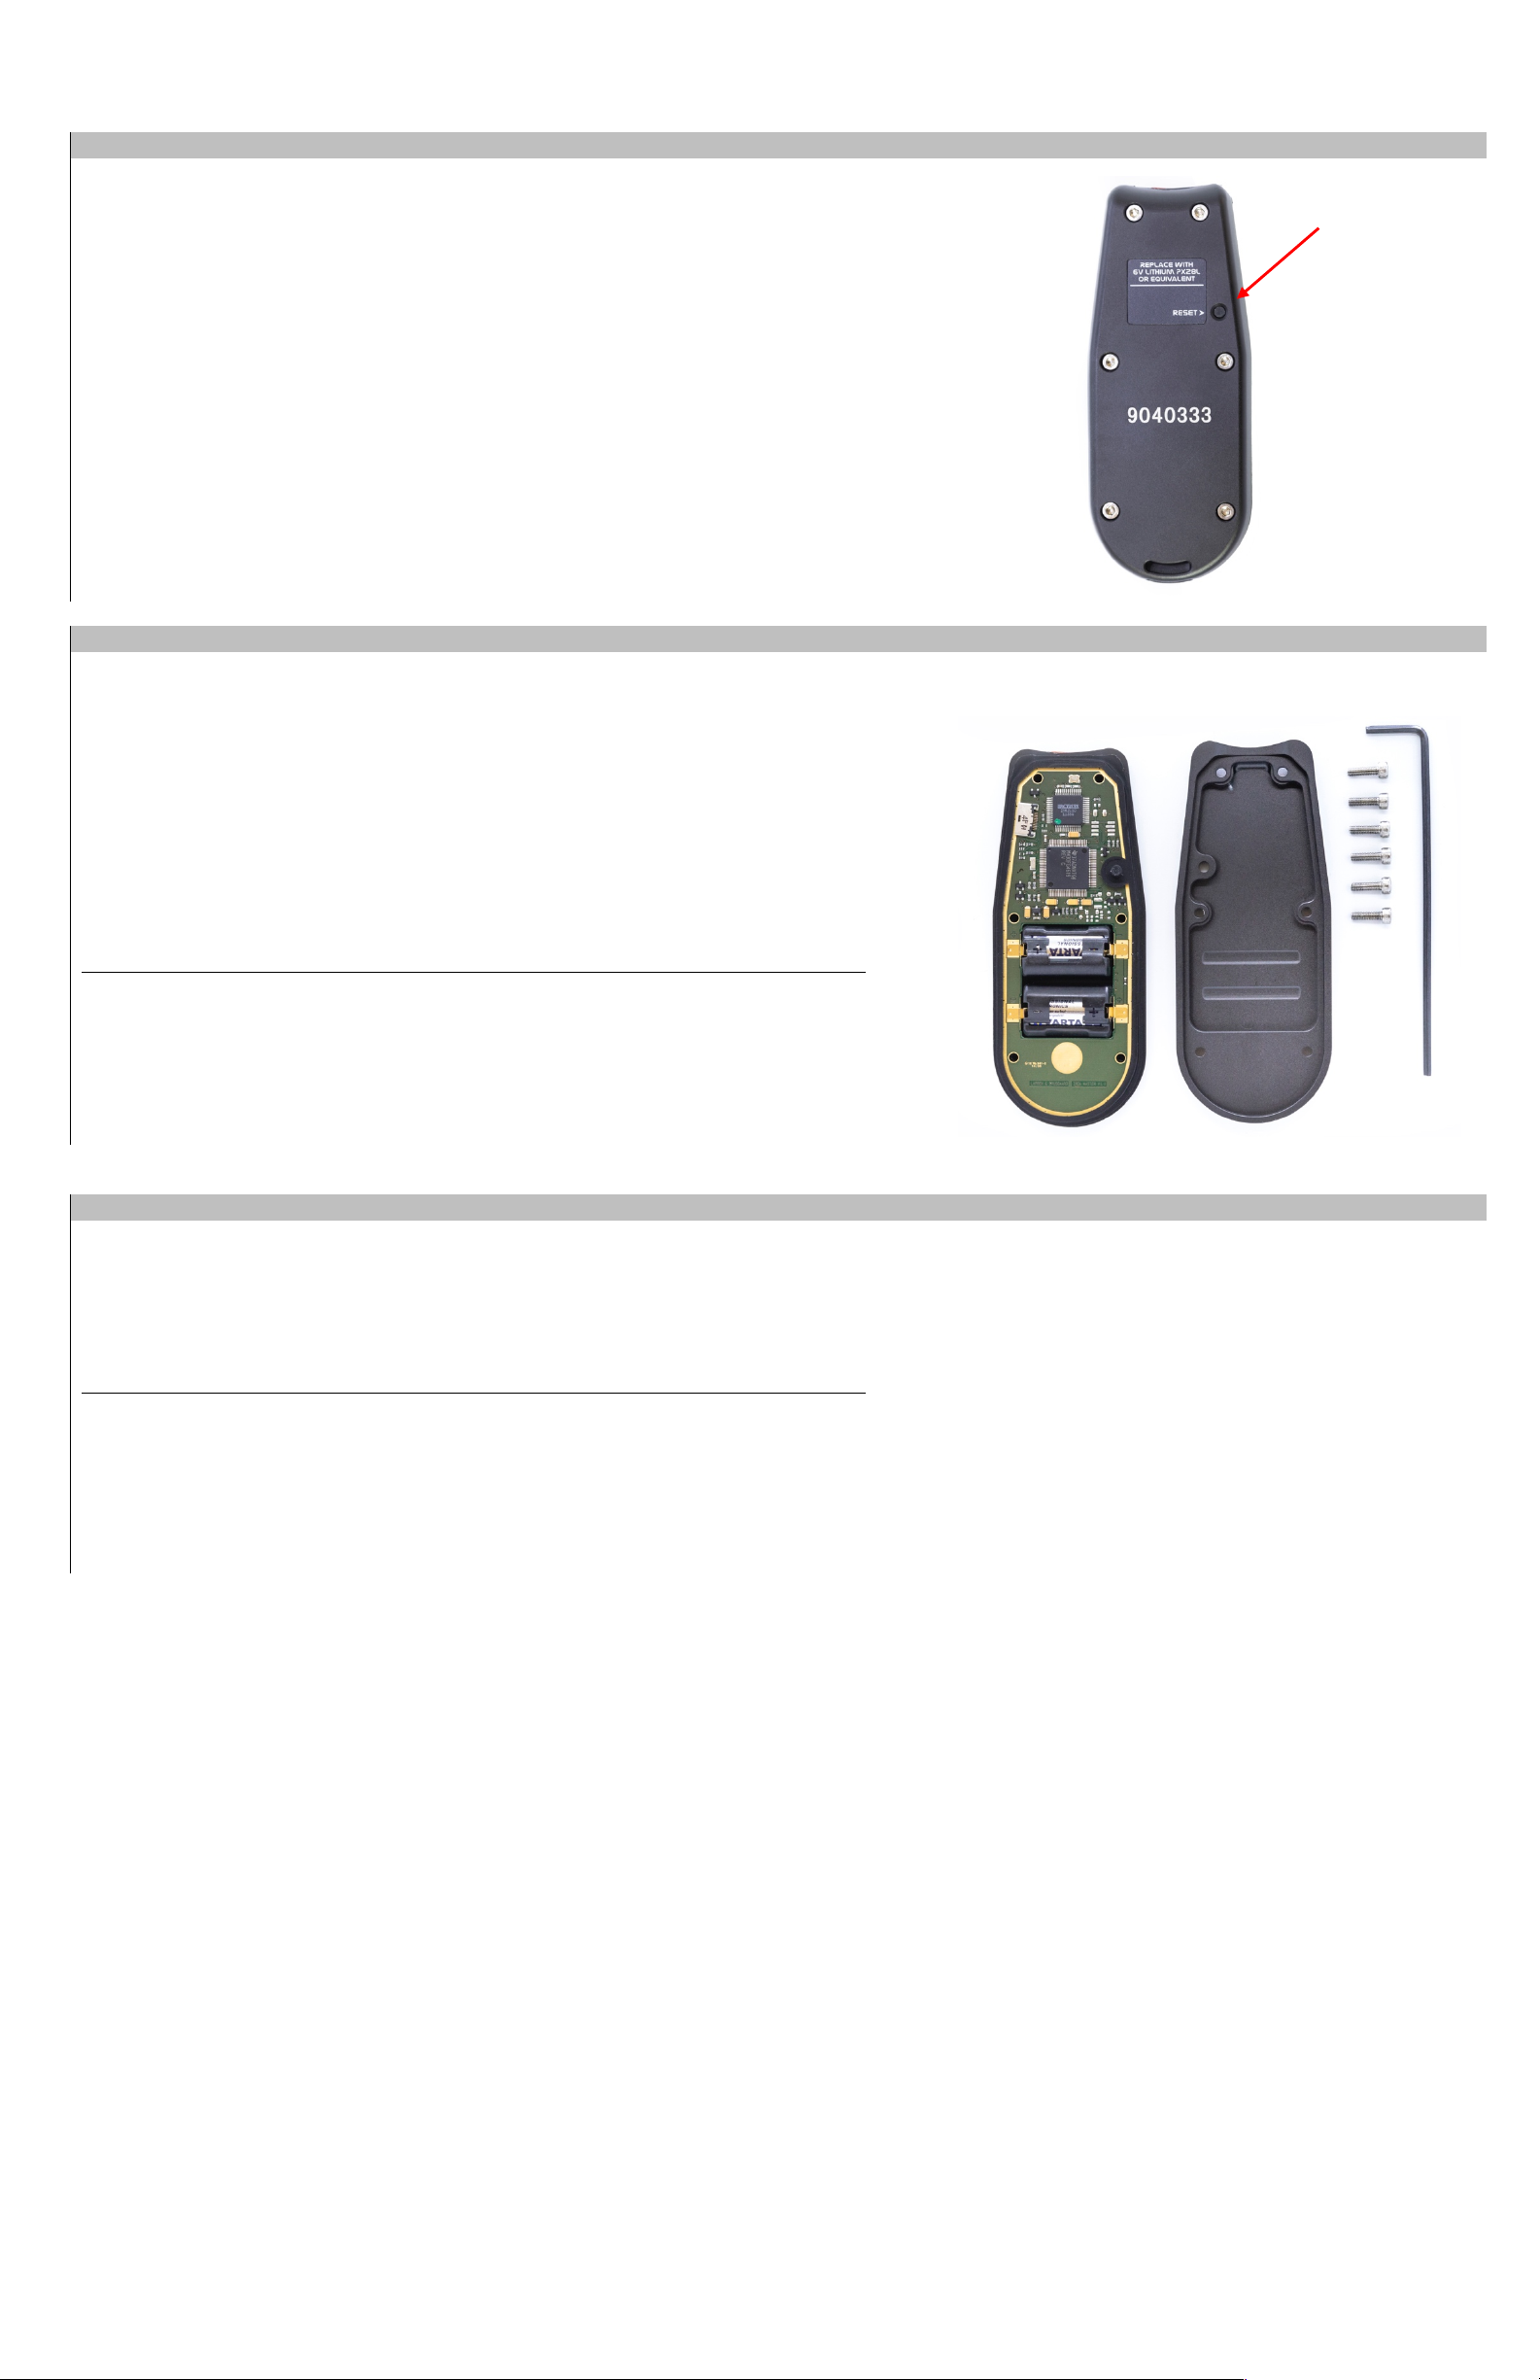
MAINTENANCE
Reset ALTISET II
A reset may be necessary for troubleshooting and firmware verification
Locate the button on the backside of the battery compartment
Use a paper clip or similar to press and release button
Battery system calibrates
The firmware version and battery voltage will be displayed after reset
Battery Change
Only use SANYO 2CR-1/3N batteries, or equivalent (2 ea.)
Battery cover screw specs: M3/T6 head (4.5mm length)
Remove the 6 screws and back cover
Remove both batteries by pushing down the battery holder to release
Install 2 new batteries into battery holders
Place battery holders into print from the front, with attention to polarity
Install back cover, and ensure rubber seal is in correct placement
Place and tighten 6 screws, using a torque screwdriver set
0.4 Nm
Reset
ALTISET II
after battery replacement
WARNING:
The battery cover and seal must be installed correctly, using correct screws and torque
Trouble Shooting
If the
ALTISET II
detects an issue, an error symbol is shown (ERR) with a number on the OLED screen
Always restart
ALTISET II
to attempt to remedy a single ERR code
If the ERR code persists, then also perform battery change
If the
ALTISET II
is still faulty after reset and battery change , it must be serviced by an LB Altimeters Service Center

ALTISET II
- Rev. 1.01 Page 14 of 16
SPECIFICATIONS
Mechanical:
Casing: Rugged, precision machined aircraft aluminum
Screen glass: Scratch proof lens made of high impact etched glass
Dimensions: 120mm x 50mm x 18mm
Weight: 136g
OLED viewing area: 4.2 cm2
MIL AltiTrack IrDa compatible: Yes
ALFA IrDa compatible: Yes
ECHO IrDa compatible: Yes
Other:
IrDa transmission range: Maximum 30 cm/ 10 inches
Operating altitude: 0 to 40,000 ft. (0 to 12,200 m)
Storing Temperature: -20C to +70C
Operating Temperature Range: -35C to +80C continuous operation
Storing Pressure: 200 to 1075 mbar
Maximum allowable humidity: Up to 99,9% relative humidity
Waterproof: No
Water resistant: Yes
Battery type: 2 x SANYO 2CR-1/3N batteries, or equivalent
L&B part no.: 801000
NATO Stock no. 5820-22-616-5040

ALTISET II
- Rev. 1.01 Page 15 of 16
WARRANTY
The following conditions apply to the
ALTISET II
warranty:
If within 12 months of the purchase of
ALTISET II
a defect or damage is identified by faulty manufacture, LB ALTIMETERS will repair the unit at no cost to the end user
To make a claim under this warranty, send the unit to an authorized dealer or directly to LB ALTIMETERS together with the dated purchase invoice or receipt.
The warranty becomes void if damage is caused by external circumstances or if the unit has been serviced or repaired by third parties unauthorized by our national
agents or LB ALTIMETERS. All further claims, especially for defects after skydiving accidents, are excluded. LB ALTIMETERS has no obligation to honor any extension of
warranty granted by any national agent
WAIVER OF LIABILITY
The buyer and user of the
ALTISET II
indemnify the manufacturer and vendor from any liability for damage incurred before, during and after skydiving with the
instrument
For download and support visit
www.LBAltimeters.com

ALTISET II - QUICK START & ROAD MAP
AltiSet II - Rev. 1.01 Page 16 of 16
Navigating Menus
Turn AltiSet II ON
AltiSet II is OFF
AltiSet II is ON
ForwardBack
Scroll Menu
Input Values
IncreaseDecrease
Confrm Value
Press
to step forward into ALL menu
SETTINGS menu for ALL units
Scroll to ALL using Scroll to menu items using
Press
to step forward into ALFA menu
SETTINGS menu for ALFA units
Scroll to ALFA using Scroll to menu items using
Press
to step forward into ECHO menu
SETTINGS menu for ECHO units
Scroll to ECHO using Scroll to menu items using
This manual suits for next models
1
Table of contents
Other LB Altimeters Measuring Instrument manuals

LB Altimeters
LB Altimeters ARES II User manual

LB Altimeters
LB Altimeters ARES II User manual

LB Altimeters
LB Altimeters ECHO User manual

LB Altimeters
LB Altimeters ALFA User manual

LB Altimeters
LB Altimeters ALFA-Q User manual

LB Altimeters
LB Altimeters ALFA User manual

LB Altimeters
LB Altimeters ARES II User manual


