Leader PYROS 3 User manual

PYROS 3

2
Product références :
V90.00.041
PYROS 3 with remote control and wireless remote control
English

3
1INTRODUCTION............................................................................................................... 4
2SAFETY INSTRUCTIONS................................................................................................. 6
3GENERAL CHARACTERISTICS & PERFORMANCES................................................... 7
3.1 General characteristics 7
3.2 Charger characteristics 8
3.3 Gas supply 8
3.4 The remotes control 8
3.5 Wired remote control 8
3.6 Wireless remote control 8
4IMPLEMENTATION INSTRUCTIONS............................................................................... 9
4.1 Assembly of the gas cylinder holder assembly 9
4.2 Connections and implementation 9
4.3 Gas cylinder connection 10
4.4 Positioning of the tray to the ground 10
4.5 Gas supply hose connection 10
4.6 Remote control connection 11
4.7 Filling the tray 11
5USE OF PYROS 3........................................................................................................... 12
5.1 Arming 12
5.2 Use of extinguishing agents 13
5.3 Instructions for use 13
5.4 Stop PYROS 3 14
6AUTONOMY AND POWER............................................................................................. 15
7SERVICING OPERATIONS ............................................................................................ 16
7.1 Precautions 16
7.2 Cleaning 16
7.3 Charging the battery 16
8ACCESSORIES USE (OPTIONS) :................................................................................. 17
8.1 Adapter and accessories 17
8.2 Implementation of the adapter and accessories 18
8.3 Handling Training accessories 19
9FAILURES....................................................................................................................... 19
10 WARRANTY.................................................................................................................... 20

4
1 INTRODUCTION
PYROS 3 is a fire trainer with water tray. It allows training in the use of different extinguishing
materials (all fire extinguishers, nozzles, portable foam units, etc ...) safely and with respect for
the environment.
Thanks to its wired remote control or its wireless remote control, PYROS 3 allows the trainer
to manage the fire (switching on and off) to accompany trainees safely during training
interventions.
The trainings conducted with PYROS 3 can be supplemented with the use of training modules
and enable personalized and realistic training: Oil explosion, aerosol explosion, fryer fire
bin fire, screen fire, electric motor fire, or electrical cabinet fire.
This manual has been designed to allow safe use of PYROS 3.
Instructions for use and maintenance must be followed to prevent incidents.
◄Wireless remote control
◄or wired remote control for
switching fire on and off
Handle for manipulation of the tray
(positioning, drain ...)
Propane gas cylinder
(Important: Industrial cylinder
without flow limiter)
If bottle of domestic
Propane gas, use kit domestic
bottle V90.80.080
Fire tray receiving
water
Gas circuit
Igniter
Flexible reinforced gas
supply hose
Control desk to stop and
control the flames
Gas valve
Wheels facilitating various
manipulations
Side holes to fill the water tray to
overflow.
Cable of the radio receiver of
the wireless remote control
Radio receiver
for the
wireless
remote control

5
Battery compartment
and electronics
Housing for wired
remote control
storage
Electrical connection
(on side - not seen here)
of the wired remote control
or of the radio receiver of the wireless
remote control.
Also allows you to plug in the charger
to charge the battery
Open / close gas valve
Gas hose for connecting gas
cylinders to control desk
Emergency stop
button
Reset key of the
emergency stop
button
Cap for blocking the gas
pipe n°2 when not used
Control desk
Connection for gas
supply hose
Gas regulator to
increase, decrease,
turn off the gas flow
Wireless
remote control
Radio receiver receiving
transmissions from the
wireless remote control
Propane gas cylinder
(Important: Industrial cylinder
without flow limiter)
If bottle of domestic
Propane gas, use kit domestic
bottle V90.80.080

6
2 SAFETY INSTRUCTIONS
–
• Read this manual completely and the instructions before implementation and use of
the equipment.
• Never use PYROS 3 tray without water.
• Regularly check the reinforced gas supply hose.
• The device only works with Propane gas.
• Use PYROS 3 only outdoors and away from flammable items.
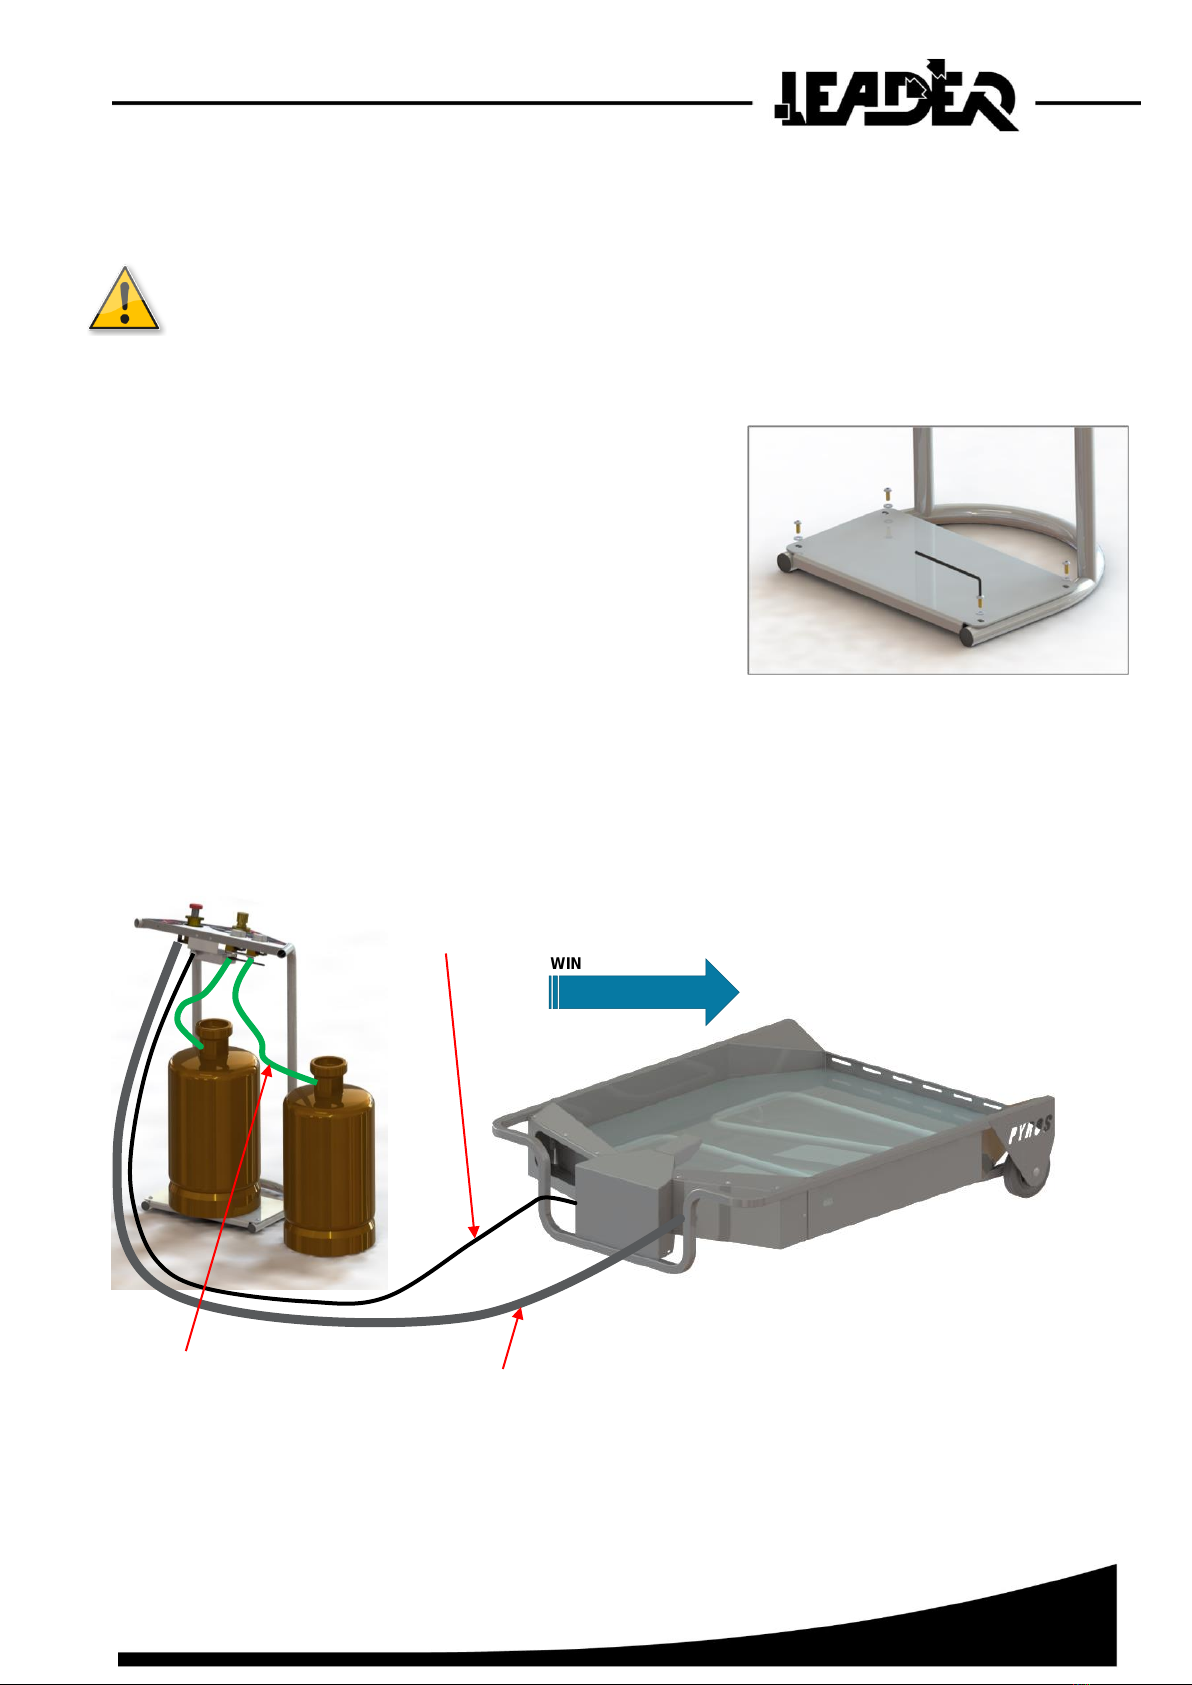
•Respect the safety distance tray / gas cylinder. It is given by the length of the 6 m gas
supply hose.
• Never use PYROS 3 beyond a pressure of 3 bar.
• Wear gloves for use and handling PYROS 3 elements to avoid any incident.
(cutting, burning ...)
• The trainer must permanently keep in hand the remote to control the fire.
• Never keep down the remote control button if no flame. This will remove the risk of spread
of non-ignited gas and its sudden inflammation outside fire tray.
• Any operation or attempt to disassemble, excluding consumable items such as the battery
or fuse, will void the manufacturer warranty.
• PYROS 3 operates only with gas in gaseous phase.
It is forbidden to feed your flame generator with propane in liquid form, especially with
carburetion bottles.
For good supply of the tray, the gas cylinders must be positioned upright. Never lie on the
side the gas cylinders. The PYROS 3 would work with gas in liquid phase and would be
irreparably damaged.
• Take care not to introduce sand or gravel in the gas supply hose or fittings of the unit. This
could damage the internal valve.
• The battery can be discharged to a minimum limit of 10 volts. Below this voltage, it will not
charge correctly anymore.
• Always replace defective parts with original parts supplied by LEADER.
• Keep the unit away from children.
• Do not use PYROS 3 in windy weather.
• Activate the emergency stop button before handling the tray (installation or removal of such
accessories)
• Do not smoke while handling the PYROS 3
REMINDER:
• Do not store propane gas cylinders inside a room. Provide an external storage.
• Training equipment using explosive fuels are intended for use by experienced
professionals. LEADER declines all responsibility for accidents or damage involving people
or property.

7
3 GENERAL CHARACTERISTICS & PERFORMANCES
3.1 General characteristics
❖Manufacturer: LEADER S.A.S
ZI des hautes vallées
Chemin N°34
76930 Octeville sur Mer
FRANCE
www.leader-group.eu
www.LeaderNorthAmerica.com
▪Content and features :
PYROS water fire pan
Material: Stainless steel 304
Dimensions: L117 x W96.5 x H26 cm –L3.84’ x W3.17’x H0.85’
Weight: 41,8 kg –92.15 lbs.
Fire area: 0,83 m²
Water capacity: 62 liters –13.64 gal
Gas flow rate at 1 bar = 36 kg/h –79.37 lbs/h , nominal flow rate at 2 bar = 59 kg/h –130.07 lbs/h.
Built-in rechargeable battery: 12 volts.
Water and dust resistant (IP67) connectors equipped with protective caps.
Gas supply control panel
Material: Stainless steel 304
Dimensions : L57 x W39.5 x H99 cm –L1.87’ x W1.3’ x H3.25’
Weight: 8,8 kg –19.4 lbs.
Gas pressure adjustable from 0 to 3 bar by pressure controller equipped with pressure gauge
“Emergency punch stop button” safety system.
Water and dust resistant (IP67) connectors equipped with protective caps.
Gas supplied by 1 or 2 propane cylinders (industrial type) without flow limiter (not provided).
Console easy to carry: stored in the fire container.
Wired remote control
Fire ignition and extinction remote control with safety switch.
Resistant to water splashes.
Electric cable: length 9 m (29.6’) – fire resistant (Standard CEI 331)
Wireless remote control
Range of 30 meters –98.5’
Resistant to water splashes.
Flexible reinforced gas supply hose
Length: 6 m (19.7’) with screwed coupling
Self-sealing.
Packaging
Carton case on a 120x100 cm palette
Temperature of use
from -5°C to +40°C
Distributor :
--to be filled in by the distributor--

8
3.2 Charger characteristics
Supply: 110 / 220 V –50 Hz Frequency
Charge time: 24 hours (when battery is fully discharged). Rely on the light on the charger.
For more information see the manufacturer attached manual of the charger.
3.3 Gas supply
Possible with one or two industrial Propane gas cylinders of 13 kg type without flow limiter
or fourth cylinders 13 kg Propane domestic type with two kits flow limiter réf: V90.80.053
Adjustable flow regulator gas.
Gas supply hose of 6m to be screwed.
It is advisable to use industrial or domestic Propane gas cylinders (13 kg or 35 kg)
from Antargaz company (France). For supply points: www.Antargaz.com
Outside France, consult the country's gas supplier.
3.4 The remotes control
PYROS 3 comes with one wired remote control and one wireless remote control.
A single remote control can be used at once as only one electrical connector is placed
on the tray.
3.5 Wired remote control
-It Connects directly to the tray, allowing the ignition and extinguishing
of the fire.
-Water resistant.
-Ddesigned to avoid accidental triggering. The control button is indeed
protected by a cover which overlooks the button height. To trigger the burning
gas, the button must be deliberately push. In the event of a fall or shock it
protects it.
-Electrical cable length: 9 meters
-Fire resistance: Certified to IEC 331.
-Temperature range: -60 ° C to 180 ° C.
3.6 Wireless remote control
-Range: 30 m
-Battery: GP27A 12V 18mAh
-It Works hand in hand with a radio receiver attached under
the table desk. This module consists of a housing with its
antenna and is resistant to water.
-The electric cable which connects the receiver to the tray is
the same length as the reinforced gas supply hose.
-Temperature range: -60 ° C to 180 ° C.

9
4 IMPLEMENTATION INSTRUCTIONS
Use within a room can cause gas buildup and explosion!
DO NOT USE INDOOR PYROS 3.
Before use: Charge the battery at least 12 hours.
4.1 Assembly of the gas cylinder holder assembly
Assemble the holder on the desk with the Allen wrench
4 screws and 4 M6 washers.
This room is designed to accommodate a Propane gas
cylinder and allows stability of the desk during the use.
A second gas cylinder can be added next to the control
desk.
4.2 Connections and implementation
a. Drawing of connections for use of the wireless remote control
WIND DIRECTION
Gas hoses to connect gas
cylinders and desk
Reinforced gas supply hose
Electric cable connecting the tray to
the radio receiver working with the
wireless remote control. Receiver is
fixed under the control panel of the
desk

10
b. Drawing of connections for use of the wired remote control
4.3 Gas cylinder connection
Hand tighten the gas connection pipe valve on the gas cylinder.
4.4 Positioning of the tray to the ground
Positioning the fire tray on a flat surface, so that the water level is equal everywhere.
Place it so that the cable of the remote control and the gas supply hose are opposite to the wind
direction.
Do not fill the water tray at this stage.
4.5 Gas supply hose connection
Hand tighten the gas supply hose connection. Perform the same operation on the desk with
the other end of the gas supply hose.
Connect the tray to the control desk without creating elbow during the implementation of the gas
supply hose.
Gas hoses to connect gas
cylinders and desk
Reinforced supply gas hose
Wired remote control directly
plugged on the tray
WIND DIRECTION

11
4.6 Remote control connection
After removing the protective cap of the connector, connect the remote control cable of the wired
remote control or the wireless remote control (cable of the radio receiver). The connection must
be done before any water filling operation of the tray to avoid wetting the electrical connector.
4.7 Filling the tray
Fill the tray with water to overflow through the side holes.
In use, the water evaporates due to the heat generated by the fire. These openings are a good
marker of the level of water. Make up the water when necessary.
Marker of the level of water
Drawing showing the connection
of the wired remote control.
Operate in the same way with the cable
of the receiver working with the wireless
remote control.
The radio receiver is fixed under the
control panel of the desk.

12
5 USE OF PYROS 3
5.1 Arming
The emergency button also functions as a stop gas valve.
To arm the emergency, stop button:
1. Use the key attached to the control desk
2. Insert the flat end in one of the slots at the base of the button of the hat
3. Lever as shown against until it clicks
Use:
1. Open the corresponding valves to the cylinders used (one or two).
2. Arm the system via the emergency stop button. The fire tray is then
supplied with gas, ready to work.
3. Keep the remote control in hand.
4. Adjust the gas outlet pressure using the gas regulator.
For ignition, the pressure should be less than or equal to 1 bar.
The pressure gauge allows visualizing the pressure.
5. Press the remote control button to ignite the fire tray.
6. Using the gas regulator, adjust the gas flow to adjust the flame height
(0.20 to about 3 meters). Turn in the direction of clockwise to increase
the flame height. Gas outlet pressure is displayed on the gauge.
The pressure must not exceed 3 bar use.
7. Release the button to turn off the fire.
Gas regulator
Emergency stop button
Gauge location indicating the
gas pressure in the circuit
Open / close gas valve connected to
the gas cylinders
1
2

13
IMPORTANT:
Always keep your eyes on the fire tray and the people around it, when you
manoeuvre the remote control.
Always keep the remote control in hand and stay close to the control desk
ready to activate the "emergency stop button" in case of problem.
If the trainer is away from the control desk, a person must be designated to stay close
to the desk, ready to pull the "emergency stop button" in case of problem.
5.2 Use of extinguishing agents
You can work on PYROS 3 with any extinguishing agent.
Beware of the use of foam concentrates: it traps the gas, which could ignite further
outside of the tray.
When the trainee has extinguished the fire, release the button on the remote.
When using a fire extinguisher or Co², it is possible that a trainee "blows" the flames.
Then release the button on the remote. The trainee will have the impression of having
extinguished the fire.
To avoid the risk of spread of non-ignited gas and its sudden inflammation
outside the tray, never hold down the button on the remote if no flame.
5.3 Instructions for use
Wait a few seconds before relighting the fire after an intervention so that the ignition system is
no longer saturated with gas.
Never use PYROS 3 without water.
Think regularly to top up the level of water during training courses.

14
5.4 Stop PYROS 3
1. Close gas cylinder valves
2. Press the button on the remote control. This activates the solenoid and allows to empty the
gas in the system.
Please note that this action may ignite the waste gases.
3. Press the emergency stop button on the control desk.
4. Put the gas valve on position 0 (unscrew maximum).
5. Close the opening / closing valve gas on the desk
6. Disconnect the gas supply hose and the remote control. Do not forget to put the protective
cap on the electrical connector on the tray.
7. Flip the tray to drain its water. Tilt the tray with the wheels on the ground on the opposite side
of the igniter to avoid wetting the compartment containing the battery and electronics.
Do not drain the water at this side of
the tray. There is the battery /
electronics compartment.
Drain at the wheels side
Tilt the tray with
the handles

15
6 AUTONOMY AND POWER
For information, the autonomy of PYROS 3 is about 58 min using industrial gas cylinder without
flow limiter.
However, the power and autonomy of PYROS 3 depend on the gas cylinders flow.
The flow of a gas cylinder varies according to two factors:
1. Ambient temperature: The higher it is, the more the rate will be important.
2. The duration of use: The longer it is, the more the possible flow will have to be low.
Number of achievable burns with 2 Propane gas cylinder 13 kg:
This table is estimated. The values are approximate and for an ambient temperature of 15°C.
Time of each fire
(in seconds)
Pressure (bar)
10’’
15’'
20’'
30’'
0.50
930
620
460
310
1.00
465
310
230
150
1.50
310
200
155
100
2.00
230
150
115
80
2.50
180
125
95
60
3.00
150
100
80
50

16
7 SERVICING OPERATIONS
7.1 Precautions
Beware of hot parts:
•The entire upper part of the tray is hot after use
• Before handling the tray, sprinkle it with water to cool it
• Wear gloves
7.2 Cleaning
•Before washing operation: Disconnect the remote control cable and position the protective cap
on the connector.
•In the case of using water nozzle or training water extinguisher: Rinse the tray with water
to get rid of the various residues.
•In the case of using Co2 extinguisher or foam concentrate: Dry clean with a tissue so as
to remove powder residue or other extinguishing agents (thoroughly stress at the igniter).
Then wash the tray with water.
•In the two previous cases, and to remove soot, clean the tray with an Inox special detergent
"Pyroclean" type; Apply with a damp sponge, then rinse with water and dry with a soft tissue.
•Dry the sensitive parts such as the electrical connector and fittings of the tank and gas supply
hose. Also check the holes so they do not have sand or gravel. They would damage the valve.
7.3 Charging the battery
Plug the charger into the connector of the tray which is also used to connect the cable of one
of the remotes control.
Then connect the charger to the mains.
Plug here

17
Note:
The charging time of an empty battery or the first charge is about 24 hours.
Also consult the manufacturer's instructions. It is recommended to recharge
the battery after each use or 1 time per month when not in use.
8 ACCESSORIES USE (OPTIONS) :
The trainings conducted with PYROS 3 can be supplemented with the use of training modules
and enable personalized and realistic training: Oil explosion, aerosol explosion, fryer fire
bin fire, screen fire, electric motor fire or electrical cabinet fire.
8.1 Adapter and accessories
Unique adapter
with fixing shapes
Ref : V90.80.077
Read carefully the specific
instructions of this aerosol
explosion module before use.
(Ref : V90.80.077)
Flat screen
H : 38 cm
W : 46.5 cm
D : 8.5 cm (base (14.5 cm)
Weight : 4.6 kg
Ref : V90.80.071
Electrical cabinet:
1 door removable key that
is fixed on
1 screen (ref. V90.80.071)
H : 38 cm
W : 46.5 cm
D : 11 cm (base (14.5 cm)
Weight : 6.5 kg
Ref : V90.80.075
Aerosol can explosion
module
To be used only with LEADER aerosol cans
H : 2.5 cm
W : 26 cm
D : 20 cm
Weight : 6.9 kg
Ref : V90.80.072
Oil explosion module
To be fixed on adapter (Ref :
V90.80.077)
To be used with vegetal oil
H : 45 cm
W : 26 cm
D : 30 cm
Weight : 2.8 kg
Ref : V90.80.073
Electric motor
H : 35.5 cm
W : 32.5 cm
D : 56 cm
Weight : 6.8 kg
Ref : V90.80.063
Fryer fire module
To be fixed on screen (ref.
V90.80.071) and bin (ref.
V90.80.062) set
H : 14 cm
W : 39.5 cm
D : 26 cm
Weight : 1.4 kg
Ref : V90.80.070
Bin
To be fixed on flat screen
(ref. V90.80.071)
H : 14 cm
W : 39.5 cm
D : 26 cm
Weight : 1.4 kg
Ref : V90.80.070
Domestic Bottle Kit
For domestic bottle
(V90.80.080)

18
8.2 Implementation of the adapter and accessories
The trainings must be completed with accessories on tray filled with water only.
Prior to manipulating the tray, shut down the system:
1. Turn off the gas supply by pressing the emergency stop button
2. Purge the line by pressing the remote control button and let the remote on the control desk
3. Close the valve located at the bottom of the tray on the gas circuit to concentrate the action
of flame only in the adapter
4. An adapter (support for various training accessories) should be positioned in the tray.
It also concentrates the flames. The adapter must be positioned on the first side of the tray
(side without wheels). The notches in the base of the adapter must fit on the gas circuit.
Accessories land on this adapter.
5. Adjust the gas regulator at a low rate (1 bar max).
6. When you release the button on the remote control, the fire can continue for a while in
the accessory, because it was filled with gas. Wait several seconds before re-ignite so that
the adapter and the accessory are no longer saturated with gas.
Nota: The accessories allow to obtain different shapes/height of flames.
By leaving open the valve, we can simulate the burning of the accessory and the
full tray.

19
8.3 Handling Training accessories
Wear gloves when handling the adapter and the various accessories during training.
These are very hot because of the fire generated by PYROS 3.
Before removing an accessory, think to cool it with some water.
9 FAILURES
Symptom
Possible origin
Solutions
The flame height
is not large enough
Is the gas cylinder full enough?
Replace the gas cylinder
Is the regulator flow adjustment
knob sufficiently screwed?
Screw the gas regulator
The gas cylinder is frozen
(the use was too intense)
Change the gas cylinder
or wait until it defrosts.
Are the climatic conditions
favourable?
A very low outside temperature
significantly affects the importance
of the fire. The fire will be more
effective during summer than
winter.
Nothing happens when you press
on the remote control
Is the battery charged?
Connect the charger to PYROS
tray and plug it to the mains.
Is a remote control connected?
Connect the remote control.
Is the electrical connector on the
tray dry?
Disconnect the remote control
cable and dry its plug and
connector on the tray.
Are the batteries in the wireless
remote control (if used) full?
Change the cell batteries.
Is the fuse still operational?
Change the fuse.
The gas does not come out (no "bubbles”
in the water). However, the spark occurs
(we hear the continuous "tac tac" of the
igniter)
Is the gas cylinder open?
Open the gas cylinder.
Check the position of the gas
regulator.
Open the gas regulator to 1 bar.
Do you hear the "tac" of the
solenoid when pressing the
remote button?
If not, the solenoid valve may be
defective. The repair must be done
at the factory.
The gas exits ("bubbles" in the water)
but does not ignite
The igniter is saturated of gas
Wait a few moments to have
sufficient ventilation.
A drop of water can be hooked to
the electrodes.
Kick on the tray to drop a potential
water drop.
De la poudre d'extincteur a-t-elle
été utilisée lors des exercices ?
Does some extinguisher powder
have been used during the
training course?
The electrodes are dirty. Wash
with water and dry them with
compressed air.
Do you hear the "tac tac" of the
igniter?
If not, the white high voltage block
of the igniter may have blown.
Its change must be made at the
factory.

20
10 WARRANTY
LEADER WARRANTY
LEADER equipment has a contractual limited guarantee from the date of purchase, defined
below by product, parts and labor (excluding transport costs and travel).
This warranty is specifically limited to replacing or repairing the equipment (or its parts) which
proves defective after examination for reasons attributable to LEADER.
To initiate this warranty, with the agreement of LEADER the claimant must return the equipment
in the shortest possible time after discovery of the defect to the following address:
LEADER SAS,
Maintenance Department,
ZI des Hautes Vallées Chemin No. 34, CS 20014,
76930 Octeville Sur Mer,
France,
OUT OF WARRANTY EQUIPMENT
A complete analysis will be carried on your faulty equipment, after which a detailed quote will be
offered.
For faults and non-warranty repairs, a diagnosis fee will be applied independently
of the acceptance of the repair estimate.
Our after sales service is committed to a processing time, upon acceptance of the quote.
LEADER AFTER SALES SERVICE
After Sales Service is composed of areas of expertise organized by product departments.
The benefits of our service are numerous:
oSupport on and off in our warranty repair
oReferenced parts (exploded view and parts list)
oLoan of equipment (identical or similar) during troubleshooting
oExpertise and assistance remote troubleshooting
oExpert technicians at your disposal to share our expertise and knowledge
Table of contents
Other Leader Fitness Equipment manuals