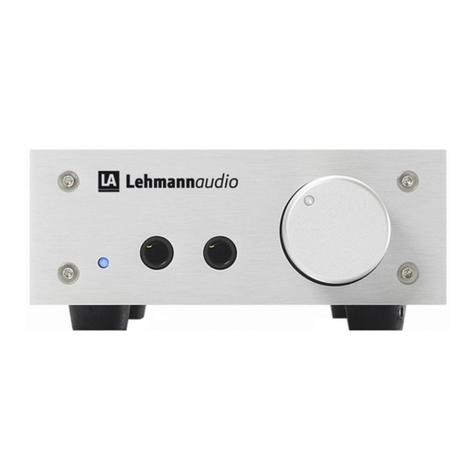
Lehmannaudio StudioCube User manual

StudioCube
User Manual………………….………………………………………..……….ENG
Version 1.0

Version 1.0
- 2 -

StudioCube User Manual
Version 1.0
- 3 -
TABLE OF CONTENTS
Safety Precautions Page 4
ntroduction Page 5
Outline
nstallation Page 6
Scope of Deliver
Starting Up
Quickstart Page 7
A word about cables…
Controls/Front Panel Page 8
Power LED
Headphone Outputs
Level Indicator
Mono Switch
Volume Control
Connectors/Rear Panel Page 9
Inputs – INPUT
Outputs – THRU
Power Suppl
Device Setup Page 10
Gain/Ground Setup
Headphones/Sensitivit
Aural Strain
Multi-unit Operation Page 13
Hook-up Mono/Stereo
Accessories/Mounting Page 14
Yoke
Stand Mounting
Under Table Mounting
Technical Specifications Page 15
Legal Provisions Page 16
Warrant
Trade Mark
Cop rights
CE, EMC, Safet
RoHS
WEEE, Waste Equipment Disposal
Troubleshooting Page 18

StudioCube User Manual
Version 1.0
- 4 -
SAFETY PRECAUT ONS
Note
Read this user manual completel .
Here ou will find all information ou need for operating the device.
Note
An tampering with or modifications on the unit will void the warrant . Use the device onl in
accordance with the user manual.
Use onl accessories specified b the manufacturer.
Mains Connection
The device can be operated on a mains voltage of 100 – 240 VAC / 50-60 Hz. The mains connection is
made with an external wall plug transformer (switching power suppl ) which delivers the operating
voltage for the StudioCube. Primar mains adaptors, which are optionall available, ensure a
worldwide use of the device.
•Use no fault adaptors or connection lines!
•Disconnect the power suppl from mains before opening the unit!
Moisture
To avoid an hazard through fire or an electric shock, this unit must not be exposed to rain or
moisture. Spra ing water or dripping liquids must not get into the unit, either. Do not place an
objects containing liquids such as beverages or vases on the device.
When the device is taken from a cold to a warm place, water condensation ma occur inside.
Onl connect to mains after the device has warmed up to room temperature.
Mounting
The surface of the device ma become hot during operation. Make sure to provide for a sufficient air
circulation. Avoid direct sunlight and close proximit to radiators, radiant heaters and similar heat
sources.
When mounting the unit into a rack, make sure to provide for a sufficient air flow and do not mount
it directl above/under a power amplifier.
Danger through high Listening Levels
With headphones unhealth volume levels can be achieved.
So before putting on our headphones, alwa s check that the selected volume level is not too high.
For detailed information see page 12.

StudioCube User Manual
Version 1.0
- 5 -
NTRODUCT ON
We thank ou for our trust which ou have shown us with the purchase of the StudioCube. The
StudioCube has been designed to give the demanding musician a detailed and transparent
monitoring experience in the studio or on stage. The perfect combination of high-grade technolog
and practical features makes the StudioCube the perfect partner for our monitoring applications.
Should ou have an questions or suggestions concerning the product ou’re welcome to contact us.
And we are alwa s happ to learn about our successful productions.
TECHNOLOGY
The StudioCube features a special architecture of discrete components and integrated circuits.
The use of high-qualit components and its functional design have resulted in a device which
together with the entirel balanced la out and the low-artefact gain stages ensures the unequalled
sound that Lehmannaudio is famous for:
•Exceptional transparenc
•Perfect transient reproduction
•Extremel low noise
OUTL NE / FEATURES
The StudioCube is a compact headphone amplifier with a flexible signal processing and level control.
The following characteristics complement the practical features of the StudioCube:
•Input with Neutrik combo socket
Allows variable connection options
•THRU output with balanced Neutrik jack socket
Allows to link several StudioCubes and to feed them with the same audio signal.
•Source switch for mono signals
Channel 1 (Left) is assigned to both headphone signals, irrespective of an other connected
devices
•High gain mode
Increases the gain b +6 dB for the connection of low-level signal sources
•High input level capabilit
High-level audio signals of up to +22 dBu ma not connected with no distortion to the
StudioCube
•Power suppl overload protection
Automatic fuse (Pol -Fuse)
•Special accessories
Yoke for mounting the StudioCube on a microphone stand

StudioCube User Manual
Version 1.0
- 6 -
NSTALLAT ON
UNPACK NG
After unpacking the StudioCube please check the device for potential transport damage. In case of
visible damage ou must under no circumstances connect the device to mains. Please contact our
dealer immediatel then.
Scope of Delivery:
•StudioCube device
•Wall plug power suppl with connection lead
•Countr -specific AC primar adaptor
•Configuration jumper
•User manual
•Guarantee card
Note
We recommend ou keep the whole packaging material for a dispatch at a subsequent date. Thus
ou will avoid transport damage.
B no means use “st rofoam chips“ or similar packaging material.
During transport the device will “joggle“ its wa down to the bottom of the box and damage ma
occur!
If the original packaging is missing, it’s best to use bubble foil in which to wrap the device generousl .
Then pack the whole issue in a solid cardBoard box.
SETUP
Alwa s put the StudioCube on a solid base. Alternativel ou can mount the unit on a stand or under
a table b using the optional oke.
Its compact size and low weight make the StudioCube also ver eas to transport.
Note
•Do not expose the device to rain or moisture!
•Do not expose the device to extreme temperatures!
•Do not place the device near strong electric or magnetic fields!
•Avoid using too short connection cables.
CONNECT ON
First connect the StudioCube via its mains connector (POWER) with the wall plug power suppl , then
connect the power suppl to mains.
The external wide-range switching power suppl of the StudioCube will adapt automaticall to
different mains voltages around the world. A travel set with primar adaptors for other countries and
mains outlets is optionall available.
Please follow the SAFETY PRECAUTIONS on page 4!

StudioCube User Manual
Version 1.0
- 7 -
QU CKSTART
Up-and-Running in a hurry…
1. Read the SAFETY PRECAUTIONS on page 4!
2. Connect the StudioCube with its power suppl to mains (blue LED will go on).
3. Connect the monitor outputs of our mixing desk or signal source to the inputs (IN L/R) of the
des StudioCube. For this use either the XLR or jack sockets. More on cabling see pages 9/13.
4. Turn the level control (VOLUME) full counterclockwise (minimum).
5. Push the MONO switch to its “lower” position .
6. Connect our headphone lead to one of the headphone sockets (A/B) on the front panel of the
StudioCube.
7. Set the desired listening volume with the volume control. Avoid excessive listening levels and
alwa s make sure the StudioCube is correctl driven.
A word about cables…
Most users of the StudioCube have invested much time and mone in their selection of the right
headphone set, mixing console or monitor speakers.
But please consider also the qualit of the relevant connection cables.
•Use onl high-qualit cables with low electrical capacitance. Audio cables with an outer mesh
screen and 4 additionall shielded inner conductors (quad cables with braided shielding) are less
interference-prone. Such high-grade cables are offered b manufacturers like Canare, Mogami and
others.
CAUT ON:
Some „house brand“ cables are made b renowned manufacturers and have a good qualit .
However, this must not alwa s be the case.
•Studio tests have revealed that those indeed somewhat „esoteric“ super audio cables do actuall
sound better. An audible difference, but of course for a stiffer price. Therefore just check out our
cables before ou bu them.
•Use onl cables with qualit connectors (Neutrik, Switchcraft, etc.).
•Avoid excessive cable lenght.
•Replace damaged cables and connectors.

StudioCube User Manual
Version 1.0
- 8 -
CONTROLS – Front Panel
1 2 3 4 5
1
Power LED
The Power LED (blue) indicates the operating status of the device. It lights up when a correct suppl
voltage is applied.
2
Headphone Outputs A/B
The StudioCube offers two parallel headphone outputs with original Neutrik 6.3mm stereo jack
sockets and goldplated contacts.
NOTE:
If you want to plug in two headphones into the StudioCube, make sure that both models have the
same sensitivity, or otherwise the volume levels of the two headphones may be widely different.
3
OK/OL nput Level ndicator LEDs
Use these two LED indicators to perfectl match the output level of our signal source to the
StudioCube and to avoid signal overload. The input level indicators will alwa s show the send level of
the connected source, irrespective of the position of the output level control (VOLUME).
•The “OK“ LED indicates a present input signal and will go on when this signal reaches a level of -30
dBu.
•The “OL“ LED (Overload) will go on when the input signal exceeds +15 dBu. The StudioCube still has
approx. 7 dB as reserve (headroom) below its maximum level of +22 dBu then.
NOTE:
Too high an input level on the StudioCube will reduce the effective adjustment range of the output
level control (VO UME) and result in a poorer channel balance. Therefore always drive the
StudioCube in such a way that the “O “ ED will not or only rarely flash during operation.
4
Mono Switch
The Mono switch allows ou to select the appropriate input channel for mono or stereo operation.
In STEREO mode both input channels (IN L+R) are routed to their corresponding headphone channel
(L/R), in MONO mode onl the left input channel is routed to both headphone channels (L+R). Audio
signals looped to other StudioCubes (THRU) will not be affected. MONO mode is activated (ON)
when the Mono switch is in its “upper” position .
5
Output Level Control - VOLUME
This rotar control is used to set the required monitoring level in our headphone. The listening
volume depends on the selected gain setting inside the device; as standard this is equivalent to +6 dB
at the right-hand stop of the volume control. (See also page 10 – device configuration).
0 dB unit gain is achieved at about the 01:30 position of the control.
StudioCube User Manual
Version 1.0
- 9 -
CONNECTORS – Rear Panel
L– INPUT – R L–THRU–R POWER
1 2 3
1
nput – NPUT L/R
The inputs of the StudioCube are fitted with Neutrik combo sockets where both balanced and
unbalanced audio signals can be connected.
Pin assignment of the combo sockets:
XLR socket:
Pin 2 > positive (+)
Pin 3 > negative (-)
Pin 1 > shield (ground)
Stereo jack socket (TSR):
Tip > positive (+)
Ring > negative (-)
Sleeve > shield (ground)
NOTE:
When connecting unbalanced signals to the input of the StudioCube, they will also be output
unbalanced at the THRU outputs, even if you use balanced cables.
2
Output – THRU L/R
For an eas linking of other audio devices or for dais -chaining several StudioCubes the THRU output
has been designed as a balanced Neutrik stereo jack socket.
Be sure to avoid ground loops when cascading devices! (See page 10/13 also).
NOTE:
At the THRU output the input signal (IN) is passively decoupled. Therefore if you connect unbalanced
cable links (mono jack) to the THRU output of the StudioCube, all other signals will be passed on
unbalanced; even if balanced cables are partly used.
3
Power Supply Connection - POWER
Here the supplied wall plug power suppl of the StudioCube is connected. This is a high-qualit wide-
range switching power suppl which ou can use worldwide with our optional primar mains
adaptors.
The power suppl conforms with the latest European ECO design directive and is energ -saving.

StudioCube User Manual
Version 1.0
- 10 -
DEV CE CONF GURAT ON
Via internal jumpers the basic gain (+6 dB) of the StudioCube can be increased b another +6 dB and
is thus adaptable to various headphone models.
In case of hum problems, the signal ground (GND) ma also be detached from the housing ground
(EARTH).
Jumper Position
NOTE!
All jumper changes must be made
while the unit is disconnected
from mains.
Damage arising from inappro-
priate use are not covered b the
warrant .
CAUT ON!
Before opening the device
disconnect the wall plug power
suppl from mains.
Gain Setting
1
Jumper – Left Gain
This jumper increases the gain for the left channel b +6 dB.
2
Jumper – Right Gain
This jumper increases the gain for the right channel b +6 dB.
Ground Setting for nput Channels
3
Jumper – Left GND
This jumper connects Pin 1 of the left input (i.e the jack plug sleeve of the left channel) with the
audio ground (GND).
4
Jumper – Right GND
This jumper connects Pin 1 of the right input (i.e the jack plug sleeve of the right channel) with the
audio ground (GND).
5
Jumper – Audio GND / Housing
This jumper connects the audio ground (GND) with the housing of the StudioCube.
NOTE:
In its delivery status the jumpers 3-5 of the StudioCube are open. Setting the GAIN jumpers has no
effect on the maximum input voltage of the device nor on the level indicators.

StudioCube User Manual
Version 1.0
- 11 -
Headphones/Sensitivity
When it comes to studio headphones, we are confronted with an immense variet of choice.
Standard headphone models have an impedance between 30 ohms and 600 ohms. Notwithstanding
the above, headphones have ver different sensitivit specs and thus convert the signal voltage
delivered b the headphone amplifier more or less efficientl into acoustic energ .
The measure of efficieny used for headphones is the achieved sound pressure level in dB at 1mW of
output power.
The following table chart shows some of the most common studio headphone models with their
technical specifications.
Impedance Sensitivit
dB @ 1mW
Voltage for
100dB SPL
Power for
100dB SPL
AKG
K-141 MKII 55 101 209mV 0.8mW
K-240 Studio 55 91 661mV 7.9mW
K-271 MKII 55 91 661mV 7.9W
Audio Technica
ATH-M30 65 100 255mV 1mW
ATH-M40 60 100 245mV 1mW
ATH-M50 38 99 219mV 1.3mW
Beyerdynamic
DT100 16 94 253mV 4mW
DT770 PRO 80 96 800mV 2.6mW
DT880 PRO 250 96 800mV 2.6mW
DT990 PRO 250 96 800mV 2.6mW
Grado
SR80 32 98 225mV 1.6mW
SR125 32 98 225mV 1.6mW
SR225 32 98 225mV 1.6mW
Sennheiser
HD-25 SP 60 90 800mV 10mW
HD-280 PRO 64 90 800mV 10mW
HD-380 PRO 54 97 318mV 1.9mW
Sony
MDR-7506 63 106 126mV 0.3mW
MDR-7509 24 107 69mV 0.2mW
Ultrasone
HFI-580 32 101 160 0.8mW
PRO 550 64 102 201mV 0.7mW
PRO 900 40 96 317mV 2.5mW
Besides other factors like transmission behaviour, wearing comfort and sound proofness, the crucial
point with studio headphones is whether the chosen model can reproduce the desired loudness
distortion-free. For this reason do not onl look at the sensitivit specs of a certain headphone
model, but also at its maximum power handling (see manufacturer data sheet).

StudioCube User Manual
Version 1.0
- 12 -
Aural Strain
But no matter how much we love music listening – especiall when using headphones we should
definitel pa attention to the healthiness of our own ears.
A prolonged overstressing b loud listening volume levels will onl do damage to our hearing. So
we’d rather lower the listening volume and go eas on our sensitive organ, because health ears are
the most essential working tool of ever musician.
Sound Pressure Level (SPL)
The sound pressure level is a logarithmic measure to describe the strength of a sound incidence.
Usuall it is measured in dBA (A-weighted).
The following table chart shows comparison in terms of SPL.
dBA Sound pressure level
150
Big firecrackers
140
Jet engine
130
Jet plane at takeoff
120
Rock concert/Live band
110
Disco/walkman/jackhammer
100
Rehearsal room/car radio
90
Factor /heav truck traffic
80
Road traffic
70
Restaurant
60
Conversation
Exposure Time
The principle of energ equivalence means that hearing loss is a function of sound pressure level and
exposure time (duration).
The greater the sound pressure level, the shorter the exposure time until damage occurs
The permissible exposure time is halved for each 3 dB increase of sound pressure level
Permanent hearing damage will occur be ond 85 dBA sound pressure level, if the hearing is
continuousl * exposed to this strain. (*more than 8 hours per da )
Depending on the sound pressure level, the following permissible exposure times will arise as a
result.
SPL
dBA
8
5
88 91 94 97 100 103 106 109 112 115 118 121
Max.
Duration h
8 4 2 1
Max.
Duration min.
30 15 7,5
Max.
Duration sec.
225 112 56 28 14 7
These maximum timespans should be taken seriousl , since otherwise our ears ma suffer from
hearing loss in case of prolonged exceeding.
NOTE for practical applications:
Before putting on a connected headphone make sure that the listening level is low. Turn down the
volume control before!
If possible use an automatic level limiter for the monitor paths on stage or in the studio.

StudioCube User Manual
Version 1.0
- 13 -
MULT -UN T OPERAT ON
If necessar , several StudioCubes can be easil driven b a common audio source. Simpl connect the
THRU output of the first “sending“ device to the input of another ”receiving” unit. You can do this
cascading in stereo mode and in pure mono mode as well.
Stereo Mode
NOTE:
MONO switch on all
devices in the „lower“
position.
In some cases it can happen that there are not enough stereo channels available to act as source
signals. The StudioCube can also be driven b a mono signal then. To avoid a single-sided channel
reproduction in the headphone, the MONO switch must be activated.
Mono Mode
NOTE:
MONO switch on all
devices in the „upper“
position.
NOTE:
Always use all cascaded devices only in the same operation mode and do not mix balanced with
unbalanced cable connections.
Do not connect more than 4 devices, as the signal is passively decoupled at the THRU output. For
linking more than 4 devices and for long transmission paths we recommend using a signal splitter
(available as optional accessory).

StudioCube User Manual
Version 1.0
- 14 -
ACCESSOR ES/MOUNT NG
4
4
Mounting Thread
The StudioCube has an insert nut on each side for easil fixing a oke with knurled-head screws.
This holder is available as an optional accessor (item No.30009EU or No.30009US) and allows to
mount the device either under table or on a microphone stand.
Stand Mounting
For a universal mounting of the StudioCube, e.g. in a rack tra , we have also built in four M3 insert
nuts on the bottom side of the device.
NOTE:
When screwing the device into place, mind the maximum depth of the threaded sleeves!

StudioCube User Manual
Version 1.0
- 15 -
TECHN CAL SPEC F CAT ONS
StudioCube
-Input Impedance 22 KOhm, balanced
-Max. Input Level +22 dBu
-Adjustable Gain +6 dB / +12 dB (with jumpers)
-Frequenc Response 10 Hz – 40 KHz (-0.5 dB)
-S/N Ratio -90 dBu @ 6 dB gain
-THD < 0.02 % (+0 dBu @ 32 Ohm)
-Channel Separation > 30 dB @ 10 KHz
-Channel Imbalance < 0.3 dB @ max. volume
-Output Power 200 mW @ 33 Ohm
-Output Impedance 5 Ohm
-Max. Output Level +12 dBu
-Connectors – Audio/Input 2x XLR/TRS combo socket, balanced
-Connectors – Audio/Output THRU 2x ¼“ TRS jack socket, balanced
-Connectors – Headphones/Output 2x ¼“ TRS jack socket
-Operation Voltage / Current 22-26 VDC / 120 mA
-Idle Power Consumption < 3W
-Fuse Internal, self-resetting, > 250 mA
-Dimensions 130x43x132 mm / 5.12”x1.69”x5.2” (W x H x D)
(housing dimensions)
-Weight 0.88 Kg / 1.94 lbs (without power suppl )
Power Supply
-Primar Input Voltage 100 – 240 VAC / 50 – 60 Hz
-Secondar Output Voltage 24 VDC
-Max. Output Current 420 mA

StudioCube User Manual
Version 1.0
- 16 -
LEGAL PROV S ONS
Warranty
Each Lehmannaudio device is individuall tested and submitted to a comprehensive functional check.
The exclusive use of super-grade components allows us to warrant our products for a period of two
ears.
For an warrant claims a valid proof of purchase is required. The product registration can also be
done online at
www.s nthax.de/
. Damages arising from incorrect mounting or inappropriate
handling are not covered b warrant and will onl be repaired at the owner’s expense. The right to
claim damages of an kind, particularl for secondar failures, is reserved.
Liabilit be ond the merchandise value of the device shall be excluded.
The terms and conditions of the compan appl :
S nthax GmbH
Am Pfanderling 60
85778 Haimhausen
Phone: +49 (0) 8133-9181 -0 Fax: -19
www.s nthax.de
State of the Art
To ensure the highest audio qualit , Lehmannaudio devices are constantl updated to the latest state
of the art. Necessar alterations in design or circuit la out will be made without prior notice.
Technical specifications and visual aspect can therefore differ from the present user manual.
Trademarks
All trademarks and registered brand names used in this manual are propert of the respective
rightholders.
Copyrights
This manual is protected b cop right. An duplication or reprint, even in excerpts, is onl permitted
with the written authorisation of S nthax GmbH. This also applies to the pictures and graphics used.
Conformity
We, the Lehmannaudio Vertriebs GmbH, Richard-Zanders-Str. 54, D-51469 Bergisch GladBach,
German , declare in our sole responsibilit that the above-described device complies with the
following standards and directives:
StudioCube Power Suppl
•EN 60065
•DIN EN 55103-1&2
•2006/95/EG
•2004/108/EG
•EN 60950-1
•EN 55011
•EN 55022
•2009/125/EG
Bergisch GladBach, Oct. 1
st
, 2010
Norbert Lehmann, Managing Director
The relevant technical documents are stored at the compan headquarter of the Lehmannaudio
Vertriebs GmbH in Bergisch GladBach.
An modification of the device which was not authorised b us will void this CE declaration.

StudioCube User Manual
Version 1.0
- 17 -
Conformity
This product was made in accordance with the 2002/95/EG directive.
WEEE
According to the Directive 2003/108/EG on Waste Electric and Electronic Equipment (WEEE) the
owners of old equipment are legall bound to dispose of their old appliances separatel from their
household waste.
Please support us and contribute our share to protect our environment. More information on the
disposal of this device can be obtained at our nearest rec cling depot.

StudioCube User Manual
Version 1.0
- 18 -
TROUBLESHOOT NG
The blue POWER LED is not on.
•Check if mains voltage is present
•Check if the power suppl is connected to mains
•Check if the power suppl connection lead is connected to the StudioCube
No headphone signal – mono mode
The green OK LED is not on.
•Check the audio connection lines between StudioCube and signal source
•Check the correct connection of the headphone, if necessar the connection cable as well
•Check if a mono signal is present at input 1 (L) and if the mono switch is active (UPPER position)
•Raise the input level on the StudioCube
•Check the volume setting
No headphone signal – mono mode
The green OK LED is on, but there is no sound.
•Check the volume setting
•Check the correct connection of the headphone, if necessar the connection cable as well
•Check if a mono signal is present at input 1 (L) and if the mono switch is active (UPPER position)
No headphone signal – stereo mode
The green OK LED is not on.
•Check the audio connection lines between StudioCube and signal source
•Check the correct connection of the headphone, if necessar the connection cable as well
•Check if a stereo signal is present at inputs 1 and 2 (L/R) and if the mono switch is disabled (LOWER
position)
•Raise the input level on the StudioCube
•Check the volume setting
No headphone signal – stereo mode
The green OK LED is on, but there is no sound.
•Check the volume setting
•Check the correct connection of the headphone, if necessar the connection cable as well
•Check if the mono switch is disabled (LOWER position)
Only mono signal
•Check the correct position of the mono switch (LOWER position)
•Check the audio connection cables for both inputs, if necessar for the outputs as well
•Check the inputs for interchanged cables and the right channel assignment
Distorted headphone signal
The red OL LED is not on.
•Check if a ver low-Z headphone is connected which might overload the output stage.
If necessar , use another headphone model
•Lower the overall gain (b removing the jumpers inside the device)

StudioCube User Manual
Version 1.0
- 19 -
Distorted headphone signal
The red OL LED is on.
•Lower the audio level at the input/s
•Check the volume setting
•Reduce the overall gain (b removing the internal jumpers)
Audible hum
•Check the connection cables, particularl their shielding and the connectors
•Disconnect the ground signal of the connection cables single-sided on the StudioCube b means of
the corresponding jumpers
Radio interference audible in the background
•Check the shielding of the cables in use
•Check the protective earth (PE) on the preceding mains lead or mains distributor.
Never stick adhesive tape over the protective earth!
•
Make sure that no HF-emitting appliances (mobile phones, radio equipment etc.) are in close
vicinit .

StudioCube User Manual
Version 1.0
- 20 -
Distributor:
Am Pfanderling 60
D-85778 Haimhausen
Phone.: +49 (8133) 91810
Fax: +49 (8133) 918119
E-mail: gmbH@s nthax.de
www.s nthax.de
Table of contents
Other Lehmannaudio Amplifier manuals

Lehmannaudio
Lehmannaudio Drachenfels User manual

Lehmannaudio
Lehmannaudio Black Cube Statement User manual

Lehmannaudio
Lehmannaudio Black Cube Statement User manual

Lehmannaudio
Lehmannaudio Black Cube SE II User manual

Lehmannaudio
Lehmannaudio Black Cube Linear User manual

Lehmannaudio
Lehmannaudio Black Cube User manual

Lehmannaudio
Lehmannaudio Linear D User manual

Lehmannaudio
Lehmannaudio Linear User manual

Lehmannaudio
Lehmannaudio Rhinelander User manual

Lehmannaudio
Lehmannaudio LinearPro User manual