1. Attach the Juicer Head (#1) to your 1182/1113 grinder motor.
· Line up the head at 2 o’clock and turn counter clockwise to lock into place.
· It may be necessary to push the release button when putting on the head on the motor.
2. Insert the Auger (#12) into the head.
· Turn the Auger to line up the Auger Gear with the Motor Gear.
3. Insert the choice Screen (#15 or #16) into the Juicer Funnel (#14).
· Line up the screen on the inside of the funnel over the cut out. Press rmly into place. The lip of the screen will sit at
against the funnel.
4. Attach Funnel (#14) to Juicer Head (#1).
· Line up the locating pin to the notch in the threads of Juicer Head (#1).
5. Place Retaining Ring (#18) over Funnel (#14) and thread onto Juicer Head (#1).
6. Insert translucent Juice Catcher (#17) over the Screen (#15 or #16) and snap into place.
7. Hand tighten the Threaded Waste Adjuster (#19) onto funnel end.
· This piece is necessary to insure the auger has a tight t in the back of the head so juice will not ow back to the motor.
8. Insert your grinders pan into the feed tube of the Juicer Head (#1).
9. You’re now ready to make juice.
Before use hand wash the juicer in warm soapy water.
Prepare fruits for juicing:
· Always use ripened fruits that are at the peak of freshness. This will render the most avorful juice.
· Fruit or vegetables which are hard should be left to ripen or steamed to soften.
· It is not necessary to peel or seed your fruits.
· Large pits or seeds should be removed.
· Large fruits should be cut to t into juicer head.
· Use your grinder stomper to press fruit into the juicer.
· You will need 2 bowls; one to catch the waste of the fruit and one for the juice.
· You can always pass the waste material back through the juicer to extract all available juice.
LEM Products • West Chester, OH 45011 • PH: 1-877-536-7763 • lemproducts.com LEM Products • West Chester, OH 45011 • PH: 1-877-536-7763 • lemproducts.com
32
GENERAL WARNINGS AND SAFETY INFORMATION PARTS LIST
PARTS LIST
USING YOUR JUICER ATTACHMENT
IT IS IMPORTANT TO READ AND UNDERSTAND ALL OF THE INSTRUCTIONS AND SAFEGUARDS PRIOR TO USE
REFER TO YOUR GRINDERS SAFETY PRECAUTIONS FOR MOTOR SAFETY PRIOR TO OPERATION
1. Always ensure that the appliance is properly assembled and safely set up before use.
2. DO NOT leave the appliance unattended if it can be switched on and operated.
3. CAUTION: This appliance is not recommended for use near or by children or persons with certain disabilities. Set up and
store the appliance out of reach of children. When not in use, store device in a secure and dry place out of reach of children.
4. The appliance is designed for domestic use and not for commercial purposes.
5. Use the appliance with the supplied accessories only. WARNING: The use of attachments not recommended or sold by the
manufacturer may cause injury, damage to personal property, and may void your warranty.
6. WARNING: Do not use while under the inuence of alcohol or drugs (prescription or non-prescription) as these may
impair user’s ability to properly assemble or safely operate the appliance.
7. The manufacturer declines any responsibility in the case of improper use of this product. Improper use of this product
voids the warranty.
8. Avoid contacting moving parts. Wait until all parts have come to a complete stop and disconnect from the power source
before removing any parts of the juicer.
9. Never feed food into appliance by hand as serious injury may occur, always use your stomper.
10. Thoroughly hand-wash all appliance parts in warm soapy water prior to use. Do not soak. NOT DISHWASHER SAFE
11. Tie back loose hair and clothing. Remove neckties, rings, watches, bracelets or other jewelry before operating the grinder.
12. Use appliance on a level, stable surface to prevent tipping. Never move the appliance while unit is in use.
13.
SAVE THESE INSTRUCTIONS
ASSEMBLY INSTRUCTIONS
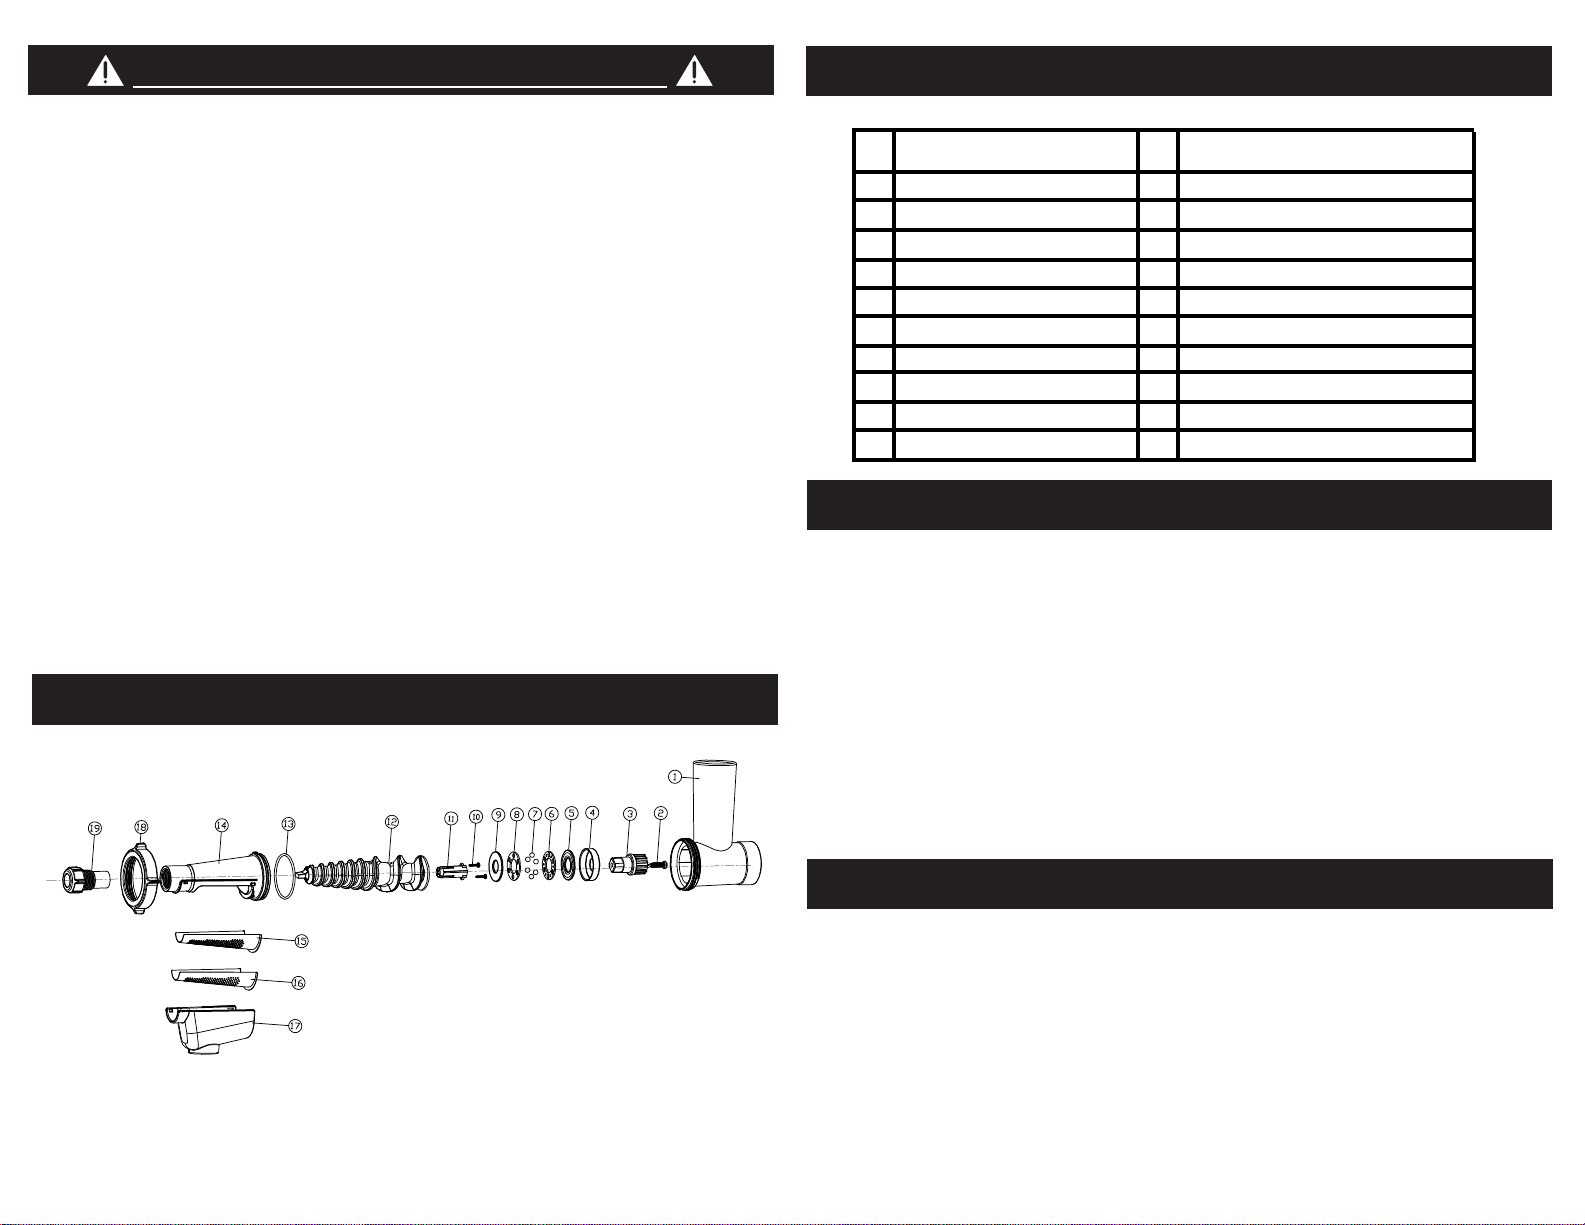
1 Juicer Head
Part
#Description Description
Part
#
2 Screw (ST5.0×20)
3 Drive Gear
4 Bearing Seal
5 Upper Bearing Support
6 Bearing Bracket A
7 Stainless Steel Ball
8 Bearing Bracket B
9 Lower Bearing Support
10 Screw (ST2.5×10)
11 Screw Stopper
12 Auger
13 Gasket
14 Funnel
15 Screen 1.5mm
16 Screen 1.0mm
17 Juice Catcher
18 Retaining Ring
19 Threaded Waste Adjuster


