manuals.online logo
Brands
  1. Home
  2. •
  3. Brands
  4. •
  5. LENCO
  6. •
  7. MP3 Player
  8. •
  9. LENCO MMS-201 User manual

LENCO MMS-201 User manual

Other manuals for MMS-201

1

Other LENCO MP3 Player manuals

LENCO CD-202 User manual

LENCO

LENCO CD-202 User manual

LENCO XEMIO-664 User manual

LENCO

LENCO XEMIO-664 User manual

LENCO MP card User manual

LENCO

LENCO MP card User manual

LENCO SCD-550 User manual

LENCO

LENCO SCD-550 User manual

LENCO Xemio-659MIX User manual

LENCO

LENCO Xemio-659MIX User manual

LENCO XEMIO-633 User manual

LENCO

LENCO XEMIO-633 User manual

LENCO HELLO KITTY MP3 User manual

LENCO

LENCO HELLO KITTY MP3 User manual

LENCO XEMIO-250 User manual

LENCO

LENCO XEMIO-250 User manual

LENCO Xemio-241 User manual

LENCO

LENCO Xemio-241 User manual

LENCO Xemio 756 User manual

LENCO

LENCO Xemio 756 User manual

LENCO Xemio-560 User manual

LENCO

LENCO Xemio-560 User manual

LENCO Xemio-768 User manual

LENCO

LENCO Xemio-768 User manual

LENCO Xemio-861BU User manual

LENCO

LENCO Xemio-861BU User manual

LENCO Xemio-280 User manual

LENCO

LENCO Xemio-280 User manual

LENCO Xemio-658 UK User manual

LENCO

LENCO Xemio-658 UK User manual

LENCO XEMIO-857 User manual

LENCO

LENCO XEMIO-857 User manual

LENCO MP CARD User manual

LENCO

LENCO MP CARD User manual

LENCO SCD-50 BT User manual

LENCO

LENCO SCD-50 BT User manual

LENCO SCD-39 USB User manual

LENCO

LENCO SCD-39 USB User manual

LENCO Xemio-767 BT User manual

LENCO

LENCO Xemio-767 BT User manual

LENCO HELLO KITTY MP3 User manual

LENCO

LENCO HELLO KITTY MP3 User manual

LENCO XEMIO- 955 User manual

LENCO

LENCO XEMIO- 955 User manual

LENCO SCD-650 User manual

LENCO

LENCO SCD-650 User manual

LENCO Xemio-154GY User manual

LENCO

LENCO Xemio-154GY User manual

Popular MP3 Player manuals by other brands

FINIS Neptune instruction manual

FINIS

FINIS Neptune instruction manual

Majestic BT 3280R MP4 instructions

Majestic

Majestic BT 3280R MP4 instructions

Slick MP418C-4 user guide

Slick

Slick MP418C-4 user guide

GPX MW6815DT instruction manual

GPX

GPX MW6815DT instruction manual

Sony NWZ-B135F - Walkman - 2 GB Digital Player Specifications

Sony

Sony NWZ-B135F - Walkman - 2 GB Digital Player Specifications

ID-AL NanoPlayer box user manual

ID-AL

ID-AL NanoPlayer box user manual

Blaupunkt Compact Drive MP3 operating instructions

Blaupunkt

Blaupunkt Compact Drive MP3 operating instructions

Memorex MMP9008 - 8GB USB 2.0 user guide

Memorex

Memorex MMP9008 - 8GB USB 2.0 user guide

Meizu Electronic Technology E5 user manual

Meizu Electronic Technology

Meizu Electronic Technology E5 user manual

Naxa NMV-173NX user manual

Naxa

Naxa NMV-173NX user manual

Philips PSA250 Specifications

Philips

Philips PSA250 Specifications

Impecca MP1202 user guide

Impecca

Impecca MP1202 user guide

Sony NW-MS7 - Memory Stick Walkman Service manual

Sony

Sony NW-MS7 - Memory Stick Walkman Service manual

Irradio RF-42UC user manual

Irradio

Irradio RF-42UC user manual

NABAIJI SWIM MUSIC 100 user guide

NABAIJI

NABAIJI SWIM MUSIC 100 user guide

Laser MP3-A9-4GB user manual

Laser

Laser MP3-A9-4GB user manual

Samsung YP-T7F Service manual

Samsung

Samsung YP-T7F Service manual

MobiBlu DAH-1500i user manual

MobiBlu

MobiBlu DAH-1500i user manual

manuals.online logo
manuals.online logoBrands
  • About & Mission
  • Contact us
  • Privacy Policy
  • Terms and Conditions

Copyright 2025 Manuals.Online. All Rights Reserved.

MMS-201
MP3 Player Speaker Box Set
User manual
English
For information and support, www.lenco.eu
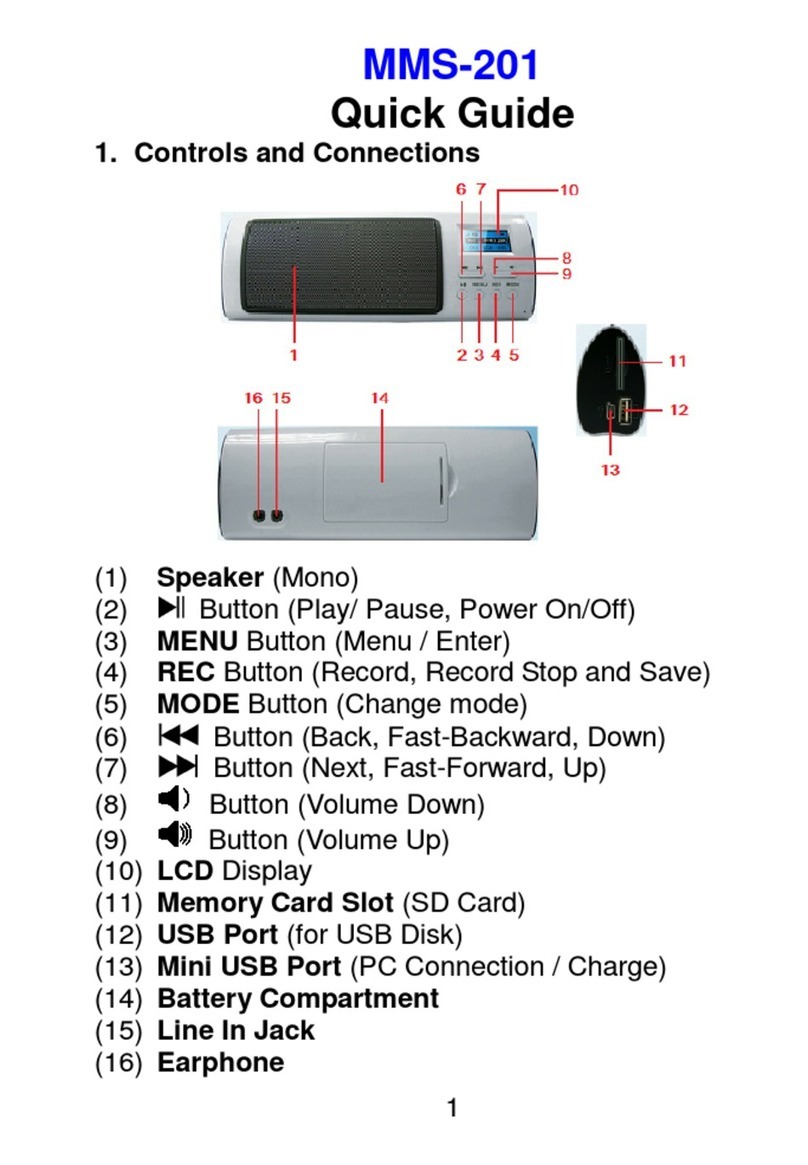
1. Basic controls and interfaces of the player
Item
Description Item Description
1 Speaker
(Mono)
9 Button
(Volume Up)
2 Button
(Play/ Pause, Power On/Off)
10 LCD Display
3 MENU Button (Menu / Enter) 11 Memory Card Slot
(SD Card)
4 REC Button
(Record, Record Stop and Save)
12 USB Port
(for USB Disk)
5 MODE Button
(Change mode)
13 Mini USB Port
(PC Connection / Charge)
6 Button
(Back, Fast-Backward, Down)
14 Battery Compartment
7 Button
(Next, Fast-Forward, Up)
15 Line In Jack
8 Button
(Volume Down)
16 Earphone
2. Detachable Rechargeable Battery
The player comes with a detachable rechargeable lithium battery. When using the device for
the first time, charging it for 3 - 4 hours or until the battery icon is show the battery is in full.
Battery Is In Full
A. Install the Rechargeable Battery:
•Open the cover door of battery compartment which located at the back of the player. And then
place the rechargeable lithium battery into battery compartment.
•Make sure contact plate is inserted into the pins connector correctly.
•Close the cover door.
Note: The player continues to use battery power after it’s been turned to off, if unit isn’t used for a
while, the battery might need to be charged.
B. Charging the Battery:
You can charge the player battery in two ways:
•Connect player to your computer.
•Use the USB power charger. (not included)
C. Connection and Charging:
•Once you have connected player with computer / Power charger, then you will see the
“Connecting Mode” or any one of the “Mode” screen on LCD display.
•In connect / mode screen, you can see the bar levels are running in battery icon, the battery is
in charging.
•The battery icon will show “Full” when the charging is completed. Disconnect the USB cable
when it is done.
Connecting Mode Screen
Important: The battery cannot be charged when your computer is in sleep mode. The USB port on
most keyboards does not provide enough power to charge the player. Connect player direct to a
USB port on your computer only to prevent charging problem.
3. Insert Micro SD Memory Card / USB Disk
MMS-201 is design without an internal memory, it need to have a USB disk or a SD memory
card insert into the USB port or the card slot. Upload your desired music files to the USB disk / SD
memory card direct from the computer then insert to player.
Important: When both SD card and / or the USB disk have inserted to device and the device is
connected to the computer by uses the USB cable; only a “Removable Driver” of SD card can be
detected and use for data transfer with the computer. Due to the same data pins are used as sharing
in-between the mini USB and the computer, the USB disk is cannot be detected and use for data
transfer.
•“Card/USB is pulled” message will show when you remove the SD memory card / USB disk
from player.
•“Format Error” message may show when you insert the SD memory card / USB disk in not
good way or incorrectly. Take them out and plug them in again.
•“No file in disk” message will show, if you do not put Micro SD memory card / USB disk into
the player’s memory card slot / USB port, when you want to change mode to music play.
Note: The player functional may dead halt if you plug and unplug the card or USB incorrectly.
Power reset the player by take out the rechargeable battery if happened.
4. Connecting and Disconnecting
Connect the player to your computer to upload music files to your player, or to download
recorded voice memos to your computer, when the SD memory card or USB disk is in use.
A. Connecting the player
•Plug the USB cable to the Player’s mini USB port and into a USB port on your computer, then
the computer will detect and install the driver automatically. Once the installation is complete
the player will be displayed in “My Computer” or for MAC users on the desktop.
•Now the player is ready for music files upload / download with your computer.
•Transfer the music files by using the computer mouse use drag and place, or copy and paste, in
between the player and your computer. Disconnect it when you’re done.
Note: The player will disconnect with PC and go into clock display mode or operation mode, when
press / Pressing “MENU” button if in connecting mode. Unplug the USB cable and plug it in again
to return to connecting mode if you want.
B. Disconnecting the player
•Do not disconnect the player while it’s uploading or downloading files with your computer.
•Windows system PC, disconnect the player by clicking the “Safely Remove Hardware” icon in
the Windows system tray.
•Mac system PC, disconnect the player by dragging the player icon on the desktop to the Trash.
•Now it is safe to unplug the USB cable.
Note: If you do not “Safely remove hardware” before disconnecting, data can be lost!
5. Getting Started
A. Turning the player ON and OFF
•Press and hold button to turn the player “On and Off”.
•When the player is turned On, first the opening screen and then it will enter to “Radio / Music
/ Line In” mode which is available.
•Example, the player will enter to Radio mode, if no SD memory card and USD disk is in use.
•When you turn Off the player, the last status will be recorded and the last status shall be recall,
when you start up the player again.
Note: The last status memory will be changed if you have take away the SD memory card and / or
USB disk.
B. Change Function Mode
•Press the “MODE” button to change to “FM Radio or Music” function mode here is in easily
way.
C. Auto Mode
•The player has designed “Auto Mode” function, the player will direct switch to related mode,
when you plug in the source of SD memory card, USB disk or Line In cable. This means that
the mode will change according to the last source have plugged.
D. Enter to Clock Display and Mode Menu
•In function mode, press and hold the “MENU” button to enter to clock display and mode menu,
then you will see the clock is displaying.
Clock Display
•In clock display mode, press “MENU / / / ” button will enter to mode menu.
•Then you can find “Calendar / Music / Recorder / FM Radio / System” mode menu here to
choose. Press / button to select your desired mode and press “MENU” button to
enter.
Mode Menu
Note: In menu mode, Press button to back to previous item / menu, press “MENU” button to
enter the selected item. Press and hold “MENU” button to return to “Clock Display” mode.
E. Mode Menu
Calendar
•In mode menu, choose “Calendar” to view the Year, Month, Date and Time” in one screen.
Music
•In mode menu, choose “Music” to enter to music mode.
Recorder
•In mode menu, choose “Recorder” to enter to record mode.
FM Radio
•In mode menu, choose “FM Radio” to enter to radio mode.
System
You might need to set some settings for player’s system, such as date and time…etc.
•In Clock Display mode, press “MENU” button to enter to mode menu.
•In mode menu, press / button to select “System”, a system settings menu is appears
to use.
a. System Time
•In system settings menu, choose “System Time” by using / button and then press
“MENU” button, a date & time setting screen appears to use.
•Press “MENU” button to change the highlight to year, and then adjusting the number to
current year by pressing the / button.
•And, repeating the adjusting methods by “MENU” and / button again for finished
those items; Month, Date, Hour, Minute and seconds setting adjustment.
•Finally, you need to press the MENU button to confirm the adjustment and back to system
menu.
b. Backlight
You can set the backlight to illuminate the screen for a certain amount of time as you desired
or make the backlight to always ON when every time you turn ON the player.
•In system settings menu, choose “Backlight”, a level bar with number appear, choose “0
(always On) / 3 / 6 / 9 / 12 / 15 / 18 / 21 / 24 / 27 / 30 (seconds)” as you desired by using
“MENU” and / buttons.
•Choose “0” to prevent the LCD backlight from turning to off. Choosing this option will
decrease battery performance.
c. Language
This player can use difference languages.
•In system settings menu, choose “Language” and then choose your desired OSD language.
d. Tool
In system setting menu, choose “Tool”, then you will see the tool menu is appear to use.
Power Off Set (Sleep)
The “Power Off Set” provides sleep function, countdown timer, to turn Off the device as you
desired time which set.
•In Tool menu, choose “Power Off Set”, a levels bar with number menu appear, then choose
“10 / 20 / 30 / 40 / 50 / 60 / 70 / 80 / 90 / 100 / 110 / 120 (minutes)” as you want by using
MENU and / buttons.
Alarm
In tool menu, choose “Alarm”, then you will see the alarm menu is appears to use.
- Alarm Off / Alarm On-
•Once you choose “Alarm”, then you will see either one of them “Alarm Off / Alarm On” is
display. It will switch to “Alarm Off / Alarm On”, when every time you’re choosing one of
them and press MENU button.
•The “Alarm Off” is disabling the alarm wake up function.
•The “Alarm On” is enabling the alarm wake up function by the selectable alarm signal
“default ringing tone” or your desired MP3 file.
- Time –
•Choose “Time” to set the alarm time as you want.
- Cycle -
•Choose “Cycle” > choose “Every Day / One Time / Cycle”, the alarm wake up cycle as you
want.
- Alarm Signal - (wake up sound by ringing tone / music file)
•Choose “Alarm Signal” > choose “Ring Embedded / Card Folder / USB Folder / Exit” as you
want.
•Choose “Ring Embedded” to have the default ring tone signal as wake up sound.
•The Card Folder item will exist when SD memory card is in use. Choose “Card Folder” >
folder and WMA/MP3 file which you want it as wake up sound.
•The USB folder item will exist when USB disk is in use. Choose “USB Folder” > folder and
WMA/MP3 file which you want it as wake up sound.
•Choose Exit to exit from Alarm Signal menu and back to previous menu.
•Press MENU button to turn Off the activated wake up ringing tone / music sound.
- Volume - (wake up sound level)
•Choose “Volume” to set wake up alarm signal / sounds level, a levels bar with number menu
appear, adjust the volume level what you want.
- Exit -
•Choose this to exit from Alarm menu and back to previous menu.
Note: The alarm duration time is 10 minutes.
Time FM Set
- Close Time FM / Open Time FM - (wake up by FM Radio)
•Once you choose “Time FM Set”, then you will see either one of them “Open Time FM /
Close Time FM” is display. It will switch to “Open Time FM / Close Time FM”, when every
time you’re choosing one of them and press MENU button.
•The “Open Time FM” is enabling the timer function to turn On the FM radio as alarm ring
sounds.
•The “Close Time FM” is disabling the timer function.
- Close FM Record / Open FM Record – (FM radio Timer Record)
•Once you choose “Time FM Set”, then you will see either one of them “Open FM Record /
Close FM Record” is display. It will switch to “Open FM Record / Close FM Record”,
when every time you’re choosing one of them and press MENU button.
•The “Open FM Record” is enabling the timer function to turn On the FM radio and FM record
function.
•The “Close FM record” is disabling the timer function.
- FM Time –
•To set the alarm time for FM radio, choose FM Time > choose “Hour and Minute” what time
as you desired to turn On the FM radio.
- Tuner Region-
•Choose “Tuner Region” > choose “Common Band / Japan Band”, and then selects the known
frequency of radio station which will be recording, and will be used as wake-up radio station of
“Time FM Set”, when the set alarm time coming.
- Exit-
•Choose this to exit from Time FM Set menu and back to previous menu.
Exit
•Choose “Exit” to exit Tool menu.
e. Contrast
•In system menu, choose “Contrast”, a level bar with number appear, choose “1 – 15” as you
desired by using “MENU” and / buttons.
f. Firmware Version
•Choose “Firmware Version” to view the firmware information.
g. Default Setting
•Choose “Default Setting” to enter to reset function, a confirm dialog box is appear, press
/ buttons to select “Yes / No”.
•Choose “Yes” to confirm and all changed system settings will back to factory default. Choose
“No” to cancel.
h. Exit
•Choose “Exit” to back to Clock Display mode.
6. Music Mode
•Press the “MODE” button to switch to the “Music” mode, the music will player automatically.
A. Play / Pause Music file
•Press button to pause the playing music.
•Press button again to play if in pause mode.
B. Change Next / Previous and Fast-Forward / Fast Backward
•Press button to play next file.
•Press button to play previous file.
•Press and hold button to play fast-forward.
•Press and hold button to play fast-backward.
C. Change Volume
•Press / pressing the / button to increase / decrease volume levels.
D. Lyric / ID3 info Display
•The ID3 information of the title, artist and album are displaying on LCD screen, when the
playing of normal music.
•The lyrics are displays automatically, when the lyrics file is available and synchronize with the
playing music.
7. Music Submenu in Music Playing Mode
•Press MENU button to call up the music submenu, and then the submenu “Cycle Mode / EQ
Settings / Repeat Mode / Back / Exit” is appear to use. (for 8 – 10 seconds)
•Press / button to choose one of them and then press MENU button to entering.
A. Cycle Mode:
•Choose cycle mode, then choose “Normal / Repeat One / Folder / Repeat Folder / Repeat
All / Intro” as you want.
B. EQ Settings:
•Choose EQ mode, then choose “Natural / Rock / Pop / Classic / Soft /Jazz / DBB” as you
want.
C. Repeat Mode: (Repeat A – B)
•Choose replay mode, then a letter “A” is flashing at a icon in LCD, then press button to
select the starting point of track “A”.
•And then a letter “B” is flashing once “A” is selected, use button again to select the
ending point of track “B” which you want by using button. And now the A – B distance of
track is repeating. (it will repeat for few time and then will back to normal play)
•To create another A – B distance of track to repeat, press button again and then again. a
new created A – B distance of track is repeating.
•To cancel the repeat A – B function, press the MEMU / button.
D. Exit:
•Choose “Exit” to back to music mode screen
8. Music Submenu in Music Stop Mode
•Press MENU button to call up the music submenu, and then the submenu “Card Folder / USB
/ Delete / Delete All / Exit” is appear to use. (for 8 – 10 seconds)
•Press / button to choose one of them and then press MENU button to entering.
A. Card Folder:
•Choose Card folder to changes / selects where the folder and file is going to play.
B. USB Folder:
•Choose USB folder to changes / selects where the folder and file is going to play.
C. Delete File:
•Choose delete file to delete the current music file, a dialog box appears to confirm. And then
press / to choose “Yes / No” then press MENU button.
D. Delete All:
•Choose delete all to delete all music files, a dialog box appears to confirm. And then press
/ to choose “Yes / No” then press MENU button.
E. Exit:
•Choose exit to back to music mode screen
Note: The sub-item of the “Card Folder / USB Folder” will not appear, if no USB / SD memory
card has plugged onto the related port / slot.
9. FM Radio
A. FM Antenna and Earphone
•This player in-built a high performance “Coil Antenna” for FM radio us, so you can receives
FM radio stations available if they are in normal signal strength.
•In the case that some FM stations under an area of low signal strength, you can try to use
earphone, plug it into earphone jack, acts like an antenna that can enhance the FM signal. But,
you can only enjoy FM radio sounds from earphone.
B. Radio Function
•Press the “MODE” button to switch to the “Radio” mode.