manuals.online logo
Brands
  1. Home
  2. •
  3. Brands
  4. •
  5. LENCO
  6. •
  7. MP3 Player
  8. •
  9. LENCO Xemio-658 UK User manual

LENCO Xemio-658 UK User manual

Other manuals for Xemio-658 UK

1

This manual suits for next models

2

Other LENCO MP3 Player manuals

LENCO XEMIO-SPORT-222 User manual

LENCO

LENCO XEMIO-SPORT-222 User manual

LENCO XEMIO-250 User manual

LENCO

LENCO XEMIO-250 User manual

LENCO MP card User manual

LENCO

LENCO MP card User manual

LENCO Xemio-767 BT User manual

LENCO

LENCO Xemio-767 BT User manual

LENCO XEMIO-SPORT-232 User manual

LENCO

LENCO XEMIO-SPORT-232 User manual

LENCO XEMIO-119 User manual

LENCO

LENCO XEMIO-119 User manual

LENCO Xemio-769GY User manual

LENCO

LENCO Xemio-769GY User manual

LENCO XEMIO-633 User manual

LENCO

LENCO XEMIO-633 User manual

LENCO XEMIO-127 User manual

LENCO

LENCO XEMIO-127 User manual

LENCO Xemio-645 User manual

LENCO

LENCO Xemio-645 User manual

LENCO Xemio-767 BT User manual

LENCO

LENCO Xemio-767 BT User manual

LENCO XEMIO-135 User manual

LENCO

LENCO XEMIO-135 User manual

LENCO XEMIO-106 User manual

LENCO

LENCO XEMIO-106 User manual

LENCO XEMIO-106 User manual

LENCO

LENCO XEMIO-106 User manual

LENCO SCD-39 USB User manual

LENCO

LENCO SCD-39 USB User manual

LENCO SCD-550 User manual

LENCO

LENCO SCD-550 User manual

LENCO XEMIO-654 User manual

LENCO

LENCO XEMIO-654 User manual

LENCO Xemio-656 User manual

LENCO

LENCO Xemio-656 User manual

LENCO SCD-50 BT User manual

LENCO

LENCO SCD-50 BT User manual

LENCO MMS-201 User manual

LENCO

LENCO MMS-201 User manual

LENCO XEMIO-760 BT User manual

LENCO

LENCO XEMIO-760 BT User manual

LENCO Xemio-768 User manual

LENCO

LENCO Xemio-768 User manual

LENCO Xemio-659MIX User manual

LENCO

LENCO Xemio-659MIX User manual

LENCO CD-200 User manual

LENCO

LENCO CD-200 User manual

Popular MP3 Player manuals by other brands

FINIS Neptune instruction manual

FINIS

FINIS Neptune instruction manual

Majestic BT 3280R MP4 instructions

Majestic

Majestic BT 3280R MP4 instructions

Slick MP418C-4 user guide

Slick

Slick MP418C-4 user guide

GPX MW6815DT instruction manual

GPX

GPX MW6815DT instruction manual

Sony NWZ-B135F - Walkman - 2 GB Digital Player Specifications

Sony

Sony NWZ-B135F - Walkman - 2 GB Digital Player Specifications

ID-AL NanoPlayer box user manual

ID-AL

ID-AL NanoPlayer box user manual

Blaupunkt Compact Drive MP3 operating instructions

Blaupunkt

Blaupunkt Compact Drive MP3 operating instructions

Memorex MMP9008 - 8GB USB 2.0 user guide

Memorex

Memorex MMP9008 - 8GB USB 2.0 user guide

Meizu Electronic Technology E5 user manual

Meizu Electronic Technology

Meizu Electronic Technology E5 user manual

Naxa NMV-173NX user manual

Naxa

Naxa NMV-173NX user manual

Philips PSA250 Specifications

Philips

Philips PSA250 Specifications

Impecca MP1202 user guide

Impecca

Impecca MP1202 user guide

Sony NW-MS7 - Memory Stick Walkman Service manual

Sony

Sony NW-MS7 - Memory Stick Walkman Service manual

Irradio RF-42UC user manual

Irradio

Irradio RF-42UC user manual

NABAIJI SWIM MUSIC 100 user guide

NABAIJI

NABAIJI SWIM MUSIC 100 user guide

Laser MP3-A9-4GB user manual

Laser

Laser MP3-A9-4GB user manual

Samsung YP-T7F Service manual

Samsung

Samsung YP-T7F Service manual

MobiBlu DAH-1500i user manual

MobiBlu

MobiBlu DAH-1500i user manual

manuals.online logo
manuals.online logoBrands
  • About & Mission
  • Contact us
  • Privacy Policy
  • Terms and Conditions

Copyright 2025 Manuals.Online. All Rights Reserved.

1
USER’S MANUAL
Xemio-658 UK
MP3 / MP4 player wit Bluetoot
For more information: www.lenco.com
2
Cautions
•Do not place naked flames, such as lighted candles on or near the
product.
•Do not place objects filled with liquids, such as vases on or near the
product.
•Do not use or store this product in a place where it is subject to direct
sunlight, heat, excessive dust or vibration.
•Do not use this product with wet hands.
•Do not clean this product with water or other liquids.
•Do not block or cover the slots and holes in the product.
•Do not push foreign objects into the slots or holes in the product.
•Do not attempt to open this product yourself. here are no user
serviceable parts inside.
•Do not allow children access to plastic bags.
Safety Warnings
•Before using this product, read and follow all warnings and instructions.
•his product is not intended for use by young children. Young children
should be properly supervised.
•his product is intended for household use only and not for commercial
or industrial use.
•Do not expose to dripping or splashing.
•No naked flame sources, such as lighted candles, should be placed on the
product.
•Ventilation should not be impeded by covering ventilation openings with
items such as newspapers, table cloths, curtains and the like.
•Make sure the unit is adjusted to a stable position. Damage caused by
using this product in an unstable position or by failure to follow any
other warning or precaution contained within this user manual will not
be covered by warranty.
We, suggest retaining the packaging in case for future transport of the
product.
If at any time in the future you should need to dispose of this product
please note that: All batteries and accumulators need to be removed from
this product (Removal of Waste Batteries and Accumulators).
WARNING:
When participating in the traffic listening to a
personal music player can make the listener less aware of
potential dangers such as approaching cars.
WARNING:
o prevent possible hearing damage, do not listen
at high volume levels for long periods.
3
1. Get to know t e controls on Player
Item
Description
1
F LCD Display
2
Button (
On / Off,
Play / Pause)
3
Button (Previous / Fast
-
Rewind)
4
Button
(Next / Fast
-
Forward)
5
M
Button (Menu)
6
Button (Previous Menu / Exit)
7
Micro
USB
Port
(PC Connection / Charge)
8
Mic
rophone Position
(
m
ono
, inside USB port
)
9
Micro SD Memory Card Slot
10
Earphone Output Jack (3.5mm Stereo)
11
Button (Volume
Down
)
12
Button (Volume
Up
)
2. About Player Battery
Player has an internal, non–user-replaceable battery. For best results,
the first time you use player, let it charge for about 3 ~ 4 hours or until the
battery status icon in the “Connect” screen shows that the battery is in full.
Battery is full
Note: Player may continue use battery power after it’s been turned off. For
maintain the battery life and performance, if unit isn’t used for a while, the
battery need to be recharged, recharging the battery at least once per
month.
4
a. C arging t e Battery:
You can charge the player battery in two ways:
Connect player to your computer. Or,
Use the USB power charger. (not included)
b. Connection and C arging:
Once you have connected player with computer / power charger, then
you will see the “C oose connection” screen appear to choose and it will
switch to Charge & ransfer” mode automatically if no action in 4 ~ 5
seconds.
Choose “C arge & Transfer” to upload or download the media files with
your computer and charging the Player’s battery.
Choose “C arge & Play” to operates the Player’s function and the battery
charging in background.
he level bars are running in battery icon at the “Connect” screen. he
battery is in charging.
“C oose connect type” “C arge & Transfer” “C arge & Play”
or
In C arging
Important: The battery does not charge when your computer is in sleep. The
US port on most keyboards does not provide enough power to charge the
player. Connect player to a US 2.0 port on your computer only to prevent
charge problem.
3. Connecting and Disconnecting Player
a. To Connecting Player:
o connect player to your computer, plug the connector of USB Cable into
a USB port on your computer, and connect the other end to player,
hen the player is ready for media files transfer with your computer and
the battery is charging when “C arge & Transfer” mode is selected. And
the “Connect” screen is appearing for view.
Now you can transfer the media files by using the computer mouse use
drag and place, or copy and paste, in between the player and your
computer.
5
b. To Disconnecting Player:
It’s important not to disconnect player while it’s syncing or transferring
files. Eject the player before disconnect it.
o eject player, press once M button, the “Connect” screen will switch to
“Main Menu” screen. And now is safe to disconnect the player with your
computer. Unplug the USB cable from the player. Or,
If you’re using a Windows PC, you can also eject player in My Computer
or by clicking the “Safely Remove Hardware” icon in the Windows
system tray, select the correspondence name of USB Device and choose
“Stop” > choose “Confirm” > choose “Confirm” follow by the pop-up
windows you’re your computer.
If you’re using a Mac, you can also eject player by dragging the player
icon on the desktop to the rash.
Disconnect the USB cable from the player and computer, simply remove
it.
If you accidentally disconnect player without ejecting it, reconnect it to
your computer and sync again. However, some media file may loss.
4. Getting Start t e Player
Turn ON / OFF t e player and use of Main Menu:
o turn ON the player, press and hold the button for 3 seconds, then
you will see any one of the following shown Main Menu screen,
“Bluetoot / Music / Movie / Record / Picture / Setup / eBook”, will
appear on LCD after the Loading and Opening screen have displayed.
o turn OFF the player, press and hold the button for 3 seconds.
“Main Menu” screens
5. Use Setup Menu
You might need to set date & time or change some default setting as you
desired in setup menu before you start to use the player.
6
o go into setup menu, from main menu, choose “Setup” by using /
and buttons, a “Setup” menu appears to use;
For back to previous menu or main menu, press or pressing button
during in setup menu and submenu.
“Setup” Menu
a. Sleep timer:
In Setup menu, choose “Sleep timer”, by using / and buttons
then choose “Off” to switch off it. ( factory default is “Off”)
In Setup menu, choose “Set sleep timer” to switch On the sleep timer, a
levels bar with number appear to use, then choose “1 ~ 99” (Minutes) as
you want by using / buttons and buttons.
he Player will turn off itself automatically as your desired time set.
b. Display settings:
You can set the backlight to illuminate the screen for a certain amount of
time as you desired, or make the backlight to “always On” when every time
you turn ON the player.
In Setup menu, choose “Display settings” > choose “Backlig t timer”, a
list appear to use, then chose “Always On / 10 / 20 / 30 seconds” as you
desired by using / buttons and buttons. Choose “Always On”
to prevent the LCD backlight from turning to off. (choosing this option
decrease battery performance)
Choose “Screen saver” > choose “Digital clock” or “Screen off” to turn
On and Off the screen saver function. Chosen digital clock to display the
date and time when the screen saver if in On.
c. Date & Time:
In Setup menu, choose “Date and time” by using / button and
button, a list appears to use.
Set Time
Choose “Time settings” to set clock, then choose “Set time format” or
“Set time” as you want;
Choose “Set time format” then choose “12 Hours / 24 Hours” show
format as you desired.
Choose “ Set time”, a clock interface will appear to set;
he “Hour / Minute” set item is highlighted, press M button to switch in
between Hour and ime which you want to set. And adjusting hour and
minute to current time by pressing the / button.
7
Finally, you need to press the button to confirm the adjustment and
the screen will back to previous menu.
Set Date
Choose “Date settings” to date, then choose “Set date format” or “Set
date” as you want;
Choose “Set date format” then choose “MM DD YYYY / YYYY MM DD”
which format as you desired.
Choose “ Set date”, a date interface will appear to set;
he “MM / DD / YY” set item is highlighted, press M button to switch in
between day, month and year which you want to set. And adjusting them
to current date by pressing the / button.
Finally, you need to press the button to confirm the adjustment and
the screen will back to previous menu.
d. Language:
his player can use difference OSD languages.
o set the language, choose “Language”, and then choose which
language as you desired by using / buttons and button.
e. Information:
You can view about the player information and disk memory status, such
as firmware version, remaining memory space available and the number of
support media files available in player.
In Setup menu, choose “Information” by using / button and
button, a list appears to use.
Choose “Player information” or “Disk space” which you want to view.
f. Factory Settings:
In Setup menu, choose “Factory settings”, a dialog “Restore factory
settings?” will pop up to confirm;
Choose “Yes” to confirm. Or, “No” to abort.
Press button to exit Setup menu.
6. Use Bluetoot Menu
From main menu, choose “Bluetoot ” menu by using / and
buttons, a Bluetooth list menu “Searc Device / Device’s List / All Music
/ BT Now Playing” is appear to choose;
8
Before pairing, please make sure your Bluetooth Receiver Device
supports Bluetooth A2DP profile.
Keep the device in 1 meter of your Bluetooth receiver device.
Switch on your Bluetooth receiver device and enable it to searching /
pairing mode.
a. Searc Device
Choose “Searc Device” to enter into the Bluetooth searching mode by
using / and buttons on player, the device searching mode is
starting, for approximate 10 ~ 20 seconds, a device(s) name list will
appear to choose for pairing.
Choose the device’s name which you want to pair then choose
“Pair/Connect” by using / and buttons, wait for few
seconds both device should be paired and the first song in music list will
playing automatically from you Bluetooth receiver device. And,
he screen is switch to “BT Now Playing” interface and a Bluetooth icon
“ “is displaying at the information bar, the Bluetooth is in transmitting.
“BT Now Playing”
o search for new Bluetooth Device;
Before you search for new device, please disconnect the current paired
device. For better result, turn the paired Bluetooth receiver to power off.
Choose “Searc Device” the device searching mode will start again for
new device(s) name list to choose again;
Choose new found and wanted Bluetooth receiver device for pairing.
b. Device’s List
Choose “Device’s List” to enter into the paired device list, you can
disconnect or un-pair it, also can re-connect those devices if it’s in
operating range.
In device’s list, choose the device’s name and choose you desired
function “Disconnect” or “Connect / Unpair” as you want. However,
make sure that you have disconnected the linking device before connect
the new wanted device.
Reconnect a pair Bluetooth device;
Automatically connecting: every time when turn “On” the Bluetooth
transmission function, it will automatically reconnect to the last
connected device if the receiver device is still in reconnect mode.
However, some Bluetooth receiver device may need to turn it “Off and
Bluetooth Transmission is On
9
On” again for reconnecting. If not;
Manual connecting: some Bluetooth receiver device may need to
reconnect manually; turn it power Off and On again for reconnecting. Or;
Choose “Device’s List” again by using / and buttons, then
choose the known device and choose “Connect” for reconnecting.
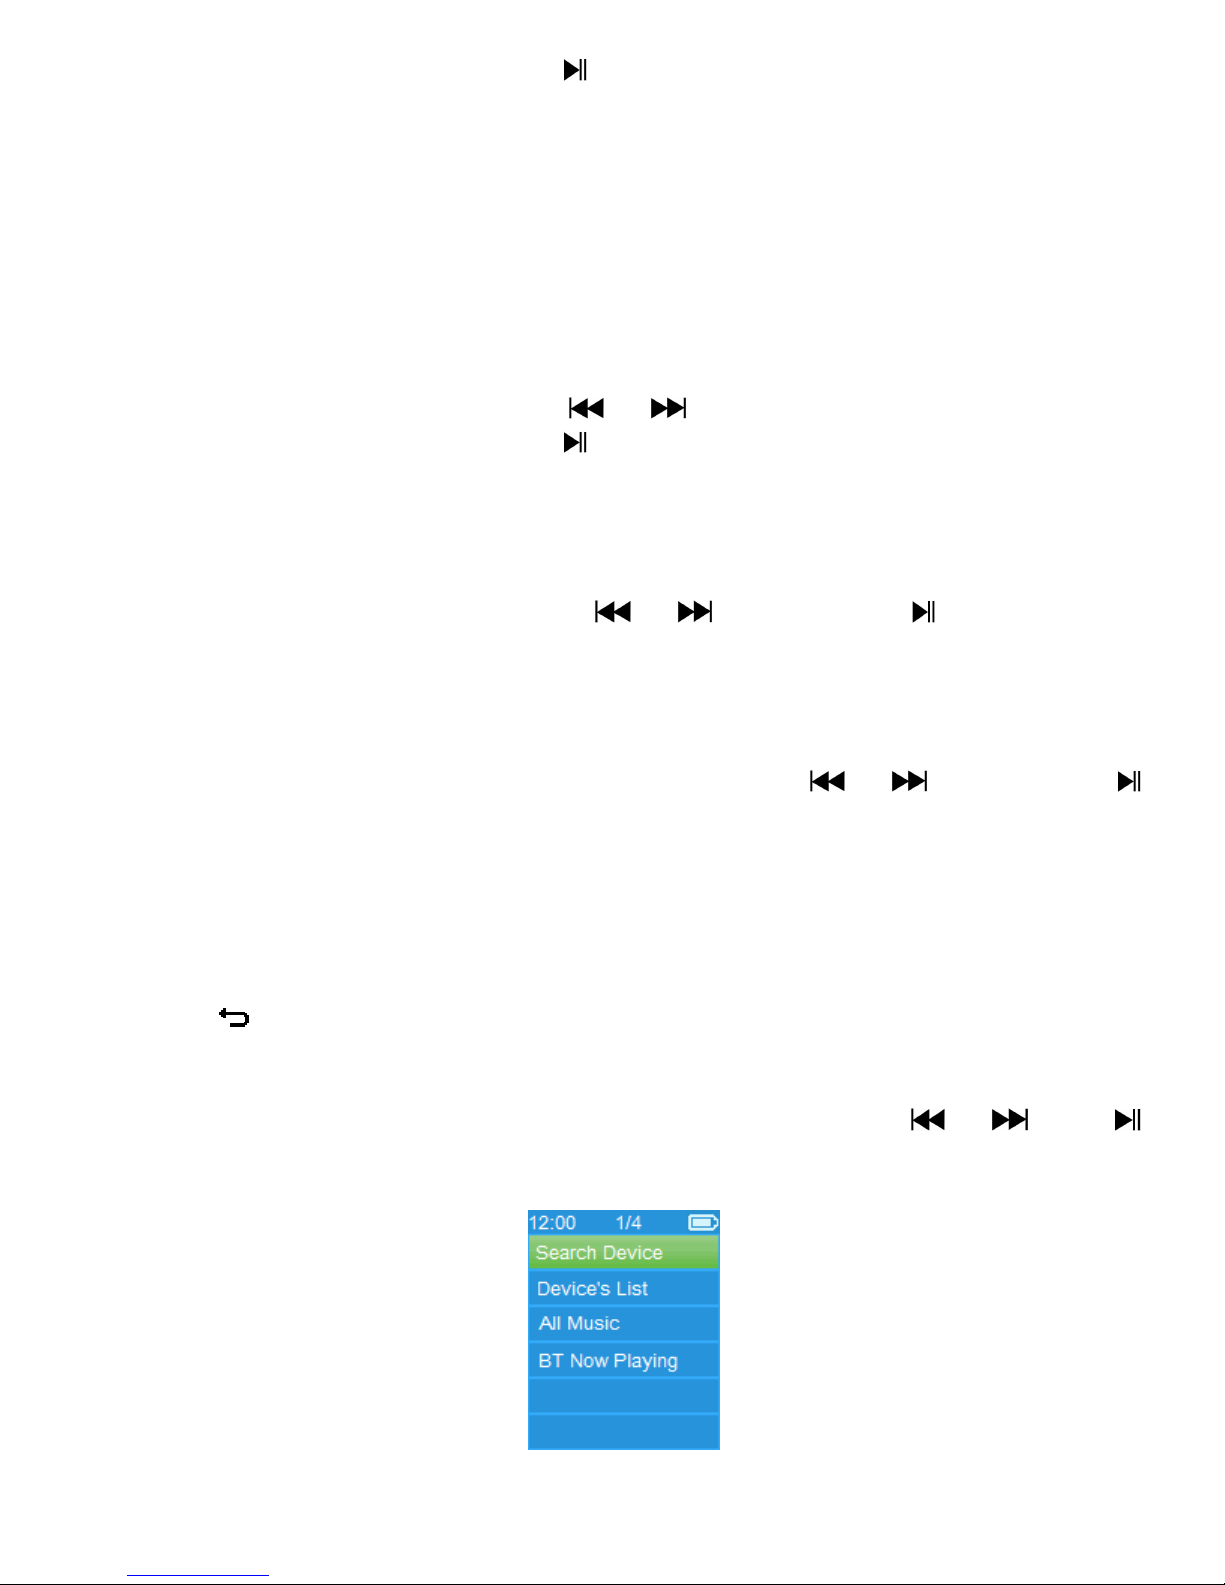
c. All Music
Choose “All Music” to enter into music list, you can direct select the
wanted music for play and transmitting by using / and
buttons
d. BT Now Playing
Choose “BT Now Playing” to return now playing interface.
In “B Now Playing” interface, you can selects; Previous / Next song file,
Play / Pause the song and adjust the Volume Up/Down by using the /
, and / buttons respectively. .
To Recall t e Bluetoot ’s Submenu / Exit Bluetoot Function
Press button, to recall the Bluetooth’s submenu. Or,
Pressing button until a “Exit BT Transmission?” dialog appear for
confirm. Choose “Yes” to exit by using / and buttons, the
Bluetooth function will turn Off and return to main menu screen. Choose
“No” to abort.
Bluetooth Function Limitation:
1. When you turn the player into luetooth audio transmitting mode, the
player earphone output sound will turned to Off automatically;
2. Only music format files with MP3, WMA and WAV can be transmitting by
the player’s luetooth function in music playing interface mode.
3. Fast-Forward and Fast ackward is not allowed to use in luetooth mode.
7. Use Music Menu
You can use this music player to playback with almost full format of music
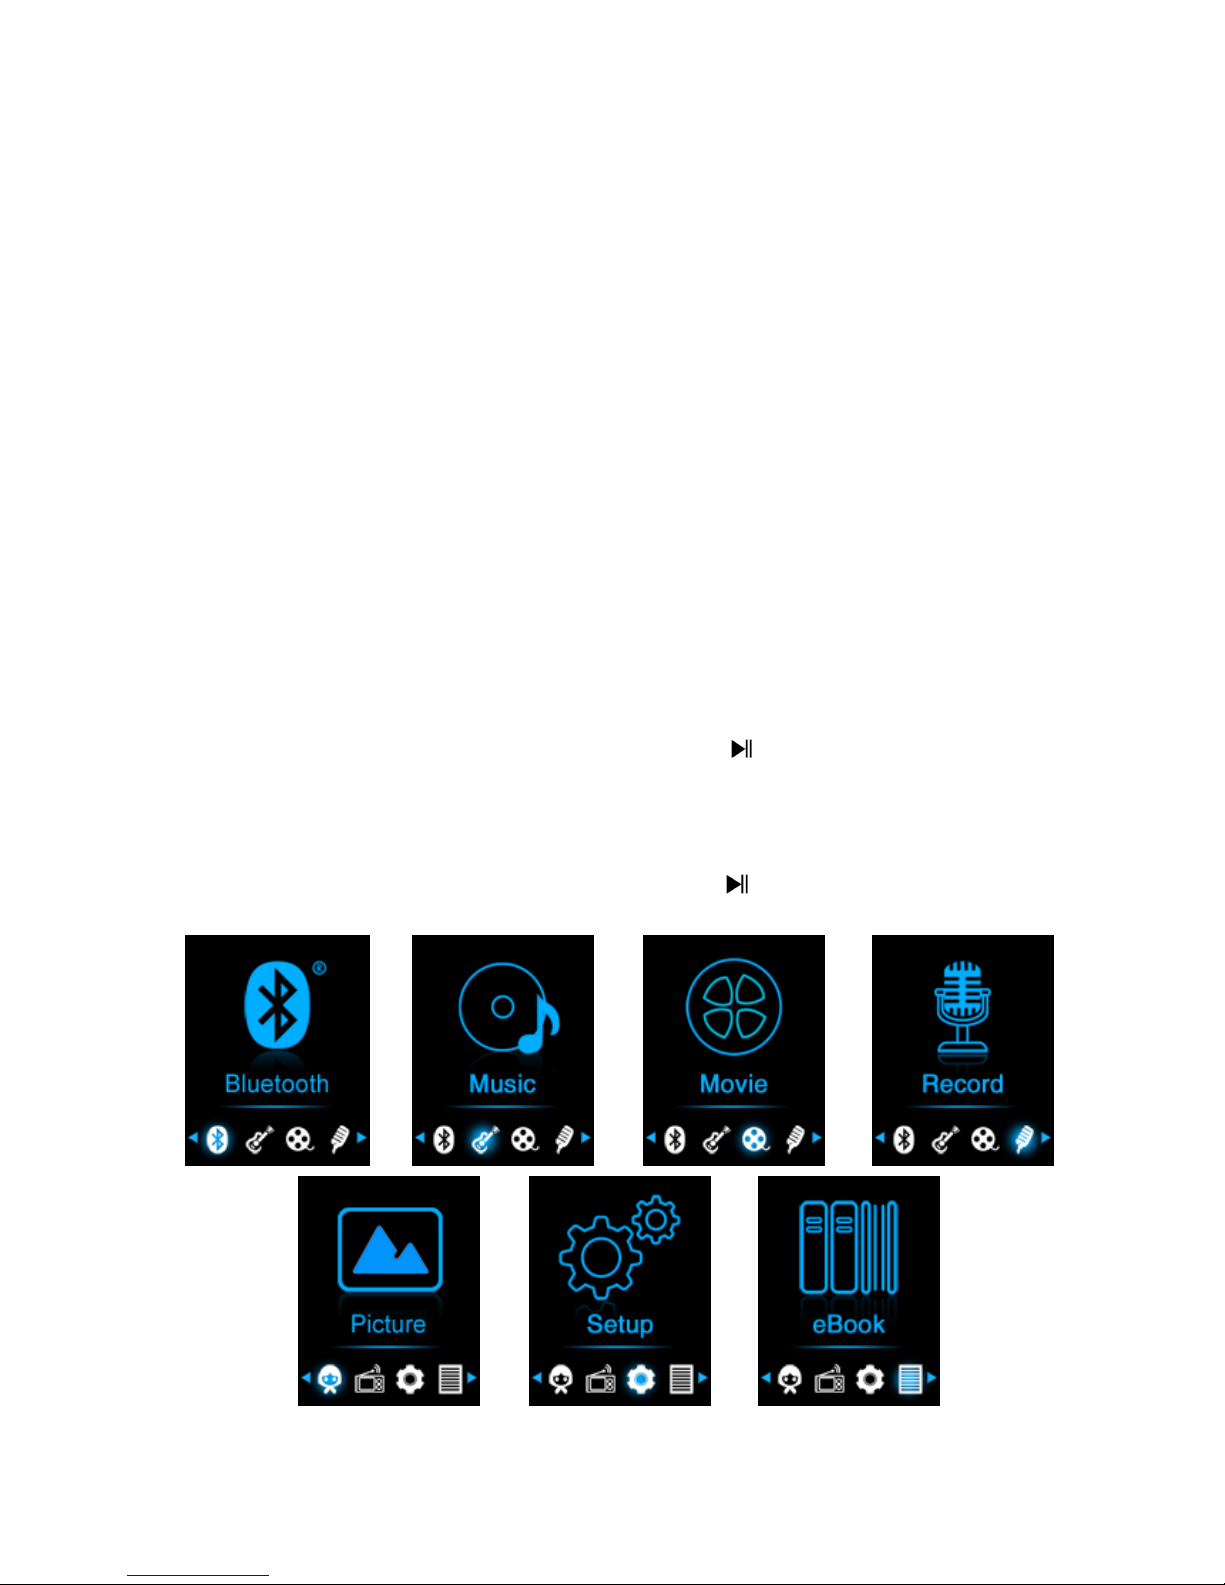
file of audio coding. o open the music player in Main Menu:
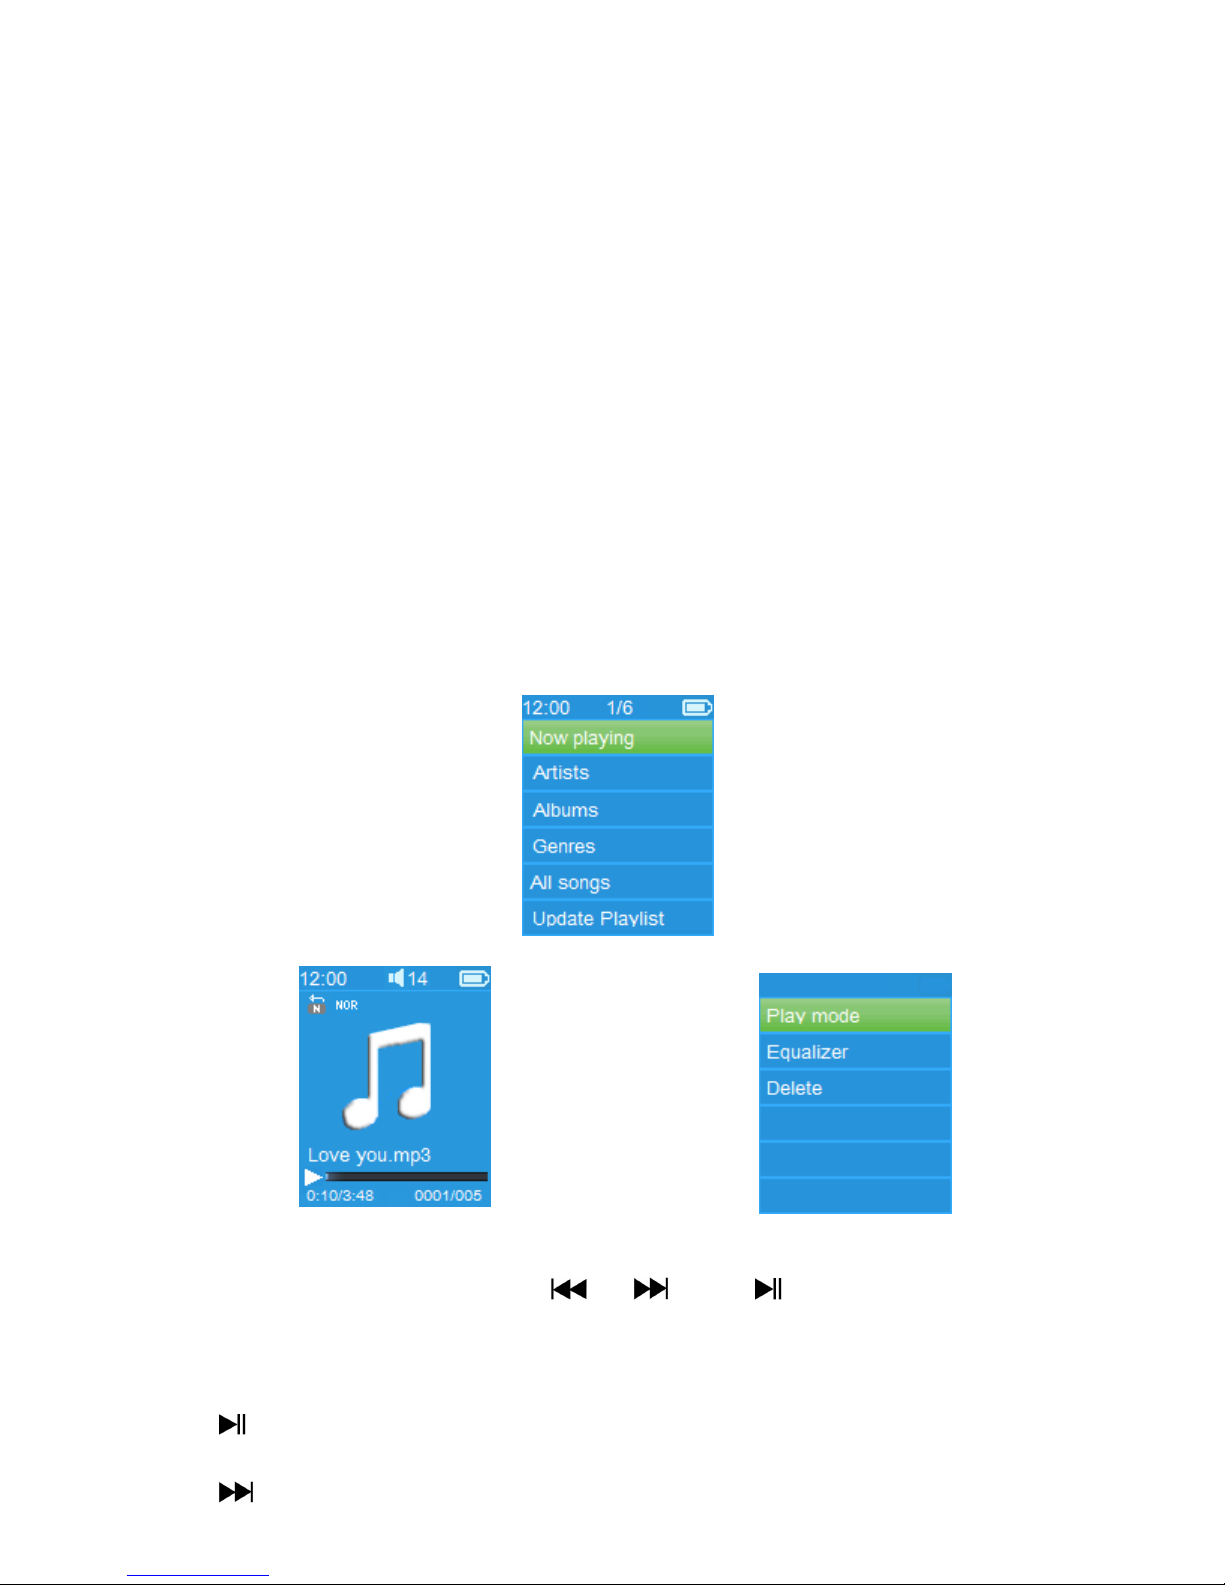
From main menu, choose “Music” by using / and button, a
list menu appears to use;
Choose “Artists / Albums / Genres / All song / Update Playlist” as you
desired;
Choose “Artists” to enter folder(s) list menu grouping by Artist name,
then choose who name of Artist folder > choose a song file in list where
start the play.
Choose “Albums” to enter folder(s) list menu grouping by Album name,
then choose who name of Album folder > choose a song file in list where
start the play.
Choose “Genres” to enter folder(s) list menu grouping by Genres name,
then choose who name of Genres folder > choose a song file in list where
start the play.
10
Choose “All song” to enter all songs list menu to select a song where
start the play. (Depend on current location of Local Folder and Card
Folder last chosen. And default is Local folder if Micro SD card is not
inserted)
Choose “Update playlist” to update the playlist when you found it show
incorrect; actually, it is normal due to some media files could be manual
deleted in player’s memory by user in some case. However, update the
playlist when necessary.
Choose “Local Folder” to use player’s internal memory as current
location, you will see all supported song files will list out in playlist when
item selected.
Choose “Card Folder” to use Micro SD Card memory as current location,
you will see all supported song files will list out in playlist when item
selected. However, a “Create list or not” will appear to confirm when
every time the Micro SD Card is plug in and used. Choose “Yes” to process,
a playlist will be generated for use. Choose “No” to abort.
Remark: The “Local Folder” and “Card Folder” items are will be existed only
in music menu when Micro SD card has plugged into the player.
“Music Menu”
“Music Now Playing Interface” “Music Submenu Menu”
To Play Music
In Artists / Albums / Genres / All song list menu, choose a song file to
star the play using by using / and button. hen the Music
interface will appears to view and use;
Play / Pause Song
In music now playing interface;
Press button to pause the playing music. Press it again to play.
Next / Fast-forward and Previous / Fast-backward Song file
Press button to play next music.