LENCO DVT-2201 User manual

- 1 -
Table of Contents
Important Safety Instructions ............................................................................. 2
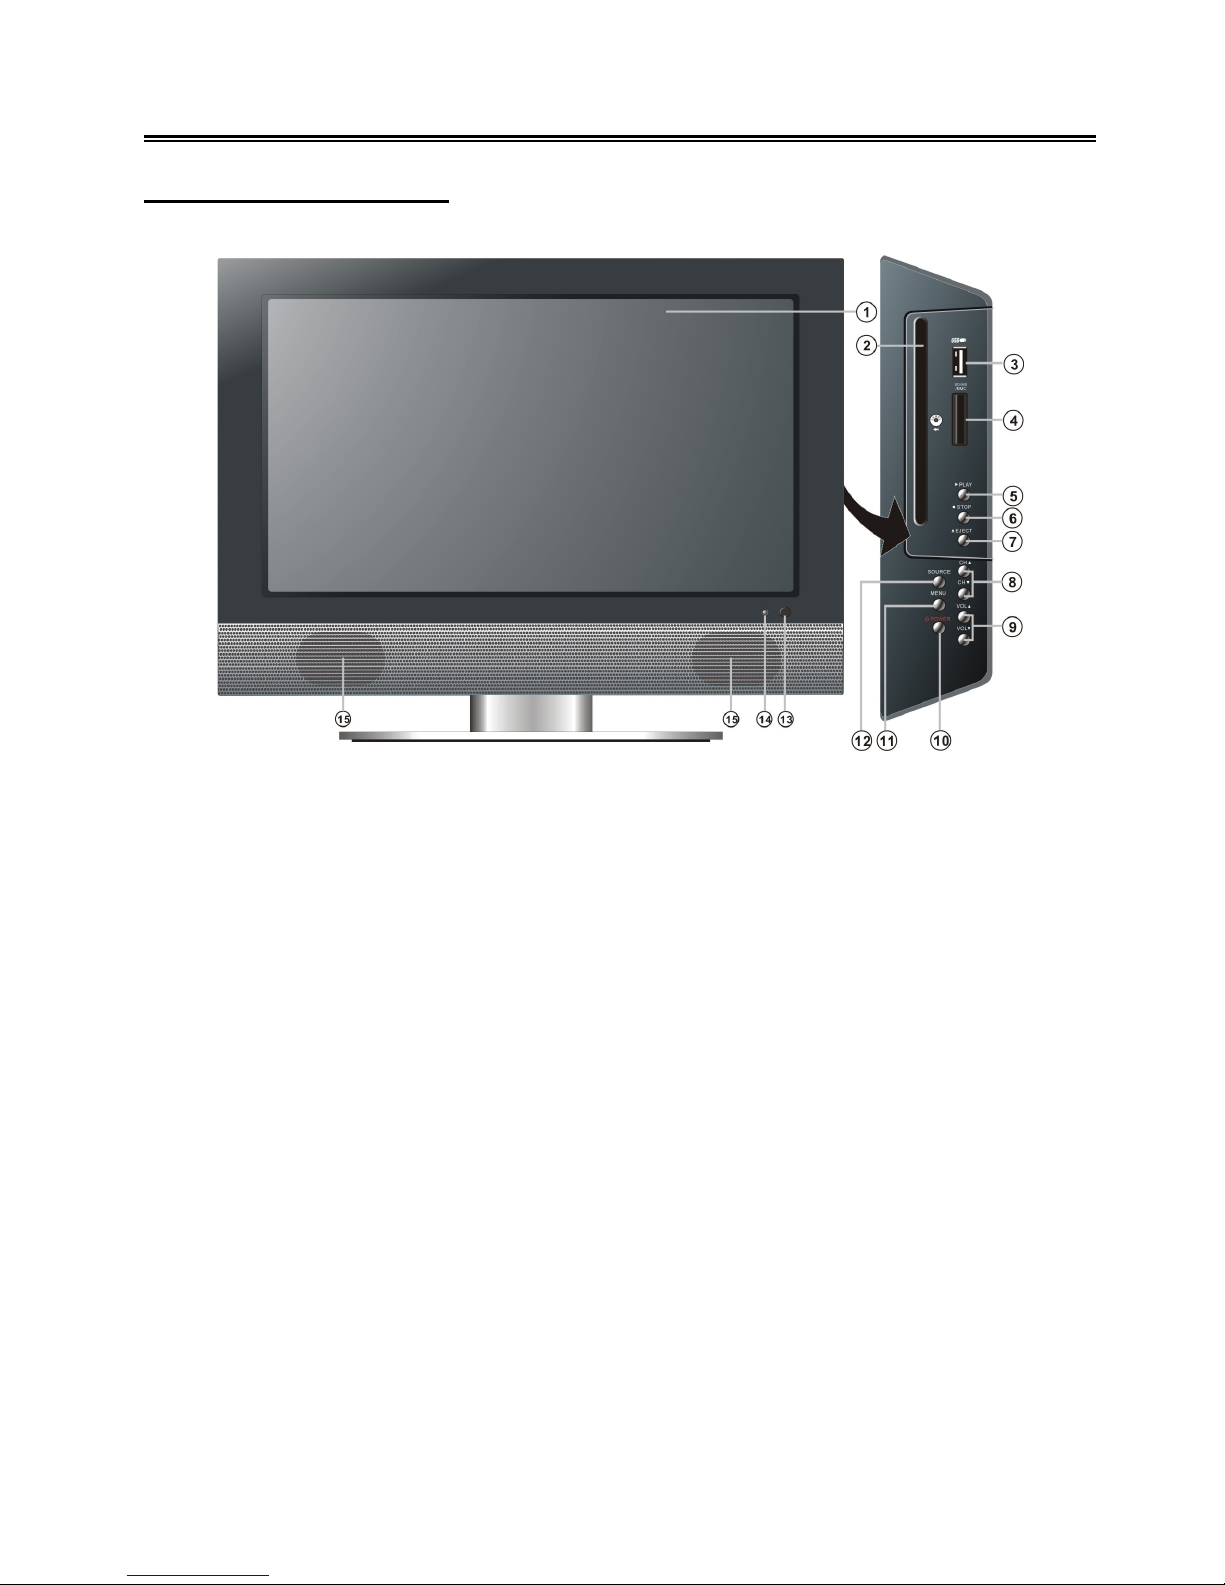
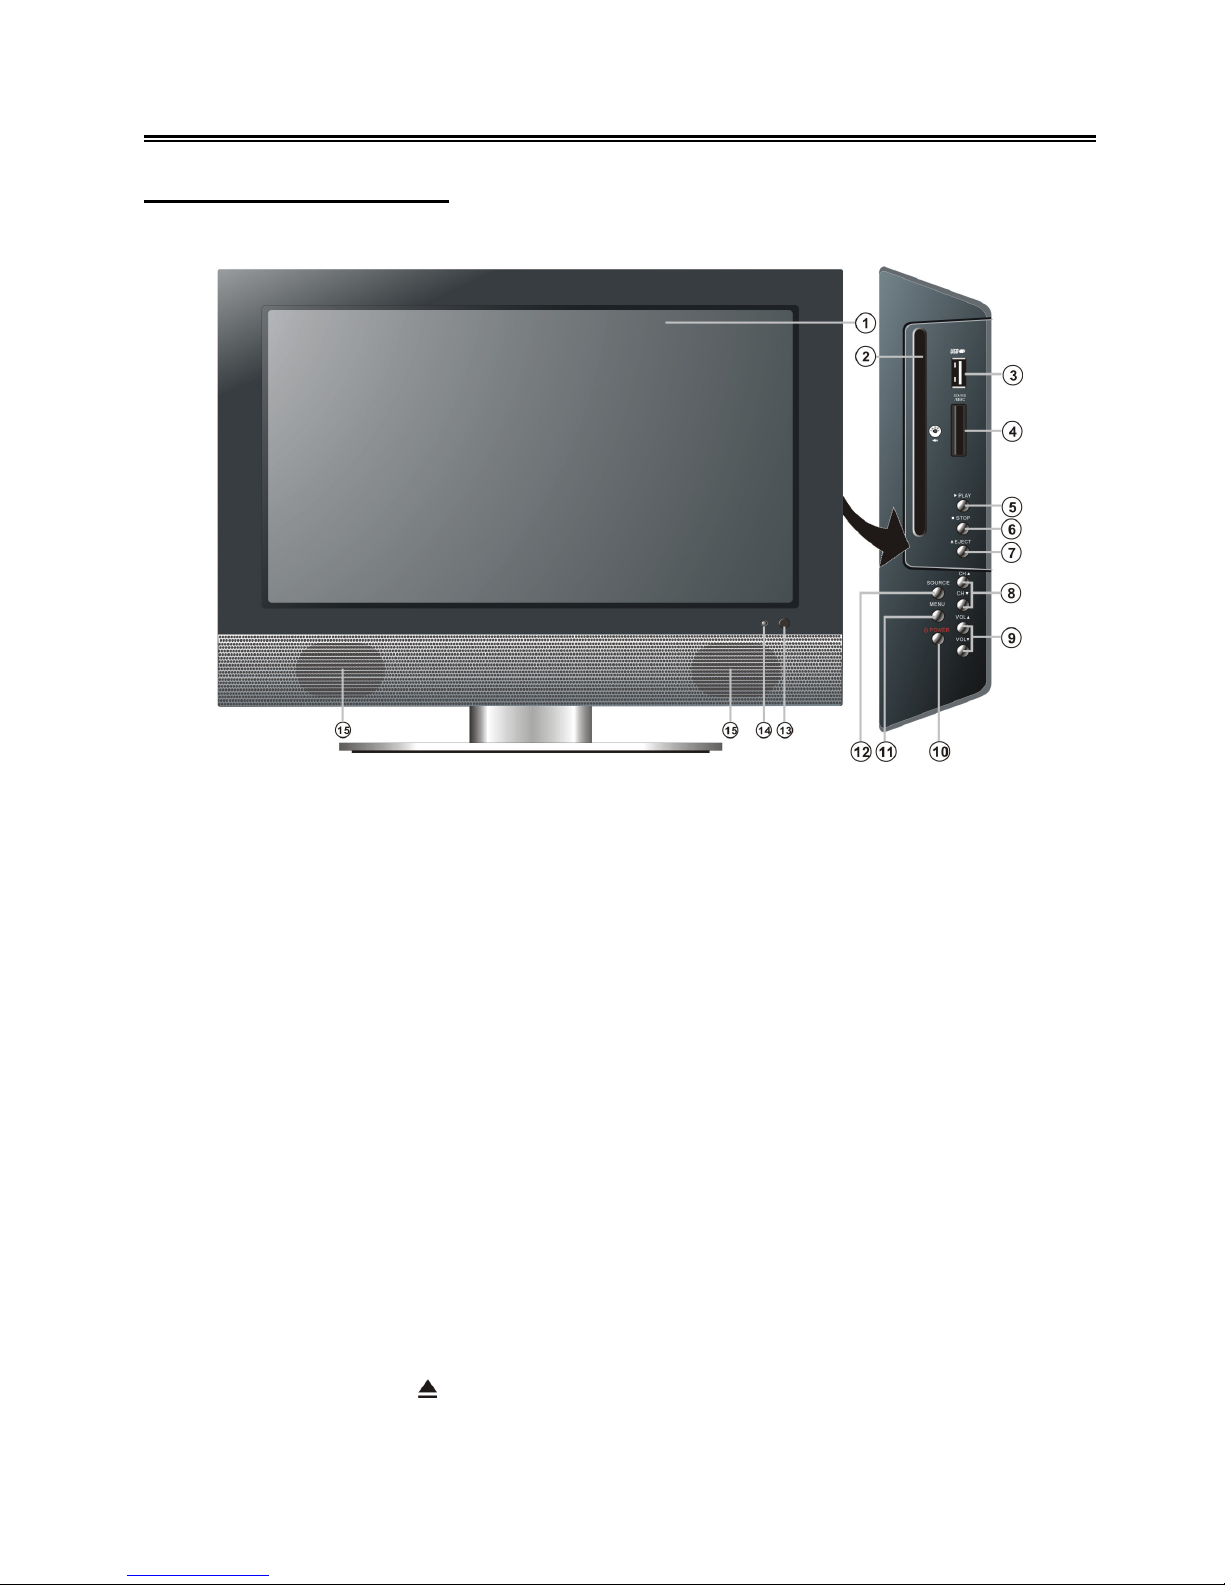
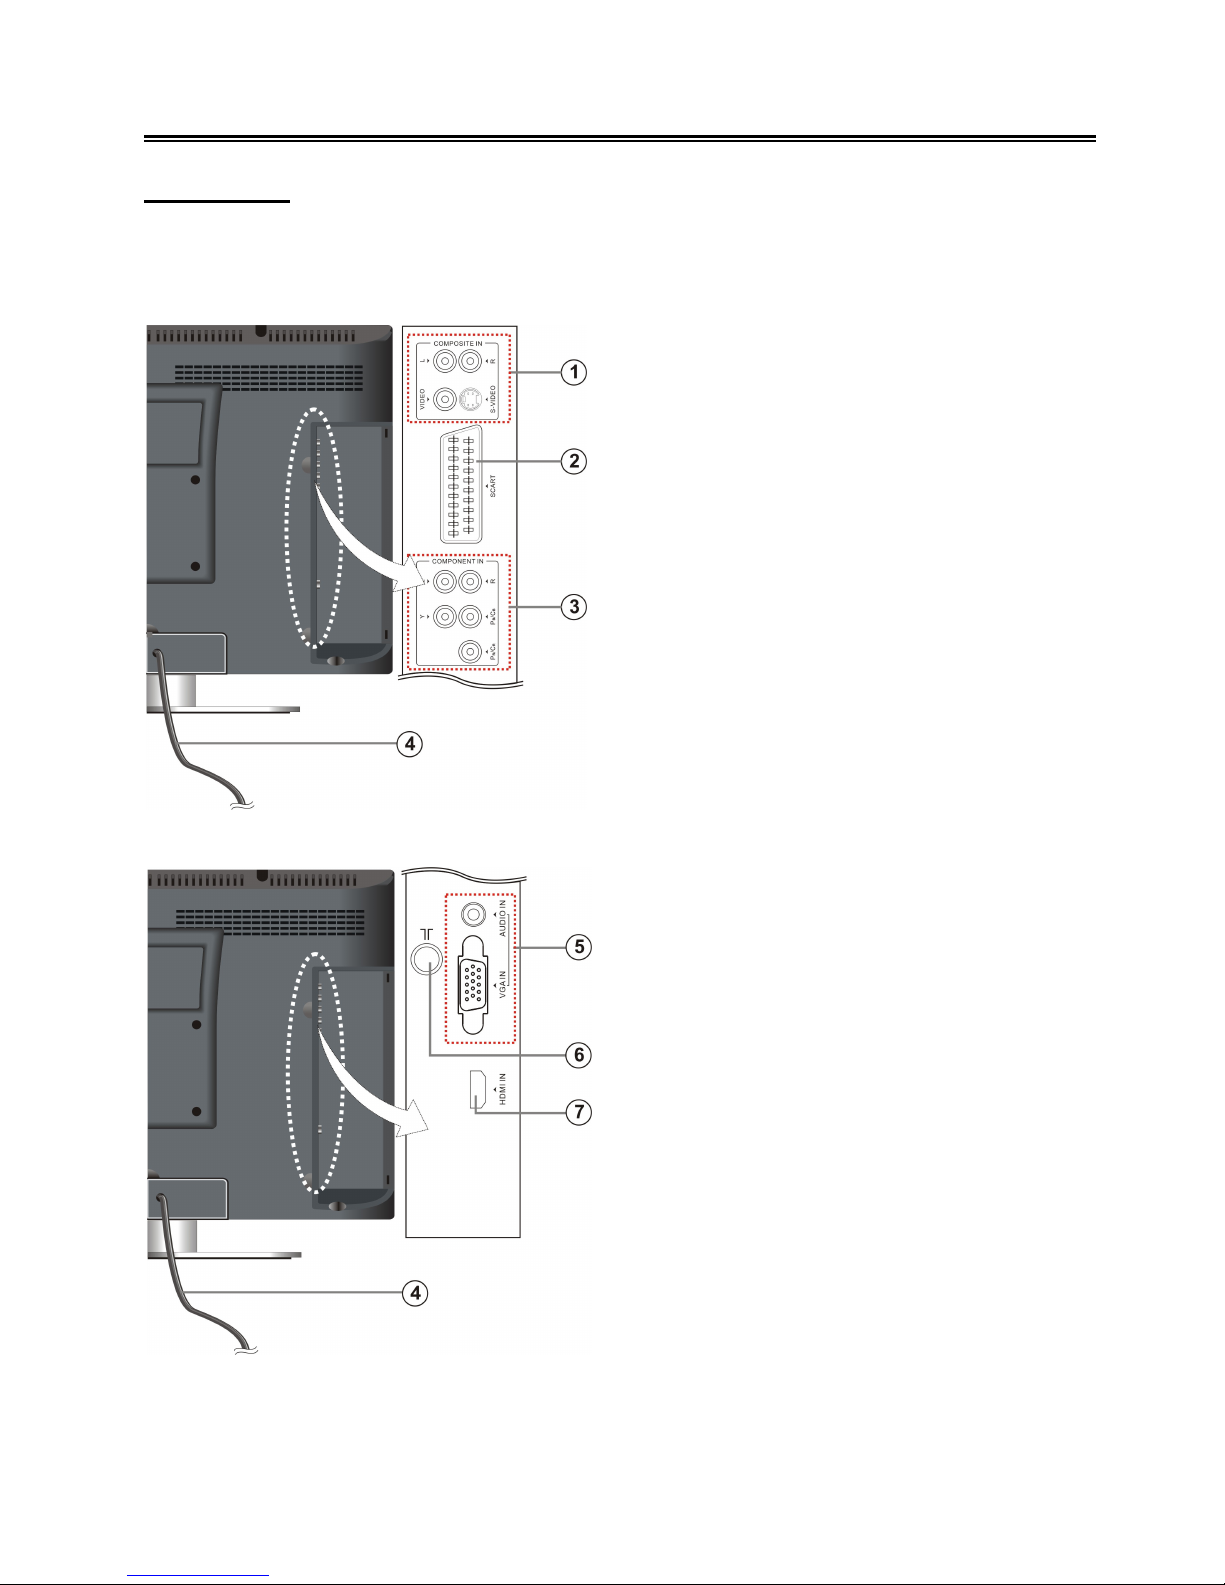
View of Unit .......................................................................................................... 4
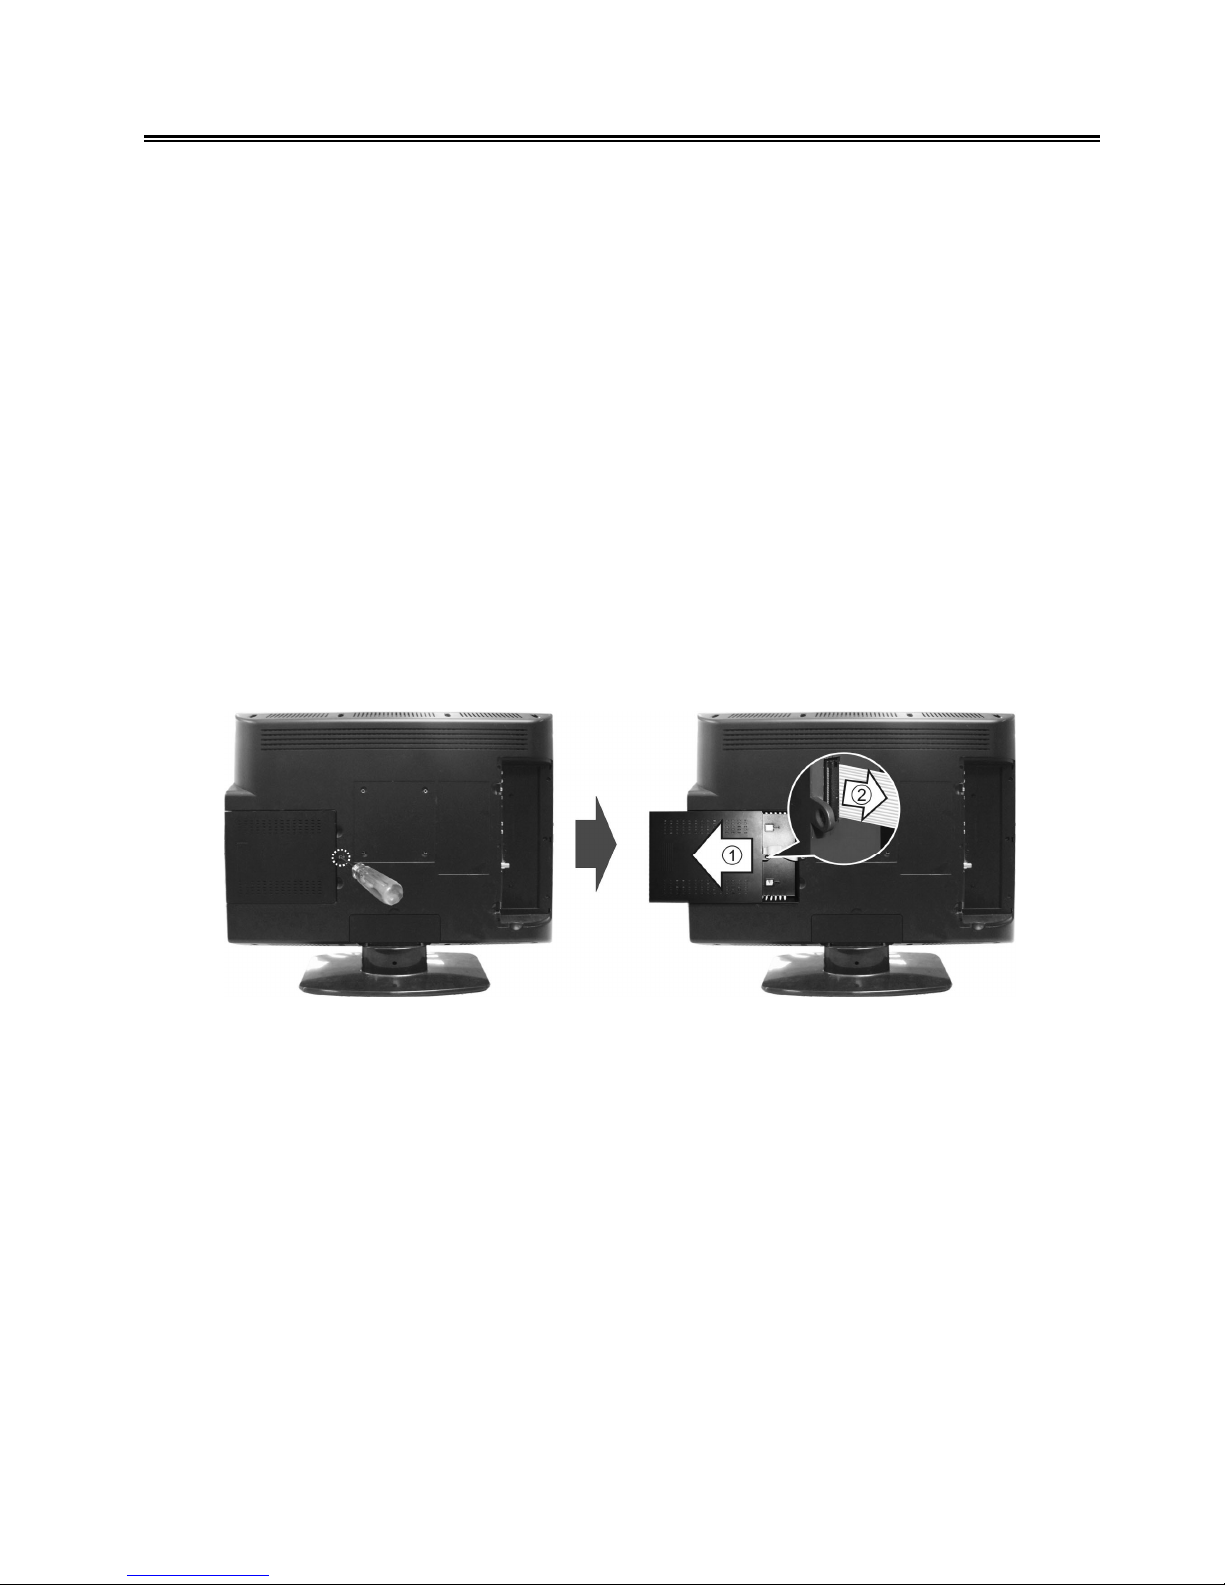
Installing the DVD Module................................................................................... 7
Disc Information................................................................................................... 8
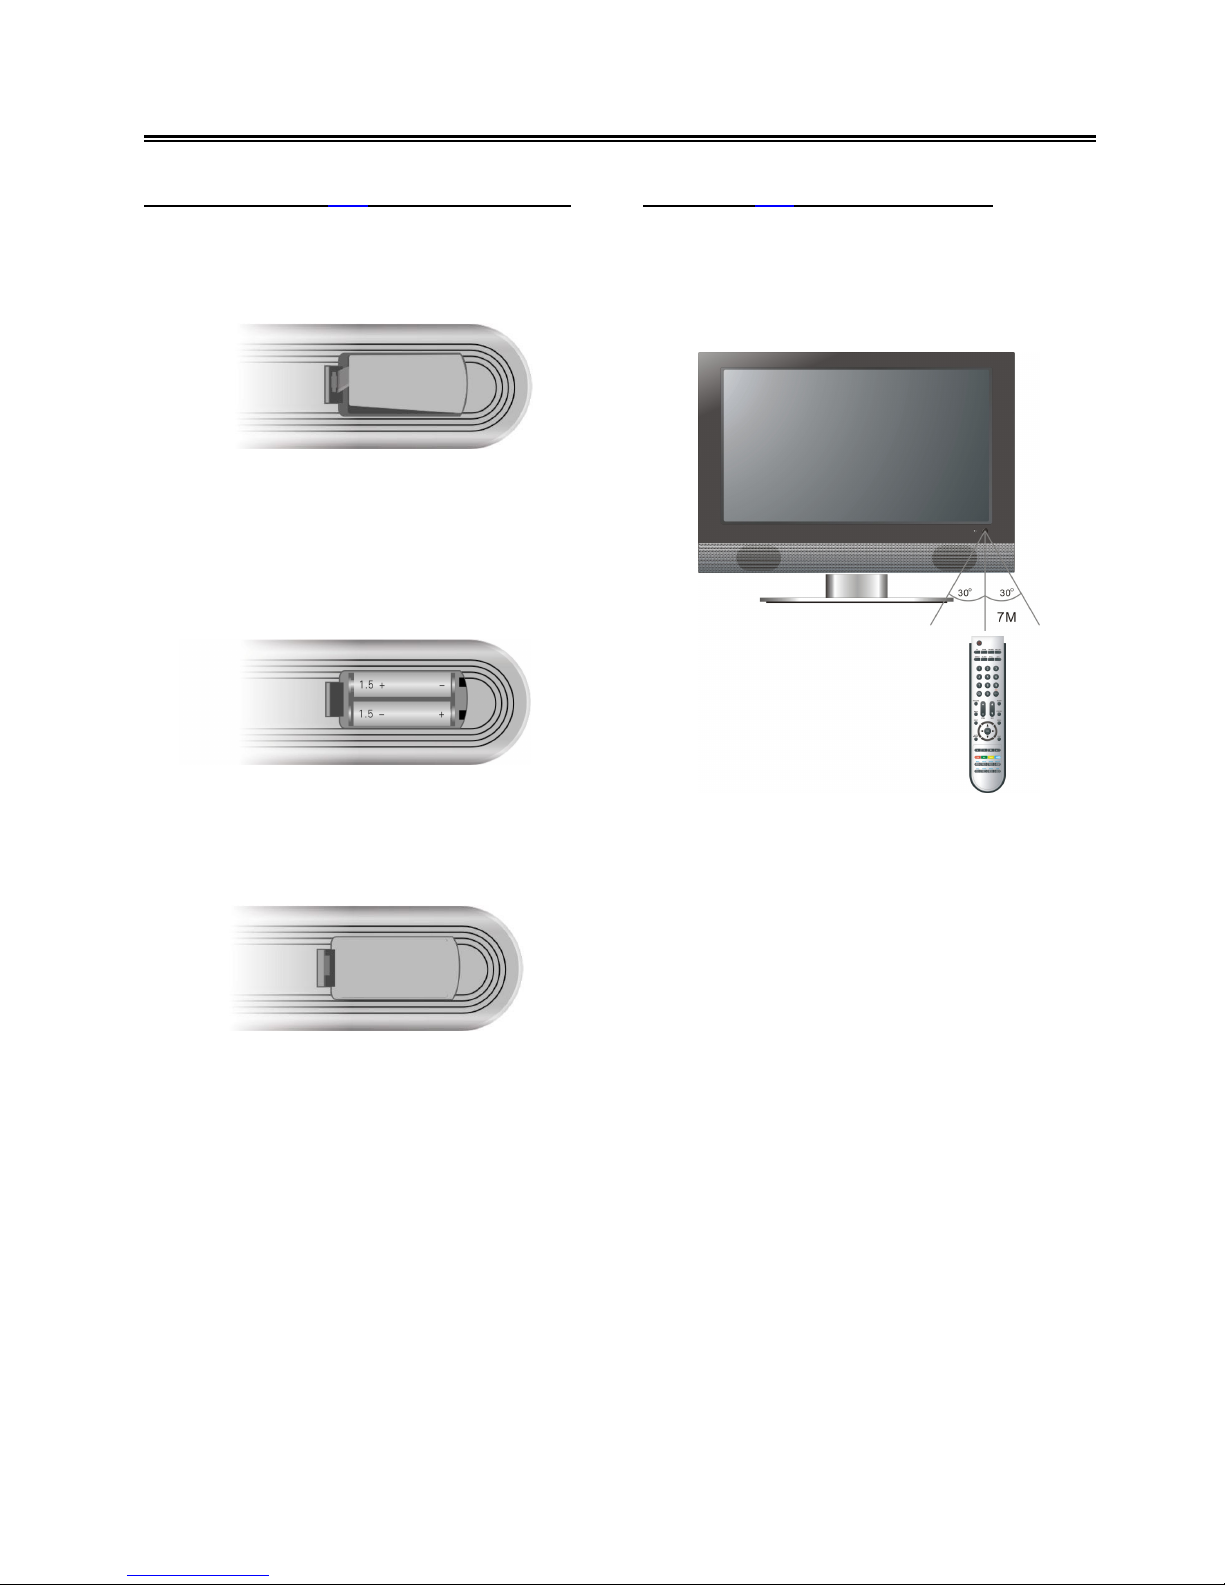
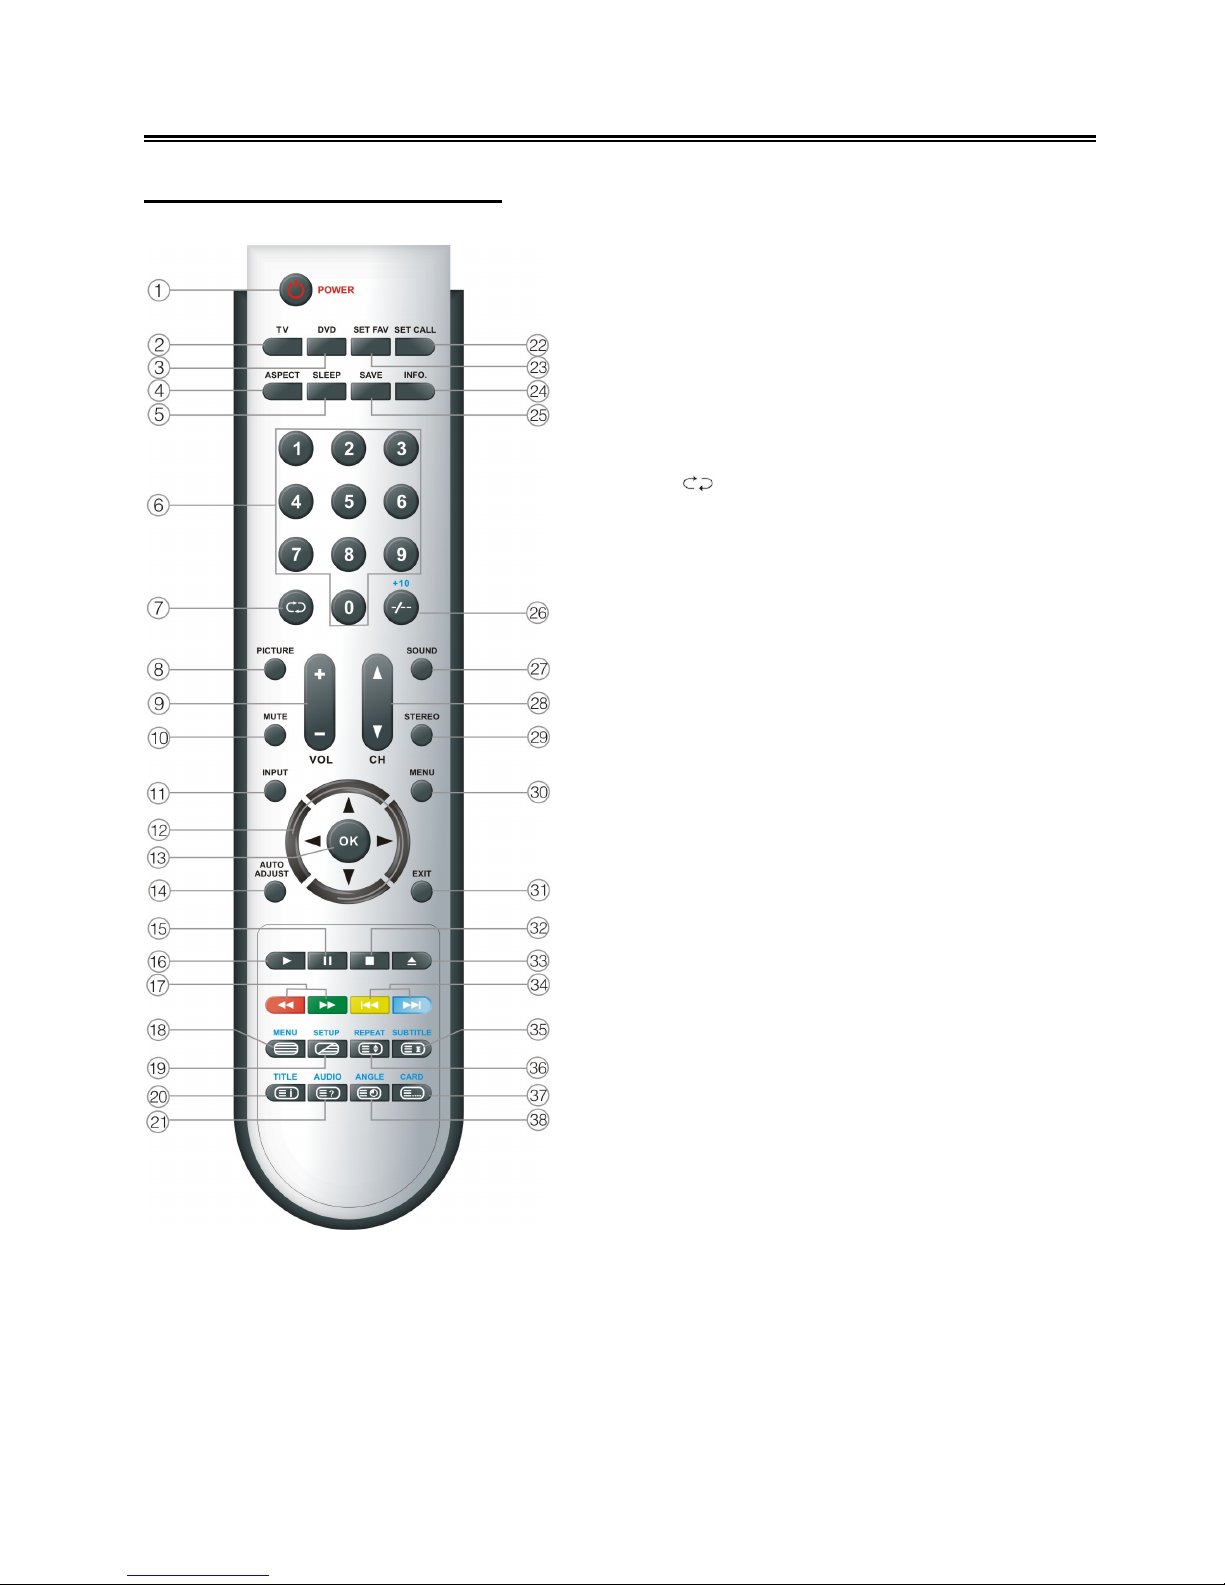
Remote Control .................................................................................................... 9
System Connections ......................................................................................... 13
Connecting to Power Supply................................................................................13
Connecting to an External AV Signal Source (Composite/S-Video) .....................13
Connecting to an External AV Signal Source (YPbPr).......................................... 14
Connecting to an HDMI Signal Source ................................................................14
Connecting to a PC.............................................................................................. 15
Connecting to a SCART signal source.................................................................16
Connecting to TV Signal ...................................................................................... 16
Source Selecting................................................................................................ 17
TV Function ........................................................................................................ 18
Preparation ..........................................................................................................18
Video Setting........................................................................................................18
Audio Setting........................................................................................................ 20
Misc Setting ......................................................................................................... 21
TV Setting ............................................................................................................23
Geometric Setting (VGA mode only) ....................................................................26
NICAM Function ................................................................................................. 28
TELETEXT Function .......................................................................................... 29
DVD Playback Operation................................................................................... 30
USB and SD/MS/MMC Card Function............................................................... 35
DVD System Setup............................................................................................. 36
Troubleshooting................................................................................................. 44
Specifications..................................................................................................... 45

- 2 -
Important Safety Instructions
Caution: use of any controls, adjustments, or procedures other than those specified herein may
result in hazardous radiation exposure.
Caution
1. The product contains a low-power device. In order to ensure the safety of the laser device, do
not remove any cover and attempt to repair the unit. If any service is needed, please contact the
distributor or its authorised service centre.
2. To reduce the risk of electric shock, do not remove the cover (back). No user-serviceable parts
inside. Refer servicing to qualified service personnel. Unplug the product from the wall outlet
before servicing or when it is unused for a long period of time.
3. The manufacturer will not be held responsible for the damage caused by any substitutions and
modification of the product without authorisation from the manufacturer’s or authorised service
agent.
WARNING
The apparatus shall not be exposed to dripping or splashing and that no objects filled with liquids,
such as vases, shall be placed on the apparatus.
Copyright Protection
This product incorporates copyright protection technology that is protected by U.S. patents and other
intellectual property rights. Use of this copyright protection technology must be authorised by
Macrovision, and is intended for home and other limited viewing uses only unless otherwise
authorised by Macrovision. Reverse engineering or disassembly is prohibited.
This symbol indicates that dangerous voltage instituting a risk of electric shock is
present within this unit.
This symbol indicates that there are important operation and maintenance
instructions in the literature accompanying the appliance.
Caution: Laser radiation when open. Do not stare into beam.

- 3 -
Important Safety Instructions
1. Read these instructions
2. Keep these instructions
3. Heed all warnings.
4. Follow all instructions.
5. Do not use this apparatus
near water.
6. Clean only with adry cloth.
7. Do not block any ventilation
openings.
8. Install according to the manufacturer instructions. Do not install near any heat sources such as
radiators, heat registers, stoves or other apparatus (including amplifiers) that produce heat.
9. Read, heed and follow all instructions to ensure correct and safe installation and interconnection
of the apparatus;
10. The apparatus shall not be exposed to dripping or splashing and that no objects filled with liquids,
such as vases, shall be placed on the apparatus.
11. The mains socket-outlet shall be installed near the apparatus and the mains plug shall remain
readily operable.
12. Protect the power cord from being walked on or pinched particularly at plugs, power sockets,
and the point where they exit from the apparatus.
13. Only use attachments/accessories specified by the manufacturer.
14. Use only with stand, tripod, bracket, or table specified by the manufacturer, or sold with the
apparatus.
15. Unplug the apparatus during lightning storms or when unused for long periods of time.
16. Refer all servicing to qualified service personnel. Servicing is required when the apparatus has
been damaged in any way, such as power-supply cord or plug is damaged, liquid has been
spilled or objects have fallen into the apparatus, the apparatus has been exposed to rain or
moisture, does not operate normally, or has been dropped.
Note: Do not touch the colour TFT LCD screen directly by hand.
The images in this manual are for reference only and may differ from your model.
IMPORTANT FOR LASER PRODUCTS
1. CLASS 1 LASER PRODUCT
2. DANGER: Visible laser radiation when open and
interlock failed or defeated. Avoid direct exposure to
beam.
3. CAUTION: Do not open the back cover. There are no
user serviceable parts inside the unit. Leave all
servicing to qualified service personnel.

- 4 -
View Of Unit
Front and Right View
1. Color TFT screen
Color TFT screen to clearly show the data.
2. Disc Tray Slot
Insert adisc into this slot.
3. USB Port
To connect an external USB device.
4. SD/MS/MMC card port
Insert an SD/MS/MMC card into this slot.
5. ►PLAY button
In DVD mode, press this button to play the disc.
6.
STOP button
In DVD mode, press this button once to stop playback, and then press the ►PLAY button to
resume normal playback. Press this button twice repeatedly to stop completely.
7. EJECT button
In DVD mode, press this button to eject the disc.
8. CH ▲/▼button
In TV mode, press this button to select channels.
In setup menu, the same function as the ▲▼ direction buttons.

- 5 -
View Of Unit
Front and Right View
9. VOL ▲/▼button
Press this button to decrease or increase the volume.
In setup menu, the same function as the ◄/►direction buttons.
10. POWER button
Press this button to enter or exit the standby mode.
11. MENU button
Press this button to enter or exit system setup menu.
12. SOURCE button
Press this button repeatedly to select the input mode, choose from: TV, SCART, Composite,
S-Video, YpbPr, VGA, HDMI and DVD.
13. Remote Sensor
14. Power Indicator
The light is blue while the system is active and red while the system is in standby.
15. Speakers
NOTE:
The “STOP”, “►PLAY”, “ EJECT” buttons are only available when the DVD module is installed.

- 6 -
View Of Unit
Rear View
Open the back cover on the right side of the unit’s rear panel and all the connecting jacks will
appear, as shown on the below figure:
1. VIDEO/S-VIDEO and L/R audio Input
Jacks
To connect an audio and video/S-Video
signal source in Composite/S-Video mode.
Video and S-Video share L/R audio jacks
and S-Video has the priority.
2. SCART Jack
To connect a SCART signal source.
3. Y/Pr(Cr)/Pb(Cb) and L/R audio Input
Jacks
To connect a Y/Pr(Cr)/Pb(Cb) signal
source in YPbPr mode.
4. Power Supply Cord
To connect the power supply.
5. VGA Input Jack
To connect a VGA signal source in VGA
mode.
6. TV Signal Input Jack
To connect a TV antenna or analog cable in
TV mode.
7. HDMI Jack
To connect an HDMI signal source.

- 7 -
Installing the DVD Module
This TV set comes equipped with a removable DVD module. Please follow the procedures below to
remove or install the DVD module, this is for service purpose only.
Note:
Before removing or installing the DVD module, ensure that the television is turned off and that the
main plug is removed from the wall socket.
DVD module removal:
Refer to the illustration below and follow the procedures below to remove the DVD module from the
unit:
1. Loosen the screw on the DVD module.
2. Carefully slide the DVD module along the rails and unplug the connecting cord from the LCD TV.
3. Slide the DVD module along the rails to fully remove the DVD module.
DVD module installation:
1. Plug the connecting cord into the DVD module.
2. Carefully slide the module into the desired position and lock the module with one screw.

- 8 -
Disc Information
Discs Supported
DISC LOGO CONTENTS SIZE MAXIMUM TIME
133min(SS-SL)
242min(SS-DL)
266min(DS-SL)
DVD
Audio+Video
(active picture) 12cm
484min(DS-DL)
CD
Audio 12cm 74min
JPEG
Still high resolution 12cm
MP3
Audio 12cm
MPEG 4
Audio+Video
(active picture) 12cm
Operating systems and features of individual DVD discs are specified by the software maker.
Please refer to the instructions accompanying the disc.
About Disc Terms
Titles
A DVD disc is often divided into TITLES. A title can be a separate item or a segment of a film. On
many discs the ROOT menu and the TITLE menu are the same.
Chapters
Each TITLE is subdivided into CHAPTERS and each chapter is numbered for easy searching.
So by knowing the right command, you can play the whole disc, or any part of the disc.
Tracks
Picture and music CDs are divided into TRACKS. Each track is numbered for searching.

- 9 -
Remote Control
Preparation of the Remote Control
Softly push the clip of the back cover to open
the battery compartment.
Insert two batteries (1.5V, size AAA), please
make sure the polarity matches the marks
inside the compartment.
Softly press the back cover to close it.
Under normal use the battery will last for six
months.
Take out the batteries when the remote is
not in use for a long time.
Using of the Remote control
Point the remote control unit from no more than
about 7m from the remote control sensor and
within about 60 degrees of the front of the unit.
•The operating distance may vary
depending on the brightness around.
Notes:
•Do not point bright lights directly at the
remote control sensor.
•Do not place objects between the remote
control unit and the remote control sensor.
•Do not use this remote control unit while
simultaneously operating the remote
control unit of any other equipment.

- 10 -
Remote Control
Remote Control Drawing
1. POWER button
Press to enter or exit the standby mode.
2. TV button
Press to enter TV mode.
3. DVD button
Press to enter DVD mode.
4. ASPECT button
Press to select the picture size: choose
from Auto, Full and 4:3.
5. SLEEP button
Press repeatedly to select the sleep time
and Off.
6. 0~9 Number buttons
Press to select numbers.
7. button
In TV mode, press to return to the channel
last viewed.
8. PICTURE button
Press to select the video display mode:
choose from User, Cinema, Normal, Vivid,
and Hi-Bright.
9. VOL +/- button
Press to increase or decrease the volume.
10. MUTE button
Press to turn on or off the speaker output.
11. INPUT button
Press repeatedly to select the input source,
choose from: TV, SCART, Composite,
S-Video, YPbPr, VGA, HDMI and DVD.
12. Direction buttons (▲▼◄►)
In the setup menu, press the ▲▼button to
select the desired items, press the ◄►
button to adjust or set.
13. OK button
Press to confirm selection in setup menu.
14. AUTO ADJUST button
In VGA mode, press to start auto-adjusting.
15.
PLAY button
In DVD mode, press to play the disc.
16.
PAUSE button
In DVD mode, press to pause the playback.
Press it again to resume normal playback.

- 11 -
Remote Control
17.
/
button
In DVD mode, press to search fast forward
or backward.
In teletext mode, press to select red/green
option.
In the setup menu, use the red button to
swap program and the green button to
insert program in TV mode (Please see
P24 or details).
18. MENU button (in DVD mode)
In DVD mode, press to enter or exit the
disc menu.
In TV, Composite, S-Video or
SCART-Composite mode, press to display
or close the teletext.
19. SETUP button
In DVD mode, press to enter or exit the
DVD setup menu.
In teletext mode, press to display or close
the teletext/display mixed.
20. TITLE button
In DVD mode, during a DVD disc playback,
press to enter or exit the title menu if the
disc contains.
In teletext mode, press to display the index
page.
21. AUDIO button
In DVD mode, press to select the audio
language or audio track.
In teletext mode, press once to display the
concealed information, such as solution of
riddles or puzzles; press again to remove
the riddles answers from the display.
22. SET CALL button
In TV mode, press to select your favorite
channels.
23. SET FAV button
In TV mode, press to set the current
channel as your favourite channel.
24. INFO. button
Press to display the reference information.
25. SAVE button
Press to close the screen display but not
the sound. It can economize power. Press
again to resume.
26. -/-- /+10 button
In TV mode, press this button select one
digit channel number, two digit channel
number or three digit channel number.
Then press the number buttons to select
the desired channel.
In DVD mode, press to select number
greater than 10.
27. SOUND button
Press repeatedly to select the sound mode:
choose from User, Normal, News, Cinema
and Concert.
28. CH
/
button
In TV mode, press to select channels.
29. STEREO button
Press to select sound track in TV mode
(please see P28 for details).
30. MENU button
Press to enter the setup menu.
31. EXIT button
Press to exit the menu in the setup menu.
32. EJECT button
In DVD mode, press to eject the disc.
33. ■STOP button
In DVD mode, press once to stop playback,
and then press the PLAY button to
resume normal playback. Press this button
twice repeatedly to stop completely.

- 12 -
Remote Control
Remote Control Drawing
34.
/
button
In DVD mode, press to skip to the previous
or next chapter/track. For some discs,
press the button once to skip to the
beginning of the current chapter/track;
press twice repeatedly to skip to the
previous chapter/track.
In teletext mode, press to select the
yellow/blue option.
In the setup menu, use the yellow button to
copy program and the blue button to delete
program in TV mode (Please see P24 for
details).
35. SUBTITLE button
In DVD mode, press to select different
subtitle languages during a multiple
language DVD disc playback.
In teletext mode, press to hold the current
page and press again to resume.
36. REPEAT button
In DVD mode, press to repeat a chapter,
track, title, or all content.
In teletext mode, press the button first time
to double the size of the teletext letters in
the upper half of the screen, second time to
double size of the teletext letters in the
lower half of the screen and third time to
resume to the normal status.
37. CARD button
In DVD mode, press to enter SD or
MS/MMC card mode. It is priority for the U
disk input.
In TV, Composite, S-Video or
SCART-Composite mode, press to
show/hide the teletext list.
38. ANGLE button
In DVD mode, press to access various
camera angles (if the DVD disc contains
multiple camera angles).
In teletext mode, press to display the
subpage of the teletext.

- 13 -
System Connections
•Do not connect the power cord until all other connections have been made.
•Ensure that you observe the colour cord when connecting audio and video cables.
•Before connecting, open the cover on the right side of the unit’s rear panel.
Connecting to Power Supply
Plug the power supply cord to the wall AC outlet.
Connecting to an External AV Signal Source (Composite/S-Video)
Use audio cables to connect an external signal source to the audio input jacks on the jack panel of
the unit. Use either composite video or S-Video cables for the video connection to the input jack on
the jack panel of the unit.
After connection, turn on the power of the unit and the external AV signal source. Press the INPUT
button on the remote control or the SOURCE button on the TV set to select the Composite or
S-video mode.
Note:
S-Video signals typically provide better image quality than composite video signals.

- 14 -
System Connections
Connecting to an External AV Signal Source(YPbPr)
Use the audio and video cables to connect the Y/Pb(Cb)/Pr(Cr) input Jacks on the right side of the
unit’s rear panel to the external AV signal source.
After connection, turn on the power of the unit and the external AV signal source. Press the INPUT
button on the remote control or the SOURCE button on the TV set to select YPbPr mode.
Connecting an HDMI Signal Source
Follow the figure below to connect an HDMI signal source to the HDMI jack on the rear panel of the
unit.
After connection, turn on the power of the television and the external HDMI device and use the Input
button on the remote control or the SOURCE button on the TV set to select HDMI mode.
Note:
HDMI provides both audio and video signals and typically provides superior image quality to
component, S-Video or composite.

- 15 -
System Connections
Connecting to a PC
The unit can be connected to a PC (personal computer) via the VGA cable. Follow the steps and the
figure below to connect.
1. Connect one end of the VGA cable to the VGA input jack on the right side of the unit’s rear panel
and the other end to the PC.
2. Connect one end of the audio cables to the PC audio input jack on the right side of the unit’s
rear panel and the other end to the PC audio output jack.
3. Set the PC’s resolution at 1440×900@60Hz for best results.
After connection, turn on the unit and the PC. Press the INPUT button on the remote control or the
SOURCE button on the TV set to select VGA mode.

- 16 -
System Connections
Connecting to a SCART signal source
Follow the figure below to connect a SCART signal source to the SCART jack on the rear panel of
the unit.
After connection, turn on the power to the television and the external AV signal source. Use the
INPUT button on the remote control or the SOURCE button on the TV set to select SCART mode.
Note:
When there is aSCART signal provided, the TV will enter SCART mode automatically; when the
SCART cable is pulled out or the external AV signal source is turned off, the TV will return to the
previous mode.
Connecting to TV Signal
This unit can be connected to the TV signal input source via the 75Ωantenna jack on the rear panel.
After connection, turn on the power of the unit. Then press the INPUT button on the remote control
or the SOURCE button on the TV set to select TV mode
and conduct program selection.

- 17 -
Source Selecting
The TV set incorporates multiple video modes, you can select the video mode according to the input
signal.
Press the INPUT button on the remote control or the SOURCE button on the right side panel of the
TV repeatedly, and you can select the video mode in the following order:
TV => SCART => Composite => S-Video => YPbPr => VGA => HDMI =>
DVD
If you remove the removable DVD module and press the INPUT button on the remote control or the
SOURCE button on the right side panel of the TV repeatedly, then you can select the video mode in
the following order:
TV => SCART => Composite => S-Video => YPbPr => VGA => HDMI
NOTE:
If there is no signal provided in VGA mode, the unit will enter the standby mode 1 minute
later and it will enter work state once there is a VGA signal provided.
In other modes, if there is no signal provided the unit will enter power-off mode 15
minutes later. You can restart the TV by pressing the POWER button.

- 18 -
TV Function
NOTE: In other mode, you can refer to the following instructions in TV mode to go on
with some settings.
Preparation
1. After connection, press the POWER button to turn on the unit.
2. Press the INPUT button on the remote control or the SOURCE button on the TV set repeatedly
to select TV mode. Then you can go on with the following setup:
Video Setting
Note: the items in the Video Setting menu can be set when there is signal provided.
Contrast
Press the ▲▼ button to select Contrast and press the ◄► button to adjust the value. Press the
MENU button to return to the previous menu.
Brightness
Press the ▲▼ button to select Brightness and press the ◄► button to adjust the value. Press the
MENU button to return to the previous menu.
Saturation
Press the ▲▼ button to select Saturation and press the ◄► button to adjust the value. Press the
MENU button to return to the previous menu.
Hue
Press the ▲▼ button to select Hue and press the ◄► button to adjust the value. Press the MENU
button to return to the previous menu.
NOTE: This item is only available under NTSC TV signal mode.
Press the MENU button once to enter the
main setup menu. Press the ◄► button to
select Video, and the screen will display as
shown on the right:
Press the OK or ▼button to enter the Video
setting menu. Press the ▲▼ button to select
an item.
Press the EXIT button to exit the menu.

- 19 -
TV Function
Sharpness
Press the ▲▼ button to select Sharpness and press the ◄► button to adjust the value. Press the
MENU button to return to the previous menu.
Color Temperature
Press the ▲▼ button to select Color Temperature and press the ◄► button to select Middle, Cool
or Warm. Press the MENU button to return to the previous menu.
DNR (Digital Noise Reduction)
Press the ▲▼ button to select DNR and press the ◄► button to select Low, Middle, Strong or Off.
Press the MENU button to return to the previous menu.
Black Level Extender
Press the ▲▼ button to select Black Level Extender and press the ◄► button to select On or Off.
Press the MENU button to return to the previous menu.
CTI (Color Transient Intensity)
Press the ▲▼ button to select CTI and press the ◄► button to select On or Off.. Press the MENU
button to return to the previous menu.
Flesh Tone
Press the ▲▼ button to select Flesh Tone and press the ◄► button to select On or Off. Press the
MENU button to return to the previous menu.
Adaptive Luma Control
Press the ▲▼ button to select Adaptive Luma Control and press the ◄► button to select On or
Off. Press the MENU button to return to the previous menu.
Advanced Picture Adjust
Press the ▲▼ button to select Advanced
Picture Adjust. Press the OK or ►button
to enter the setup, as show on the right:
In the menu, press the ▲▼ button to select
an item. Press the ◄► button to set.
Press the EXIT button to exit the menu.

- 20 -
TV Function
Audio Setting
Note: the items in the Audio Setting menu can be set when there is signal provided.
Bass
Press the ▲▼ button to select Bass and press the ◄► button to adjust the level. Press the MENU
button to return to the previous menu.
Treble
Press the ▲▼ button to select Treble and press the ◄► button to adjust the level. Press the MENU
button to return to the previous menu.
Balance
Press the ▲▼ button to select Balance and press the ◄► button to adjust the level. Press the
MENU button to return to the previous menu.
Surround
Press the ▲▼ button to select Surround and press the ◄► button to select On or Off.. Press the
MENU button to return to the previous menu.
Reverb
Press the ▲▼ button to select Reverb and press the ◄► button to select Low, Middle, Strong or Off.
Press the MENU button to return to the previous menu.
Press the MENU button once to enter the
main setup menu. Press the ◄►button to
select Audio and the screen will display as
the figure on the right.
In the menu, press the OK or ▼button to
enter the menu. Press the ▲▼ button to
select an item.
Press the EXIT button to exit the menu.
Other manuals for DVT-2201
1
Table of contents
Other LENCO TV DVD Combo manuals

LENCO
LENCO DVT-154 User manual

LENCO
LENCO DVL-2253 BLACK User manual

LENCO
LENCO DVT-1941 User manual

LENCO
LENCO DVT-2201 User manual

LENCO
LENCO DVT-1001 User manual

LENCO
LENCO DVT-1936 User manual

LENCO
LENCO DVL-2453 BLACK User manual

LENCO
LENCO DVT-221 User manual

LENCO
LENCO DVL-1953 BLACK User manual

LENCO
LENCO DVT-221 User manual

LENCO
LENCO DVL-2750 User manual

LENCO
LENCO DVT-194 User manual

LENCO
LENCO DVT-2451 User manual

LENCO
LENCO DVT-224 User manual

LENCO
LENCO DVT-1901 User manual

LENCO
LENCO DVT-1541 User manual

LENCO
LENCO DVT-1946 User manual

LENCO
LENCO DVT-2441 User manual

LENCO
LENCO DVT-1932 User manual

LENCO
LENCO DVT-1541 User manual