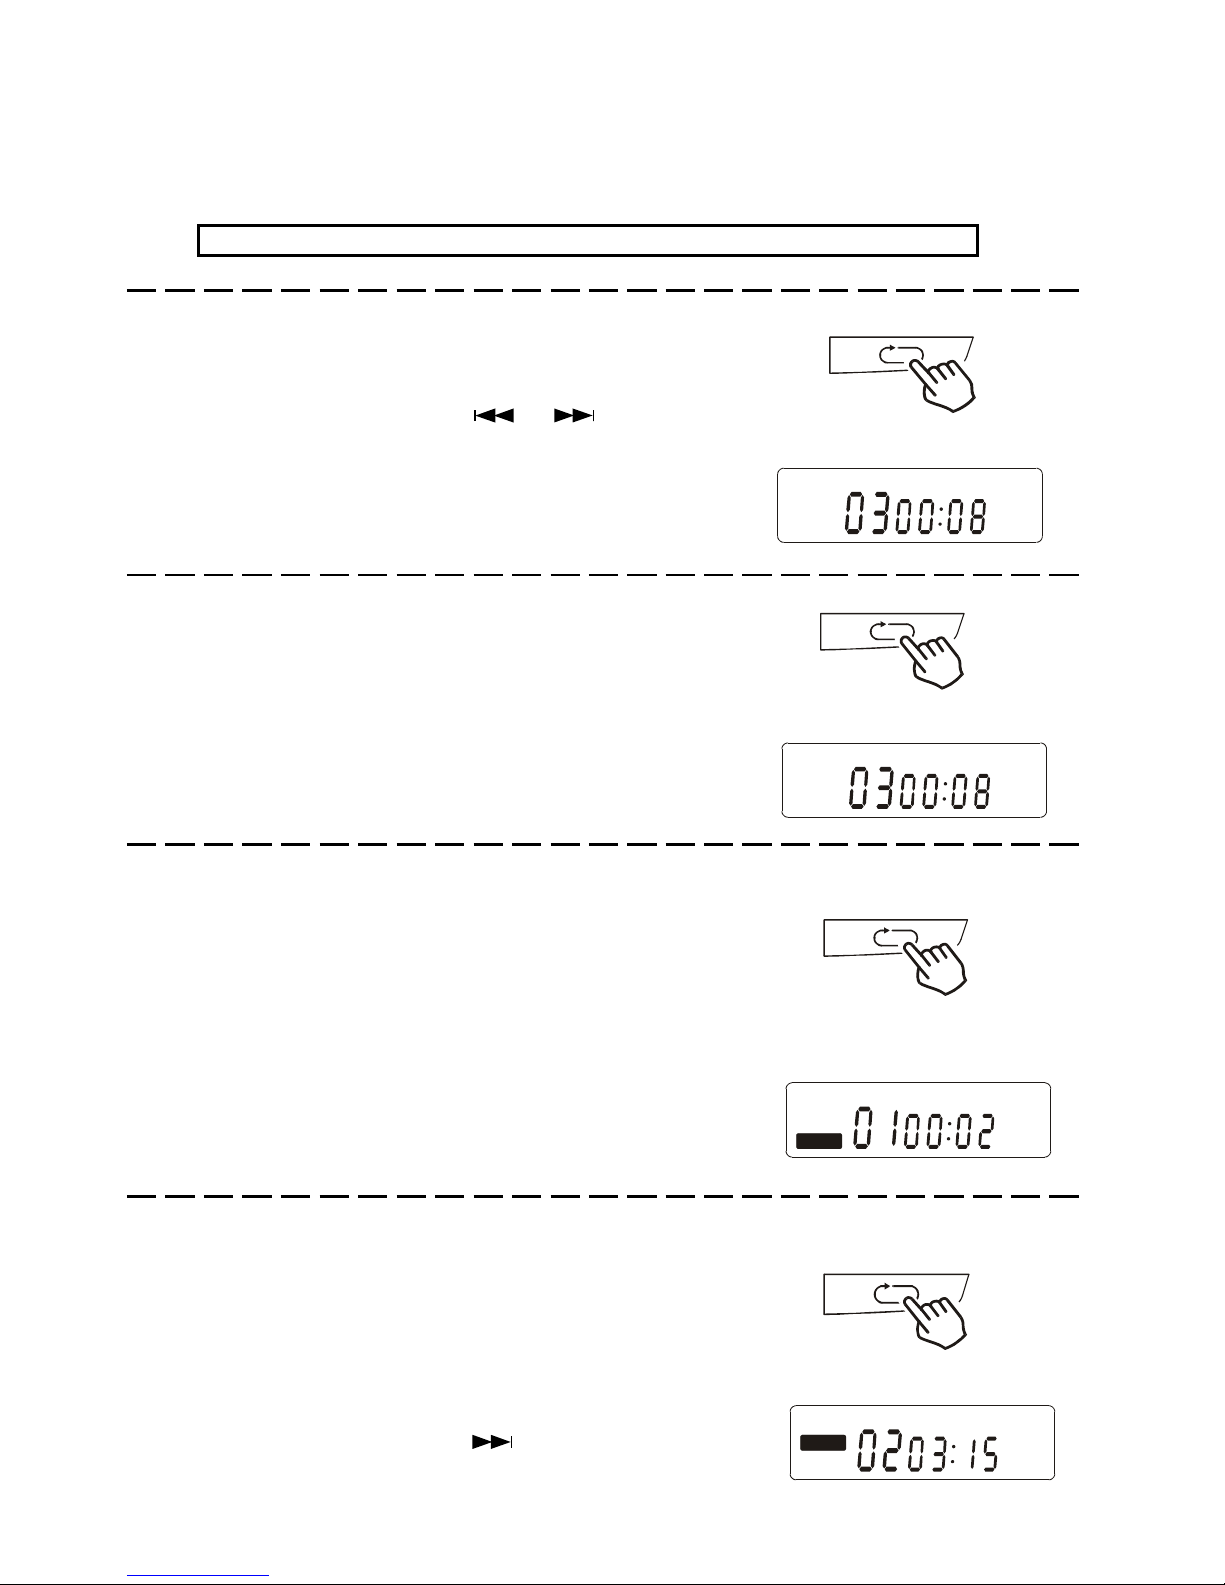
manuals.online logo
Brands
  1. Home
  2. •
  3. Brands
  4. •
  5. Lenoxx
  6. •
  7. CD Player
  8. •
  9. Lenoxx CD-79 User manual

Lenoxx CD-79 User manual

Other Lenoxx CD Player manuals

Lenoxx PR4057 User manual

Lenoxx

Lenoxx PR4057 User manual

Lenoxx CD-895 Operator's manual

Lenoxx

Lenoxx CD-895 Operator's manual

Lenoxx CDR-190 User manual

Lenoxx

Lenoxx CDR-190 User manual

Lenoxx CD-87 Operator's manual

Lenoxx

Lenoxx CD-87 Operator's manual

Lenoxx CD-85 Operator's manual

Lenoxx

Lenoxx CD-85 Operator's manual

Lenoxx SL-328 User manual

Lenoxx

Lenoxx SL-328 User manual

Lenoxx CD-625 User manual

Lenoxx

Lenoxx CD-625 User manual

Lenoxx CD-50 User manual

Lenoxx

Lenoxx CD-50 User manual

Lenoxx CD-89 Operator's manual

Lenoxx

Lenoxx CD-89 Operator's manual

Lenoxx Durabrand CD-565 Operator's manual

Lenoxx

Lenoxx Durabrand CD-565 Operator's manual

Lenoxx CD-210 User manual

Lenoxx

Lenoxx CD-210 User manual

Lenoxx CD-91 User manual

Lenoxx

Lenoxx CD-91 User manual

Lenoxx CD-91 User manual

Lenoxx

Lenoxx CD-91 User manual

Lenoxx CD-85 Operator's manual

Lenoxx

Lenoxx CD-85 Operator's manual

Lenoxx CD-965 Operator's manual

Lenoxx

Lenoxx CD-965 Operator's manual

Lenoxx CD-88 User manual

Lenoxx

Lenoxx CD-88 User manual

Lenoxx CD-61 Operator's manual

Lenoxx

Lenoxx CD-61 Operator's manual

Lenoxx CD-155 User manual

Lenoxx

Lenoxx CD-155 User manual

Lenoxx CD-857 User manual

Lenoxx

Lenoxx CD-857 User manual

Lenoxx Durabrand CD-62 Operator's manual

Lenoxx

Lenoxx Durabrand CD-62 Operator's manual

Lenoxx CD-90 User manual

Lenoxx

Lenoxx CD-90 User manual

Lenoxx CD-155 User manual

Lenoxx

Lenoxx CD-155 User manual

Lenoxx CD-52 User manual

Lenoxx

Lenoxx CD-52 User manual

Lenoxx CD-57 Operator's manual

Lenoxx

Lenoxx CD-57 Operator's manual

Popular CD Player manuals by other brands

Arcam CD23 Handbook

Arcam

Arcam CD23 Handbook

Sanyo MCD-Z1F Service manual

Sanyo

Sanyo MCD-Z1F Service manual

JVC RC-ST3SL instructions

JVC

JVC RC-ST3SL instructions

Technics SL-P9066 operating instructions

Technics

Technics SL-P9066 operating instructions

Marantz HD-CD1 quick start guide

Marantz

Marantz HD-CD1 quick start guide

Sony DVP-FX850 Service manual

Sony

Sony DVP-FX850 Service manual

Philips AZ1140 Instrukcja obs?ugi

Philips

Philips AZ1140 Instrukcja obs?ugi

Alpine 7909 owner's manual

Alpine

Alpine 7909 owner's manual

JVC CH-X350 instructions

JVC

JVC CH-X350 instructions

RCA RP-7923 instruction manual

RCA

RCA RP-7923 instruction manual

Pioneer DEH-P3550MP XM Operation manual

Pioneer

Pioneer DEH-P3550MP XM Operation manual

Philips Shockproof AX2102 brochure

Philips

Philips Shockproof AX2102 brochure

Philips CD582 user manual

Philips

Philips CD582 user manual

Philips AZ 6821 operating manual

Philips

Philips AZ 6821 operating manual

Lasonic MSU-2020 user manual

Lasonic

Lasonic MSU-2020 user manual

Denon DCD-1420 Service manual

Denon

Denon DCD-1420 Service manual

Panasonic SJ-MR100 operating instructions

Panasonic

Panasonic SJ-MR100 operating instructions

Onkyo DX-7210 instruction manual

Onkyo

Onkyo DX-7210 instruction manual

manuals.online logo
manuals.online logoBrands
  • About & Mission
  • Contact us
  • Privacy Policy
  • Terms and Conditions

Copyright 2025 Manuals.Online. All Rights Reserved.

®
MODEL CD-79
OPERATING INSTRUCTIONS
PLEASE READ CAREFULLY BEFORE USE
PLAYS ALL MUSIC COMPACT DISCS
BASS BOOST SYSTEM
6 DIGIT LCD VISUAL DISPLAY
TRACK REPEAT & DISC REPEAT
10 SECOND ESP (ELECTRONIC SHOCK PROTECTION) PLUSTM SYSTEM
DELUXE STEREO HEADPHONES INCLUDED
CAR POWER CORD AND CASSETTE ADAPTOR INCLUDED
AC ADAPTOR INCLUDED
USES 2 SIZE AA BATTERIES (NOT INCLUDED)
AUX OUT JACK - CONNECTS TO YOUR STEREO SYSTEM
CD79(12D-10E2)011240 NL v.1 E
10 SECOND ESP PLUS
TM
ELECTRONIC SHOCK PROTECTION
PROGRAMMABLE COMPACT DISC PLAYER
WITH CAR ADAPTOR KIT
1
INTRODUCTION
Your new Lenoxx Sound model CD-79 portable compact disc player, uses the latest
technology to give you crisp clean sound from all your compact discs.
Please read these operating instructions completely to take advantage of all the features
of this set.
ACCESSORIES INCLUDED
AC ADAPTOR STEREO HEADPHONES
CAR CASSETTE ADAPTOR CAR CIGARETTE LIGHTER
ADAPTOR
NOTE: Adaptor may look slightly different
from above illustration.
LOCATION OF CONTROLS
1
2
3567
9
11
12
15
1. CD DOOR OPEN BUTTON (slide to open)
2. CD DOOR
3. BACKWARD SKIP/SEARCH BUTTON ( )
4. PROGRAM BUTTON
5. FORWARD SKIP/SEARCH BUTTON ( )
6. ESP+ (electronic shock protection) BUTTON
7. STOP AND POWER OFF BUTTON
8. REPEAT/RANDOM BUTTON
9. LCD DISPLAY
10. PLAY/PAUSE BUTTON
11. AC ADAPTOR JACK
12. AUX OUT JACK (for home stereo connection)
13. VOLUME CONTROL
14. PHONES JACK (headphones jack)
15. BATTERY DOOR
16. BASS BOOST SWITCH
8
13
14
4
16
2
10
POWER SOURCES
1.Using with Batteries
TIPS ON BATTERY USE
Reversing polarities will damage the batteries and possibly your set. Be sure to
follow polarity ( + and - ) as indicated.
Do not mix different types together (Alkaline, Carbon-Zinc, Nickel-Cadmium etc.),
or old batteries with new ones.
When not in use for an extended period of time, or while internal batteries will not
be used, remove them to prevent possible acid leakage or corrosion resulting in
damage to your player.
When the batteries have become discharged, they must be disposed of in a safe
manner that complies with all applicable laws.
Installation of batteries should only be done by an adult (for safety).
WHEN FLASHES IN THE DISPLAY
If the alkaline batteries are weak and discharged, this symbol   flashes in the
display, then the power automatically turns off. If this occurs, replace the alkaline
batteries (also if display does not show anything, the batteries are dead).
ALKALINE BATTERY LIFE
Bear in mind that battery life expectancy is based upon volume and bass listening
levels.
Maximum battery power consumption happens at maximum settings. Typical life
for 2 size AA alkaline batteries is above 8 hours of continuous use.
Insert two size AA alkaline batteries
according to the + and - markings in
the battery compartment.
3
NOTE: You may use rechargeable batteries on this set. However, because
rechargeable batteries generally have lower voltage (1.2 volts instead of
1.5 volts). Your playing time will be much less than normal fresh alkaline
batteries.
2.Using AC Power
Your player may be powered from any household 120V AC outlet, using the AC
adaptor included. Insert the adaptors small connector plug into the DC 4.5V Jack
marked on player (on the right side of the set), and plug the adaptor into
an AC outlet.
NOTE: If the AC Adaptor is connected, and regular batteries are installed, the
player automatically switches to the AC Adaptor power and the batteries
are not used.
CAUTION:
To prevent electric shock, do not use this AC Adaptor with an extension cord or
outlet, unless it can be fully inserted without exposing any part of the blades. Do
not use any other AC adaptor to power this set or you may damage your set.
4
3.Using Cigarette Lighter Adaptor
Use the cigarette lighter adaptor to supply power to
your player and conserve battery life when using the
CD player in a car (no batteries are needed).
Plug the adaptor into the car cigarette lighter. Insert
firmly, and the cigarette lighter indicator will light up.
Plug the other end into the DC 4.5V Jack on the right
of the set.
If there is no power, your fuse may have blown. To
change fuse on cigarette lighter adaptor, unscrew
the tip. Replace only with same 1A 250V fuse.
CAUTION:
Use this set only with the supplied cigarette lighter adaptor. Use with other cigarette
lighter adaptors could damage the set.
When the inside of the cigarette lighter socket is dirty with ashes, the plug section may
become hot due to poor contact. Be sure to clean your car cigarette lighter socket
before use.
After use, disconnect the cigarette lighter adaptor plugs from both the set and the
cigarette lighter socket.
The cigarette lighter adaptor may cause interference with reception to the car radio. If
this happens, disconnect the cigarette lighter adaptor from the cigarette lighter socket.
Do not leave the cigarette lighter adaptor plugged in without your cars motor running,
your cars battery may drain in some models of cars that supply power to the cigarette
lighter plug even with the cars keys removed.
Cigarette Lighter
Indicator
CONNECTING TO HOME STEREO SYSTEMS
The AUX OUT jack is made to accept a stereo mini plug (3.5mm). Simply connect the
cables mini plug to the AUX OUT jack on your player, and the other appropriate end
usually RCA JACKS to the CD/AUX INPUTS of your home stereo.
YOUR CD PLAYER
TO AUX IN JACKSTO AUX OUT JACK
YOUR STEREO
SYSTEM
OPTIONAL CABLE (3.5mm)
TO RCA JACKS
5
NOTE: The car cassette adaptor has the play head on one side
only. If the cassette adaptor keeps ejecting out, or the sound is weak, press
the REVERSE button on your cassette player to change direction or reverse
the adaptor.
Remove two large
screws with a dime
or screwdriver
Fig. 1 Fig. 2
Move cord to desired
position (three cord
positions)
The car cassette adaptor allows you to use your CD player with your car stereo
cassette system or portable audio cassette system.
1. Insert the car cassette adaptor in the same direction as you would insert an audio
cassette tape, with the side marked
THIS SIDE UP
facing upwards.
Reposition the cord
The cord should extend out from the cassette player
when the cassette is inserted (direction depending
on your tape player).
1. To reposition the cord, remove the top plate by
removing 2 screws with a dime (see Fig. 1).
2. Reposition the cord so that it comes out from
other positions (see Fig. 2).
3. Replace the cover and the screws.
TO AUX OUT JACK
CASSETTE ADAPTOR
2. If the car cassette adaptor cord is on the wrong side
of the tape, reposition the cord by following the
instructions below.
3. Insert the car cassette adaptor stereo plug into the
AUX OUT jack on the right of the CD player.
4. Turn on the cassette player. Press PLAY button on
the cassette player.
5. Press PLAY on the CD player.
6. Adjust the volume on your cassette player.
7. When done, leave the cassette player on and first
eject the adaptor, then turn off cassette player.
CD PLAYING
4Adjust the Volume.
1Load the Disc.
2Connect the Headphones.
3Press the PLAY/PAUSE button.
1234
1234
1234
1234
1234
Push
here
Disc
Label side up Slide right to open
To PHONES jack
Stereo headphones
PLAY/PAUSE
button
VOLUME CONTROL
6
TRACK NUMBER
CURRENTLY
PLAYING
ELAPSED PLAYING
TIME OF THE
CURRENT TRACK
TOTAL TRACKS TOTAL PLAYING
TIME ON THE CD
Other Operations
Operation Press Display window shows
To pause play
To release pause
and resume play
TRACK NUMBER
CURRENTLY PLAYING
PLAYING TIME
FLASHES
TRACK NUMBER
CURRENTLY PLAYING
PLAYING TIME
ADVANCES
To stop
To skip to the next track(s)
To skip to the previous track(s)
once (or repeatedly)
To go ahead at high speed
(search) Keep depressed and release when the
desired music section of the disc is found.
To go back at high speed
(search) Keep depressed and release when the
desired music section of the disc is found.
BASS BOOST switch
This switch enhances the low frequency (bass)
sounds at low listening levels. Switch this ON or
OFF to suit your taste.
TOTAL TRACKS TOTAL PLAYING TIME
PLAY/PAUSE
button
PLAY/PAUSE
button
STOP button
To turn off the power STOP button once and wait 30 seconds, or press
STOP button twice
BASS BOOST switch
7
Single Track Repeat
Plays one song over and over till you press STOP.
During play, select the song you want to repeat with
either of the SEARCH buttons ( or ), then press
the REPEAT/RANDOM button once, the symbol
REPEAT
1
appears in the display.
The song currently playing will repeat over and over,
until you press STOP.
All Tracks Repeat
Repeats all songs in order, till you press STOP.
During play, press the REPEAT/RANDOM button twice,
the symbol
REPEAT ALL
will show in the display.
All songs will keep playing in sequence 1, 2, 3, etc. and
when finished, will start all over again until you press the
STOP button.
REPEAT, INTRO AND RANDOM PLAY
You may have repeat, intro or random play using the REPEAT/RANDOM button.
Press the REPEAT/RANDOM button several times, and the display will show the
followings in turn:
REPEAT 1 --> REPEAT ALL --> INTRO --> SHUFF (RANDOM) --> NORMAL PLAY
Intro Play
This plays the first 10 seconds of songs in sequential
order.
1. During play, press the REPEAT/RANDOM button
three times, the word
INTRO
will flash in the display.
2. Press the PLAY button, the word
INTRO
will stop
flashing and the first 10 seconds of each song on the
CD will play in sequential order.
3. When you find a song you like, press the PLAY button,
normal play will be resumed, that song (and the
following songs) will play NORMALLY.
Random Play
This plays the songs on the disc in a random order.
1. During play, press REPEAT/RANDOM button four times
the word
SHUFF
will flash.
2. Press the PLAY button, this will play all of the songs
in random order selected by the CD player. The word
SHUFF
will stop flashing.
3. Press the SEARCH button to skip to the next
random song.
8
REPEAT 1
X 1
REPEAT ALL
X 2
INTRO
SHUFF
X 3
X 4
The tracks (songs) on the disc can be programmed (arranged in advance) to play in
any order you prefer (up to 20 tracks can be programmed).
Programming Example:
Program Number 1 2 3 4 5 6 7 8
Track Number (song number) 35 8 1 2 4 1 1
etc.
etc.
PROGRAM PLAY
During programming, the word
PROG
flashes in the display. To program songs to play
in your preferred order, follow steps below:
1.During play, press the PROGRAM
button.
The word
PROG
will flash in the display.
Program number
2.Press the SEARCH button ( or )
to select track number 3 (example).
PROG
and track number 03 will flash in the
display.
Track number
3.Press the PROGRAM button. Track 3 is
now programmed.
Program #2 will now show in the
display, ready for your next selection of
track.
4.Repeat steps 2 and 3 to program other
tracks till you finish (up to 20 selections).
5.After programming is finished, press
PLAY to begin programmed play.
PROG
changes to be steady on in
the display, and music begins to play in
the order you programmed.
NOTE:
- The player will stop automatically after
all programmed tracks have been
played.
- To quit programmed play, press STOP
button once. Then you may press PLAY
button to re-start normal play.
Your programming will be lost:
When the alkaline batteries are
exhausted or removed, or the AC
ADAPTOR is disconnected.
When the power is shut off or the CD
DOOR is opened.
9
PROG
PROG
PROG