Leuchtie Easy Charge User manual

IMPORTANT DOCUMENT –PLEASE RETAIN!
Effective 06/2023
Operating instructions
LEUCHTIE®Easy Charge
with motion sensor
easily rechargeable via USB charging station
Initial start-up
Before using the LEUCHTIE for the first time please remove the transport protection (insulation cap). It is the
red stopper located on the side without size label on the light tube.
Removing the insulation cap:
1. Separate the tube from the battery
pack by pulling them apart with slight
angular movements, taking care not to
use excessive force (1).
In doing so, hold the silicone sleeve
onto the battery compartment.
2. Remove the red insulation cap (2) and
discard.
Fix the attachment loop:
3. In order to secure the LEUCHTIE to a
collar or harness with the enclosed
fixation loop, pull the open end of the
tube through both transparent rubber
rings of the loop (3).
Closing:
4. Insert the end of the tube straight into
the battery compartment. Be careful
not to bend the contact spring.
5. Press the battery pack and the tube
firmly together as far as possible, until
they are closed completely.
IMPORTANT: There must be no gap
between the battery pack and the tube
(see also figures page 3).
Turning the LEUCHTIE on and off
Simply slip the LEUCHTIE over the dog’s
head and it will turn on automatically by
sensor as soon as the battery pack points
downwards and the LEUCHTIE is in motion.
When the battery pack faces upwards the
LEUCHTIE will turn off slowly after approx.
one minute. Therefore, suspend the
LEUCHTIE e.g. on a hook for storage.

Important notes for recharging
Before using your LEUCHTIE for the first time, please charge it until the red and the green LED of the
charging station light up together.
Charging the batteries:
Please use only the provided original LEUCHTIE charging
station.
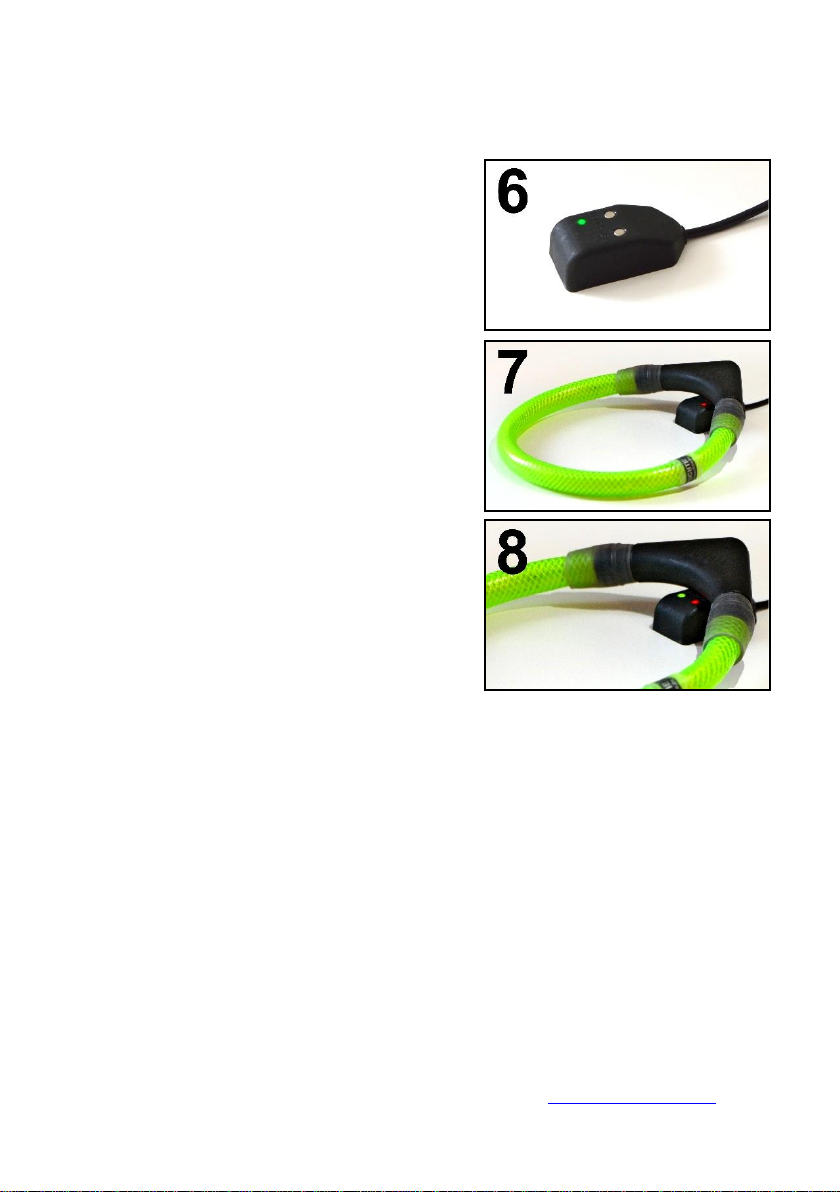
6. Place the charging station flat on a level surface with
the charging contacts facing upwards.
Connect the USB cable to a USB power source (e.g.
USB power supply unit or USB socket of a car or PC,
etc.). The green LEDof the charging station indicates
that it is ready for use.
7. Place the charging contacts of the LEUCHTE on the
charging station. Themagnetic charging contacts will
automatically align. The red LED shows that the
batteries are recharging.
8. The green and the red LED light: The batteries are
charged.
We recommend:
Charge the batteries as early as possible: once a week
overnight until the green LED of the charging station lights
up together with the red one.The robust NiMH batteries
have no memory effect.
Early recharging offers the following advantages:
•shorter loading times
•maximum possible burn time and brightness
due to fully charged batteries
•optimal protection of the batteries (more charging cycles)
Tips:
In order to achieve the best results please recharge at room temperature (5 –25 °C).
The charging process can easily be interrupted, e.g. for a walk. Please place it again on the charging
station until the green and the red LED of the charging station light up.
The charging contacts of the battery pack only conduct electricity during the charging process. The
contacts canthus be short-circuited or held underwater without creating any danger for dogs or humans.
The battery pack is 100% waterproof.
Please make sure that the battery pack is clean and dry when placing it on the charging station.
If the LEUCHTIE is not used for a longer period of time (e.g. in summer), please fully charge the batteries
before taking it out of operation. Store the LEUCHTIE in an upright position so that it does not turn on.
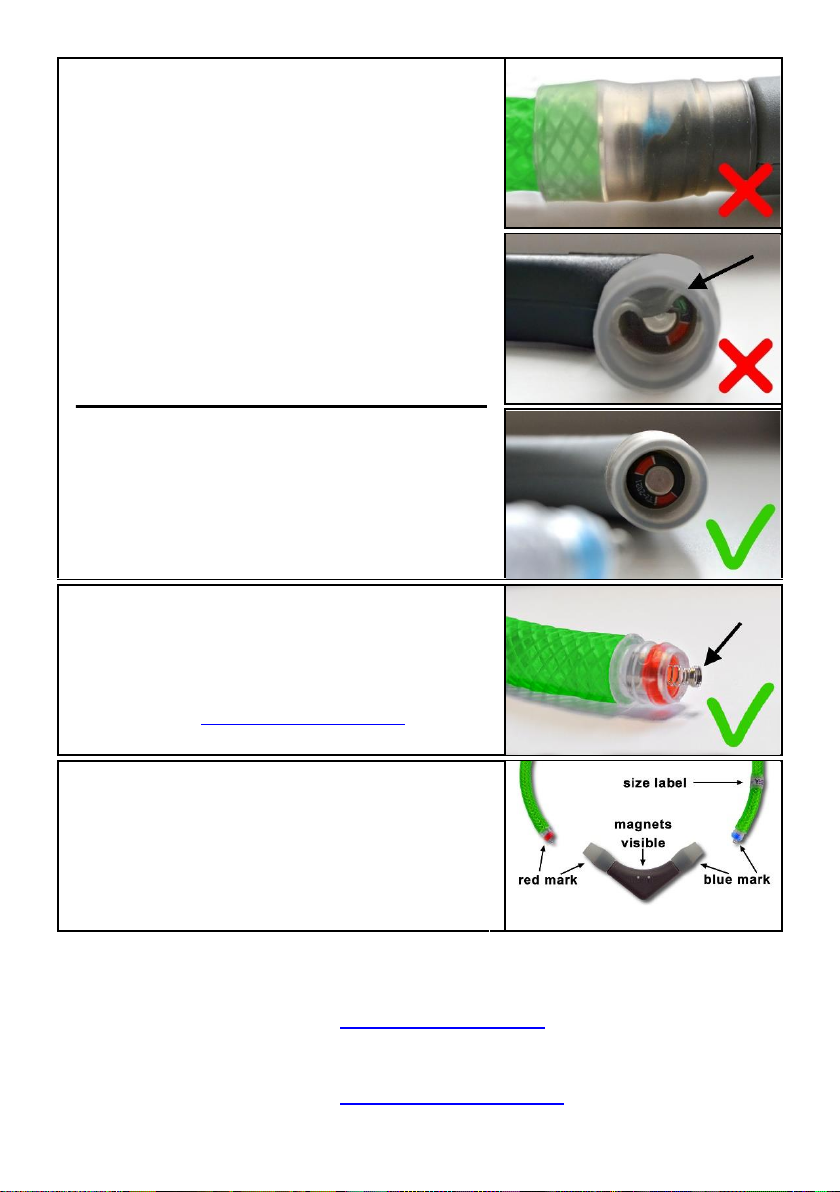
In case of chargingproblems check and clean the magnetic contacts. Metal parts stickingto the magnets
can be removed easily using adhesive tape.
The batteries can be replaced if necessary.
Detailed information including instructions can be found on the internet at www.leuchtie.com/faq

Correct connection of battery compartment and light tube
Please always ensure a correct connection between battery compartment and light tube. Otherwise
loose contacts may occur or the connection may even open.
Assemble the LEUCHTIE correctly:
The silicone sleeves are located on both sides centrally on
the transition from battery part to light tube and do not show
any defects.
A) The LEUCHTIEis completelyclosed up to the stop: there
is no gap between the light tube and the battery
compartment.
B) The sleeve end with the annular bead sits on the battery
pack on both sides.
Possible sources of error
LEUCHTIE is not completely closed:
•The light tube is not completely inserted into
the battery compartment:
A gap can be seen between the light tube
and the battery pack.
Incorrectly attached silicone sleeves:
•The sleeve is not pulled all the way to the
stop on the battery compartment - it is
located too far on the light tube.
•The sleeve is pulled beyond the stop of the
battery compartment - it is too far on the
battery compartment.
•The sleeve is attached the wrong way
round. The sleeve end with the ring bead
must be on the battery compartment.

Kinked battery compartment:
•The edge of the battery compartment has been
accidentally kinked when the light tube was
inserted into the battery compartment.
•As a result, the light tube cannot be inserted
completely into the battery compartment up to the
stop.
•In comparison, a correctly seated battery
compartment with the sleeve attached.
Bent or loose contact springs:
•The springs protruding from the ends of the light tube
on both sides must be firmly screwed into the nut and
must not be bent or kinked.
•Defective contact springs can be easily replaced if
necessary: www.leuchtie.com/faq-spring
Battery pack inserted the wrong way round:
Lay down the battery compartment and the light tube as
shown and connect both as follows:
•the end of the tube marked red with the red marking
in the battery compartment
•the end of the tube marked bluewith the blue
marking in the battery compartment
Spare parts & repair service
If required, you can obtain rechargeable batteries, inexpensive spare parts and useful accessories from
your dealer or directly from us: www.shop.leuchtie.com
If, contrary to expectations, a case of damage occurs which you or your dealer cannot repair, we offer
you the possibility of an uncomplicated repair at any time:
www.leuchtie.com/service

Safety information
•Please use the LEUCHTIE only for its designated purpose.
•Do not attach a lead to the LEUCHTIE and avoid holding your dog by the LEUCHTIE. Too much
force on the LEUCHTIE could cause the batteries, springs and other parts to fall out and get lost.
•LEUCHTIE is not a toy!
Your LEUCHTIE can be damaged by excessive stress (e.g. by throwing or biting hard) and may
open under certain circumstances. Small parts such as batteries, contact springs, etc. can fall out
and get lost.
Swallowing small parts can be life-threatening! Therefore, keep both your LEUCHTIE as well as
the accessories (e.g. the magnet and the attachment loop) out of the reach of your dog and small
children. If parts have been swallowed, medical assistance should be sought immediately.
•Do not use the LEUCHTIE if malfunction or damage is apparent. We accept no liability for any
further damage or loss.
•Make sure that no humidity gets inside the LEUCHTIE –especially when cleaning it or changing
the batteries. When fully closed, the LEUCHTIE is protected against water and humidity very well.
Should you notice humidity inside the LEUCHTIE, pull the tube and the battery pack apart with
slight angular movements (see figure page 1) and let both parts dry completely. Avoidtemperatures
above 50°C.
•Do not dry or heat the LEUCHTIE in the microwave under any circumstances - the microwave
radiation would destroy the electronics immediately.
•Do not disassemble, heat or short-circuit the built-in batteries.
Cleaning
Clean the LEUCHTIE in warm water and soap or mild detergent if required. Do not use aggressive or
solvent-based cleaners! When cleaning the LEUCHTIE, please ensure that the silicone sleeves are
closed properly to prevent humidity from entering.
Warranty
Within the framework of the respective legally applicable warranty we will repair all defects, which can
be proven to have been caused by material or manufacturing defects. Excluded from this warranty are
all defects caused by improper use, non-observance of this manual, leaked batteries and wear from
using the product. Further claims are excluded; there will not be any liability for consequential damages.
Opening the product (exceptfor activatingand batterychanges) and other interferences by unauthorized
persons will automatically void the warranty. Repairs or the replacement of parts will not extend the
original warranty.
In case of a warranty claim, please contact the retailer from whom you purchased the
product.
Manufactured in Germany by:
trends and more GmbH & Co. KG
Hammerweg 123
D-92637 Weiden
Phone: +49 961 4708440
E-Mail: info@leuchtie.de
WEEE: DE 23706136

Disposal / Recycling / Labeling
7,8
This product meets the requirements of the Directive 2011/65/EU of the European
Parliament and of the Council of 8 June 2011 on the restriction of the use of
hazardous substances in electrical and electronic equipment.
(CE7: LEUCHTIE Pro Easy Charge and CE8: LEUCHTIE Premium Easy Charge)
Please protect the environment and recycle this product. The product is labeled with
the symbol of the crossed out waste bin, which means that it should be dropped off
free of charge at a local collection point for recycling at the end of its useful life.
Disposal in the regular waste is not permitted.
The used batteries cannot be disposed of with the regular household waste! Please
dispose of them via the appropriate commercially available containers or drop them
off at public collection points.
Table of contents
Other Leuchtie Pet Care Product manuals

Leuchtie
Leuchtie Plus User manual

Leuchtie
Leuchtie Plus User manual

Leuchtie
Leuchtie Premium Easy Charge User manual

Leuchtie
Leuchtie Standard User manual

Leuchtie
Leuchtie Mini User manual

Leuchtie
Leuchtie Premium User manual

Leuchtie
Leuchtie Plus Easy Charge User manual

Leuchtie
Leuchtie Plus User manual

Leuchtie
Leuchtie Premium Easy Charge User manual

Leuchtie
Leuchtie Premium User manual