LEVIT E-bikes User manual

1
Bicycle Owner’s Manual
E-bikes

2
Welcome to the LEVIT family!
We have been assembling and selling bicycles in Hawk Mountains for more
than 30 years, and for the whole time we have believed that riding a bike is
a key to fun and transportation in the overcrowded and ever-faster world that
we live in.
We make every single bicycle in such way that it would provide you with
an excellent riding experience. We select meticulously reliable components,
and we test them ourselves with our legs. That’s because your satisfaction
is our only goal. The goal of your journey is then up to you only, regardless of
whether you are aer a fast trip to work, a trip with your family, or finding new
adventures in the back country.
If you opted for a bike with a motor to assist you, or you place your bet on
strength of your own body, we would like to wish you thousands of happy
miles.
Contents
What is an e-bike and what does it consist of? 3
Basic information about using an e-bike 4
CODAC – e-bike control 5
TFT COLOUR – e-bike control 7
LED – e-bike control 10
VINKA DC40 – e-bike control 11
Baery 13
Integrated baery 14
Baery placed on the rear side of the seat tube 15
Baery charging 15
Baery storage 17
Assembly and adjustment 18
E-bike maintenance 19
FAQ 20
E-bike warranty 22

3
What is an e-bike
and what does it consist of
baery 2
cadence (speed)
sensor crankset rotation sensor
control panel
brake levers
with braking sensor 1
control unit
(may be a part of the motor)
motor 3
LEVIT e-bike technical data:
Rated motor power 250 W
System voltage 36 V
Operating temperature 0 / +40 °C
Skladovací teplota 10 / +40 °C
IP 54 Rating
(protection against contamination from limited amounts
of dust and from water sprays from all directions)
Every bicycle that is equipped with an electric motor, control unit, and a baery is considered to be
an e-bike. The drive unit serves as a kind of assistant that helps the rider with pedalling and provides
their comfort. In general, the motor assistance can be activated only if the rider themselves actively
pedals (spins the crankset forwards). The crankset motion is monitored by a special sensor located
in the boom bracket. The maximum speed of an e-bike with motor assistance enabled is approx.
25km/h. When this speed is reached, the motor switches o automatically, and you follow riding as
on a regular bicycle. If the baery gets flat, or if you switch of the motor, you can carry on to your
destination using your own force without any resistance.
The electric motor can be engaged also by pushing the control buon or accelerator, however, it will
only reach the maximum speed allowed of 6km/h. This function is called Walk Assistance, and you
can take advantage of whenever you manipulate the bicycle. It is impossible to reach higher speeds
without the rider being actively involved in pedalling. Each e-bike whose characteristics and features
are compliant with the EN 15194-1 standard, is considered a regular bicycle from the perspective of
road safety legislation. No driving licence is required to use such an e-bike, you can ride it on cycling
paths, and wearing a bicycle helmet is compulsory for minors under 18 years of age. Despite that, we
do recommend that all e-bike users regardless of age wear a bicycle helmet while riding the e-bike.
1 Only models equipped with mechanical brakes.
2 The baery can be located on the frame, behind the seat
tube or in a rack.
3 The motor may be located in the rear wheel, front wheel
or in the boom bracket.

4
Basic information
for use of an e-bike
IMPORTANT Always check functionality of brakes and baery charge status before every
ride. Always use a bicycle helmet while riding on an e-bike!
Riding your e-bike
Riding an e-bike is the same like riding a regular bicycle. You only need to sit on the bicycle, gain
some speed and pedal. Once the crankset is spun, the motor is automatically activated in from
that moment, it works according to the assistance mode selected. If you use brakes, the motor is
disabled automatically. This is not the case of LEVIT bicycles equipped with hydraulic disc brakes
as these brakes do not have all necessary sensors.
Motor on these models is switched o within two seconds aer you stop pedalling. Once you
reach the speed of 25km/h, the motor is disabled automatically, and will be reactivated only aer
the speed has dropped below this threshold. The motor is not engaged also if you do not pedal,
or if you spin the crankset in reverse direction.
IMPORTANT A long ride with low rotation rate of the motor and high level of assistance
may result in motor overheating and even damage, if the motor is under excess load. In such
cases, it is highly recommended that you decrease the assistance.
The bicycle function may be impacted by external electromagnetic elements (such as
radars etc.).
RECOMMENDATIONIf you encounter problems with shiing lower or higher gears, we
recommend additional installation of “Gear Sensor” that disables the motor shortly during
shiing. Therefore, the change of gears does not occur when the motor is fully engaged,
which is good not only for the actual motor, but for all drivetrain components.
displaying of additional
information

5
CODAC – e-bike control
Calvia HD, Chilo 1, Muan HD, Musca HD
speed units
Walk assistance
Speed / distance
units
power indicator
assistance mode
baery status
lights
speed indicator
displaying of additional
information
additional information
display modeí Error messages
USB slot
Switching On/Off
1. Switch on the electric system power on the battery
Activate the baery by pushing the buon on its housing.
2. Switch on the LCD panel of the e-bike.
Push the X buon on the display control and hold it
pushed for 5 seconds. The electric system is switched o
in the same way. Hold the buon pushed for 4 seconds to
switch o the frame baery. The system will automatically
switch o aer 10 minutes of inactivity to save energy.
Setting the assistance mode
To change assistance mode in the range of 0-5, briefly push the buon. The highest level
of assistance is indicated with the number 5, the level with indication 0 means no assistance of
the motor.
WARNING The motor may vibrate for a short period of time during a low revolution ride
with a high degree of assistance set. If this happens, we recommend that you immediately
change the assistance mode to a lesser degree.
Walk Assistance
Walk Assistance is activated by pushing and holding the (-) buon on the control display.
The assistance mode ranging from 1 to 5 must be selected to activate the Walk Assistance mode.
The purpose of this function is to make manipulation with the e-bike easier for its users. Typically, it
is used during walking with the e-bike. In this case, the e-bike speed will be between 4 and 6km/h.
The Walk Assistance is disabled immediately aer you release the buon.
Baery placed on
the rear side of
the seat tube
integrovaná
baterie

6
WARNING Do not try to hinder the bicycle motion. In such case, the motor may suer damage.
Changing the additional information display mode
change of information displayed is carried out by a short pushing of the buon.
Information is displayed in the following order:
Deletion of temporary data
Push the buon twice to delete temporary data (trip, time, avg, max). The display will show rES.
Select possibility Y using and buons and confirm by pushing the buon.
Setting of parameters
Push the buon twice to enter the parameters seing mode. Use and buons to change
a parameter. push the buon to save the set parameter.
Switching on lights (only if lights are installed)
Front and rear lights are switched on by pushing and holding the buon for 1 second.
USB connector
The display is equipped with a MicroUSB connector that can be used to recharge mobile
devices (5V/0.5W). Use an adapter or a MicroUSB-B connector cable to connect your device
to the charging connector.
Explanatory notes:
rES - deletion of daily distance
Un - unit seing (km / miles)
Ld - seing of wheel circumference in cm
(max. +/- 5% from the default circumference seing)
bL - display backlighting seing, range 1-3
Ls - speed limit; the value of 20 equals the max.
assisted speed of 25 km/h
SPS - signal of the speed sensor
Cr - the value of the current
If an error persists, or if a dierent error than the one mentioned here is displayed, contact your retailer.
TRIP
Distance of
your trip
ODO
Tota l
distance
TIME
Time*
MAX
Maximum
speed
AVG
Average
speed
Code Cause of the problem
0X0000 no error
0X0001 BMS or surge error
0X0002 control unit overheated
0X0004 motor feed
0X0008 Hall probe - motor
0X0010 motor overheated
0X020 protection against undervoltage
0X0100 speed too high
0X0200 communication error - baery
0X0400 PAS sensor
0X0800 speed sensor
0X1000 communication error - display
Error messages

7
TFT COLOUR – e-bike control
Muan MX, Musca MX
ONOFF
baery status
time
USB charging
lighting
voltage indicator / baery
status percentage indicator
speed
scale
indicator mode
power indicator
data display
assistance mode
Switching On/Off
1. Switch on the electric system power on the battery
Activate the battery by pushing the button on its housing.
2. Switch on the TFT panel of the e-bike.
Push the X buon on the display control and hold it pushed
for 2 seconds. Switching o the system is carried out in the
same way. Hold the buon pushed for 4 seconds to switch o the frame baery. The system will
automatically be disabled aer 5 minutes of inactivity to save energy (this period can be set by
the user – see parameter seing below).
Setting of assistance mode
To change the assistance mode in the range of 0-5, briefly push the buon. The highest
level of assistance is indicated with the number 5, whilst the no assistance level is indicated
with the number 0. The assistance mode is set to 1 aer the display is switched on.
WARNING The motor may vibrate for a short period of time during a low revolution ride
with a high degree of assistance set. If this happens, we recommend that you immediately
change the assistance mode to a lesser degree.
Walk Assistance
The Walk Assistance is activated by pushing the (-) buon that sets the assistance to Walk
Assistance mode (the Walk Assistance mode symbol will be displayed). Push the (-) buon
again, and the assistance will be activated until you release the buon. The purpose of this
function is to make manipulation with the e-bike easier for its users. Typically, it is used during
walking with the e-bike. In this case, the e-bike speed will be between 4 and 6km/h. The walk
assistance is switched o immediately aer you release the buon.
Baery placed on
the rear side of
the seat tube
integrovaná
baterie

8
WARNING Do not try to hinder the bicycle motion. In such case, the motor may suer
damage.
Changing the speed and distance indicator modes
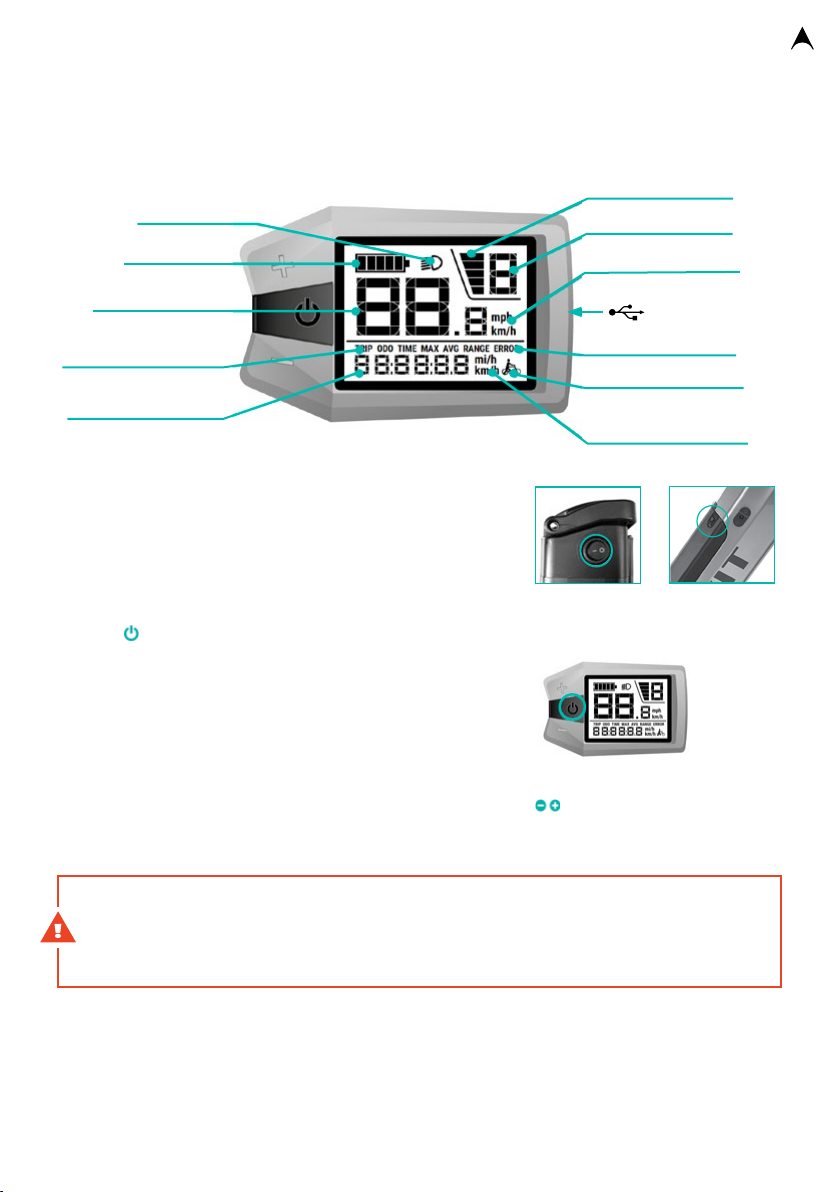
The change of information displayed is carried out by a short pushing of the buon I.
Switching on/off the display backlight
The display backlight is switched on/o by pushing the (+) buon and holding it pushed for 2
seconds. The display backlight is turned on automatically in low light. If it is disabled automatically,
it must be reactivated manually. The backlight intensity can be adjusted by the user – see the
parameters seing below.This sequence will turn on or o the front/rear lights of Tour models.
Deletion of temporary data
Use the method described in the paragraph on parameters seings to delete temporary data.
The temporary data can be deleted via “Display seing” and “TRIP reset” (once the TRIP reset
item is highlighted, push the (+) buon, and set to “YES” value using (+) (-) buons. Aer you have
confirmed your selection by the I buon, the temporary data will be deleted. The temporary data
will also be deleted automatically aer reaching the ride time of 99:59 hours. The temporary data
will not be deleted in case the display is switched o.
Setting of parameters
Push the I buon twice in the space of approximately 0.3 seconds to enter the parameter seing
mode. Use the (+) (-) buon to navigate through individual menu items and to change seing of
parameters. Push the I buon to confirm your selection. push the I buon twice in the space of
approximately 0.3 seconds to exit the parameter seing mode. The parameters seing mode will
be disabled automatically aer 10 seconds of inactivity.
Display Setting Unit item
Information item Items in the seings may dier based on the display soware version currently used.
TRIP
Distance of
your trip
ODO
Tota l
distance
MAX
Maximum
speed
AVG
Average
speed
RANGE
Remaining
range
TIME
Tota l
ride time
Unit – seing of units (km / miles)
Brightness – seing of display backlight intensity (10, 30, 50, 75 or 100%)
Auto Off – sets the automatic display switching o (1–9 min)
Max Pas – seing of number of assists (3/5/9)
Power View – seing of power indicator format (power / torque)
SOC View – baery status indicator format seing (percentage/voltage)
TRIP reset – deletion of temporary data (TRIP, MAX, AVG, TIME)
AL Sensitivity – lighting sensitivity (0 – 5.0 = light sensor switched o)
Set Clock – clock seing
Back – return
Battery info – complete information about the baery status and features
Error Code – complete information about error messages displayed (max. 10 items)
Back – zpět

9
Error messages
Code Cause of the problem
07 Protection against baery surge (check the baery voltage).
08 Error of the motor’s Hall probe (check seings and connection with motor).
09 Error of the motor’s phase cable (check seings and connection with motor)
11 Error of the control unit temperature sensor (check seings and connection
with the control unit).
12 Error of the torque sensor (check seings and connection with motor)
13 Baery temperature too high (switch o the system and wait).
14 Baery temperature too low (switch o the system and wait).
21 Error of the speed sensor (check seings and connection with motor)
22 BMS interface error (replace the baery).
25 Torque sensor error (remove the baery and replace it; if the error persists,
have your e-bike serviced).
30 Communication error (check that all connectors are connected correctly).

10
LED – e-bike control
Chilo 3, Tumbi
ONOFF assistance mode
illumination
baery status
Switching On/O
1. Switch on the electric system power on the battery
Activate the battery by pushing the button on its housing.
2. Switch on the control panel of the e-bike.
Push and hold the X buon on the control pushed for 5 seconds. The system is switched o in the
same way. The system will automatically switch o aer 10 minutes of inactivity to save energy.
Seing of assistance mode
change the assistance mode in the range of 1-5, push the (+)(-) button. If you want to enjoy an
unassisted ride, switch off the electric system by pushing the X button.
WARNING The motor may vibrate for a short period of time during a low revolution ride
with a high degree of assistance set. If this happens, we recommend that you immediately
change the assistance mode to a lesser degree.
Walk assistance
Walk Assistance is activated by pushing and holding the (-) button. The assistance mode
ranging from 1 to 5 must be selected to activate the Walk Assistance mode. The purpose of
this function is to make manipulation with the e-bike easier for its users. Typically, it is used
during walking with the e-bike. In this case, the e-bike speed will be between 4 and 6km/h.
The walk assistance is switched off immediately after you release the button.
WARNING Do not try to hinder the bicycle motion. In such case, the motor may suer
damage
SWITCHING LIGHTS ON OFF
Push and hold the (+) button for 1 second to switch the lights on / off. X will light up on the
display .
BATTERY STATUS INDICATOR
Shows the remaining battery capacity. If all LED diodes are lit, the battery is fully charged. In
the battery has lower voltage (lower current capacity) and higher current load (e.g. during an
ascent), the display of capacity may fluctuate in the control panel. A more precise reading is
provided by the indicator located directly on the battery.
Baery placed on
the rear side of
the seat tube

11
Switching On/O
1. Switch on the electric system power on the battery
Activate the battery by pushing the button on its housing.
2. Switch on the control panel of the e-bike.
Push the X buon on the display and hold it for several seconds. The system is switched o in the
same way. Hold the buon pushed for 4 seconds to switch o the frame baery. The system will
automatically switch o aer 15 minutes of inactivity to save energy (this period can be set by the user
– see parameter seing below).
Seing of assistance mode
To change assistance mode, briefly push the (+)(-) button. The highest level of assistance is
indicated as BOOST, whilst the no assistance level is indicated as OFF. The assistance mode is
set to ECO mode after the display is switched on.
WARNING The motor may vibrate for a short period of time during a low revolution ride
with a high degree of assistance set. If this happens, we recommend that you immediately
change the assistance mode to a lesser degree.
Walk Assistance
The Walk Assistance is activated by pushing the I button and subsequently pushing and
holding the (-) button that sets the assistance to Walk Assistance mode (the Walk Assistance
mode symbol X will be displayed). The Walk Assistance will be activated until you release the (-)
button. The purpose of this function is to make manipulation with the e-bike easier for its users.
Typically, it is used during walking with the e-bike. In this case, the e-bike speed will be between
4 and 6km/h. The walk assistance is switched off immediately after you release the button.
VINKA DC40 – e-bike controla
All Vinka models
Included with the bicycle is this USB adapter that is intended to connect to the rear of the
display to provide power to other devices. All displays mounted on LEVIT bicycles (with the
exception of LED displays) have a USB connector that provides power to external devices such
as mobile phones, GPS and others.
Lights activated
Baery status
Assistance mode
Ride data display
Motor power
indicator Current speed
Service indicator
ONOFF

12
WARNING Do not try to hinder the bicycle motion. In such case, the motor may suer
damage.
Changing information on the display
The change of information displayed is carried out by a short pushing of the button I.
This changes the maximum speed and average speed information only. The remaining
information is displayed constantly.
Deletion of temporary information (TRIP, MAX, AVG):
Temporary information can be reset by pushing the (+) and (-) buttons simultaneously.
The display shows the following information:
Switching on the light:
It is possible to switch on the lights by pushing and holding the (+) button for a few seconds.
This will darken the display slightly. The display is also darkened automatically in low ambient
light, so that the rider is not blinded by the light of the display.
Seing:
The settings screen can be accessed by pushing the I and (-) buttons simultaneously.
Use the (+) (-) button to navigate through individual menu items and to change setting
of parameters. Push the I button to confirm your selection. Push the I and (-) buttons
simultaneously to exit the mode, or confirm the Exit item.
CADEDENCE
Pedalling
cadence
ODO
Tota l
distance
TRIP
Distance of
your trip
MAX
Maximum
speed
AVG
Average
speed
Wheel size – information on diameter of wheels set (in inches). (Cannot be set by users.)
Walk Speed – selection of the Walk Assistance’s maximum speed. (The following range can be set: 3-6km/h).
Speed Limitation – information on the maximum speed of the motor assistance (cannot be set by users).
LCD Brightness – Selection of display backlight level. (Can be set from Level 1 to Level 5)
Unit Type – Selection of unit of speed (km/h or mph can be selected)
Asistent Indicator – Seing of the assistance level display type.
(Verbal or numeric display can be selected).
GSGI – Gearsensor calibration
About – Soware information
Code Cause of the problem
90 Zero torque error
11 Torque beyond the range
92 Torque sensor error
13 Gearsensor error
15 Speed sensor error
18 Cadence error
20 Control unit overheated – warning
A1 Control unit overheated – error
22 PCB sensor error
25 Motor overheated – warning
A6 Motor overheated – error
A7 System Error
80 communication lost
32 Remote communication lost
01 Incorrect communication data
40 Motor error
41 High peak current of the motor
C2 Motor phase failure
43 High direct current of the
motor
D0 High baery voltage
51 Low baery voltage
52 High baery current
E0 Incorrect baery version
E5 Incorrect display version
Error messages

13
Baery
Recommendation
Battery is the most expensive part of the whole e-bike. Therefore, it is advisable to pay
maximum attention to its recharging, storage and manipulation. The battery contains certain
chemicals that may be dangerous if the battery is handled or used incorrectly. Be careful,
lithium and its oxides are flammable in contact with humidity.
Never dismantle the battery. Use of incorrect procedure might easily damage it. At the
same time, there is a risk of injury due to ignition or possible explosion. Bear in mind that
tampering and disturbance of the warranty seal results in warranty for the battery and all its
parts becoming invalid.
WARNING If the baery capacity is too low, the motor will cease to run smoothly and will
show irregularities in its operation. In such a case, switch of the electric drive system and
continue without its assistance as if you are riding a regular bike. Baery being hot is a
normal feature, and is not indicative of any fault. The baery is protected by a temperature
sensor that will disable it automatically if it is overheated (e.g. when the ambient
temperature is too high). Wait until the baery cools down to the operation temperature and
then resume your ride.
WARNING The power of the motor decreases as the baery charge level decreases.This
means that it can provide half of its original power if the baery has a 30% charge. This may
change depending on the motor type.
Baery lock
Always lock the baery and take the lock with you whenever you leave your
e-bike unaended at a public place. This will prevent the of the baery.
Keep the baery always locked while riding! The baery lock does not serve
as a mere protection of the baery from being stolen, but ensures its safe
position. Baeries without rocker switches are switched o automatically aer 30 minutes
of inactivity (the time may dier depending on baery type). The baery is not capable of
detecting low consumption of energy by the display, and so it may happen, that the baery
(and the whole system with it) is switched o automatically during a long unassisted ride. You
can prevent this from happening by activating the assistance for a short period of time.
ATTENTION Always switch the baery o before manipulating with it.

14
Integrated baery
Muan, Musca, Nefel, Svarog, Sokor, Kingit, Tengu, Corax, Arian, Columba, Calvia
Switching on: the baery is switched on by a buon located on its upper part.
Manipulation: turn the key 180° to remove the baery. Move the release / lock lever towards the
handlebars, firmly grab the top end of the baery and release it by pulling gently upwards. Insert
the baery by placing it over the contacts on its lower part, then push the upper part until you
hear the lock latch click. Now move the release / lock lever back towards the saddle. Turn the key
to lock the baery.
Switching off: the baery is switched of by pushing and holding the buon for the period
of 5 seconds.
How to find out about capacity of the batterye: the baery oers a simple indication using
three colours of LED diodes – red diode means capacity of 0–20%, green equals capacity
of 20–80%, and the blue colour indicates charge of 80–100%. More detailed information are
provided on the display.
Vrchní
Spodní
locklock
locklock
switch
and battery statuse
switch andswitch and
battery statusbattery status
removing
battery
removingremoving
batterybattery
mechanicalmechanical
fusefuse
mechanicalmechanical
fusefuse
charging connectorcharging connector

15
Baery placed on the rear side
of the seat tube
Chilo, Tumbi
Switching on: Switch the baery using a switch on its upper part.
Manipulation: Remove the seatpost with saddle first to be able to remove the baery from the
frame. The lock is located in the lower part of the baery. Then, turn the clock into the UNLOCK
position, and remove the baery by pulling its handle up.
The baery is installed in reverse order. The groove of the baery must be placed onto the guiding
ledge, otherwise it will be impossible to slide it down completely. Slide the baery carefully, so that
its connector is not damaged by a sharp impact. Turn the key to the LOCK position to secure the
baery. Remove the key.
How to find out about capacity of the baery: by the means of a LED indicator located in the
upper part of the baery. It is activated by pushing the buon. The baery must be switched on.
The baery is at its full capacity if 4 LED diodes are lit (3 green, 1 red). If only red LED diode is on,
the baery is nearly depleted, and must be recharged as soon as possible.
Baery charging
RECOMMENDATION Lithium baeries do not have the memory eect, so they can be
charged any time, ideally aer every ride. Due to self-acting discharge of the baery that
causes gradual loss of capacity, it is recommended to check the baery regularly during a
long-term storage, and to recharge the baery if a drop below the recommended level of
60-80% of the its full capacity is found out.
Baery can be recharged both either directly on the bicycle, or it can be removed and recharged
separately from the e-bike. Always switch the baery o before recharging it. Baery must be
always charged in dry environment. The charging connector is not resistant to splashing water.
Room temperature (15–20°C) is ideal for baery recharging. Recharging the baery in ambient
temperature lower than 0°C or higher than 40°C may seriously damage the baery.
battery status
locked
unlocked
baery o

16
Method
First, connect the charger to the battery and then to the mains supply (230V). Wait until the LED
light on the charger lights up red. This signals that recharging is in progress. The recharging is
stopped automatically once the battery is fully recharged. Still, we recommend that you unplug
the charger from main supply and the battery immediately after recharging is completed. The
diode that indicates recharging will light green then. Interrupted recharging does not cause
damage to the battery in any way.
RECOMMENDATION If you feel that the total capacity of your baery has decreased
significantly, this may have happened due to recharging the baery or operating the bicycle
in unsuitable weather conditions.
RECOMMENDATION Always use the charger supplied with the e-bike! Using a dierent
charger may damage the baery and/or other parts and components of the electrical
system, which results in the warranty provided by the manufacturer becoming void. If the
status indicator indicates that the baery is flat, it still has some minimum voltage that
protects it from damage. This voltage is no longer sucient to allow actuation of the e-bike,
and so it is highly advisable to recharge the baery as soon as possible. Never leave the
baery discharged for an extended period of time. This could damage it permanently.
Factors that influence e-bike range
The range of your e-bike is influenced by many various factors, and therefore it is very dicult to
stipulate the distance an e-bike may travel with one fully charged baery. The key factors are:
• trip profile (flat profile vs. long and steep climbs)
• weather – temperature, head wind (ideal temperature is approximately 20°C, no wind)
• weight of the rider and the cargo (the greater the weight, the greater the consumption)
• technical condition of the e-bike (correctly adjusted and properly lubricated e-bike has
less resistance)
• tyre pressure (low pressure = greater consumption)
• riding style (the more force of your own is used, the less is used by the motor)
• selected assistance mode (the higher the mode, the greater the consumption)
• current battery capacity (greater capacity = greater range)
DOPORUČENÍ In order to achieve maximum range possible, maintain your e-bike it proper
condition and maintain correct pressure in tires. The state of your baery is important, too,
and so it is necessary that you take proper care of it according to this manual. Try to utilize
the lowest assistance mode so that riding your bicycle feels nice, but does not use the
baery energy unnecessarily at the same time. You can increase your speed while exerting
the same force by choosing the correct gear.This will also increase your range.
Transporting the baery
Transportation of the battery must comply with guidelines and provisions related to
hazardous materials. Undamaged batteries can be transported on roads by private users
without them having to comply with any other conditions. When commercial forwarders
or third parties are used for transportation of the battery, special requirements regarding

17
Baery storage
The battery must be stored at a dry and well-ventilated place, away from direct sunlight and
other heat sources. The storage temperature must range from –10 to 40°C (ideally 15–20°C).
If the battery was stored at a cold place, it is necessary to leave it warm up naturally to
optimum operation temperature (20°C) before using it on the e-bike.
Never leave the battery completely flat. This could cause its permanent damage. If it happens
that the battery gets flat, first recharge it so that it has half of its capacity, and then leave it to
cool down. Once the battery has cooled down, resume the recharging to achieve full capacity.
Keep your battery charge status in the range of 60-80% when not using the e-bike for a long
time
(for example during winter). Do not store it permanently placed in the charger, or locked in
the e-bike.
Lithium batteries discharge gradually when not in use (about 5-10% of its capacity per month).
Therefore, check your battery regularly, and if you notice that its capacity has dropped,
recharge it so that it has the recommended capacity of 60-80%.
RECOMMENDATION Li-ion baeries are fully recyclable. Aer its lifespan has elapsed,you
can take it to any collection point, or to the retailer where you bought it.
packaging materials and labelling must be adhered to (such as ADR directives). Batteries
can be forwarded only on condition that their housing has not been damaged. Place
a tape or sticker over naked contacts, and pack the battery so that it does not move in its
packaging. Notify the forwarder of the fact that the parcel contains a hazardous material.

18
Installation and adjustment
Installation and removing of a wheel with a hub motor.
A situation may occur due to transport or service in which it may be necessary to remove
the wheel with motor. First of all, disconnect the motor connector that is located about 20 cm
from the inlet into the motor. Now release the brake caliper (if it is engaged), shi to the smallest
sprocket (in case of motors placed in the rear of the bicycle), loosen the motor nuts with wrench
no. 18 and remove the wheel from the dropouts. Proceed in reverse order to reinstall the wheel.
WARNING When installing the wheel with motor, it is necessary that the axle is positioned
in such a way that the notch is oriented downwards. The cable must enter the motor from
below. Otherwise water could leak into the motor and damage it.
WARNING When connecting the connector, pay aention to the fact that the arrows on
both parts of the connector must be directed towards one another. Connect the connector
using sucient force. Insucient connection may result in non-functional motor or damage
to the connector.
Brake disc installation
Use original bolts from the motor (M5×8) when installing the brake disc. If you use bolts
whose length exceeds 8mm, the inner part of the motor is blocked.
RECOMMENDATION Li-ion baeries are fully recyclable. Aer its lifespan has elapsed, you
can take it to any collection point, or to the retailer where you bought it.

19
E-bike maintenance
WARNING Never immerse baery, baery charger or other electric components into water
or any other fluid. Never use pressurized water (WAP) to wash your e-bike. Remove the
baery before you start washing your e-bike.
Regular e-bike maintenance
• Do not forget to regularly take care of your e-bike. Only through regular care
• can you achieve its troublesome operation, prolong its lifespan, and assure safety not
only for yourselves, but for other traffic participants, too.
• Keep your e-bike and all its components clean.
• Use only recommended and time-tested cleaning agents (such as Dirtwash or Pure from
Weldtite – more on www.bplumen.cz/weldtite).
• Lubricate the chain with suitable lubricants regularly (e.g. TF2 lubricants made by
• Weldtite – more on www.bplumen.cz/weldtite).
• If you use your e-bike in winter, do not forget to remove any traces of soil from it after
every ride. Pay increased attention to battery contacts and other electric contacts and
sockets.
• Whenever you manipulate with the e-bike, pay attention not to damage its electric
system cables. Damaged cables pose a risk of electrical injury.
• Regularly check that all joints are tight and brakes are fully functional. Also, pay attention
to all other components and make sure that they are not damaged or worn. Look for any
cracks in the frame, fork, stem, or handlebars, damaged cables and hoses, damaged battery
housing etc.
• Always remove the battery before transporting your e-bike in a car or on its roof.
RECOMMENDATION If you want to prevent punctures to the inner tube, we recommend
that you use a sealant (such as Dr. Sludge made by Weldtite. More on www.bplumen.cz/
weldtite).
RECOMMENDATION Due to the position of drivetrain parts, particular shape of the frame
and greater weight, it is advisable to consult sta at an authorized LEVIT partner when
selecting a bike seat for a child, a cart to be mounted behind the e-bike, or bike racks for
car roofs.
IMPORTANT Due to the position of drivetrain parts, particular shape of the frame and
greater weight, it is advisable to consult sta at an authorized LEVIT partner when selecting
a bike seat for a child, a cart to be mounted behind the e-bike, or bike racks for car roofs.

20
Frequently asked questions (FAQ)
How should I take care of my baery?
Regular rides on your e-bike are the best way to take care of your battery. The more you
ride the better. In order to achieve the longest lifespan, the optimum battery status ranges
from 20 to 80% of full charge. It is not necessary to charge your battery before you ride your
bicycle for the first time: you can do it straight away! Try to return home from your rides with
at least 10% of remaining battery capacity.
If the battery is flat, first recharge it so that it has approximately half of its full capacity,
leave it to cool down and then recharge it fully. In winter, store the battery at a dry place
with ambient temperature of at least 15°C. Bear in mind that the battery should have
approximately half of its full charge. Then, it will be sufficient to check the battery status
once a month, and if it happens that its capacity dropped, leave in the charger for about
an hour.
How many kilometres can I ride on my e-bike?
E-bike range can never be stipulated precisely or guaranteed. It always depends on several
factors, such as rider’s weight, trip profile, use of assistance during the ride, weather
conditions, technical state of the e-bike etc. If you are looking at a long trip and you are not
sure when are you back home, play it safe and take the charger with you.
What is the lifespan of the baery?
Similar to range, lifespan cannot be determined precisely. There is a general rule, though:
the more you ride the e-bike, the longer is the lifespan of the battery. It is only about
discharging and recharging it regularly. It can be said that if the battery is taken good care
of, its lifespan can exceed 4-5 years. It gradually loses its capacity in this time.
What if the baery stops working?
When the battery reaches the end of its projected lifespan, it is necessary to replace it with
a new one. It is due to these reasons that LEVIT has most of their batteries in stock; in such
case, we recommend that you pay a visit to any LEVIT partner and purchase a new battery.
The original battery is fully recyclable, and we recommend that you dispose of it at any
collection point, or at your retailer.
What should I do with my e-bike in winter?
Once you stop riding your bicycle, store it in a dry place where the temperature is in the
range of 15–20°C. Remove the battery from the e-bike, make sure that its charge status is
about 50% of its full capacity, and store the battery away from the e-bike.
It is a good idea to check the battery status. If there is less than 30% of the capacity
remaining in the battery, recharge it for about an hour. Ideally, the capacity of a battery that
is stored for a long time should be between 70 and 80% of its full capacity.
Do not leave the battery flat for a long time; it may result in its irreversible damage. If you
find out that your battery is flat, first recharge it so that it has half of its full capacity, and
then leave it to cool down. Once the battery has cooled down, resume the recharging to
achieve full capacity of the charge.
Table of contents