Leviton NPC DHV User manual

R
User Guide
Network Protocol Converter
Software Revision 3.10 and above
Leviton Lighting Control Division Headquarters
20497 SW Teton Avenue, Tualatin, OR 97062
Customer Service Telephone: 1-800-736-6682
FAX: 1-503-404-5600
Tech Line: 1-800-864-2502
Leviton Manufacturing Co., Inc.
59-25 Little Neck Parkway, Little Neck, NY 11362-2591
Telephone: 1-800-323-8920
FAX: 1-800-832-9538
Visit Leviton’s Web site at http://www.leviton.com and http://www.nsicorp.com
© 2002 Leviton Manufacturing Co., Inc. All Rights Reserved
Specifications and Pricing Subject to Change at any time.
LIT-NPDHV-000
rev: A, 12/23/2003

User Guide
Rev: A20031222.sw3.10 Page 1
Table of Contents
Overview 3
Part 1 Initial Set-up & Basic Configuration 7
Physical Connections 8
Installation 11
System Status Check 15
Navigation & Front Panel Controls 16
Part 2 Quick Start Configuration 18
Part 3 Wrapping Up 21
Part 4 Advance Configuration & Operation 24
Main Menu 25
General Set-up 27
Device Connections 32
DMX Universe Numbers 36
Patching 38
Patch Manipulation 42
Channel Options 44
Lighting Groups 50
Event Log 53
Selecting Displays 55
Configuration by Telnet or Keyboard 57
File Transfer 60
Warranty 66

User Guide
Page 2
Figure Table of Contents
Figure 1 NPC Product Line XP, DHV and DLR 3
Figure 2 NPC Front and Back Views 8
Figure 3 Device Connections 13
Figure 4 Handheld Remote Physical Connections 14
Figure 5 Successful Status of LED 15
Figure 6 NPC Front Panel Buttons 16
Figure 7 Quickstart Device Connection Screens 19
Figure 8 Quick Start Universe Patching 20
Figure 9 NPC Main Menu 25
Figure 10 General Setup 27
Figure 11 Device Connections 33
Figure 12 DMX 512 Universes 36
Figure 13 Patching 38
Figure 14 DHV Channel Options 44
Figure 15 Typical Room with Two Partitions 50
Figure 16 Grouping of Control Channels 51
Figure 17 Lighting Groups 52
Figure 18 Event Log 54
Figure 19 Select Video 1 Display 55
Figure 20 Windows Start Menu 57
Figure 21 Typical Windows RUN Dialog Box 58
Figure 22 Windows Telnet Session 58
Figure 23 Windows Start Menu 61
Figure 24 Windows TUN Dialog Box 62
Figure 25 WIN 98 FTP Screen Partial 62

User Guide
Rev: A20031222.sw3.10 Page 3
Overview
Network Protocol Converter
The Network Protocol Converter by Leviton's Lighting Control
Division provides exceptional convenience and flexibility as an
interface for remote devices, displays, and networking of theatrical
and architectural control devices. The Network Protocol Converter
(NPC) is installed as a node on an Ethernet network communicating
using the ColorNet 2.0 and TCP/IP protocols. The Network
Protocol Converter, when combined with other network devices
supporting ColorNet 2.0 system, allows for the following types of
devices to communicate over the ColorNet network:
ColorNet 2.0 Enabled Control Consoles (Innovator)
i Series Dimmer Racks
Hand Held Focus Remotes
Dimension D8000/D4200 Architectural Control Stations
Figure 1: NPC Product Line XP, DHV and DLR
NPC DHV
NPC DLR
NPC XP

User Guide
Page 4
Currently there are three models of the NPC available, each of
which support the following interfaces:
To facilitate communication between these devices your NPC allows
you to:
Create quick port to network patches
Create quick network to port patches
Patch channels from the network to channels on a port
Patch channels from a port to channels on the network
View video displays produced by other ColorNet
enabled equipment
Although the concepts, routines, and functions for installation and
configuration are similar for all three models, this manual is
specifically tailored for the DHV model.
Definitions
Here are some common words you will find in this manual which
may require a little more definition.
Channel – A channel usually refers to an individual unit of control
on the Luma-Net network. However the word channel sometimes is
used to reference an individual DMX address or a fader on a control
device or theatrical console. If you pay careful attention, you will be
able to determine the meaning by it’s context.
Model
DMX
Inputs
DMX
Outputs
Handheld
Remote
Video
Outputs
Keyboard
LunaNet
Lan's
Memory
Cards
Analog
Inputs
XP
DHV
DLR
3
3
3
3
1
1
12
2
2
1
116
11

User Guide
Rev: A20031222.sw3.10 Page 5
ColorNet – ColorNet is Leviton’s network protocol used to carry
lighting control signals over Ethernet wiring using TCP/IP. For
additional information on ColorNet see the appendices to this
document.
DMX – (Short for DMX512, a USITT Standard) A digital multiplexed
control protocol used to control lighting devices like dimmers,
effects, and automated lighting.
DMX Universe – A DMX universe is a virtual or physical group of
512 DMX addresses. In the physical world, a DMX universe
represents a DMX input or output from a source of control like a
control console or NPC. In the virtual world, like on the ColorNet
network, a DMX universe is just simply a common group of 512
DMX channels. All DMX signals on the ColorNet network belong to a
virtual DMX Universe.
Ethernet – Ethernet is a networking term which describes the
physical devices and equipment used to inter-connect networking
equipment. When a network is referenced as an ‘Ethernet network’
it describes a certain set of components used to interconnect
computing equipment.
IP Address – An IP (Internet Protocol) address is a way to
reference a particular node on a network which speaks the TCP/IP
protocol. The IP address can be user defined and set via the
software for the device. All IP addresses on the same network must
only reference one node.
LC-Net- Leviton’s "CAN" based network which carries data for
some of our architectural products.
Lighting Group – Lighting Groups are used to delineate groups of
Luma-Net channels which operate together (within the same room)
when using room separate/combine Luma-Net functions.

User Guide
Page 6
Luma-Net – Leviton’s RS-485 based network which carries control
data for our architectural stations.
MAC Address – a unique network address which identifies a piece
of networking hardware to be used on an Ethernet network. The
MAC address of a device can not be changed.
TCP/IP – is a networking protocol or rather suite of protocols
commonly used on Ethernet networks and the internet. TCP is an
acronym for Transmission Control Protocol and IP is an acronym
for Internet Protocol.

User Guide
Rev: A20031222.sw3.10 Page 7
Part 1- Initial Set-up & Basic
Configuration
This section of the manual will cover the installation and basic
configuration of the NPC. There are (4) steps required to make
your NPC work:
1. Physical Installation
2. Set General & Network Settings
3. Set Device Connections
4. Create Basic Patches
Until these steps are complete, your NPC will not be operational.
For advanced configuration of the NPC, please reference Part 2 of
this guide.
Part 1 Contents
Physical Connections.......................................... 8
Installation........................................................11
System Status Check.........................................15
Navigation & Front Panel Controls.......................16
Quick Start Configuration...................................18

User Guide
Page 8
Physical Connections
The information in this chapter identifies and describes all of the
physical connections, controls, and indicators of the NPC.
The images below show the front and back views of the NPC. They
are designed to give you an overview of the physical attributes to
the NPC. Use the numbered callouts to cross reference with the
legend/descriptions below.
Figure 2: NPC DHV Front and Back Views
1) Hand Held Remote Port: A Theatrical Control Console Hand
Held Remote can be plugged into this port to control any ColorNet
2.0 console connected to the network.
2) Power Indicator: This LED will be lit if the NPC is receiving DC
input power.
3) Reset Hole: Push a paperclip through this hole to access the
reset switch.
13

User Guide
Rev: A20031222.sw3.10 Page 9
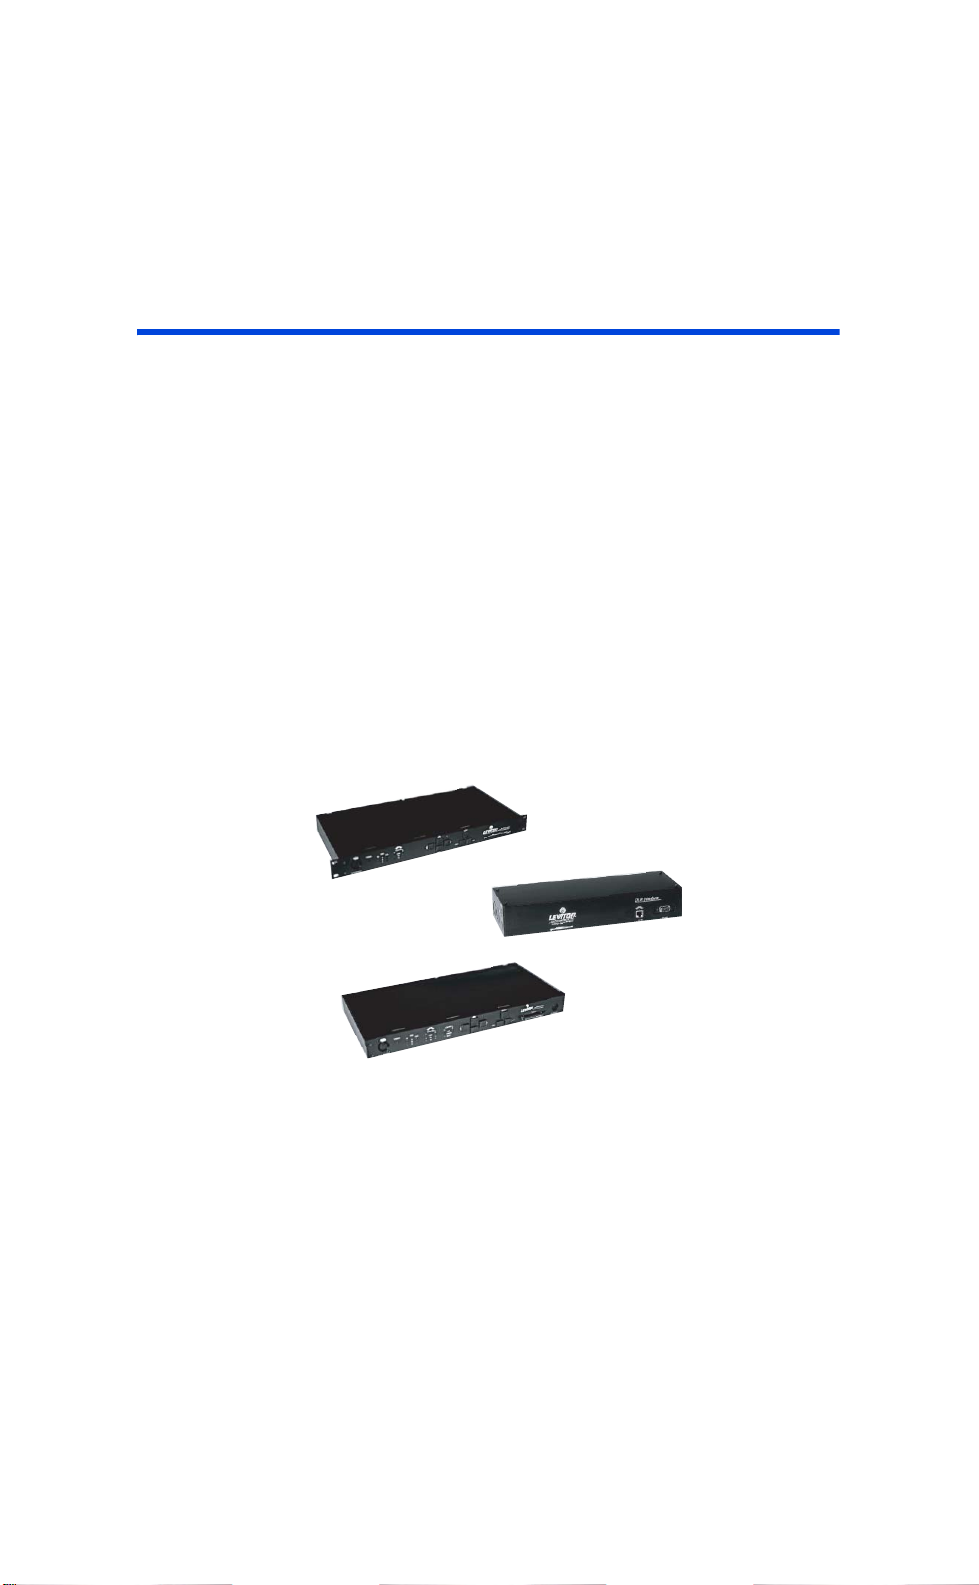
4) DMX512 Indicators: Each DMX512 input and output LED
indicators will light green to show activity on their respective ports.
5) ColorNet Indicators: There are two sets of LED indicators;
one set for each ColorNet port. The Link LED indicates whether the
port has established a connection to the ColorNet network. TX & RX
indicates any transmitting or receiving data to or from the network.
6) Navigation & Operation Buttons: Buttons used when
performing local configuration functions. See the chapter titled
“Navigation Button Operation & Requirements”
7) Video Ports: Ports used to connect VGA compatible video
monitors. Each monitor can be configured to display a local or
remote network device video display.
8) Ethernet Ports: Ethernet ports used for connection to a
ColorNet 2.0 TCP/IP Ethernet network.
9) DMX512 Output Ports: Output a standard DMX512 control
signal from the ColorNet network.
10) DMX512 Input Ports: Any device that supplies a DMX512
signal can be connected to these ports. The dimmer information
contained within the DMX512 signal can be patched to any location
on the ColorNet network or directly to an output port.
11) Hand Held Remote Hardwired Port: This port is to be used
for connecting external hardwired connections for a Hand Held
Remote to the NPC. Note: The front panel HHR connector and the
back panel HHR connector are internally connected to each other,
therefore, only one can be used at a time. If either HRR port is
used, the Luma-Net A port must not be used.
12) Power Input Port: Plug the supplied DC Power supply into
this port to supply power to the NPC. The NPC requires +12-
24VDC, and has a load of 800mA excluding any external loads like

User Guide
Page 10
Luma-Net stations or analog devices. The NPC is supplied with a
12VDC, 2.5A power supply.
13) DMX512 Input Termination Switches: Placing one of
these switches in the “1” position connects a 120 ohm resistor
across the signal pins 2 and 3. This should only be done if the
connection to the port is the end of the DMX512 run.

User Guide
Rev: A20031222.sw3.10 Page 11
Installation
The installation and physical connections to the NPC should be
pretty straight forward and for many may be self explanatory.
However, here is a brief explanation of the required steps and any
important notes.
Physical Installation & Power
Install the device into it’s physical location. If the device is to be
rack mounted, install it into the rack. If it’s to be table top mounted,
set it up on the table.
Observe clearances as required for proper device operation.
Front panel access for local configuration and visual status
indication, and rear access for connections. Be sure to leave
enough room for the connector!
Prepare the power connections, but do not yet connect power.
Power should be the last thing connected after all other
connections have been made.
ColorNet Network Connections
1Connect ColorNet Port A to your Ethernet hub for
interface to other ColorNet devices.
2If your NPC is near an i Series dimming rack, and
your system requires it, you may connect ColorNet
port B to the dimming rack processor.
Connect a video monitor to Video Port #1 and/or #2 as
required. Remember when connecting to a network hub, a
straight through network patch cable should be used. If
connecting directly to another device, a special type of cable
referred to as a "crossover cable" should be used. This type of
cable swaps the send/receive pairs so that network integrity is
maintained.

User Guide
Page 12
Video Connections
Even if a video monitor is not being used in the permanent
installation, it is helpful if not required for initial setup/
configuration.
To Video Monitors
DMX 512 IN
Leviton Mfg. Co. Inc.
Made in the U.S.A.
Tualatin, OR.
VIDEO 1 VIDEO 2 10/100
A
10
B
AUI
B
I - O
DMX512 OUT
DMX512 OUT
AB
DMX512 OUT
CA
I - O I - O
DMX 512 INDMX 512 IN
BC
HHR POWER
+15
VDC
IN
PUSH PUSH PUSH

User Guide
Rev: A20031222.sw3.10 Page 13
DMX Connections
Connect any required DMX input or output devices
Figure 3: Device Connections
Connect any required
DMX Inputs or Outputs
DMX Data
Output DMX Data
Input
(Not all required connections)
0,1,2,3 Outputs
0,1,2,3 Inputs
DMX Pinout
Pin
1
5
4
3
2
Function
Common
Data 1-
Data 1+
Data 2-(N/C)
Data 2+(N/C)
Wire (Belden 9829)
Pair Color
-Shield
Black
1
2Black
Red
White
DMX 512 IN
Leviton Mfg. Co. Inc.
Made in the U.S.A.
Tualatin, OR.
VIDEO 1 VIDEO 2 10/100
A
10
B
AUI
B
I - O
DMX512 OUT
DMX512 OUT
AB
DMX512 OUT
CA
I - O I - O DMX 512 INDMX 512 IN
BC
HHR POWER
+15
VDC
IN
PUSH PUSH PUSH

User Guide
Page 14
Handheld Remotes
Connect Handheld remote to front or back of NPC.
If a handheld remote is used, either hardwired or otherwise,
you must abandon the Luma-Net A port.
Figure 4: Handheld Remote Physical Connections
Back
To hardwire building
HHR Wiring
I - O
DMX 512 INDMX 512 IN
BC
HHR POWER
+15
VDC
IN
To Handheld Remote
Terminal
Front
PUSH
R
POWER
B
C
DMX
A
IN OUT
RX
TX
ColorNet
A
LINK
B
H. H. REMOTE
Handheld Remote (HHR)
Pin/
Terminal Function Wire (Belden 9830)
Pair Color
1
1
2
3
4
5
6
Common
Common
+12VDC
RX-
RX+
TX-
TX+
-
1
2
3
Shield
White/Blue
Blue/White
White/Orang
e
Orange/Whit
e
White/Green
Green/White

User Guide
Rev: A20031222.sw3.10 Page 15
System Status Check
Make your final power connections and apply power.
At this point in time, your NPC should be operational. There’s a bit
of configuration which must still be done, but all your connections
are made. To checkout the system, observe the LED’s on the front
of the unit.
Figure 5: Successful Status of LED
LED’s may not be lit as expected with default configuration.
Indicates Power
Connector Indicates
DMX Data
Received
}
Indicates
Transmitting DMX
Data Network Connection
Status
PUSH
R
POWER
B
C
DMX
A
IN OUT
RX
TX
ColorNet
ALINK B
H. H. REMOTE

User Guide
Page 16
Navigation Button Operation &
Requirements
Figure 6: NPC Front Panel Buttons
The basic operation of the NPC is made simple through the use of
the seven buttons located on its front panel. These buttons have
two primary sets of functions, the first group of buttons, [UP],
[DOWN], [LEFT] and [RIGHT], are purely for navigation. They
are used to move the cursor around the video display. The second
group of buttons is used to modify parameter values or settings.
[SELECT] is used to "select" a menu choice, save changes, or
return to the previous screen. [PREV] (short for "previous") and
[NEXT] are used to step through the parameter options or to
increment/decrement a number.
Sometimes, you will be using the [NEXT] and [PREV] buttons
to scroll through a large range of values, like the alphabet. In
this situation, you can press and hold the button which will
quickly scroll through the values instead of repeatedly pressing
the buttons.

User Guide
Rev: A20031222.sw3.10 Page 17
Generally, a typical use of the navigation & operation
buttons will be as follows:
Step 1 From the Main Menu, use the
[UP][DOWN][LEFT][RIGHT] navigation
buttons to select the main menu option
you desire.
Step 2 When you’ve reached your desired main
menu option, press the [SELECT] button.
Step 3 You now will be looking at a configuration
or status screen. From this point you use a
combination of the
[UP][DOWN][LEFT][RIGHT] arrow
keys to get to your desired option.
Step 4 Then use the [NEXT][PREV] button to
make changes.
Step 5 Repeat steps 3 & 4 until all settings have
been changed.
Step 6 Press the [SELECT] button. This will
either return you to the previous screen or
ask if you want to save changes. If you are
asked if you want to save changes,
pressing the [SELECT] button again will
save them. Pressing any other key will
cancel the changes.
These are the basics of using the navigation & operation buttons.
In some screens there are additional options or requirements which
will be covered in the section of the manual which describes those
areas.

User Guide
Page 18
Part 2- Quick Start
This chapter is designed to quickly get you up and running with the
basic functionality of the NPC. However, it’s certainly not all
inclusive. If after performing the steps in this chapter your NPC is
not operating correctly or you need additional configuration
options, please reference the remainder of the manual.
Step 1- Installation, Connections and Power
Install the NPC as required, make all data connections and apply
power as discussed in the previous chapter.

User Guide
Rev: A20031222.sw3.10 Page 19
Step 2- Device Connections
Verify all device connections from the "Device Connections" options
from the main menu. The port setting should be set correctly to no
no device
or otherwise based on whether or not something is
connected to that port, and the port status should read active or
inactive based on their current connection state.
Figure 7: Quickstart Device Connections Screens
Other manuals for NPC DHV
1
This manual suits for next models
3
Table of contents
Other Leviton Media Converter manuals