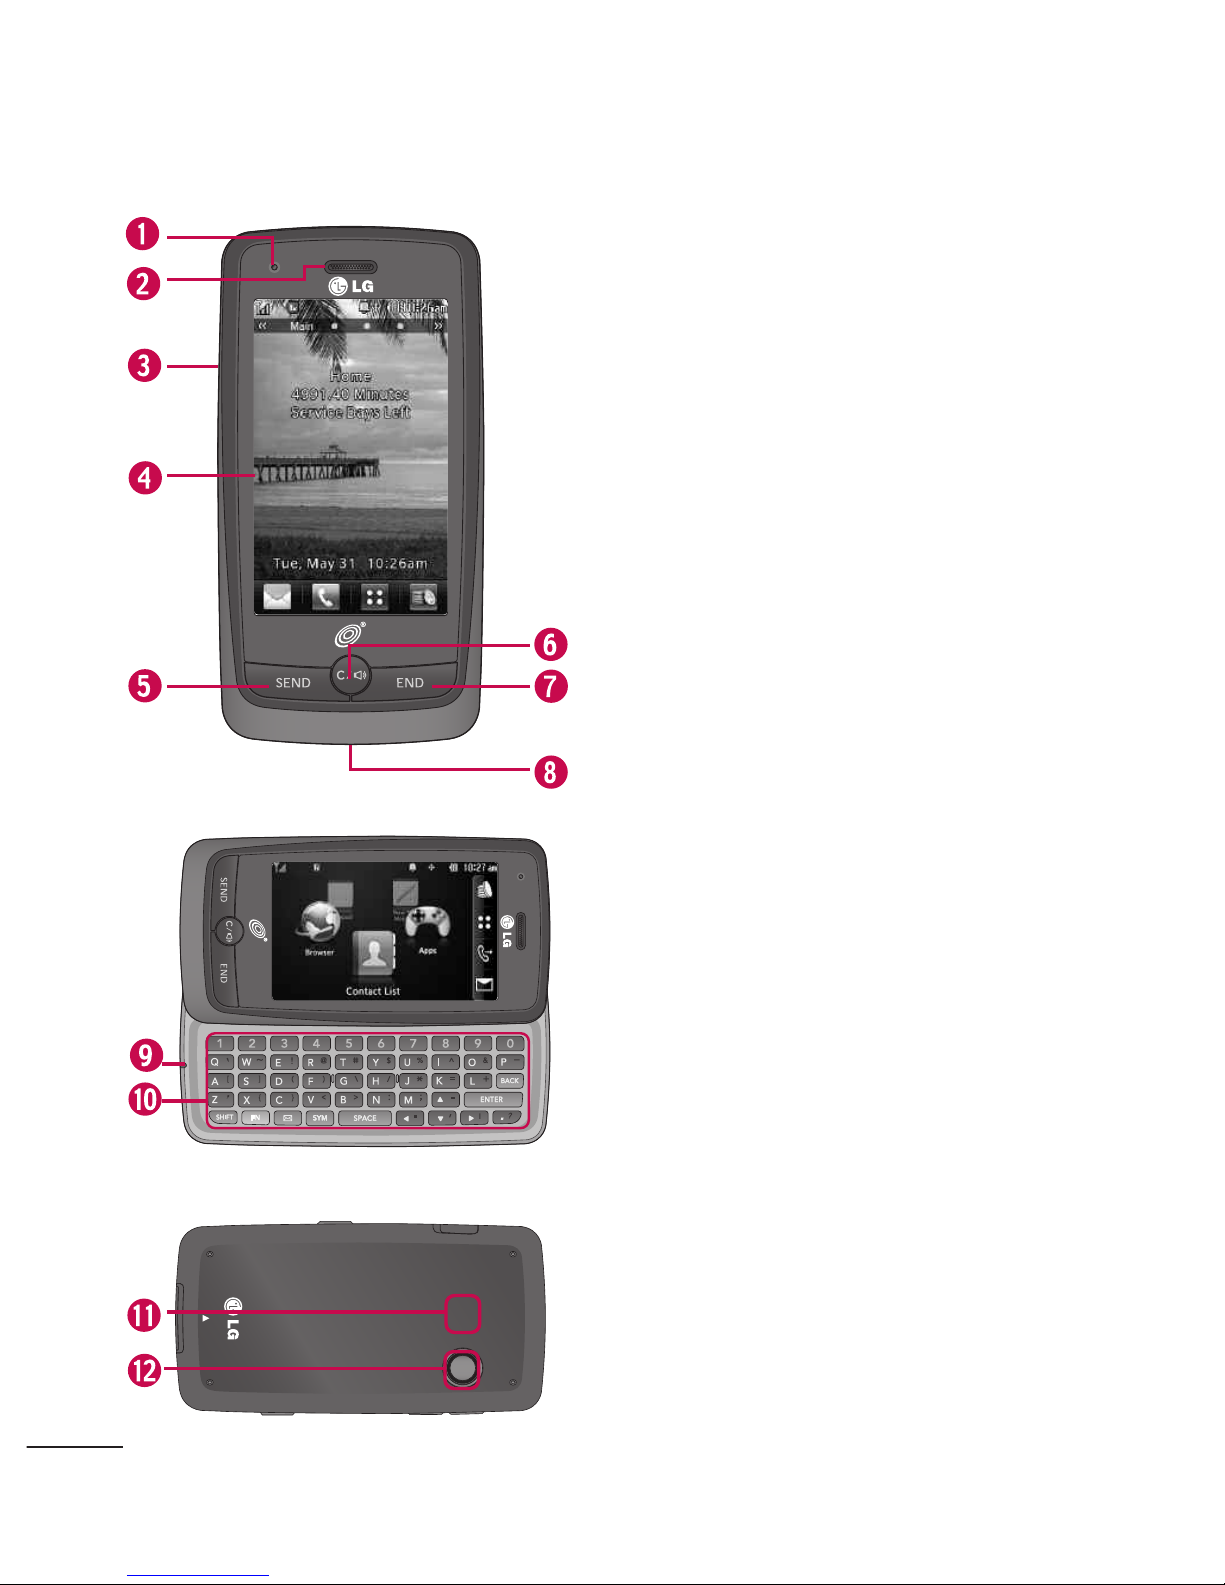
LG 511C User manual

LG511C User Guide
- English
Some of the contents in this manual may differ from your
phone depending on the software of the phone or your service
provider.

2
Phone Overview
1. LED light Alerts you of new notifications.
2. Earpiece Lets you hear the caller.
3. Slide Slide open to access the QWERTY
keyboard.
4. LCD Screen Displays incoming calls, messages
and status icons as well as viewing a wide variety
of content you select to view.
5. Send Key Use to place or answer calls. You can
also press to access your Call History.
6. Clear Key Deletessingle spacesor characters
with a quick press. Todelete entire words, press
and hold this key. This key will also allow you to
back out of menus, one level at a time. Press and
hold from the home screen to enable/disable the
Speakerphone.
7. End Key Use to end a call. Also returns you to
the home screen.
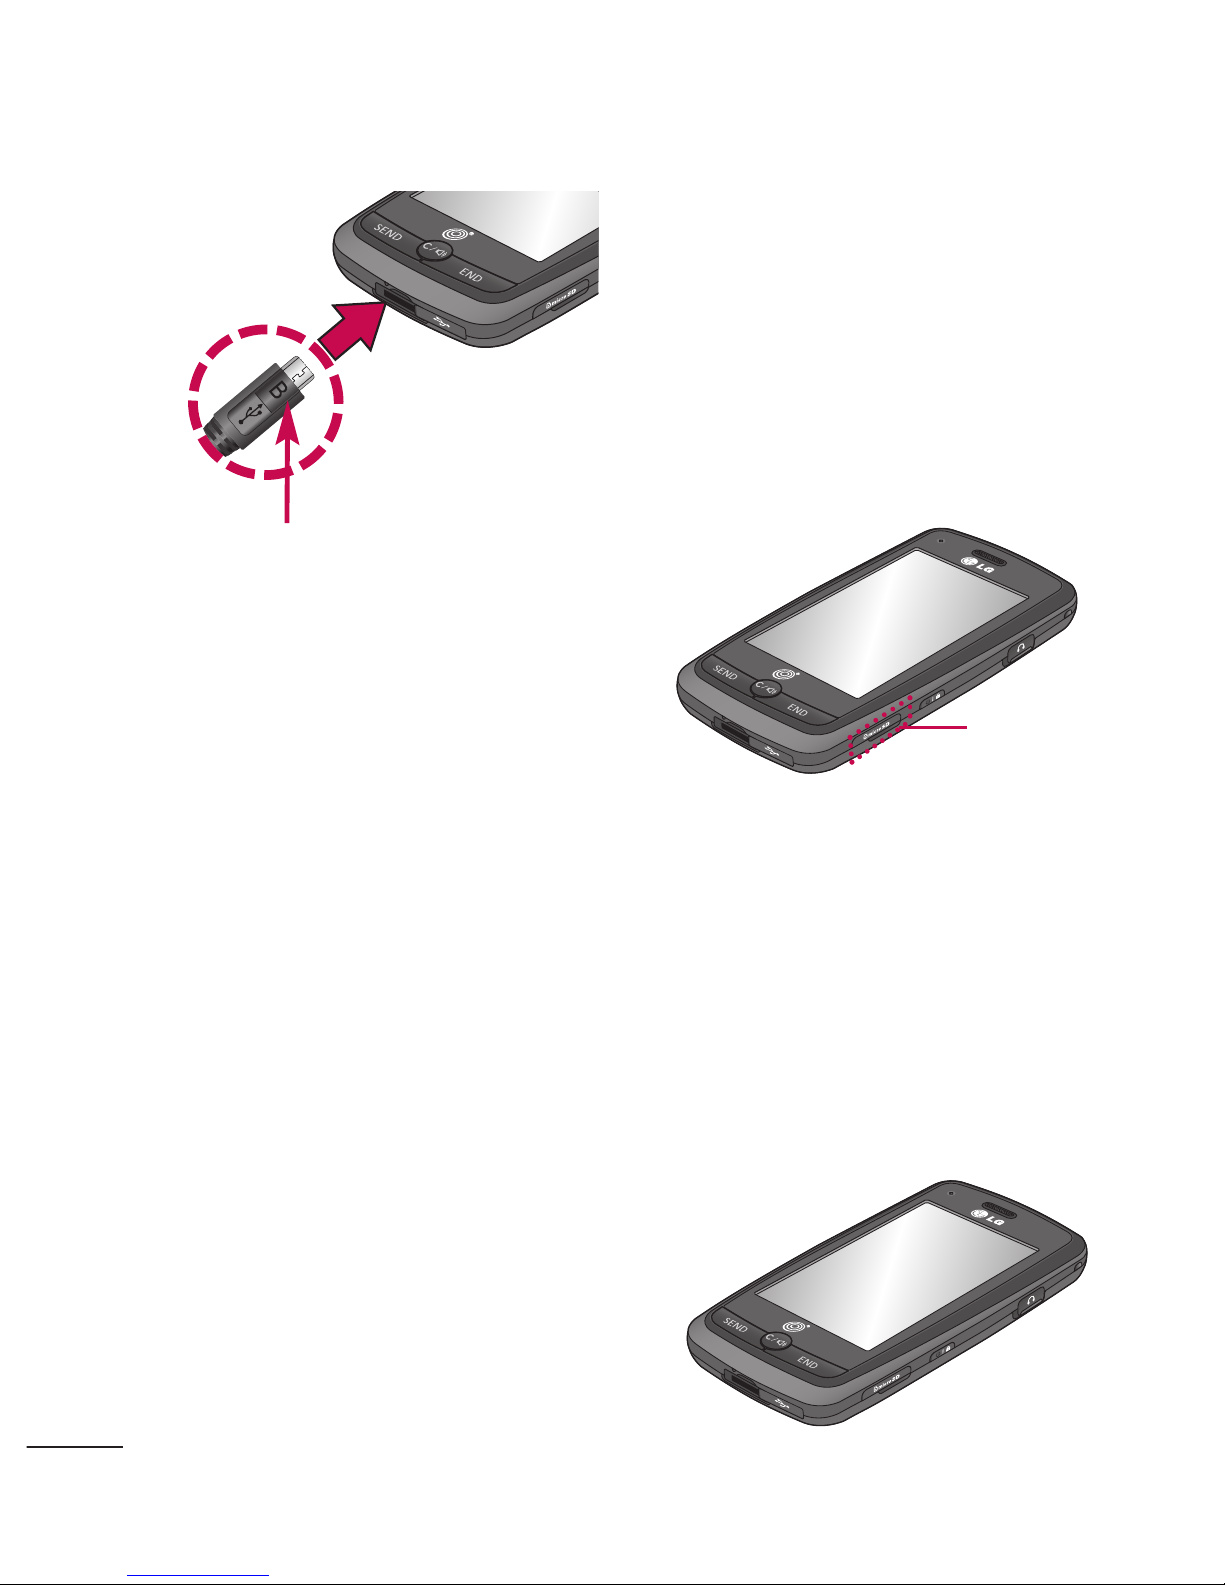
8. Accesory/Charger Port Connects the phone to
the battery charger or other available accessories.
9. Microphone Allows other callers to hear you
clearly when you are speaking to them.
10. Alphanumeric Keypad Use to enter numbers
and characters and select menu items.
11. Speaker Lets you hear the caller's voice, music
and video in speakerphone mode.
12. Camera Lens Used to take photos and record
video. Keep it clean for optimal photoquality.

3
1.Volume Keys Use to adjust the
ringer volume from the home screen
and the earpiece volume during a
call.
2.Camera Key Use for quick access to
Camera functions.
3.Earphone Jack Allows the use of a
headset to hear caller's voice.
4.Power/Lock Key Allows you to turn
the phone on and off. You can also
lock and unlock the phone.
microSD™card slot
(accommodates optional
microSD™card up to 32GB.) Only use an LG-approved
microSD™card. Toaccess the microSD™cardslot you
must remove the cover located on the microSD card slot.

4
Phone Overview
Internal Qwerty Keypad
Your phone features a QWERTY keyboard, specifically designed
for easy and comfortable text entry. The QWERTY keyboard uses
astandard layout.
1. Function Key allows you enter the
alternate character (such as $ for the W
key) on the QWERTY keyboard (See
"Entering and Editing Information" on
page 28for more information). To lock
the function key (as when entering a series
of numbers or alternate characters), press
twice.
2. SHIFT Key lets you change letter
capitalization when entering text, using the
QWERTY keyboard.
3. Back Key Use to delete a letter, words or
sentences. Also use it to exit the menu and
go back to standby mode.
4. Return Key Use to go to next line editing
your message.

Communicate
Prepaid
Add Airtime
BuyAirtime
My Phone Number
Airtime Info
Airtime Display
Serial Number
Code Entry Mode
Contacts
New Contact
Contact List
Speed Dials
Groups
My vCard
Messages
New Text Message
NewPictureMessage
Inbox
Drafts
Outbox
Voicemail
Web Alerts
Templates
Delete All
Delete Inbox
DeleteOutbox
DeleteDrafts
Delete Web Alerts
Delete All
Messages
Message Settings
All Messages
Text Messages
New Text
Message
5
Menus Overview
Menu Access
Touch the
Menu Key
to access the phone’s main menu. To
access the main menu, first unlock the phone by pressing the
Power/Lock Key
on the right side of your phone. To return to
the Home screen, touch or press .

Speed Dials
Recent Calls
Missed Calls
Received Calls
Dialed Calls
All Calls
Call Timer
Browser
Apps
Entertainment
Take Photo
Gallery
My Stuff
Images
Videos
Sounds
Record Video
Drawing Panel
Record Voice
SNS
Music
Recently Played
All Songs
Artists
Albums
Genres
Playlists
Settings
Repeat
Shuffle Songs
Background Music
Utilities
Voice
Command
Start Command
Command Mode
Announce Alert
Train Word
Best Match
Notepad
Organizer
Calendar
Date Finder
6
Menus Overview

Stopwatch
Alarm Clock
World Clock
Calculator
Tools
Tip Calculator
Unit Converter
Settings
Sound
Settings
Ringtones
All Calls
Caller ID
No Caller ID
Volume
Master Volume
Keypad
Earpiece
Speaker
Message Alerts
Text Message
Picture Message
Voicemail
All Messages
Message Reminder
Alert Type
Call Alert
Message Alert
Schedule Alert
Alarm Alert
Service Alerts
Minute Beep
Call Connect
Low Battery
Power On/Off Tone
Display
Settings
Wallpaper
Screen
Main
Shortcut
Contacts
Multimedia
Touch Key
Guard
LCD Settings
Power Save
Backlight
Brightness
Languages (Idiomas)
Clock & Calendar
7

Font Settings
Dial Font Size
Menu Style
Name Match for
Dialing
Call Settings
Answer Options
Auto Retry
One Touch Dial
Airplane Mode
TTY Mode
Touch
Settings
Touchscreen
Calibration
Touchscreen Effect
Phone
Settings
Auto Touch Lock
Security
Lock Phone
Camera
Restrictions
Change Lock
Code
Reset Default
Memory
HandsetCommon
Memory
Handset Reserved
Memory
External Memory
Primary Storage
Setting
Phone Info
My Number
ESN/ MEID
Icon Glossary
Version
System
Network
Location
Bluetooth
USB Mass
Storage
8
Menus Overview

9
Getting Started with Your Phone
The Battery
The phone comes with a
rechargeable battery. The
battery charge level is shown at
the top of the LCD screen.
Installing the Battery
1. Remove the battery cover by
gentlypressing up on the
bottom part of the battery
cover.
2. Align the battery contacts
with the phone terminals at
the bottom of the battery
compartment.
3.
Gently push down on the
battery until it clicks into
place.
4. Replace the battery cover by
gently pressing down on the
top part of the battery
cover, then sliding it
downwards.
Removing the Battery
1. Turn the phone off and
removethe battery cover.
2. Use the fingertip cutout at
the top of the battery
compartment tolift the
battery out.
Charging the Battery
To use the charger provided
with your phone:
Warning! Use only the charger
provided with the phone. Using
any charger other than the one
included with the LG511C may
damage your phone or battery.
Note
It is important to fully charge the
battery before initial use of the
phone.

1. Plug the end of the adapter
intothe phone’scharger
port and the other end into
an electrical outlet.
2. The charge time varies
depending upon the battery
level.
How to Install Your
microSD™Card
1. Locate the microSD
™
slot on
the right side of the phone
and gently uncover the slot
opening.
2. Insert the microSD
™
card
with the label side facing up
and gently push it in until it
clicks into the slot. If you
insert the card in the wrong
direction, it may damage
your phone or your card.
10
Getting Started with Your Phone
Notice
Please make sure that the 'B' side faces
up before inserting a charger or data
cable intothe charger portof your
phone.
MicroSD™
Slot

How to Remove Your
microSD™Card
1. Uncover the slot opening
and gently press and release
the exposed edge of the
microSD
™
card to eject it.
2. Remove the microSD
™
card
from the slot and replace
the cover.
Battery Charge Level
The battery charge level is
shown at the top right of the
LCD screen. When the battery
charge level becomes low, the
low battery sensor alerts you in
three ways: sounding an
audible tone, blinking the
battery icon, and displaying a
warning message.
If the battery charge level
becomes exceedingly low, the
phone automatically switches
off and any function in
progress is not saved.
Turning the Phone On
and Off
Turning the Phone On
1. Install a charged battery or
connect the phone to an
external power source.
2. Press the Power/Lock Key
for about 3 seconds
until the LCD screen lights
up.
Turning the Phone Off
1. Press and hold the
Power/Lock Key until the
LCD screen turns off.
Note
Do not attempt to remove the
microSD™card while reading or
writing tothe card.
11

Signal Strength
Call quality depends on the
signal strength in your area.
The signal strength is indicated
on the screen as the number of
bars next to the signal strength
icon . The more bars, the
better the signal strength. If
the signal quality is poor, move
to an open area. If you are in a
building, the reception may be
better near a window.
Screen Icons
To see the icon glossary, touch
Menu
->
Settings
->
Phone Settings
->
Phone Info -
>Icon Glossary
on your
phone.
Making Calls
lf the phone is locked, press
the Power/Lock Key on the
right side of your phone.
1. Touch and enter the
phone number (include the
area code if needed).
2. Press or touch
.
3. Press to end the call.
Correcting Dialing
Mistakes
If you makeamistakewhile
dialing a number, press or
touch once to erase the
last digit entered, or hold down
or touch and hold
for atleast 2 seconds to erase
all the digitsentered.
12
Getting Started with Your Phone

Redialing Calls
1. Press twice to redial
the last number you dialed.
If you press once, the most
recent (Missed, Received
and Dialed) calls in your Call
History list will display. You
can select any of these calls
to place an outgoing call.
Receiving Calls
1. When the phone rings
and/or vibrates, press
to answer.
2. Press to end the call.
13
Note
If you press or (the
volume keys), while the phone is
ringing, the ringing or vibration is
muted for that call.
Tip
The Call Settings menu allows you
to choose your answer options. To
access the Answer Options, touch
Menu -> Settings ->
Call Settings -> Answer Options
.
The following options are available:
Slide Open/ Any Key/ SEND Key
Only/ Auto Answer

Auto Device Lock
Sets your phone to require a
4-digit password in order to
use the phone.
To set lock mode on, touch
Menu
->
Settings
->
Phone Settings
->
Security
-> Enter your Lock
Code ->
Lock Phone
->
None/ When Switch On/
Immediately
.
Speaker Phone Function
This Function is used during a
phone call.
Touch / to activate
and deactivatespeaker mode.
Quick Volume Adjustment
Use the volume keys to adjust
the Master Volume from the
Homescreen and the Earpiece
Volume during a call. The
upper volume key increases the
volume and the lower volume
key decreases the volume.
Call Waiting
Your cellular service may offer
call waiting. While a call is in
progress, a beep indicates
another incoming call. When
call waiting is enabled, you may
put the activecall on hold while
you answer the other incoming
call. Check with your cellular
service provider for information
about this function.
Note
Until you change it, the default
lock code/password is the last 4
digits of your phone number.
14
Quick Access to Convenient Features
Note
Keypad Volume is adjusted through
the Sounds Volume Menu.
(Menu->Settings->
Sound Settings->Volume->
Keypad).

1. Press to receive a
waiting call.
2. Press again to switch
between calls.
Caller ID
Caller ID displays the phone
number or name of the incoming
call. If the caller’s identity is
stored in Contacts, the name will
appear along with the phone
number. Check with your service
provider toensurethey offer this
feature.
Speed Dialing
Speed dialing is a convenient
featurethatallows you to make
phone calls quickly. A number
key can be assigned to a
specific phone number. By
pressing and holding down a
number key, your phone will
recall the phone number
associated from the Contact
List and dial that phone
number for you. Speed Dial
Number 1 is set to Voicemail
by default and is
unchangeable.
Dialing Single Digit Speed
Dials (from 2 to9)
Press and hold the Speed
Dial number.
OR
Enter the Speed Dial
number and press .
Dialing Double Digit Speed
Dials (from 10 to 99)
Press the first digit and then
press and hold the key of
the second digit.
OR
Enter the first and second
digits and press .
15

16
Entering and Editing Information
Text Input
Each time you touch a data entry field, the touchscreen
automatically displays a keypad allowing you to enter text,
numbers, and symbols. For example, in a name field, an alphabet
keypad appears, but you can also switch to number mode to
enter digits.
Options:
Without text entered: Add/ Save As
When text entered: Add/ Save As/ Copy Text
Touch to delete text.
Handwriting input mode Key.
T9 Mode

17
Contacts in Your Phone’s Memory
The Basics of Storing
Contacts Entries
1. Enter the phone number
you want to save (up to 48
digits).
2. Touch .
3.
Touch Save and select either
Add New Contact or
Update Existing on the pop-
up screen.
4. Touch a Phone Label.
Mobile 1/ Home 1/ Office
1/ Mobile 2/ Home 2/
Office 2/ Fax
5. Touch the Name field and
enter a name for the phone
number (up to 32
characters). Then touch
and . A
confirmation message is
displayed briefly.
Phone Numbers With
Pauses
When you call automated
systems such as voice mail or
credit billing numbers, you
often have to enter a series of
numbers to navigate through
the system. Instead of entering
these numbers by hand, you
can storethe numbers in your
Contacts separated by special
pause characters(W, P). There
are two different types of
pauses you can use when
storing a number:
SaveDone
Note
Use
Existing Entry
to add
another phone number to a
contact alreadystored in
memory.

18
Contacts in Your Phone’s Memory
Wait (W)
The phone stops dialing until
you select
Release
to advance
to the next number.
2-Sec Pause (P)
The phone waits 2 seconds
beforesending the next string
of digits.
Storing a Number with
Pauses
1. Touch .
2. Touch
Contacts
.
3. Touch
New Contact
.
4. Enter a name (up to 32
characters) and touch the
number field to enter a
number.
5. Select
Wait
or
2-Sec Pause
.
6. Enter additional number(s),
touch
and then
.
Adding a Pause to an
Existing Number
1. Touch .
2. Touch
Contacts
.
3. Touch
Contact List
.
4. Scroll through the list and
touch the Contact entry you
wish toedit.
5. Touch
Edit
.
6. Touch the number.
7. Touch .
8. Touch
Wait
or
2-Sec Pause
.
9.
Enter additional number(s),
touch and then
.
Save
Done
Save
Done

Searching Your Phone’s
Memory
The
LG511C
phone is able to
perform a dynamic search of the
contents in your phone’s
memory. A dynamic search
compares entered letters or
numbers against the entries in
your Contacts. A matching list is
displayed in descending order.
You can then select a number
from the list tocall or edit.
Searching by Letter
1. Touch .
2. Touch
Contacts
.
3. Touch
Contact List
to
display your contacts
alphabetically.
4. Touch the key(s) on the
alphanumeric keypad that
corresponds with the search
letter.
Scrolling Through Your
Contacts
1. Touch .
2. Touch
Contacts
.
3. Touch
Contact List
to
display your contacts
alphabetically.
4. Scroll through the list.
Accessing Options
1. Touch .
2. Touch
Contacts
.
3. Touch
Contact List
to
display your contacts
alphabetically.
4. Touch one of the following
options:
New Contact:
Allows you to
add a new contact to your
Contact List.
19

Send Message
:Send a text
message or picture message to
the selected contact.
Delete
:Delete the selected
entry from your Contacts.
Set Homescreen
:Add the
selected contact to the
Contacts Idle group list.
Send via Bluetooth:
Send a
contact(Name Card) via
Bluetooth
®
.
Delete All:
Deletes all of your
contacts in the Contact List.
Making a Call From Your
Phone’s Memory
Once you have stored phone
numbers in your Contacts, you
can place calls to those
numbers quickly and easily.
●
By touching a phone
number in Contacts or
Recent Calls, and pressing
or touching .
●
By using Speed Dialing.
20
Contacts in Your Phone’s Memory
Other manuals for 511C
1
Table of contents
Other LG Cell Phone manuals