LG E617g User manual

Quick start guide
Guide de Démarrage rapide
LG-E617g
P/N : MBM63682001 (1.0) Gwww.lg.com
ENGLISH
FRANÇAIS
Printed in Korea


ENGLISH
Quick start guide
LG-E617g
To download the latest full version of the user guide, go to
www.lg.com/ca on your PC or laptop.

Index L
G
Pr
o
Ea
r
Vol
Ba
c
Re
t
pr
e
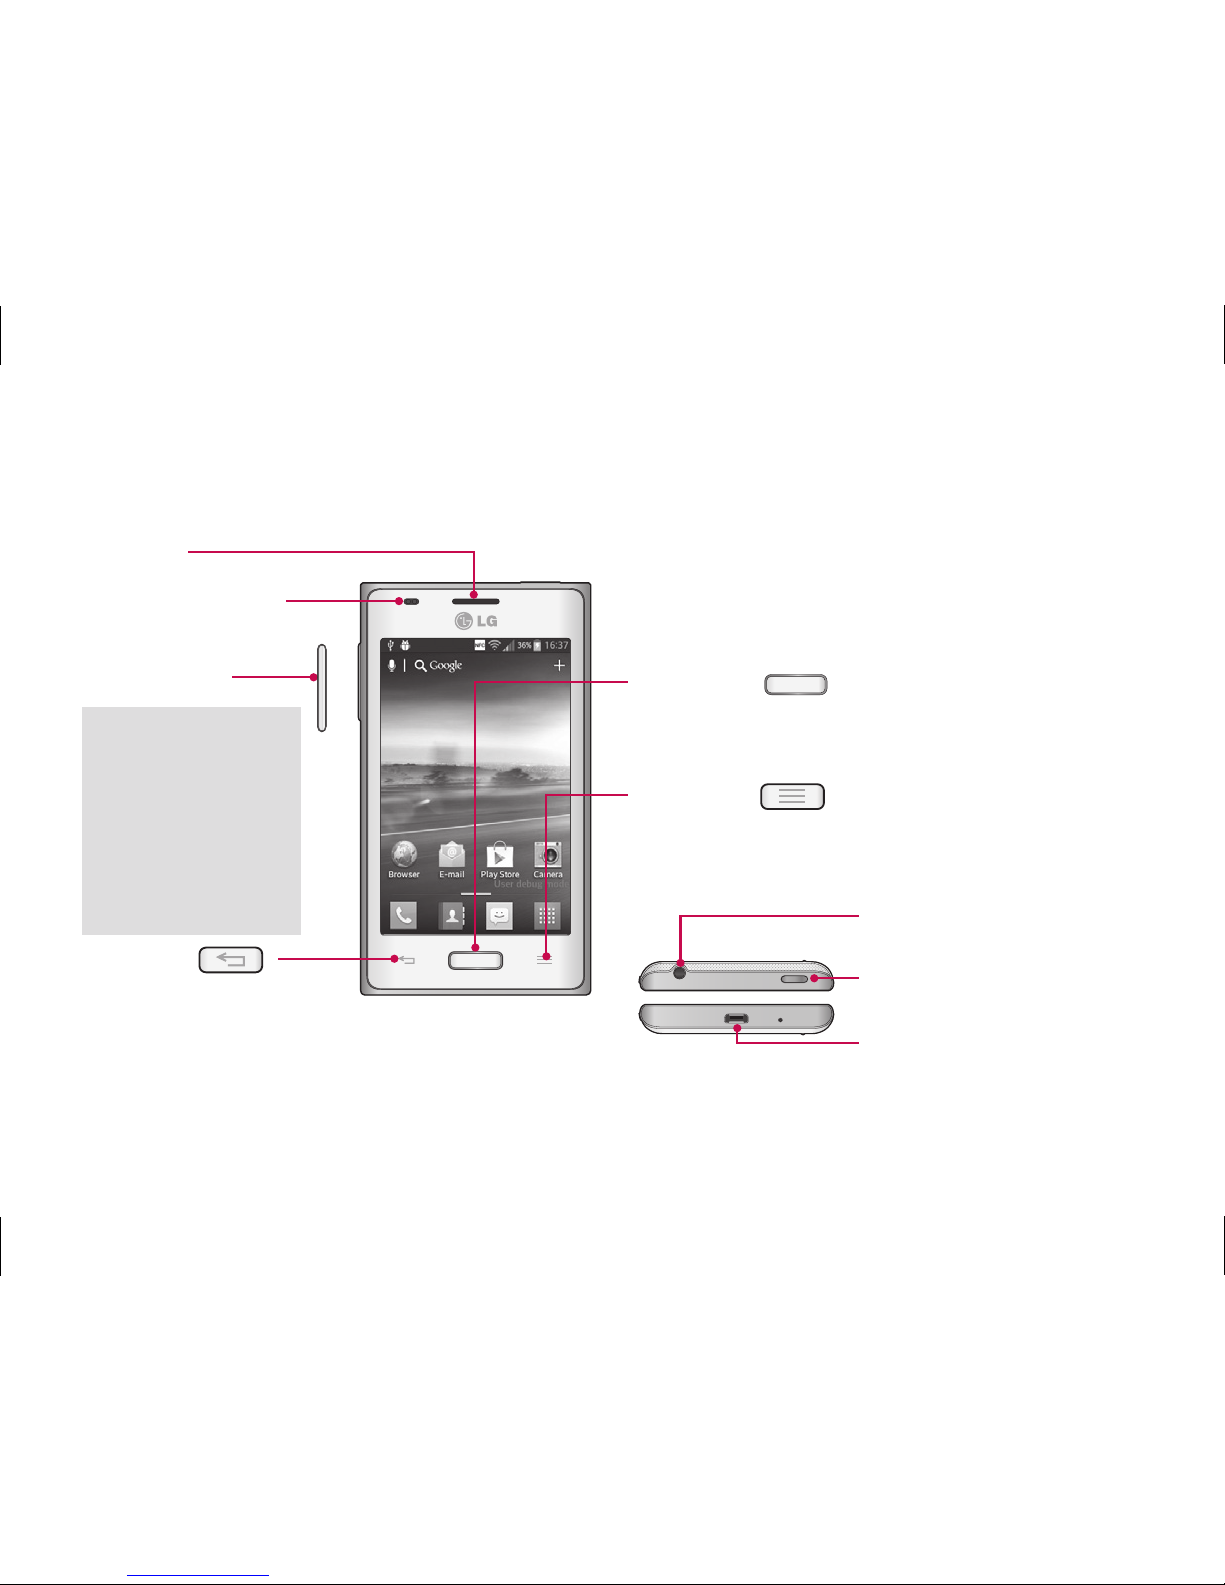
LG-E617g Overview......................................1
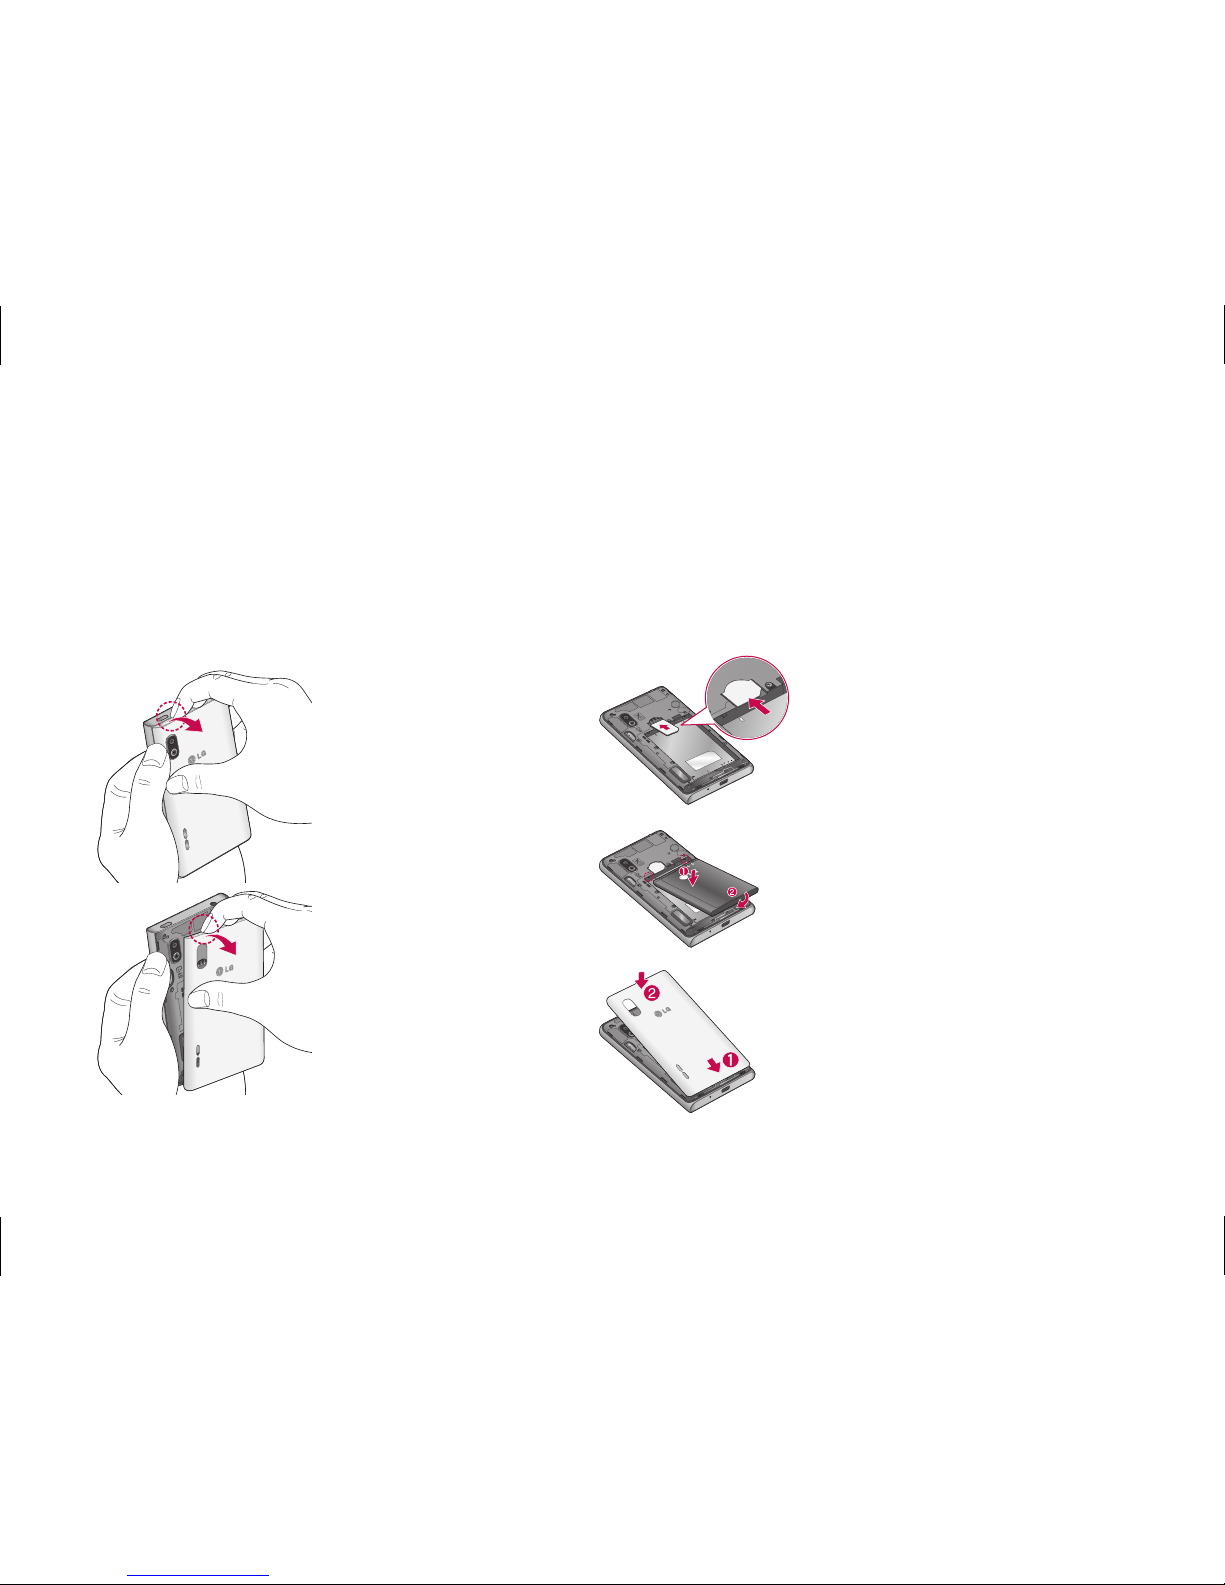
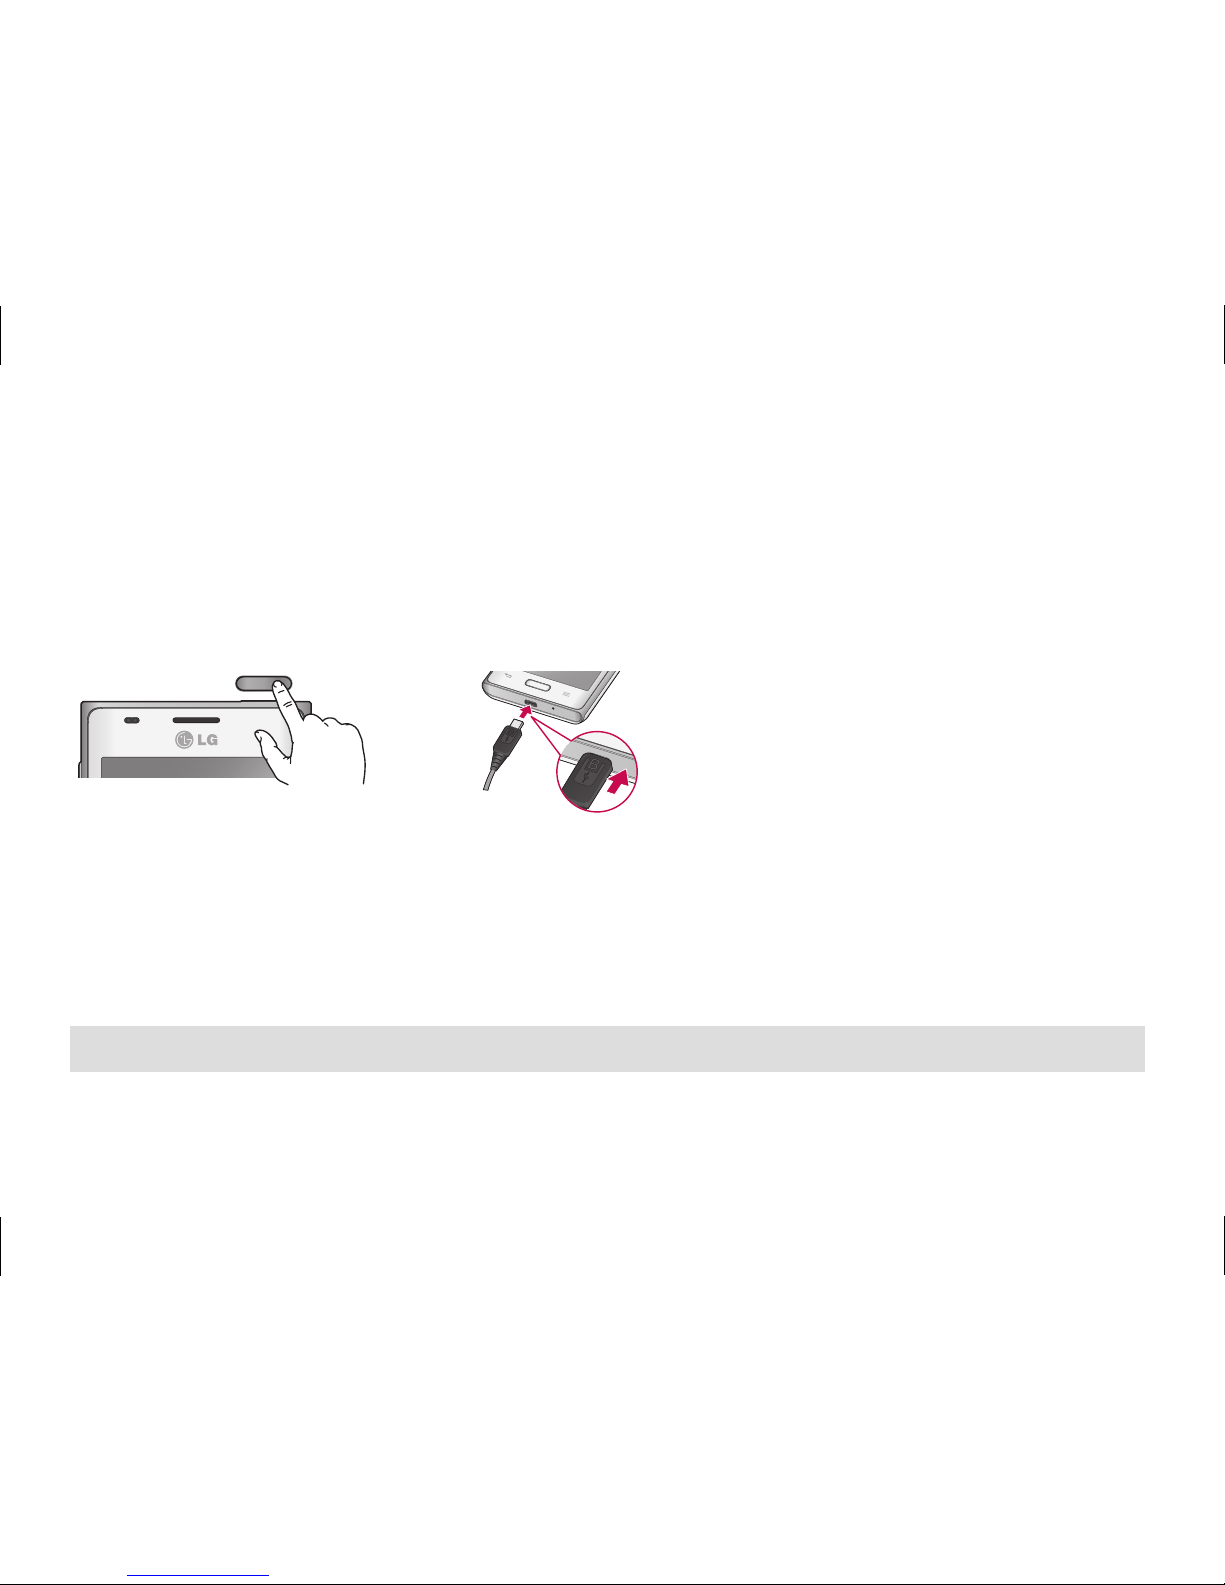
Setup ............................................................2
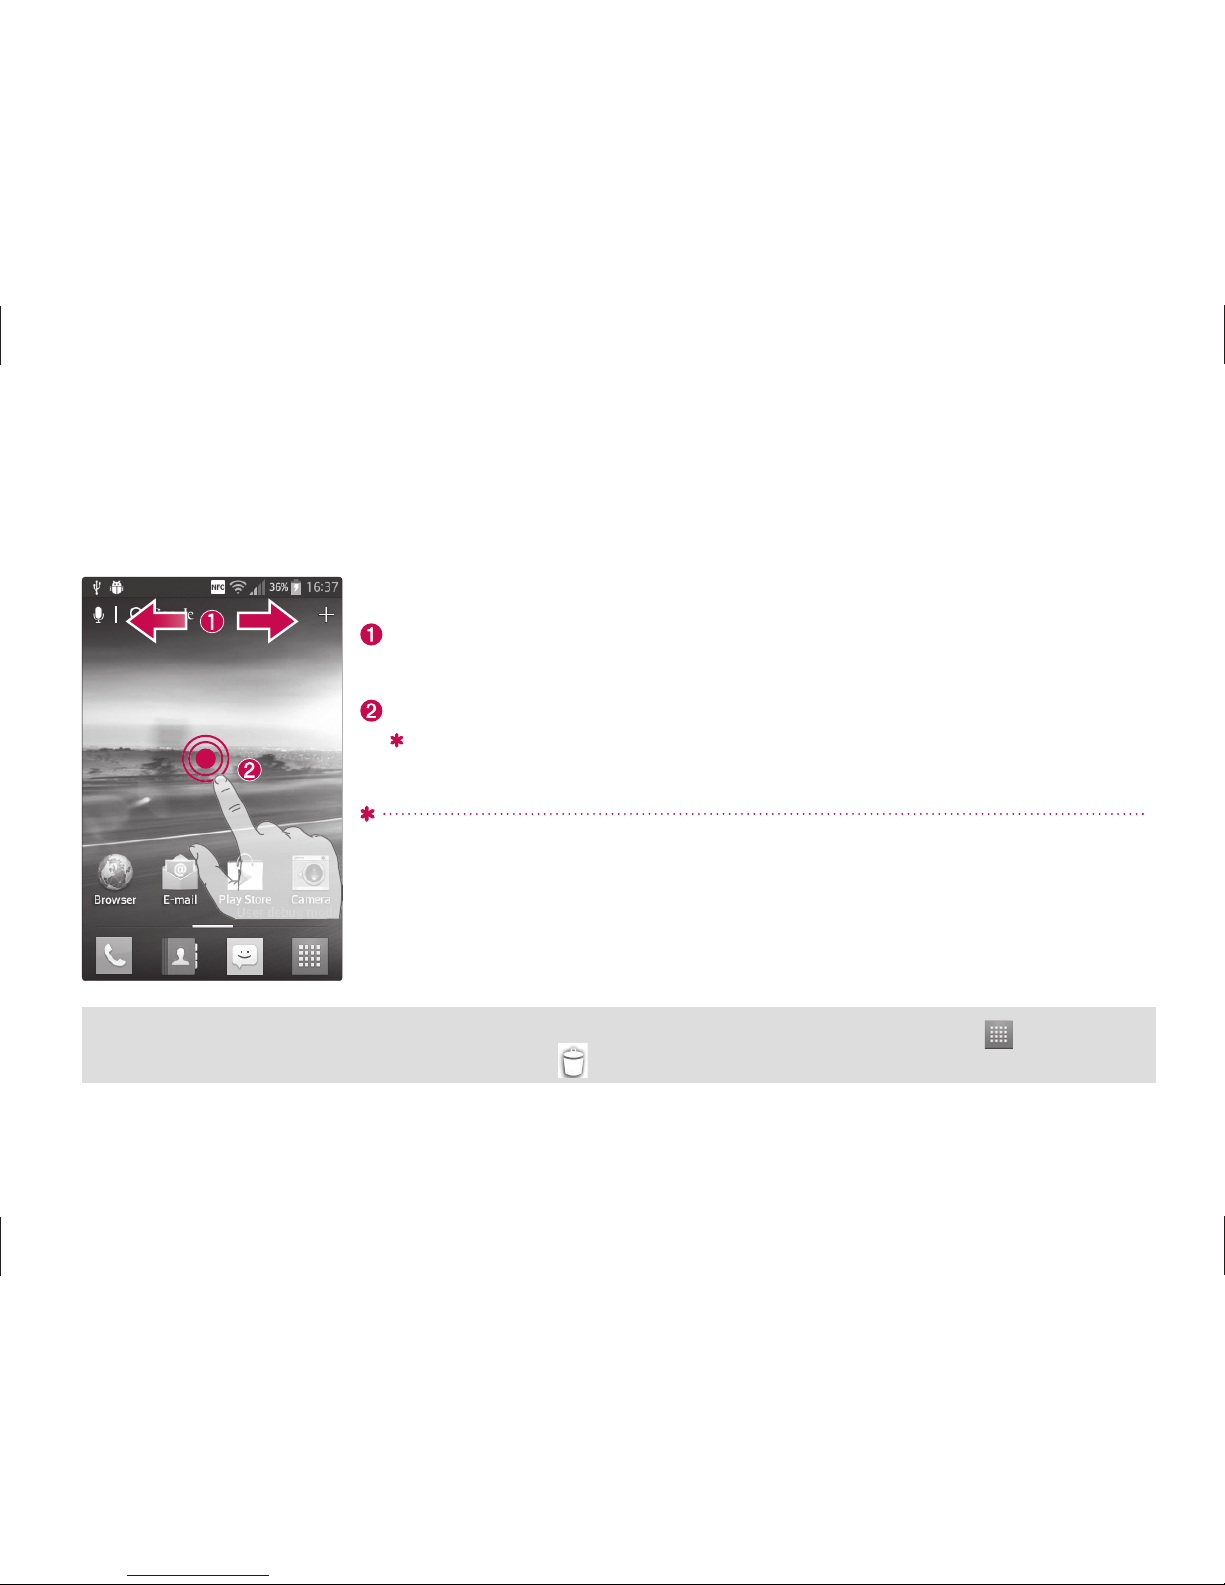
Home screen................................................5
Unlock screen ..............................................6
Notification screen ......................................7
Make a call/send a message ......................8
Contacts .......................................................9
Browser/Maps............................................ 10
Camera ........................................................ 11
Video camera.............................................. 11
Google account.......................................... 12
Downloading applications......................... 13
E-mail.......................................................... 14
QuickMemo................................................ 15
1.
2.
3.
4.
5.
6.
7.
8.
9.
10.
11.
12.
13.
14.
15.
16.
17.
18.
19.
LG Tag+....................................................... 16
Connect your phone with your computer 17
For your safety ........................................... 19
Safety Guidelines ..................................... 28
Technical Data............................................57
NOTE:
• Always use genuine LG accessories. Failure to do
this may void your warranty.
• Accessories may vary in different regions.
• Some features and service may vary by area,
phone, carrier, plan and software version.
• Screen displays and illustrations on this Quick
Start Guide may differ from those you see on
actual phone.
Ti
p
Pr
e
Vo
Vo
fo
r
us
e
fu
n

1
LG-E617g Overview
Proximity Sensor
Earpiece
Menu Key
Display the available options.
Home Key
Return to the Home screen from any screen.
Volume Keys
Back Key
Return to the
previous screen. Charger/USB Port
Earphone Jack
Power/Lock Key
16
17
19
2
8
57
o
Tip!
Press and hold the
Volume Up and
Volume Down Keys
for one second to
use the QuickMemo
function.

2
S
e
To
m
u
In
s
W
A
ca
c
o
U
n
Before you start using the phone, you need to insert the SIM card and battery.
Installing the SIM card and battery
Remove the
battery cover.
1.
Make sure the gold
contact area on the card
is facing downwards.
2.
Insert the battery.
3.
Insert the battery cover.
4.
Setup

3
Setup (continued)
To store multimedia files, such as pictures taken using a built-in camera to SD card, you
must insert a memory card into your phone.
Installing the memory card
Turn the phone off
before inserting or
removing the memory
card. Remove the
battery cover.
1.
Insert the memory
card into the slot.
Make sure the gold
contact area is facing
downwards.
2.
WARNING! Do not insert or remove the memory card when the phone is turned on. Otherwise the memory
card, as well as your phone, may become damaged and the data stored on the memory card may get
corrupted. To remove the memory card safely, touch > Apps tab > Settings > Storage from the DEVICE >
Unmount SD card > OK.
rd
r
.

4
Yo
u
TI
P
a
p
H
o
When you first turn on the phone, you will be guided through a series of essential steps to
configure the phone settings.
Turning on the phone Charging the phone
Press and hold the Power/Lock
key for a couple of seconds.
The charging port is at the bottom of the phone.
Insert one end of the charging cable into the phone
and plug the other end into an electrical socket.
To maximise the battery lifetime, ensure that the battery
is fully charged before you use it for the first time.
•
•
•
TIP! If the phone is locked and does not work, press and hold the Power/Lock key for 10 seconds to turn it off.
Setup (continued)

5
You can customise each screen by adding widgets or shortcuts to your favorite applications.
Adding icons to the Home screen
Swipe your finger right or left to move through the screens.
Stop when you get to a screen that you want to add items to.
Touch and hold an empty area in the Home screen. Touch the
Apps, Downloads, Widgets or Wallpapers option then select
the item you want to add.
Apps: Add applications that are updated dynamically
Downloads: Add direct links to applications
Widgets: Add widgets to organise your contacts/shortcuts
Wallpapers: Change the wallpaper on the current Home screen
TIP! Touch and hold the application you want to add to the Home screen, by selecting it from . To delete an
application, touch and hold it, then drag it to the icon.
Home screen
o
ery
f
f.

6
N
o
After a period of inactivity, to conserve the battery, the screen you are currently viewing will
be replaced by the lock screen.
Unlocking the screen
Press the key.
Swipe the screen any
direction.
Setting up the display
Touch > System
settings.
Select Display > Screen
timeout.
Select the period of time
you want.
1.
2.
3.
NOTE: To lock your
screen using the
pattern lock feature,
touch > System
settings > Lock screen
> Select screen lock >
Pattern. A short tutorial
will guide you through
the process of setting a
pattern lock.
Unlock screen
On
Th
e
Tu
r
To
To
u
1.
2.
TI
P

7
Notification screen
l
e
m
n
al
a
On this screen, you can view and manage Sound, Wi-Fi, Bluetooth, Rotation, etc.
The 'notification drawer' runs across the top of the screen.
Turning features on/off
Touch and slide the notification drawer
downwards.
Touch the icons to turn the
corresponding features on/off.
To view further notification setting
Touch > .
1.
2.
<notification drawer>
TIP! To preserve battery life, turn off Wi-Fi, Bluetooth and GPS when you are not using them.

8
Yo
u
ad
d
C
o
Make a call/send a message
It only takes a few taps to make a call or send a message.
Making a call
Touch .
Dial the number you want to call or start typing the name of the contact by touching .
Sending a message
Touch .
Touch .
Enter the name or number you want to send the message to, or touch to select a
number from your contacts list.
Compose your message and press Send.
NOTE: To answer an incoming call in locked screen, hold and slide icon towards right. When the screen is
unlocked, you just need to touch the icon to answer.
1.
2.
1.
2.
3.
4.

9
You can automatically synchronise the contacts on the phone with any of your online
address books, or even import contacts from another SIM/SD card.
Importing/exporting contacts
Touch .
Touch > Import/Export.
1.
2.
NOTE: To add a number from a recent call to your contacts, locate the number
in your call logs, touch the number. Touch > Create new contact to create a
new contact entry, or touch existing contacts to add a new number to existing
contacts.
Contacts
.
s

10
Use the Web browser to surf the Net with ease. Use Maps during a journey to pinpoint your
location and check for traffic updates en route.
Browsing the Web
Touch > .
Touch .
Enter text.
Scroll up/down or pinch to view the webpage.
Setting up Maps
Touch > .
Set up the connection to Wi-Fi or Mobile data connection/GPS.
1.
2.
3.
1.
2.
Pinch-to-Zoom: use your index finger and thumb in a pinching or spreading
motion to zoom in or out when using the Web browser, a map or pictures.
Browser/Maps
V
i
C
a

11
ur
P
S.
Zoom
Brightness
Shot mode
Flash
Settings
Video mode
Taking a photo
Gallery
Video camera
Zoom
Brightness
Video size
Flash
Settings
Camera mode
Start recording
Gallery
Camera

12
Google account
The first time you open the Google application, you need to sign in. If you do not have a
Google account, you will be prompted to create one.
Creating a Google account
Touch > .
Touch New to start the Gmail setup wizard.
You then need to follow the setup instructions and enter the necessary information to
activate the account. Please wait while the server creates your account.
TIP! Once you have created your Gmail account, you can access Gmail and Google Apps, and use Google's
many services on the phone.
1.
2.
3.
Do
w
TI
P
D
o

13
Download fun games and useful apps from the Android Market.
In home screen
Touch > .
Sign in to your Google account.
Select an app from the list of featured apps or use the search
feature.
Managing applications
Touch > > Apps.
You cannot delete the pre-installed applications.
1.
2.
3.
TIP! Launch the downloaded application from the icon > Downloads tab.
Downloading applications

14
You can stay connected with MS Exchange and other popular email providers.
Setting up an account
Touch > .
Select an email provider.
Enter your email address and password,
then touch Next.
Follow the remaining instructions.
1.
2.
3.
4.
Sending an email
Touch > .
Touch .
Enter your text, touch > Attach
file to attach a file (if needed) and then
touch .
1.
2.
3.
TIP! You can set sound and vibration alerts to notify you when you receive a new email.
E-mail Q
Th
e
p
a
s
t
1.
N
O

15
n
QuickMemo
The QuickMemo function allows you to create memos and capture screen shots.
Enter the QuickMemo screen by
pressing both the Volume Up
and Volume Down Keys for one
second on the screen you want
to capture.
1.
Or touch and
slide the Status
Bar downwards
and touch .
Select the desired
menu option from
Pen type, Colour,
Eraser, and create a
memo.
2.
Touch from
the Edit menu and
select to save
the memo with the
current screen.
3.
NOTE: Please use the tip of your finger while using the QuickMemo function. Do not use your fingernail.

16
LG Tag+
By
us
e
Sy
n
To
sof
(w
w
1.
2.
3.
C
o
LG Tag+ allows easy saving and loading to NFC tag, which can be customized to suit certain
environments.
Using Tag+ writing
Open the LG Tag+ application.
Select the desire mode (Car mode/Office mode/Sleep mode/User
mode) and tap Write on tag.
Touch the back of your device to a tag or a device to share, then
launching application and changing settings can be set.
Using Tag+ reading
When touching the set tag or a device, mode will be activated right away.
1.
2.
3.
TIP! Be careful not to scratch or damage the inside of the battery cover as this is the NFC antenna.
Table of contents
Languages:
Other LG Cell Phone manuals