LG G STYLO User manual

Available applications and services are subject to change at any time.

i
Table of Contents
Introduction 1
GetStarted 2
PhoneLayout 2
microSIMCard 3
HandlingthemicroSIMCard 3
InsertmicroSIMCard 4
microSDCard 6
InsertmicroSDCard 6
UnmountthemicroSDCard 8
RemovemicroSDCard 9
FormatmicroSDCard 9
BatteryUse 9
BatteryCapacity 9
ChargetheBattery 9
TurnYourPhoneOnandOff 11
UsetheTouchscreen 11
ActivateYourPhone 15
CompletetheSetupScreens 16
BasicOperations 18
Basics 18
HomeScreenandApplicationsList 18
SelectOptionsandNavigateScreens 18
MenuOperations 18
PhoneSettingsMenu 18
PortraitandLandscapeScreenOrientation 18
CaptureScreenshots 19
Applications 19
PhoneNumber 21
EnterText 21
QWERTYKeyboard 22
PhoneKeyboard 23
TipsforEditingText 24
SearchYourPhoneandtheWeb 27

ii
PhoneandWebSearchUsingTextEntry 27
PhoneandWebSearchUsingVoiceCommand 28
UsingClipTray 28
GoogleAccount 29
CreateaGoogleAccount 29
SignintoYourGoogleAccount 29
GooglePlayStore 30
FindandInstallanApplication 30
ReinstallanApplication 31
LockandUnlockYourScreen 31
UnlockYourScreenUsingtheKnockCodeFeature 32
UpdateYourPhone 33
UpdatePRL 33
UpdateProfile 33
UpdateFirmware 34
UpdateLGSoftware 34
UICCUnlock 34
YourPhoneInterface 35
HomeScreenBasics 35
HomeScreenLayout 35
ExtendedHomeScreens 36
StatusBar 36
NotificationsWindow 39
CustomizetheHomeScreen 39
CreateShortcuts 40
AddandRemoveWidgetsontheHomeScreen 40
ChangethePhone'sWallpaper 41
CustomizeApplicationsIconsontheHomeScreen 42
PhoneApp 43
PlaceandAnswerCalls 43
CallUsingthePhoneDialer 43
AnswerPhoneCalls 44
In-CallScreenLayoutandOperations 44
PlaceCallsfromContacts/CallHistory 46
PlaceaCallfromContacts 46
CallfromCallLogs 46
OptionalServices 46

iii
VoicemailSetup 47
VisualVoicemail 47
SetUpVisualVoicemail 47
ReviewVisualVoicemail 48
VisualVoicemailOptions 48
ConfigureVisualVoicemailSettings 49
ChangeYourMainGreetingviatheVoicemailMenu 50
CallerIDBlocking 50
CallWaiting 50
ConferenceCalling 51
CallForwarding 51
CallSettings 52
Contacts 53
AddaContact 53
CheckContacts 54
EditaContact 54
DeleteaContact 55
SharingContacts 55
JoinandSeparateContacts 55
ImportandBackUpContacts 56
ImportContactsfromamicroSDCardorUSBStorage 56
ImportContacts 56
BackUpContacts 56
MessagingandInternet 57
TextandMultimediaMessaging 57
ComposeTextMessages 57
ReadandReplytoTextMessages 58
SendaMultimediaMessage(MMS) 58
SaveandResumeaDraftMessage 59
ManagingMessageConversations 59
TextandMultimediaMessageOptions 61
CreateandSendGmail 63
CreateaGoogleAccount 63
SignintoYourGoogleAccount 63
AccessGmail 64
SendaGmailMessage 64
ReadandReplytoGmailMessages 65

iv
Email 66
AddanEmailAccount(POP3orIMAP) 66
CorporateEmail(Outlook) 66
OpenEmail 67
CreateandSendEmail 68
ReplytoorDeleteanEmailMessage 68
ConfigureandSyncCorporateEmailSettings 69
DataServicesGeneralInformation(SprintSparkLTEand3GNetworks) 71
SprintSparkLTE 71
YourUserName 71
DataConnectionStatusandIndicators 72
Browser 72
LearntoNavigatetheBrowser 72
GotoaSpecificWebsite 73
BrowserMenu 74
AdjustBrowserSettings 74
ConfigureWebsiteSettings 75
CreateBookmarks 75
ChromeBrowser 76
CameraandVideo 78
TakePicturesandRecordVideos 78
TakePictures 78
RecordVideos 79
CameraandVideoSettings 79
Multi-pointAuto-focus 80
GestureShot 80
ViewYourPictures 80
GalleryOptions 81
AssignPictures 81
VideoOptions 82
DualPlay 83
UsefulAppsandFeatures 84
Navigation 84
GoogleMaps 84
Scout 84
GoogleHangouts 85
SprintZone 86

v
QuickMemo+ 86
DualWindow 87
Music 87
GooglePlayMusic 88
MusicPlayer 88
BackUpYourDownloadedMusicFiles 89
Calendar 89
ChangeCalendarView 90
ViewEventDetails 90
CreateanEvent 90
EditorDeleteanEvent 91
SetanEventReminder 91
RespondtoanEventReminder 92
DisplayandSynchronizeCalendars 92
ChangeCalendarSettings 92
Folders 93
Clock 94
AdditionalClockFeatures 95
Calculator 96
Connectivity 97
ConnectionsOptimizer 97
TransferFilesBetweenYourPhoneandaComputer 98
Wi-Fi 99
TurnWi-FiOnandConnecttoaWirelessNetwork 99
Wi-FiSettings 100
DisconnectWi-Fi 100
Wi-FiDirect 100
Wi-FiHotspot 101
Tethering 101
Bluetooth 102
BluetoothInformation 102
EnabletheBluetoothFeature 102
PairBluetoothDevices 103
ConnecttoaPairedBluetoothDevice 103
SendInformationUsingBluetooth 104
ReceiveDataviaBluetooth 104
SmartShare 105

vi
EnjoyContentViaaVarietyofDevices 105
EnjoyContentfromNearbyDevices 106
UsingContentfromtheCloud 107
VirtualPrivateNetworks(VPN) 107
PrepareYourPhoneforVPNConnection 108
SetUpSecureCredentialStorage 108
AddaVPNConnection 108
ConnecttoorDisconnectFromaVPN 108
Settings 110
NetworksSettings 110
AirplaneMode 110
Wi-Fi 110
Bluetooth 110
MobileData 110
Call 111
Share&Connect 111
MoreSettings 112
SoundSettings 113
SoundProfile 113
Volume 113
Ringtone 113
SoundwithVibration 114
VibrateType 114
Interruptions 114
LockScreen 115
Apps 115
MoreSettings 115
DisplaySettings 116
HomeScreen 116
LockScreen 117
HomeTouchButtons 120
FontType 120
FontSize 121
Brightness 121
Auto-RotateScreen 121
ScreenTimeout 121
MoreSettings 122

vii
GeneralSettings 122
Language&Input 122
Location 123
Accounts&Sync 123
Cloud 123
Accessibility 124
ShortcutKey 126
Security 126
QuickCircleCase 128
DualWindow 128
Date&Time 128
Storage 128
Battery&Powersaving 128
ActivateThisDevice 129
SystemUpdates 129
Apps 129
DefaultMessageApp 130
Backup&Reset 130
AboutPhone 131
CopyrightInformation 131
ForAssistance 132
SprintAccountInformationandHelp 132
SprintAccountPasswords 132
ManageYourAccount 132
SprintSupportServices 133
Index 134

Introduction 1
Introduction
Thefollowingtopicsdescribethebasicsofusingthisguideandyournewphone.
About the User Guide
ThankyouforpurchasingyournewLGGStylo.Thefollowingtopicsexplainhowbesttousethis
guidetogetthemostoutofyourphone.
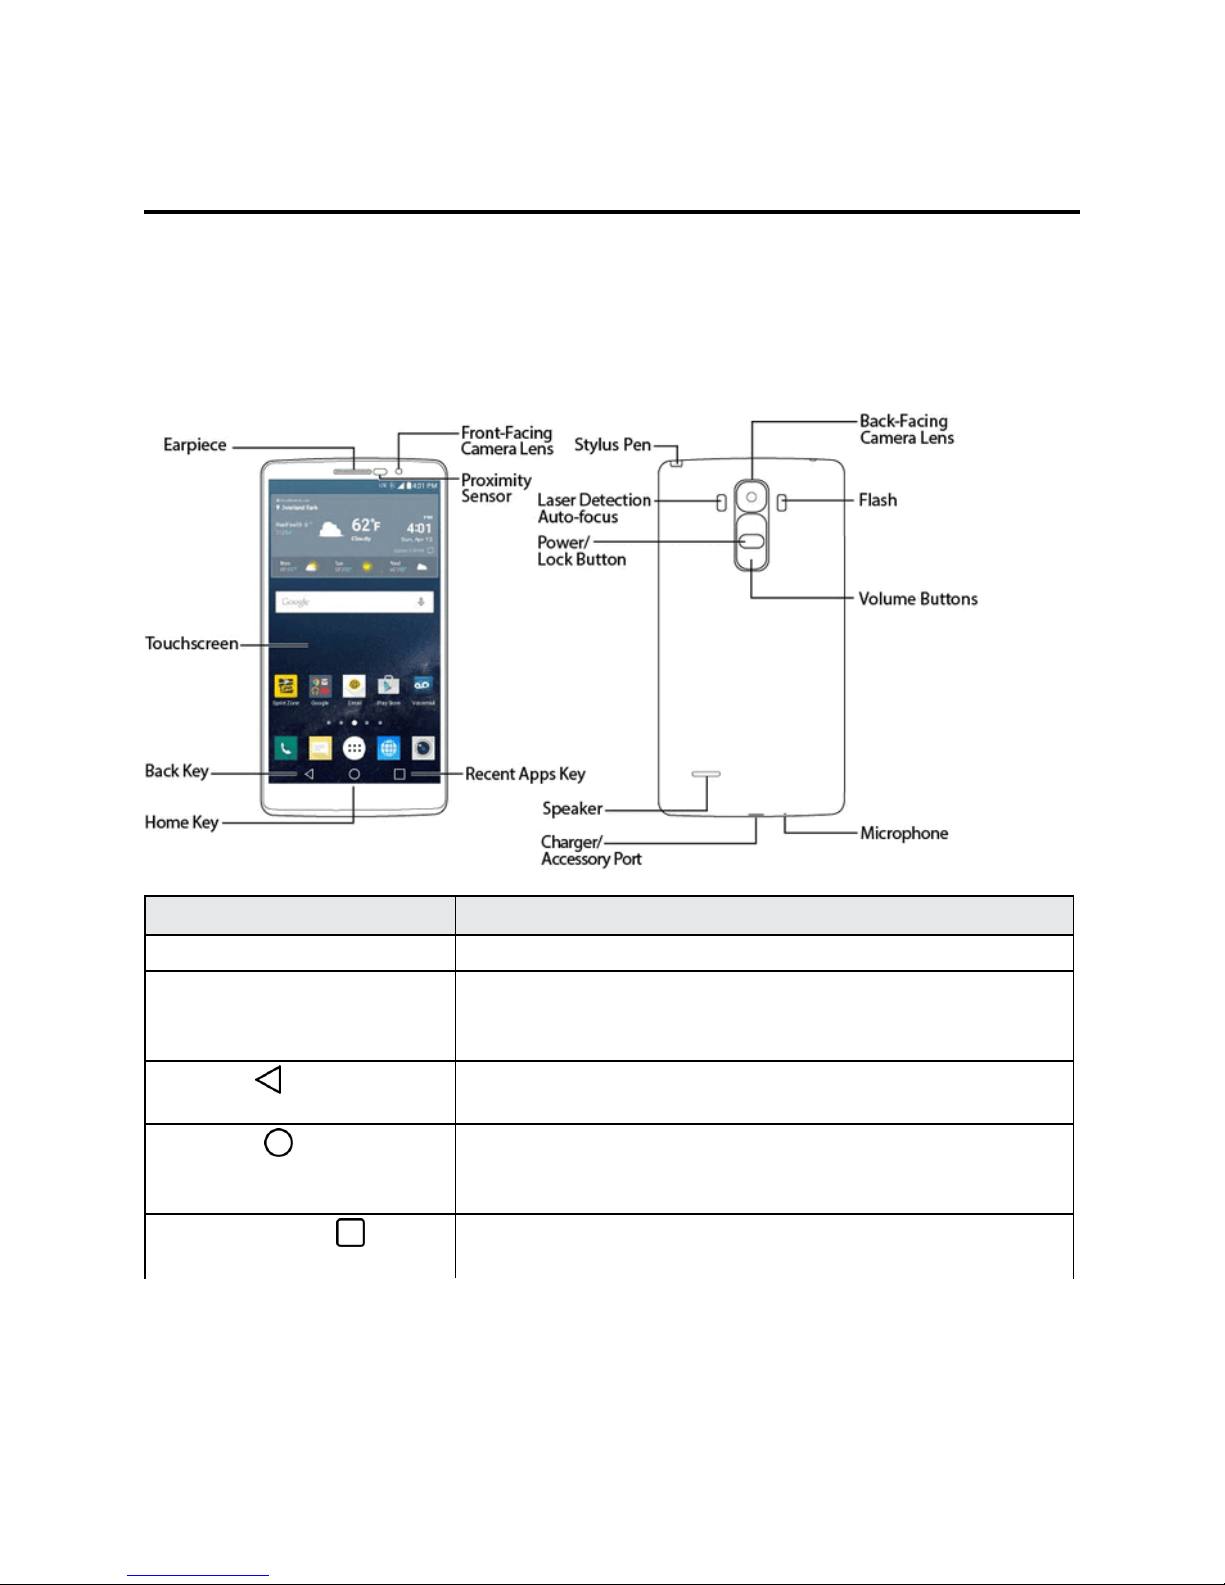
Before Using Your Phone
ReadGetStartedandBasicOperationsthoroughlyforproperusage.
Accessibleservicesmaybelimitedbysubscriptioncontractconditions.
Descriptions in the User Guide
Notethatmostdescriptionsinthisguidearebasedonyourphone'ssetupatthetimeofpurchase.
Unlessotherwisenoted,instructionsbeginfromthephone'shomescreen,whichisdisplayedby
pressing .Someoperationdescriptionsmaybesimplified.
Screenshots and Key Labels
Screenshotsintheuserguidemayappeardifferentlyonyourphone.Keylabelsintheuserguideare
simplifiedfordescriptionpurposesanddifferfromyourphone'sdisplay.
Other Notations
Intheuserguide,thephonemaybereferredtoeitheras"phone,""device,"or"handset."A
microSD™ormicroSDHC™cardisreferredtoasan"SDCard"ora"memorycard."

Get Started 2
Get Started
ThefollowingtopicsprovidealltheinformationyouneedtosetupyourphoneandSprintservicefor
thefirsttime.
Phone Layout
Thefollowingillustrationoutlinesyourphone’sprimaryexternalfeaturesandbuttons.
Part Description
Earpiece Letsyouhearthecallerandautomatedprompts.
Touchscreen Displaysalltheinformationneededtooperateyourphone,such
astheapplications,callstatus,theContactslist,thedateand
time,andthesignalandbatterystrength.
Back Key Returnstothepreviousscreen.Italsoclosespop-updisplay
itemssuchasmenusanddialogboxes.
Home Key ReturnstotheHomescreen.Ifyou'realreadyviewingoneof
extensioncanvases,itopensthecentralHomescreen.Touch
andholdtoaccessGoogleNow.
Recent Apps KeyAllowsyoutoaccessrecently-usedapps.Touchandholdto
accesstheavailableoptions.

Get Started 3
Part Description
Proximity Sensor Sensesproximitytowardsotherobjects(suchasyourhead)so
thattouchcommandsarenotaccidentallyactivatedduringacall.
Note:Pleasebecarefulnottocoverthesensorswitha
protectivefilm,pouch,oraprotectivecasenotauthorizedbyLG.
Front-Facing Camera Lens Allowsyoutotakepicturesandvideoofyourself.Alsoletsyou
participateinvideochats.
Stylus Pen Allowsyoutousestyluspen.
Laser Detection Auto-focus Longandshortdistancefocusarequicklyandaccuratelyaligned
whentakingpicturesorrecordingvideowiththeback-facing
camera.
Power/Lock Button Locksthescreen.Pressandholdtoopenthephoneoptions
menuforthefollowingoptions:Poweroff,Poweroffandrestart,
andTurnon/offAirplanemode.
Speaker Letsyouhearthedifferentringersandsounds.Thespeakeralso
letsyouhearthecaller’svoiceinspeakerphonemode.
Charger/Accessory Port AllowsyoutoconnectthephonechargeroranoptionalUSB
cable.
Microphone Transmitsyourvoiceforphonecallsorrecordsyourvoiceor
ambientsoundsforvoicerecordingsandvideos.
Volume Buttons Allowyoutoadjusttheringerandmediavolumes,ortoadjustthe
in-callvolumeduringacall.
Flash Helpsyoutakepicturesandvideoindimlighting.
Back-Facing Camera Lens Letsyoutakepicturesandrecordvideos.
CAUTION!Insertinganaccessoryintotheincorrectjackmaydamagethephone.
microSIM Card
ThemicroSIMcardisanIC(IntegratedCircuit)cardcontainingphonenumberandothercustomer
information.
Handling the microSIM Card
KeepthefollowinginmindwhenhandlingamicroSIMcard.
n CustomerisresponsibleforanydamagecausedbyinsertingmicroSIMcardinanother-brandIC
cardreader,etc.Thecompanyisnotresponsibleinsuchcase.
n AlwayskeeptheICchipclean.
n Wipecleanwithadry,softcloth.
n Avoidapplyinglabels.MaydamagethemicroSIMcard.

Get Started 4
n SeeinstructionsincludedwiththemicroSIMcardforhandling.
n ThemicroSIMcardisthepropertyofthecompany.
n ThemicroSIMcardisreplaceable(atcost)incaseofloss/damage.
n ReturnthemicroSIMcardtothecompanywhencancellingyoursubscription.
n ReturnedmicroSIMcardsarerecycledforenvironmentalpurposes.
n NotethatmicroSIMcardspecificationsandperformancemaychangewithoutnotice.
n ItisrecommendedthatyoukeepaseparatecopyofinformationthatisstoredonthemicroSIM
card.Thecompanyisnotresponsiblefordamagesfromstoredinformationthatislost.
n AlwaysfollowemergencyprocedurestosuspendserviceifyourmicroSIMcardorphone
(microSIMcardinserted)islost/stolen.Fordetails,contactCustomerService.
n Alwayspoweroffthephonebeforeinserting/removingamicroSIMcard.
Insert microSIM Card
FollowtheseinstructionstoinsertamicroSIMcard.Remembertopoweroffyourphonebefore
insertingamicroSIMcard.
1. Removethebackcover.
l Liftgentlyinthedirectionshown.
2. InsertthemicroSIMcard.

Get Started 5
l InsertgentlywithgoldICchipfacingdownward.
3. Insertthebattery.

Get Started 6
4. Attachthebackcover.
l Makesureallthetabsaresecureandtherearenogapsaroundthecover.
microSD Card
YourphonesupportstheuseofanoptionalmicroSDcard(notincluded)toexpanditsstorage
capacity.Somecardsmaynotoperateproperlywithyourphone.
microSD card Cautions
Data:InformationstoredonthemicroSDcardcanbecomelostorchangedaccidentlyorasa
resultofdamage.Itisrecommendedthatyoukeepaseparatecopyofimportantdata.The
companyisnotresponsiblefordamagesfromdatathatislostorchanged.
Reading/Writing Data:Neverpowerofforremovethebatterywhilereadingorwritingdata.
Handling microSD card:Use/storemicroSDcardsawayfromthereachofinfants.Maycause
chokingifswallowed.
Insert microSD Card
FollowthesestepstoinsertanoptionalmicroSDcard(notincluded).Makesuretopoweryour
phoneoffbeforeinsertingorremovingamicroSDcard.
1. Removethebackcover.

Get Started 7
l Liftgentlyinthedirectionshown.
2. InsertthemicroSDcard.
l InsertthemicroSDcardallthewaygentlywithoutbendingandwiththeterminalsfacing
down.
l InsertonlymicroSDcards.
3. Insertthebattery.

Get Started 8
4. Attachthebackcover.
l Makesureallthetabsaresecureandtherearenogapsaroundthecover.
Unmount the microSD Card
AlwaysunmountthemicroSDcardbeforeremovingitfromyourphone.
1. Tap > >Settings >Generaltab.
2. TapStorage.
3. TapUnmount SD card.
l ThemenuoptionnamechangesfromUnmount SD cardtoMount SD card.Thecardis
nowunmounted.

Get Started 9
Remove microSD Card
FollowtheseinstructionstoremoveamicroSDcard.Alwayspowerthephoneoffbeforeinsertingor
removingamicroSDcard.
1. Tap > >Settings >Generaltab.
2. TapStorage.
3. TapUnmount SD card.
4. Removethebackcover.
5. SlidethemicroSDcardoutoftheslottoremoveit.
6. Attachthebackcover.
Format microSD Card
WhenyouinsertanoptionalmicroSDcardforthefirsttime,itisrecommendedthatyouformatiton
yourphone.
1. Tap > >Settings >Generaltab.
2. TapStorage.
3. TapErase SD card.
4. TapErase SD cardagain.
5. TapErase SDcardonelasttimetoconfirm.
l AlldataonthemicroSDcardiserased,andthecardisformattedforuseonyourphone.
Battery Use
Thefollowingtopicsexplainhowtochargeyourphone’sbattery.
Battery Capacity
YourphoneisequippedwithaLi-Ionbattery.Itallowsyoutorechargeyourbatterybeforeitisfully
drained.Thebatteryprovidesupto23hoursofcontinuousdigitaltalktime.
Charge the Battery
Followtheseinstructionstochargeyourphone’sbatteryusingeithertheincludedACadapterorvia
aUSBconnectiononyourcomputer.

Get Started 10
Charge Using the AC Adapter
1. PlugtheUSBconnectorintothecharger/accessoryportatthebottomofyourphone.
2. PlugtheotherendoftheUSBcableintotheACadapter.
3. PlugtheACadapterintoanelectricaloutlet.
l Theindicatorlightilluminateswhenchargingstarts.Thelightgoesoffwhenthebatteryis
fullycharged.Fullychargingabatterymaytakeuptothreehours.
4. Aftercharging,disconnectthephonefromthecharger.
l UnplugtheACadapterfromtheoutlet,andremovethemicroUSBcablefromthephone
andtheACadapter.
Note:Alwaysunplugthechargerfromthewallsocketafterthephoneisfullychargedtosave
unnecessarypowerconsumptionofthecharger.
Charge Using a PC Connection
BeforeusingaPCconnectiontochargeyourphone,ensurethatthecomputeristurnedon.
Dependingonthetypeofconnection,yourphone’sbatterymaynotcharge.
1. InsertthesmallendofthemicroUSBcordintothecharger/accessoryportatthebottomofyour
phone.
2. InsertthelargeendofthemicroUSBcordintoanexternalUSBportonyourcomputer.
3. Aftercharging,removethemicroUSBcablefromboththephoneandthecomputer.

Get Started 11
Turn Your Phone On and Off
Theinstructionsbelowexplainhowtoturnyourphoneonandoff.
Turn Your Phone On
n PressandholdthePower/LockButton.
Yourphonewillpoweron.Dependingonthesettings,youmayseethelockscreen.
l SeeLockandUnlockYourScreenandSelectScreenLockforinformationaboutusingthe
screenlock.
l Thefirsttimeyouturnthephoneon,youwillseethesetupscreens.SeeCompletetheSetup
Screensfordetails.
l Ifyourphoneisnotyetactivated,seeActivateYourPhoneformoreinformation.
Turn Your Phone Off
1. PressandholdthePower/LockButtontoopenthephoneoptionsmenu.
2. TapPower offtoturnthephoneoff.
3. TapOKtoconfirm.
Yourphonewillpoweroff.
Yourscreenremainsblankwhileyourphoneisoff(unlessthebatteryischarging).
Tip:TheKnockONfeatureallowsyoutodouble-tapthescreentoeasilyturnitonoroff.
Use the Touchscreen
Yourphone’stouchscreenletsyoucontrolactionsthroughavarietyoftouchgestures.
Tap or Touch
Whenyouwanttotypeusingtheonscreenkeyboard,selectitemsonscreensuchasapplicationand
settingsicons,orpressonscreenbuttonsbysimplytappingortouchingthemwithyourfinger.

Get Started 12
Touch and Hold
Toopentheavailableoptionsforanitem(forexample,acontactorlinkinaWebpage),touchand
holdtheitem.
Swipe or Slide
Toswipeorslidemeanstoquicklydragyourfingerverticallyorhorizontallyacrossthescreen.
Other manuals for G STYLO
9
Table of contents
Other LG Cell Phone manuals