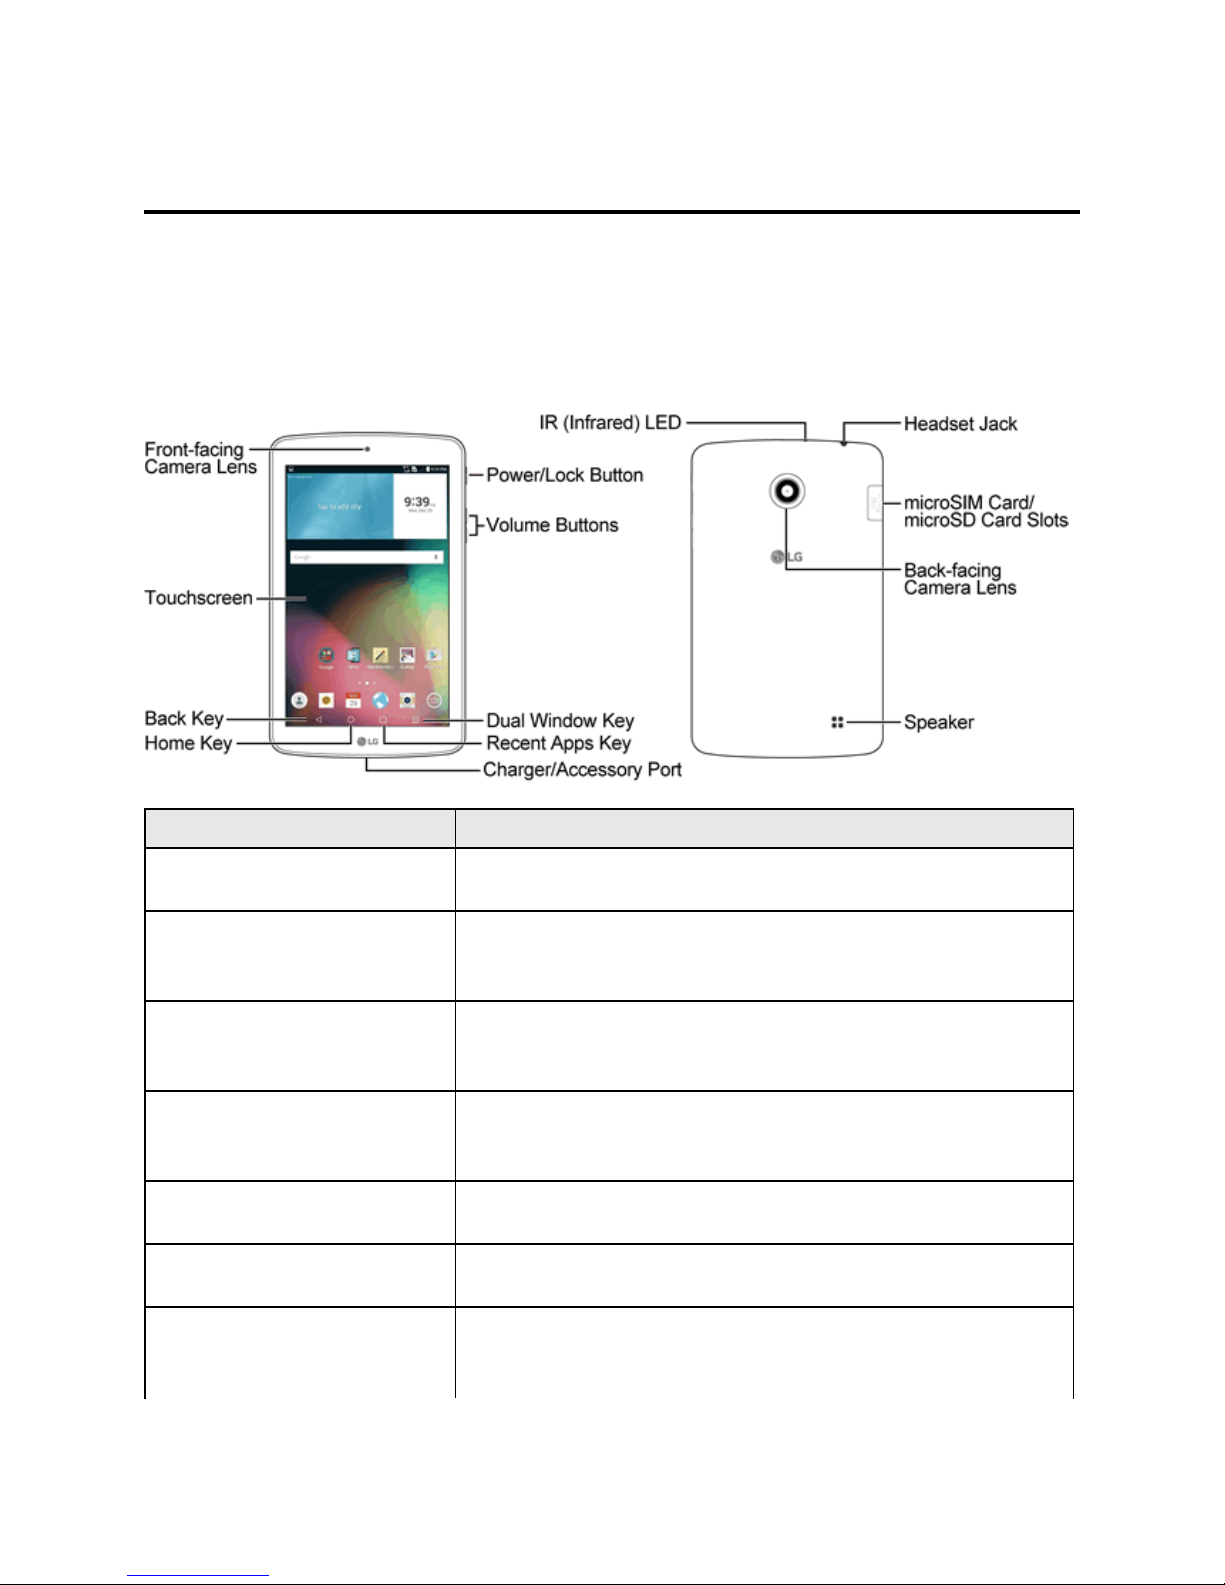
LG GPad F 7.0 User manual

Available applications and services are subject to change at any time.

i
Table of Contents
GetStarted 1
TabletLayout 1
microSIMCard 2
HandlingthemicroSIMCard 2
InsertmicroSIMCard 3
microSDCard 3
InsertmicroSDCard 4
UnmountthemicroSDCard 4
RemovemicroSDCard 5
FormatmicroSDCard 5
ChargetheBattery 5
TurnYourTabletOnandOff 7
UsetheTouchscreen 7
ActivateYourTablet 11
CompletetheSetupScreens 12
BasicOperations 14
Basics 14
HomeScreenandApplications(Apps)List 14
SelectOptionsandNavigateScreens 14
MenuOperations 14
TabletSettingsMenu 14
PortraitandLandscapeScreenOrientation 14
CaptureScreenshots 15
Applications 15
EnterText 17
TipsforEditingText 19
SearchYourTabletandtheWeb 21
TabletandWebSearchUsingTextEntry 22
TabletandWebSearchUsingVoiceCommand 23
UsingClipTray 23
GoogleAccount 23
CreateaGoogleAccount 23
SignintoYourGoogleAccount 24

ii
GooglePlayStore 24
LockandUnlockYourScreen 26
UnlockYourScreenUsingtheKnockCodeFeature 26
UpdateYourTablet 27
UpdateProfile 27
UpdateFirmware 27
UpdateLGSoftware 28
UICCUnlock 28
YourTabletInterface 29
HomeScreenBasics 29
HomeScreenLayout 29
ExtendedHomeScreens 30
StatusBar 30
NotificationsWindow 32
CustomizetheHomeScreen 33
CreateShortcuts 33
AddandRemoveWidgetsontheHomeScreen 34
ChangetheTablet'sWallpaper 35
CustomizeApplicationsIconsontheHomeScreen 35
Contacts 37
AddaContact 37
CheckContacts 37
EditaContact 38
DeleteaContact 38
ImportContacts 38
ImportContactsfromanmicroSDcardorUSBStorage 38
ImportContactsFromYourInternalStorage 38
ExportContactstoYourInternalStorage 39
SharingContacts 39
JoinandSeparateContacts 39
MessagingandInternet 41
CreateandSendGmail 41
CreateaGoogleAccount 41
SignintoYourGoogleAccount 41
AccessGmail 42
SendaGmailMessage 42
ReadandReplytoGmailMessages 43

iii
Email 44
AddanEmailAccount(POP3orIMAP) 44
CorporateEmail(Outlook) 44
OpenEmail 45
CreateandSendEmail 45
ReplytoorDeleteanEmailMessage 46
ConfigureandSyncCorporateEmailSettings 46
DataServicesGeneralInformation(SprintSparkLTE) 49
SprintSparkLTE 49
DataConnectionStatusandIndicators 49
Browser 50
LearntoNavigatetheBrowser 50
GotoaSpecificWebsite 51
BrowserMenu 51
AdjustBrowserSettings 52
CreateWebsiteSettings 52
CreateBookmarks 53
CameraandVideo 55
TakePictures 55
RecordVideos 55
CameraandVideoSettings 56
Multi-pointAuto-focus 56
GestureShot 56
ViewYourPictures 57
GalleryOptions 57
AssignPictures 58
VideoOptions 58
LiveZoom 59
DualPlay 60
UsefulFeatures 61
Navigation 61
GoogleMaps 61
Scout 61
Hangouts 62
QPair 63
PeelSmartRemote 63
QuickMemo+ 64

iv
DualWindow 65
Music 66
GooglePlayMusic 66
MusicPlayer 66
BackUpYourDownloadedMusicFiles 67
Calendar 68
OpentheCalendar 68
ChangeCalendarView 68
ViewEventDetails 68
CreateanEvent 69
EditorDeleteanEvent 69
SetanEventReminder 70
RespondtoanEventReminder 70
DisplayandSynchronizeCalendars 70
ChangeCalendarSettings 71
Folders 71
Clock 72
Calculator 74
Connectivity 75
ConnectionsOptimizer 75
ConnecttoaPCviaUSB 75
Wi-Fi 77
TurnWi-FiOnandConnecttoaWirelessNetwork 77
Wi-FiSettings 77
DisconnectWi-Fi 78
Wi-FiDirect 78
Wi-FiHotspot 79
Tethering 79
Bluetooth 80
BluetoothInformation 80
EnabletheBluetoothFeature 80
PairBluetoothDevices 80
ConnecttoaPairedBluetoothDevice 81
SendInformationUsingBluetooth 82
ReceiveDataviaBluetooth 82
SmartShare 83
EnjoyContentViaaVarietyofDevices 83

v
EnjoyContentfromNearbyDevices 84
VirtualPrivateNetworks(VPN) 85
PrepareYourTabletforVPNConnection 85
SetUpSecureCredentialStorage 85
AddaVPNConnection 85
ConnecttoorDisconnectFromaVPN 85
Settings 87
WirelessNetworksSettings 87
AirplaneMode 87
Wi-Fi 87
Bluetooth 87
MobileData 87
Share&Connect 88
MoreSettings 89
DeviceSettings 91
Sound 91
Display 93
HomeScreen 96
LockScreen 97
Storage 100
Battery 100
SmartCleaning 101
Apps 101
DualWindow 102
PersonalSettings 102
Accounts&Sync 102
Location 102
Security 103
Language&Input 104
Backup&Reset 105
SystemSettings 106
ShortcutKey 106
Date&Time 106
Accessibility 106
ActivateThisDevice 108
SystemUpdates 109
Printing 109

vi
AboutTablet 109
CopyrightInformation 110
ForAssistance 111
SprintAccountInformationandHelp 111
SprintAccountPasswords 111
ManageYourAccount 111
Index 112

Get Started 1
Get Started
ThefollowingtopicsgiveyoualltheinformationyouneedtosetupyourtabletandSprintservicefor
thefirsttime.
Tablet Layout
Thefollowingillustrationoutlinesyourtablet’sprimaryexternalfeaturesandbuttons.
Part Description
Front-Facing Camera Lens Allowsyoutotakepicturesandvideoofyourself.Alsoletsyou
participateinvideochats.
Touchscreen Displaysalltheinformationneededtooperateyourtablet,such
astheapplications,theContactslist,thedateandtime,andthe
signalandbatterystrength.
Back Key Returnstothepreviousscreen.Italsoclosespop-updisplay
itemssuchasmenusanddialogboxes.Touchandholdto
accesstheDualwindowfeature.
Home Key ReturnstotheHomescreen.Ifyou'realreadyviewingoneof
extensioncanvases,itopensthecentralHomescreen.Touch
andholdtoaccessGoogleNow.
Charger/Accessory Port AllowsyoutoconnectthetabletchargeroranoptionalUSB
cable.
Recent Apps Key Allowsyoutoaccessrecently-usedapps.Touchandholdto
accesstheavailableoptions.
Dual Window Key Allowsyoutochangetodualwindowmode.Itallowsyouto
managetwodifferentappsatthesametimebysplittingthe
screenintwo.

Get Started 2
Part Description
Volume Buttons Allowyoutoadjusttheringerandmediavolumes.
Power/Lock Button Locksthescreen.Pressandholdtoopenthetabletoptions
menuforthefollowingoptions:Poweroff,Poweroffandrestart,
andTurnon/offAirplanemode.
IR (Infrared) LED UsesinfraredtocommunicatewithdevicesusingthePeelSmart
Remoteapp.
Speaker Letsyouhearthedifferentringersandsounds.
Back-Facing Camera Lens Letsyoutakepicturesandrecordvideos.
microSIM Card/microSD
Card Slots
AllowsyoutoinsertyourmicroSIMcardandamicroSDcard.
Headset Jack Allowsyoutopluginaheadsetforconvenient,hands-free
conversations.
CAUTION!Insertinganaccessoryintotheincorrectjackmaydamagethetablet.
microSIM Card
ThemicroSIMcardisanIC(IntegratedCircuit)cardcontainingthetabletnumberandother
customerinformation.
Handling the microSIM Card
KeepthefollowinginmindwhenhandlingamicroSIMcard.
n CustomerisresponsibleforanydamagecausedbyinsertingmicroSIMcardinanother-brandIC
cardreader,etc.Thecompanyisnotresponsibleinsuchcase.
n AlwayskeeptheICchipclean.
n Wipecleanwithadry,softcloth.
n Avoidapplyinglabels.MaydamagethemicroSIMcard.
n SeeinstructionsincludedwiththemicroSIMcardforhandling.
n ThemicroSIMcardisthepropertyofthecompany.
n ThemicroSIMcardisreplaceable(atcost)incaseofloss/damage.
n ReturnthemicroSIMcardtothecompanywhencancellingyoursubscription.
n ReturnedmicroSIMcardsarerecycledforenvironmentalpurposes.
n NotethatmicroSIMcardspecificationsandperformancemaychangewithoutnotice.

Get Started 3
n ItisrecommendedthatyoukeepaseparatecopyofinformationthatisstoredonthemicroSIM
card.Thecompanyisnotresponsiblefordamagesfromstoredinformationthatislost.
n AlwaysfollowemergencyprocedurestosuspendserviceifyourmicroSIMcardortablet
(microSIMcardinserted)islost/stolen.Fordetails,contactCustomerService.
n Alwayspoweroffthetabletbeforeinserting/removingamicroSIMcard.
Insert microSIM Card
FollowtheseinstructionstoinsertamicroSIMcard.Remembertopoweroffyourtabletbefore
insertingamicroSIMcard.
1. OpenthecoverofthemicroSIM/microSDcardslots.
l Opengentlyinthedirectionshown.
2. InsertthemicroSIMcard.
l InsertgentlywithgoldICchipfacingdownward.
3. ClosethecoverofthemicroSIM/microSDcardslots.
l Makesureallthetabsaresecureandtherearenogapsaroundthecover.
microSD Card
YourtabletsupportstheuseofanoptionalmicroSDcard(notincluded)toexpanditsstorage
capacity.Somecardsmaynotoperateproperlywithyourtablet.
microSD Card Cautions
Data:InformationstoredonmicroSDcardcanbecomelostorchangedaccidentlyorasaresultof
damage.Itisrecommendedthatyoukeepaseparatecopyofimportantdata.Thecompanyisnot
responsiblefordamagesfromdatathatislostorchanged.
Reading/Writing Data:Neverpowerofforremovethebatterywhilereadingorwritingdata.

Get Started 4
Handling microSD card:Use/storemicroSDcardsawayfromthereachofinfants.Maycause
chokingifswallowed.
Insert microSD Card
FollowthesesteptoinsertanoptionalmicroSDcard(notincluded).Makesuretopoweryourtablet
offbeforeinsertingorremovingamicroSDcard.
1. OpenthecoverofthemicroSIM/microSDcardslots.
l Opengentlyinthedirectionshown.
2. InsertthemicroSDcard.
l InsertthemicroSDcardallthewaygentlywithoutbendingandwiththeterminalsfacing
upward.
l InsertonlymicroSDcards.
3. ClosethecoverofthemicroSIM/microSDcardslots.
l Makesureallthetabsaresecureandtherearenogapsaroundthecover.
Unmount the microSD Card
AlwaysunmountthemicroSDcardbeforeremovingitfromyourtablet.
1. Tap > >Settings .
2. TapStorage.
3. TapUnmount SD card.
l ThemenuoptionnamechangesfromUnmount SD cardtoMount SD card.Thecardis
nowunmounted.

Get Started 5
Remove microSD Card
FollowtheseinstructionstoremoveamicroSDcard.Alwayspowerthetabletoffbeforeinsertingor
removingamicroSDcard.
1. Tap > >Settings .
2. TapStorage.
3. TapUnmount SD card.
4. OpenthecoverofthemicroSIM/microSDcardslots.
5. SlidethemicroSDcardoutoftheslottoremoveit.
6. ClosethecoverofthemicroSIM/microSDcardslots.
Format microSD Card
WhenyouinsertanoptionalmicroSDcardforthefirsttime,itisrecommendedthatyouformatiton
yourtablet.
1. Tap > >Settings .
2. TapStorage.
3. TapErase SDcard.
4. TapErase SD cardagain.
5. TapErase everythingtoconfirm.
l AlldataonthemicroSDcardiserased,andthecardisformattedforuseonyourtablet.
Charge the Battery
Followtheseinstructionstochargeyourtablet’sbatteryusingeithertheincludedACadapterorviaa
USBconnectiononyourcomputer.
Charge Using the AC Adapter
1. PlugtheUSBconnectorintothecharger/accessoryportatthebottomofyourtablet.

Get Started 6
2. PlugtheotherendoftheUSBcableintotheACadapter.
3. PlugtheACadapterintoanelectricaloutlet.
4. Aftercharging,disconnectthetabletfromthecharger.
l UnplugtheACadapterfromtheoutlet,andremovethemicroUSBcablefromthetabletand
theACadapter.
Note:Alwaysunplugthechargerfromthewallsocketafterthetabletisfullychargedtosave
unnecessarypowerconsumptionofthecharger.
Charge Using a PC Connection
BeforeusingaPCconnectiontochargeyourtablet,ensurethatthecomputeristurnedon.
Dependingonthetypeofconnection,yourtablet’sbatterymaynotcharge.
1. InsertthesmallendofthemicroUSBcordintothecharger/accessoryportatthebottomofyour
tablet.
2. InsertthelargeendofthemicroUSBcordintoanexternalUSBportonyourcomputer.
3. Aftercharging,removethemicroUSBcablefromboththetabletandthecomputer.

Get Started 7
Turn Your Tablet On and Off
Theinstructionsbelowexplainhowtoturnyourtabletonandoff.
Turn Your Tablet On
n PressandholdthePower/LockButton.
Yourtabletwillpoweron.Dependingonthesettings,youmayseethelockscreen.
l SeeLockandUnlockYourScreenandSelectScreenLockforinformationaboutusingthe
screenlock.
l Thefirsttimeyouturnthetableton,youwillseethesetupscreens.SeeCompletetheSetup
Screensfordetails.
l Ifyourtabletisnotyetactivated,seeActivateYourTabletformoreinformation.
Turn Your Tablet Off
1. PressandholdthePower/LockButtontoopenthetabletoptionsmenu.
2. TapPower offtoturnthetabletoff.
3. TapOKtoconfirm.
Yourtabletwillpoweroff.
Yourscreenremainsblankwhileyourtabletisoff(unlessthebatteryischarging).
Tip:TheKnockONfeatureallowsyoutodouble-tapthescreentoeasilyturnitonoroff.
Use the Touchscreen
Yourtablet’stouchscreenletsyoucontrolactionsthroughavarietyoftouchgestures.
Tap or Touch
Whenyouwanttotypeusingtheonscreenkeyboard,selectitemsonscreensuchasapplicationand
settingsicons,orpressonscreenbuttonsbysimplytappingortouchingthemwithyourfinger.

Get Started 8
Touch and Hold
Toopentheavailableoptionsforanitem(forexample,acontactorlinkinaWebpage),touchand
holdtheitem.
Swipe or Slide
Toswipeorslidemeanstoquicklydragyourfingerverticallyorhorizontallyacrossthescreen.

Get Started 9
Drag
Todrag,pressandholdyourfingerwithsomepressurebeforeyoustarttomoveyourfinger.While
dragging,donotreleaseyourfingeruntilyouhavereachedthetargetposition.
Flick
Flickingthescreenissimilartoswiping,exceptthatyouneedtoswipeyourfingerinlight,quick
strokes.Thisfingergestureisalwaysinaverticaldirection,suchaswhenflickingthecontactslist.

Get Started 10
Rotate
Formostscreens,youcanautomaticallychangethescreenorientationfromportraittolandscapeby
turningthetabletsideways.Whenenteringtext,youcanturnthetabletsidewaystobringupabigger
keyboard.
Note:TheAuto-rotatecheckboxneedstobeselectedforthescreenorientationtoautomatically
change.Fromhome,tap > >Settings >Display>Auto-rotate screen.
Tip:Youcanalsoaccessthescreenrotationsettingfromthenotificationswindow.Pulldownthe
statusbarandtapRotationtoselectordeselecttheoption.
Pinch and Spread
“Pinch”thescreenusingyourthumbandforefingertozoomoutor“spread”thescreentozoomin
whenviewingapictureoraWebpage.(Movefingersinwardtozoomoutandoutwardtozoomin.)

Get Started 11
Activate Your Tablet
Followtheinstructionsbelowtoactivateyourtabletifithasnotalreadybeenactivated.Depending
onyouraccountorhowandwhereyoupurchasedyourtablet,itmaybereadytouseoryoumay
needtoactivateitonyourSprintaccount.
n IfyoupurchasedyourtabletataSprintStore,itisprobablyactivatedandreadytouse.
n IfyoureceivedyourtabletinthemailanditisforanewSprintaccountoranewlineofservice,it
isdesignedtoactivateautomatically.
l Whenyouturnthetabletonforthefirsttime,youshouldseeaHands Free Activation
screen,whichmaybefollowedbyaFirmware Updatescreen.Followtheonscreen
instructionstocontinue.
n Ifyoureceivedyourtabletinthemailandyouareactivatinganewtabletforanexistingnumber
onyouraccount(you’reswappingtablets),youcanactivateonyourcomputeronlineordirectly
onyourtablet.
l Activate on your computer:
o Gotosprint.com/activateandcompletetheonlineinstructionstoactivateyourtablet.
l Activate on your tablet:
o Turnonyournewtablet.(Makesuretheoldoneisturnedoff.)Yourtabletwill
automaticallyattemptHands-FreeActivation.

Get Started 12
o TapActivatetooverrideauto-activationandstartthemanualactivationwizard.
o Followtheon-screenpromptstocompletetheactivationprocess.
Ifyourtabletisstillnotactivated,visitsprint.com/supportforassistance.Ifyoudonothaveaccessto
theInternet,callSprintCustomerServiceat1-888-211-4727fromanothertablet.
Tip:DonotpressthePower/LockButtonwhilethetabletisbeingactivated.Pressingthe
Power/LockButtoncancelstheactivationprocess.
Note:Ifyouarehavinganydifficultywithactivation,visitsprint.com/support.
Complete the Setup Screens
Thesetupscreenshelpyousetupcertainfeaturesandpreferencesonyourtablet.Onceyourtablet
hasbeenturnedon,youwillseeaAccessibilitymessage.Youcanthencompletethesetupprocess.
Note:Youmaybeabletocompletethesetupscreensbeforeyourtablethasbeenactivatedonyour
Sprintaccount.
Note:Duringoraftersetup,youmayseeaConnections Optimizernotice.Readthenoticeand
touchI Agreetoallowyourtablettoconnectautomaticallytothebestavailabledatanetwork,
includingWi-Fi.ToturnConnectionsOptimizeroffatanytime,fromhome,tap > >Settings
>More…>Mobile networks>Connections optimizeranduncheckthebox.See
ConnectionsOptimizerfordetails.
1. Ontheconfigurationscreen,touchNexttogetstarted.
2. Followtheonscreeninstructionstocompleteeachsection.Foreachtopic,youwillhavethe
optiontoskipitandcontinuetothenextscreen.
l Select language-Selectadesiredlanguage.
l Set internet connection-Ifprompted,followthepromptstosignintoanavailableWi-Fi
network.ForsecuredWi-Finetworks,youwillneedtoenterapassword.SeeWi-Fiformore
details.
l Tap & Go-AllowsyoutoquicklycopyanyGoogleAccounts,backedupappsanddatafrom
yourexistingAndroiddevice.TapSKIPifyouwanttoskipthisstep.
l Google Services-ReadalloftheinformationfortheavailableGoogleServicesand,ifyou
agree,tapNext.Otherwise,unchecktheoptionsandtapNext.
o Use Google's location service-Helpsappsdeterminelocation.Thismeanssending
anonymouslocationtoGoogle,evenwhennoappsarerunning.TapLearn morefor
additionalinformation.
o Help improve location services-AllowsappsandservicestoscanforWi-Finetworks
evenwhenWi-Fiisoff.

Get Started 13
o Help improve your Android experience-Allowsyourdevicetosenddiagnosticand
usagedatatoGoogleautomatically.TapLearn moreforadditionalinformation.
l Useful settings-SetthetabletnametobeusedforBluetooth®andWi-FiDirectand
contactinformationincaseyourtabletislost.
l Knock Code-SetyourpersonalizedKnockCodeforyoursecurity.
l Home touch button combination-Selectthedesiredhometouchbuttoncombination.
3. TapDone.Yoursetupisnowcomplete.Followtheonscreeninstructionstolearnaboutbasic
touchmenunavigation,viewtutorials,orjustgetstarted.
Other manuals for GPad F 7.0
2
Table of contents
Other LG Cell Phone manuals