LG K4 LTE User manual

User guide. MFL69707701 (1.0)
This booklet is made from 98% post-consumer recycled paper.
This booklet is printed with soy ink. Printed in China
User guide.
Guía del usuario.

Copyright©2016 LG Electronics, Inc. All rights reserved.
LG and the LG logo are registered trademarks of LG Corp.
All other trademarks are the property of their respective
owners.

1
Important Customer Information
Before you begin using your new phone
Included in the box with your phone are separate information leaflets.
These leaflets provide you with important information regarding your new
device. Please read all of the information provided. This information will
help you to get the most out of your phone, reduce the risk of injury, avoid
damage to your device, and make you aware of legal regulations regarding
the use of this device.
It’s important to review the Product Safety and Warranty Information guide
before you begin using your new phone. Please follow all of the product
safety and operating instructions and retain them for future reference.
Observe all warnings to reduce the risk of injury, damage, and legal
liabilities.

2
Important Customer Information...............................................1
Table of Contents .......................................................................2
The Basics...................................................................................5
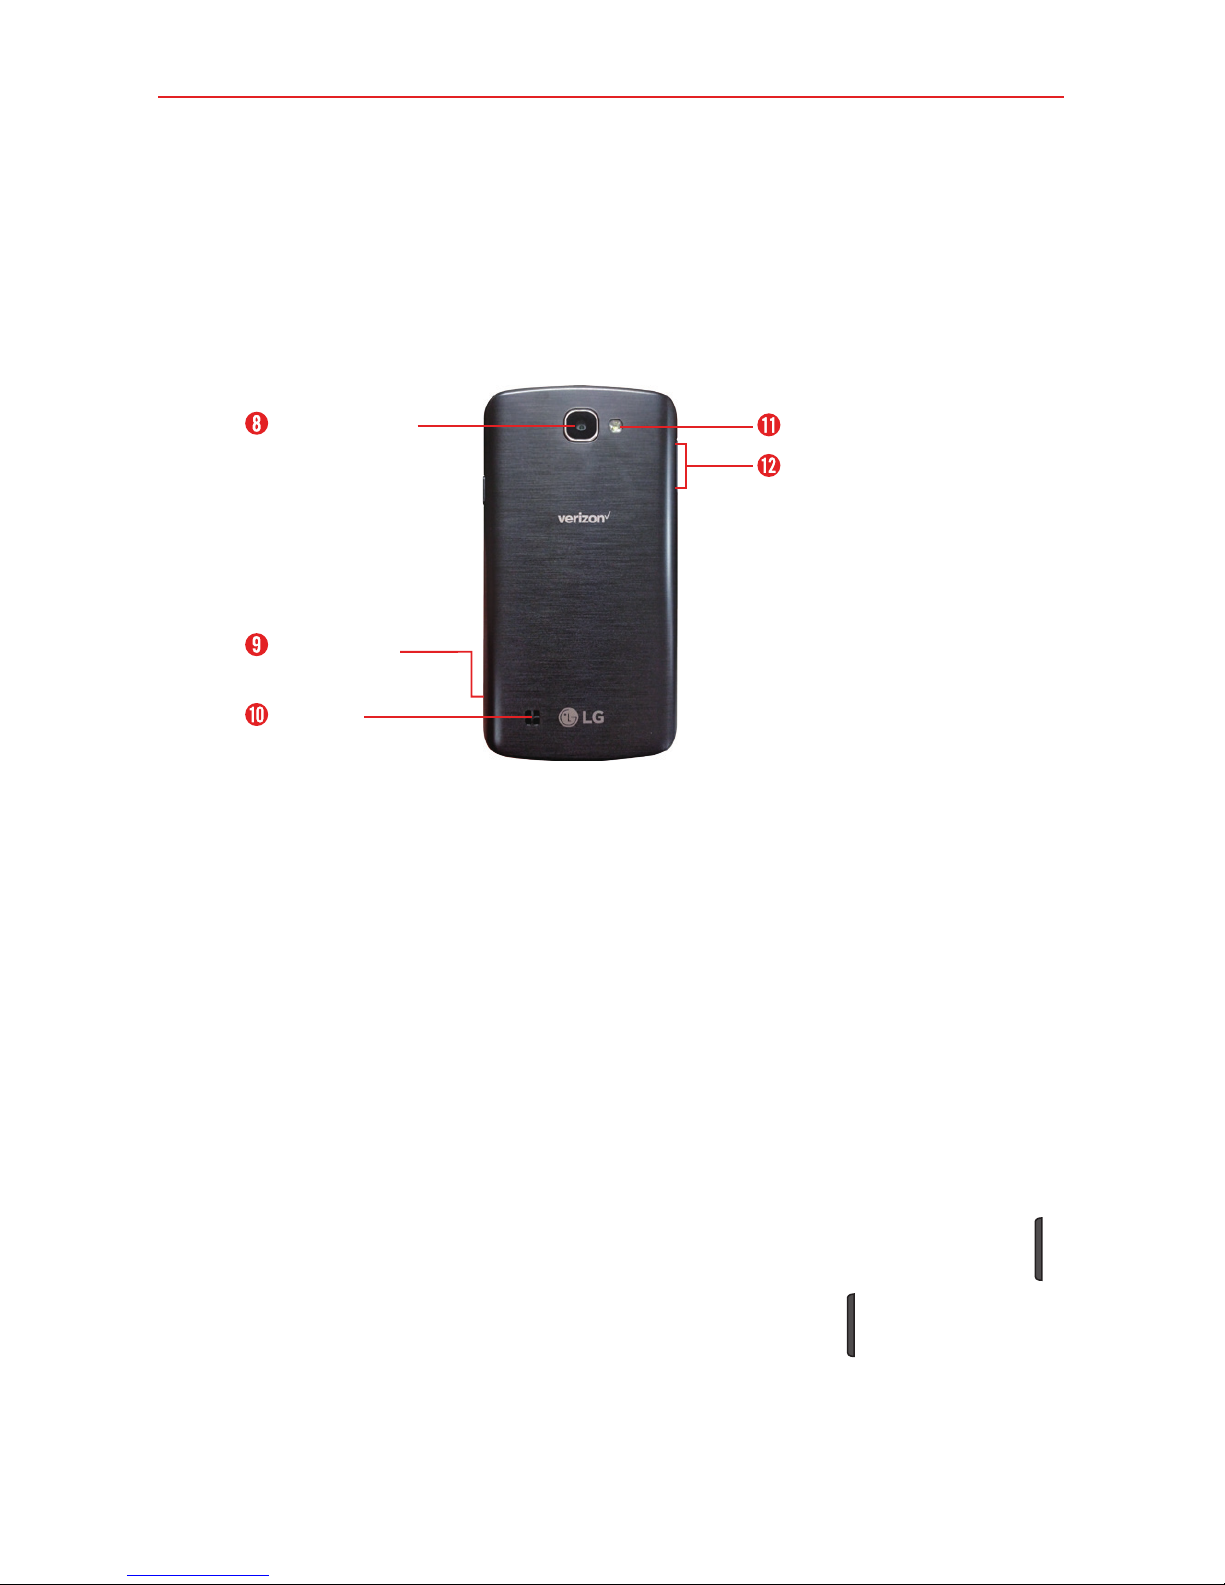
Phone Overview.................................................................................................... 5
Help ........................................................................................................................7
Setting Up Your Phone ........................................................................................ 8
Removing the Battery and SIM Card ................................................................10
Inserting and Removing a Memory Card...........................................................11
Charging Your Phone ..........................................................................................12
Optimizing Battery Life ......................................................................................13
Turning Your Phone On and Off ........................................................................15
Your Google Account .......................................................................................... 17
Anti-Theft Guide .................................................................................................18
Touch Screen .......................................................................................................19
Getting to Know the Home Screen ..................................................................20
Apps: How to View, Open, and Switch .............................................................26
Capturing a Screenshot.....................................................................................33
Phone’s Status Icons .........................................................................................34
Managing Notifications .....................................................................................36
Setting Your Lock Screen ..................................................................................38
Connecting to Networks and Devices .................................... 41
Wi-Fi.....................................................................................................................41
Wi-Fi Direct ........................................................................................................42
Bluetooth.............................................................................................................42
PC Connections with a USB Cable ..................................................................43
PC Connections with a USB Cable for Mac OS X Users ..............................44
Calls .......................................................................................... 45
Placing and Ending Calls ..................................................................................45
Answering or Rejecting Calls............................................................................48
Working with the Recent Tab ............................................................................50
Calling Your Contacts.........................................................................................52
Options During a Call ........................................................................................53
Managing Multiple Calls....................................................................................53
Table of Contents

3
Table of Contents
Communication ....................................................................... 55
Contacts..............................................................................................................55
Messaging............................................................................................................61
Email....................................................................................................................65
Entertainment .......................................................................... 68
Camera................................................................................................................68
Gallery ................................................................................................................. 73
Music ................................................................................................................... 78
Tools.......................................................................................... 82
Capture+ .............................................................................................................82
Clock....................................................................................................................84
Calculator............................................................................................................85
Calendar..............................................................................................................86
Voice Recorder ................................................................................................... 87
File Manager.......................................................................................................89
Google Apps .......................................................................................................90
Settings .................................................................................... 92
WIRELESS NETWORKS...................................................................................92
DEVICE................................................................................................................ 97
PERSONAL ...................................................................................................... 102
SYSTEM ............................................................................................................... 106
Safety....................................................................................... 110
Consumer Information About Radio Frequency Emissions.......................... 112
Consumer Information on SAR .......................................................................117
FCC Hearing-Aid Compatibility (HAC) Regulations for Wireless Devices.. 118
Caution: Avoid potential hearing loss. ........................................................... 120
TIA Safety Information.................................................................................... 122
Safety Information ........................................................................................... 125
FDA Consumer Update ................................................................................... 129

4Table of Contents
Specifications ..........................................................................141
FAQ ..........................................................................................142
LIMITED WARRANTY STATEMENT ....................................148
Index ........................................................................................155

5
The Basics
Phone Overview
Front View
Proximity/Ambient
light sensor
Earpiece
Front camera
Power/Lock button
Back button Recent apps button
Home button
NOTES sAll screen shots in this guide are simulated. Actual displays may vary.
sInstructions to perform tasks in this guide are based on the default settings and may
change depending on the mode and software version on your phone.
1. Earpiece Lets you hear callers and automated prompts.
2. Back button Returns to the previous screen. Also closes pop-up items,
such as menus, dialog boxes and the on-screen keyboard.
3. Proximity/Ambient light sensor Senses proximity toward other objects
(such as your head) so that tap commands are not accidentally activated
during a call or when carried inside a pocket.
It also employs an ambient sensor which measures the surrounding light
and adjusts the LCD brightness to provide a vivid screen.
NOTE Don't block the sensor or near the sensor to avoid problems with the touch screen.
4. Front camera Use to take pictures and record videos of yourself. You
can also use this for video chatting. Keep it clean for optimal
performance.
5. Power/Lock button Press to turn off the screen backlight and lock the
screen, or turn the screen backlight back on. Press and hold to turn the
phone on/off, restart it, and activate/deactivate Airplane mode.

6The Basics
6. Recent apps button Displays recently used applications. If you touch
and hold this key, it opens a menu of available options.
7. Home button Returns to the Home screen from any screen.
Rear View
Back camera Flash
Volume button(s)
Speaker
Back cover
cutout
8. Back camera Use to take photos and record videos. Keep it clean for
optimal performance.
9. Back cover cutout Use to remove the back cover for access to the
battery, the SIM card slot, and the microSD card slot.
10. Speaker Use to listen to audio (e.g., music, videos, sound clips,
speakerphone, etc.) from the rear speaker instead of the earpiece.
11. Flash Brightens up the captured image or recorded video when you
turn on the flash.
12. Volume button(s) Press to adjust the ringer, the media volumes, or the
in-call volume during a call. They also access shortcuts when enabled in
the Settings menu.
TIPS sWith the screen backlight off (asleep), you can press either of the Volume button(s)
twice quickly to activate the Camera app.
sWith the screen unlocked, press both of the Volume button(s) at the same time to
open the Capture+ app to write a memo.

7
The Basics
Top and Bottom Views
USB/Charging port
Microphone
Headset jack
Microphone
13. Microphone Transmits your voice to the other caller. It's also used for
voice-activated functions.
14. Headset jack Allows you to plug in an optional headset for convenient,
hands-free conversations. You can also plug in headphones to listen to
music.
15. USB/Charging port Allows you to connect the phone and the USB
cable for use with the charger adapter, or other compatible accessories.
16. Microphone Transmits your voice to the other caller. It's also used for
voice-activated functions.
Help
The Help app allows you to quickly and conveniently view information
about your phone, including how-to videos, Icon glossary, etc.
To access Help, tap the Home button >
the Apps icon >
Help .

8The Basics
Setting Up Your Phone
Step 1. Remove the Back Cover
With the phone facing down, insert your fingernail into the cutout located
on the lower left of the back cover and lift the cover up gently.
Step 2. Insert the Battery
Insert the battery, making sure the gold contacts line up. Press down gently
to secure it.

9
The Basics
Step 3. Replace the Back Cover
Align the cover over the back of the phone, and then press down along the
edges to secure it.
Step 4. Charge the Phone
Fully charge your phone before turning it on.
Plug the small end of the USB cable into the USB/charger port on your
phone. Plug the other end into the charger and plug the charger into an
outlet.
WARNING! Only use approved chargers with your device. Incompatible chargers or tampering
with the charging port could damage your device and void the warranty.

10 The Basics
Removing the Battery and SIM Card
Removing the battery
1. With the phone facing down, insert your fingernail into the cutout located on
the lower left of the back cover and lift the cover up gently.
2. Use the fingertip cutout at the bottom of the battery compartment to lift
the battery out.
Removing the SIM card
The SIM card is pre-installed in your smartphone. If you need to replace
your SIM card, refer to the following instructions.
1. Turn the phone off, then remove the back cover and the battery (as
demonstrated in the previous instructions).
2. Locate the slot for the SIM card (at the top of the battery compartment)
and gently slide the SIM card out to remove it.

11
The Basics
Inserting and Removing a Memory Card
Inserting a microSD card
1. Remove the back cover (as demonstrated in the previous instructions).
2. Position the microSD card (sold
separately) with the label side facing up
and the gold contacts toward the slot (at
the upper-left side of the phone), then
carefully slide it into the slot until it's
secured in place.
NOTE The microSD card can be easily damaged by
improper operation. Please be careful when inserting, removing, or handling it.
Removing the microSD card
1. Unmount the microSD card.
Tap the Home button > touch and
hold the Recent apps button >
Settings > Storage & USB > the Eject
icon .
2. The microSD slot is just mentioned in the
previous instructions (its location is not
pointed out unless you make my text
suggestion).
3. Carefully pull the microSD card out to remove it.

12 The Basics
Unmounting the microSD card
It’s important to unmount the microSD card prior to removing it from the
phone to avoid damage to it or the data saved on the card.
1. Tap the Home button > touch and hold the Recent apps button .
2. Tap Settings > Storage & USB.
3. Tap the Eject icon .
Charging Your Phone
Your phone comes with a USB cable and a charger adapter. You can
connect them together and charge from a power outlet, or you can use the
USB cable alone to charge from your computer. Correctly orient the plugs
before insertion to avoid damaging your phone and cable.
NOTE Please only use approved charging accessories to charge your LG phone. Improper
handling of the USB/Charging port, as well as the use of a incompatible charger, may
cause damage to your phone and void the warranty.
1. Correctly orient the USB cable with the charger adapter and connect
them. As shown below, both the USB logo on the USB cable and the LG
logo on the adapter will face toward you.
USB Cable Charger Adapter
2. The USB/Charging port is located at the bottom of the phone. Correctly
orient the cable's plug with the port before plugging it in. As shown on
the following page, the USB logo on the cable will face upward.
3. Plug the charger adapter into a power outlet to begin charging.

13
The Basics
Charging with the USB Cable
NOTE
Make sure to correctly orient the cable's
plug with the port before plugging it in.
When the phone is facing upward, the USB
logo on the cable will also face upward.
USB Cable
You can use your computer to charge your phone. To be able to charge with
the USB cable, you need to have the necessary USB drivers installed on
your PC first. Connect one end of the USB cable to the USB/Charging port
on your phone (as shown above) and connect the other end to a USB port
on your PC. It’s best to use the rear USB port when connecting to a desktop
PC. The USB hub should be powered by an external power source.
NOTE You may experience a slower charging rate when charging from your computer.
Optimizing Battery Life
You can extend your battery’s life between charges by turning off features
that run in the background. You can also monitor how apps and system
resources consume battery power.
Tips to extend the life of your battery
Reduce the screen brightness and set a shorter screen timeout.
Turn off radio communications (such as Wi-Fi, Bluetooth®, GPS, etc.) that
you're not actively using. (Note that the GPS receiver is only turned on
when an app that makes use of it is opened).
Turn off automatic syncing for Gmail, Calendar, Contacts, and other apps
if you don’t need it.
NOTES sAllowing other devices to use your device's hotspot connection will drain your battery
more quickly.
sIf you accidently press the Power/Lock button while the phone is in your pocket, the
proximity sensor prevents the screen from turning on in order to save battery power.

14 The Basics
To check the battery charge level
Tap the Home button > touch and hold the Recent apps button >
Settings > Battery.
The battery level (as a percentage of fully charged) and the battery status
(Charging or Discharging) is displayed at the top of the screen.
Checkmark the Battery percentage on Status Bar checkbox to display
the remaining battery charge percentage on the Status Bar next to the
battery icon.
Tap Battery saver to view and/or modify your Battery saver settings.
To monitor and control what uses the battery
The Battery usage screen allows you to see which apps are consuming the
most battery power. Information on this screen allows you to identify
downloaded apps you may want to turn off when not being used, so you
can get the most out of your battery power.
Tap the
Home button >
touch and hold the Recent apps button >
Settings
> Battery > Battery usage.
OR
Tap the
Home button >
touch and hold the
Recent apps button >
Settings
> About phone > Battery > Battery usage.
The top of the Battery usage screen displays a usage graph and below it,
battery usage times and details. All of the apps or services using battery
power are listed from the greatest amount of energy used to the least
amount.
Tap an app or service in the Battery usage screen to see details about its
power consumption. Different apps or services offer different kinds of
information, and they may even include options to modify the settings so
you can reduce power consumption by that app.
Tap Stop next to an app you want to stop running.

15
The Basics
Battery saver
Battery saver changes certain settings to conserve battery power until you
can recharge your phone. If you turn Battery saver on, it will automatically
activate when the battery charge level drops to the level you set. If Battery
saver is off, you’ll be prompted to turn on Battery saver when the battery
reaches low levels.
Tap the Home button > touch and hold the Recent apps button >
Settings
> Battery >
Battery saver.
From the Battery saver screen: Select to activate Battery saver
immediately, or when the charge drops to 5% or 15%. If you turn off
Battery saver, when the battery charge becomes low, a notification
prompts you to turn it on.
Mark the Restrict apps in background checkbox to restrict apps in the
background, as well as notifications, downloading, and streaming for
apps when Battery saver is on.
After you modify the Battery saver settings to your preferences, tap the
switch to toggle it On (blue) or Off (gray).
Turning Your Phone On and Off
Turning your phone on
Press and hold the Power/Lock button for a couple of seconds until the
screen turns on.
Turning your phone off
1. Press and hold the Power/Lock button until the Phone options menu
appears.
2. Tap Power off in the Phone options menu.
3. Tap OK to confirm that you want to turn off the phone.

16 The Basics
Turning the screen on and off using the KnockON feature
The KnockON feature allows you to double-tap the screen to easily turn the
screen on or off.
Quickly double-tap the center of the dark screen to turn on the backlight
and display the Lock screen.
Quickly double-tap the Status Bar, an empty area on the Home screen,
or the Lock screen to turn the screen off.
NOTES sThe backlight will not turn on if the proximity sensor is covered.
sWhen the screen is off and you double-tap the upper portion of screen with Knock
Code activated, the Knock Code grid is displayed for you to enter your Knock Code.
Turning the screen on using the Knock Code feature
If your Lock screen unlock sequence is set to a Knock Code, tap your
Knock Code on the darkened screen to automatically turn on the backlight
and unlock the screen at the same time.
TIP When the screen is in timeout and a Knock Code is set, pressing the Power/Lock button
displays the Lock screen (e.g., to check the time). You can tap your Knock Code to
unlock the screen or press the Power/Lock button again (or double-tap the Status Bar)
to turn the backlight back off.
NOTES sIf you enter the incorrect Knock Code 6 times, you'll be prompted you to enter your
backup PIN to unlock your phone and the unlock sequence is automatically changed to
Swipe.
sUse a fingertip instead of a fingernail to tap your Knock Code on the screen.
Setting up the Knock Code feature
1. Tap the Home button > touch and hold the Recent apps button >
Lock screen settings.
2. Tap Select screen lock > Knock Code.
3. Tap the squares in a pattern (from 6 to 8 taps) to set your Knock Code,
tap DONE, enter it again, then tap CONFIRM.
NOTE You'll be prompted to enter a backup PIN in case you forget your Knock Code.

17
The Basics
To unlock the phone
If you don’t use the phone for a while, the screen and
backlight will turn off to conserve battery power. To
unlock the phone’s default Lock screen:
NOTE The default Lock screen simply locks the screen to prevent
unintentional actions. For more security to guard against
unauthorized use, you can set an unlock requirement (such as a
Knock Code, pattern, PIN, or password) that will need to be
entered to unlock it.
1. Turn the screen on.
Press the Power/Lock button .
NOTE Avoid covering the proximity sensor when turning the screen on.
Doing so will prevent the screen from turning on.
OR
Quickly double-tap the center of the screen (KnockON).
2. From the center of the screen, swipe in any direction to unlock it.
Your Google Account
You must sign into a Google Account to use Gmail, Hangouts, Google
Calendar, and other Google apps; to download apps from Play Store; to
back up your settings to Google servers; and to take advantage of other
Google services on your phone.
IMPORTANT
ţIf you don’t sign into a Google Account during setup, you're prompted to sign in or to
create a Google Account the first time you start an app that requires one, such as Gmail
or Play Store.
ţWhen you sign in, you’re prompted to enter your username and password.
ţAfter you sign in, your contacts, Gmail messages, Calendar events, and other
information from these apps and services on the web are synchronized with your
phone.
ţIf you have an enterprise account through your company or other organization, your IT
department may have special instructions on how to sign in to that account.

18 The Basics
Setting up your Google Account
If you use Setup Wizard to set up your Google Account or launch an
application that requires a Google Account (such as Play Store or Gmail),
you're guided through the following steps.
1. Enter your email and tap NEXT.
NOTE If you don't already have a Google Account, tap Or create a new account and follow the
prompts to create your new account.
2. Enter your password and tap NEXT.
3. Follow the rest of the instructions on the screen.
Your Gmail, Google Contacts, and Google Calendar events will all be
synchronized with your phone automatically.
Anti-Theft Guide
You can set up your device to prevent other people from using it if it’s been
reset to factory settings without your permission. For example, if your device
is lost, stolen, or wiped, only someone with your Google Account or screen
lock information can use the device.
All you need to make sure your device is protected is:
Set a screen lock: If your device is lost or stolen but you have a screen
lock set, the device can’t be erased using the Settings menu unless your
screen is unlocked.
Add your Google Account on your device: If your device is wiped but
you have your Google Account on it, the device can’t finish the setup
process until your Google Account information is entered again.
After your device is protected, you’ll need to either unlock your screen or
enter your Google Account password if you need to perform a factory reset.
This ensures that you or someone you trust is performing the reset.
NOTE Do not forget your Google Account and password you added to your device prior to
performing a factory reset. If you can't provide the account information during the setup
process, you won't be able to use the device at all after performing the factory reset.
Table of contents
Other LG Cell Phone manuals