manuals.online logo
Brands
  1. Home
  2. •
  3. Brands
  4. •
  5. LG
  6. •
  7. Digital Signage
  8. •
  9. LG 98ls95a Quick start guide

LG 98ls95a Quick start guide

Drawn Approved
Signature Yoonjeong.Oh Jongok.Kim
MMM/DD/YYYY Oct/24/2014 Oct/24/2014
98LS95A LG MBM64776906
US,WM LG Digital Signage (1508-REV02)
:LGEAK :LGEKR :LGERS
:LGEAZ :LGEMA :LGESY
:LGEEG :LGEMX :LGETH
:LGEIL :LGEND :LGEVN
:LGEIN :LGERA :LGEWR
:LGEAS
2. Printing Specification
1. Trim size (Format)
: • Unfolded size
420 mm x 297 mm
: • Folded size
210 mm x 148.5 mm
:5. Bindery
One sheet (2 Folded)
:6. Language
ENG/FRA/ESP (3)
:7. Number of pages
2
:2. Printing colors
1 Color (Black)
:3. Stock (Paper)
Uncoated, wood-free paper 80 g/㎡
:4. Printing method
1. Model Description
:Model name
:Brand name
:Part number
:2nd, 3rd Suffix
:Product name
(Revision number)
Printing specification
Checked
Seounggeun.Kim
Oct/24/2014
Off set
N
O
T
E
“This part contains Eco-hazardous substances (Pb, Cd, Hg, Cr6+, PBB, PBDE, etc.) within LG standard level,
Details should be followed Eco-SCM management standard[LG(56)-A-2524].
Especially, Part should be followed and controlled the following specification.
(1) Eco-hazardous substances test report should be submitted when Part certification test and First Mass Production.
(2) Especially, Don’t use or contain lead(Pb) and cadmium(Cd) in ink.
Printed in Egypt
Printed in Mexico
Printed in Thailand
Printed in India
Printed in China
Printed in Vietnam
3. Origin Notification
Printed in Kazakhstan
Printed in Korea
Printed in Mexico
Printed in Brazil
Printed in Poland
Printed in China
4. Changes
Printed in Indonesia
Printed in Russia
Printed in Poland
Printed in Algeria
Rev. Number
MMM/DD/YYYY
Signature
ECO Number
Change Contents
Aug/13/2015
Miyeon.Kim
EKMF800057
To add note sentence about optical port
Feb/16/2015
Miyeon.Kim
EKMF200311
Apply FTC Green guide regulation
1
10
9
8
7
6
5
4
3
2
Front P/no. Back
297 mm
420 mm
Folded
148.5 mm
210 mm
Front Front P/no. Front
Easy Setup Guide
Easy Setup Guide
Easy Setup Guide
Easy Setup Guide
Easy Setup Guide
:Total pages
2 pages
Pagination sheet
:Part number
MBM64776906
(Revision number)
(1508-REV02)
Fold Step
Easy Setup Guide
Guide de conguration rapide
Guía Rápida
www.lg.com
FRA
Assurez-vous que les accessoires suivants sont inclus avec votre moniteur.
Les accessoires fournis peuvent avoir un aspect légèrement différent de ceux représentés ci-dessous.
ENG
Make sure the following items are included with your product.
The included accessories may look slightly different from the gures shown below.
Accessories / Accessoires fournis / Accesorios
Connecting external devices / Raccordement d'appareils externes /
Conexión de dispositivos externos
Optional Accessories / Accessoires en option /
Accesorios opcionales
ENG FRA
FRANÇAISENGLISH
ESP
ESPAÑOL
ESP
Asegúrese de que con el producto se suministran los siguientes accesorios.
Los accesorios incluidos pueden parecer distintos a los que se muestran a continuación.
FRA
ENG
Without prior notice, optional accessories are subject to change to improve the per-
formance of the product, and new accessories may be added. Optional accessories
are not included for all models.
Les accessoires en option peuvent être modiés et de nouveaux accessoires peu-
vent être ajoutés sans préavis, dans le but d'améliorer les performances du produit.
Les accessoires en option ne sont pas inclus avec tous les modèles.
Se podrán cambiar los accesorios opcionales para mejorar el funcionamiento
del producto, así como incorporar nuevos accesorios sin previo aviso. Los ac-
cesorios opcionales no se incluyen en todos los modelos.
ESP
Connect the signal input cable and tighten it by
turning the screws clockwise.
ENG
Raccordez le câble d'entrée de signal et serrez-le
en tournant les vis dans le sens des aiguilles d'une
montre.
FRA
Conecte el cable de entrada de señal y asegúrelo
girando en el sentido de las agujas del reloj.
ESP
Connecting to a PC / Connexion à un PC / Conexión a un PC
98LS95A
RS-232C Cable
Câble RS-232C
Cable RS-232C
DISPLAYPORT Cable
Câble DISPLAYPORT
Cable DISPLAYPORT
Stereo to COMPONENT Gender
Câble stéréo vers composant mâle
Estéreo a cable de género compuesto
Wi-Fi Dongle
Module de sécurité Wi-Fi
Dispositivo de seguridad Wi-Fi
(AN-WF500)
Eye-Bolt Bracket
Support à boulons à oeil
Soporte de cáncamo
(2 EA)
M4 x L12 Screws (4 EA)
(For Eye-Bolt Bracket)/
Vis M4 x L12 (4 EA)
(Pour support à
boulons à oeil)/
Tornillos M4 x L12 (4 EA)
(Para soporte de cáncamo)
DP OUT
DVI OUT
IR&LIGHT
SENSOR
HDMI
DVI OUT
P/NO : MBM64776906 (1508-REV02)
Printed in Korea
FRA
Sélectionnez un signal d’entrée.
ENG
Select an input signal.
HDMI1 HDMI2 DISPLAYPORT DVI COMPONENT
ESP
Seleccione una señal de entrada.
ID
BACK TILE
ON OFF
EXIT
Note / Remarque / Nota
*MBM64776906*
Please read this Easy Setup Guide carefully before operating your product. Keep it for future
reference and record the model number and serial number of the product. See the label
attached on the product and quote this information to your dealer if you require service.
ENG
Por favor lea esta Guía Rápida cuidadosamente antes de operar su producto.
Consérvela para futura referencia y registre el nombre del modelo y el número de serie del
producto. Vea la etiqueta que está pegada en el producto y cite esta información a su centro
de venta en caso de requerir servicio.
ESP
FRA Veuillez lire ce guide de configuration rapide attentivement avant d'utiliser votre produit et le
conserver pour pouvoir vous y référer plus tard. Veuillez également noter le modèle et le
numéro de série du produit. indiqués sur l'étiquette afin de fournir cette information à votre
détaillant si votre produit doit être réparé.
Un Manual del Propietario extendido que contiene información sobre las características
avanzadas está ubicado en el CD-ROM proporcionado en versión electrónica. Para leer
estos archivos, usted necesitará usaruna Computadora Personal (PC) equipada con una
unidad CD-ROM.
ESP
Note / Remarque / Nota
FRA Une copie électronique d'une version étendue du guide du propriétaire contenant des ren-
seignements sur les fonctions avancées se trouve sur le CD-ROM. Pour lire ces fichiers,
vous devez utiliser un ordinateur équipé d'un lecteur de CD-ROM.
An electronic version of an extended owner's manual that contains information about the
advanced features can be found in the CD-ROM.To read these files, you will need to use a
(PC) equipped with a CD-ROM drive.
ENG
Remote Control/ Batteries
Télécommande et piles
Control remoto, baterias CD (Owner's Manual)/Card
CD (Manuel d'utilisation)/ Carte
CD (manual de usuario)/ tarjeta
HDMI Cable
Câble HDMI
Cable HDMI
IR & Light Sensor
Détecteur IR et lumière
Sensor de infrarrojos y luz
P
A
G
E
INPUT
ENERGY
SAVING
MARK
ARC
ON
OFF

. , !

ABC

DEF

GHI

JKL

MNO

PQRS

TUV

1/a/A

- * #
WXYZ
CLEAR
MONITOR
PSM
AUTO
MUTE
BRIGHT
NESS
MENU
POWER
OK
S.MENU
ID
BACK TILE
ON OFF
EXIT
Power Cord
Cordon d'alimentation
Cable de alimentación
Screws
Vis
Tornillos
Screws
Vis
Tornillos
Cable holder/ Cable Tie
Support de câble/ Serre-câbles
Organizador de cables/ sujetacables
Speaker kit
Kit haut-parleur
Kit de altavoces
Media Player kit
Kit de Lecteur multimédia
Kit de reproductor multimedia
Screws
Vis
Tornillos
Media Player
Lecteur multimédia
Reproductor multimedia
CD (Owner's Manual)/Card
CD (Manuel d'utilisation)/Carte
CD (manual de usuario)/ tarjeta
IR&LIGHT
SENSOR
Network
HDMI
USB
OR
Receptor/DVD/vídeo HD/
Cámara de vídeo / Cámara /
Consola de videojuegos
ESP
HD Receiver/DVD/VCR
Camcorder/Camera/Gaming Device
ENG
Direct Connection/
Using the Router/
Using the Internet
ENG
Conexión directa /
A través de un router /
A través de Internet
ESP
Connexion directe /
Utilisation du routeur /
Utilisation d'Internet
FRA
Récepteur HD / Lecteur
DVD / Magnétoscope
Caméscope / Appareil
photo / Console de jeu
FRA
ou
o
Speaker
SP-2200Haut-parleur
Altavoz
ENG For information on how to use the optical port,
refer to the owner's manual.
FRA Pour plus d'informations sur la façon d'utiliser
le port optique, consultez le manuel d'utilisation.
ESP Para obtener información sobre cómo utilizar
el puerto óptico, consulte el manual del usuario.
LG Digital Signage
(MONITOR SIGNAGE)
Afchage dynamique numérique LG
(MONITEUR DE SIGNALISATION)
Señalización digital de LG
(MONITOR SIGNAGE)
REMOTE CONTROL / TÉLÉCOMMANDE / MANDO A DISTANCIA
Installing Batteries / Insertion des piles /
Instalación de las pilas
ENG To replace batteries, open the battery cover, replace batteries (1.5 V
AAA) matching and ends to the label inside the compartment,
and close the battery cover. To remove the batteries, perform the
installation actions in reverse.
Pour remplacer les piles, ouvrez le couvercle du compartiment des piles,
insérez deux piles de 1,5 V de type AAA en respectant la polarité et
, et refermez le couvercle. Pour retirer les piles, procédez à l'inverse de
leur insertion.
FRA
Para cambiar las pilas, abra la tapa del compartimento, sustitúyalas
(1,5 V Vcc) haciendo coincidir los polos y con la etiqueta del
interior y vuelva a colocar la tapa. Para retirar las pilas, realice el
proceso de instalación en orden inverso.
ESP
ENG FRA
FRANÇAISENGLISH
ESP
ESPAÑOL
※ The specifications shown above may be changed without prior notice for quality improvement.
ENG
※ Les spécifications indiquées ci-dessus peuvent être modifiées sans préavis à des fins d'amélioration de
la qualité.
FRA
※ Las especificaciones mostradas anteriormente pueden cambiar sin previo aviso para mejorar la calidad.
ESP
ENG Insert CD-ROM in Computer.
CD-ROM will open automatically.(for Window only)
If it does not run automatically, it is available to see the below sequence.
My computer ➙ Digital_LG(CD-ROM) ➙ Index.htm Open
My computer ➙ Digital_LG(CD-ROM) ➙Manual ➙ Owner's manual
Open
FRA Insérez le CD ROM dans l'ordinateur.
Le CD-ROM s'exécutera automatiquement (sous Windows uniquement).
S'il ne s'exécute pas automatiquement, suivez les étapes ci-dessous.
Mon ordinateur ➙ Digital_LG(CD-ROM) ➙ Ouvrez le fichier Index.htm
Mon ordinateur ➙ Digital_LG(CD-ROM) ➙Manuel ➙ Ouvrez le
fichier Manuel
ESP Introduzca el CD-ROM en el PC.
El CD-ROM se abrirá automáticamente (solo para Windows).
Si no se ejecuta de forma automática, siga la secuencia que se
indica a continuación.
Mi PC ➙ Digital_LG(CD-ROM) ➙ Abrir Index.htm
Mi PC ➙ Digital_LG(CD-ROM) ➙Manual ➙ Abrir manual de usu-
ario
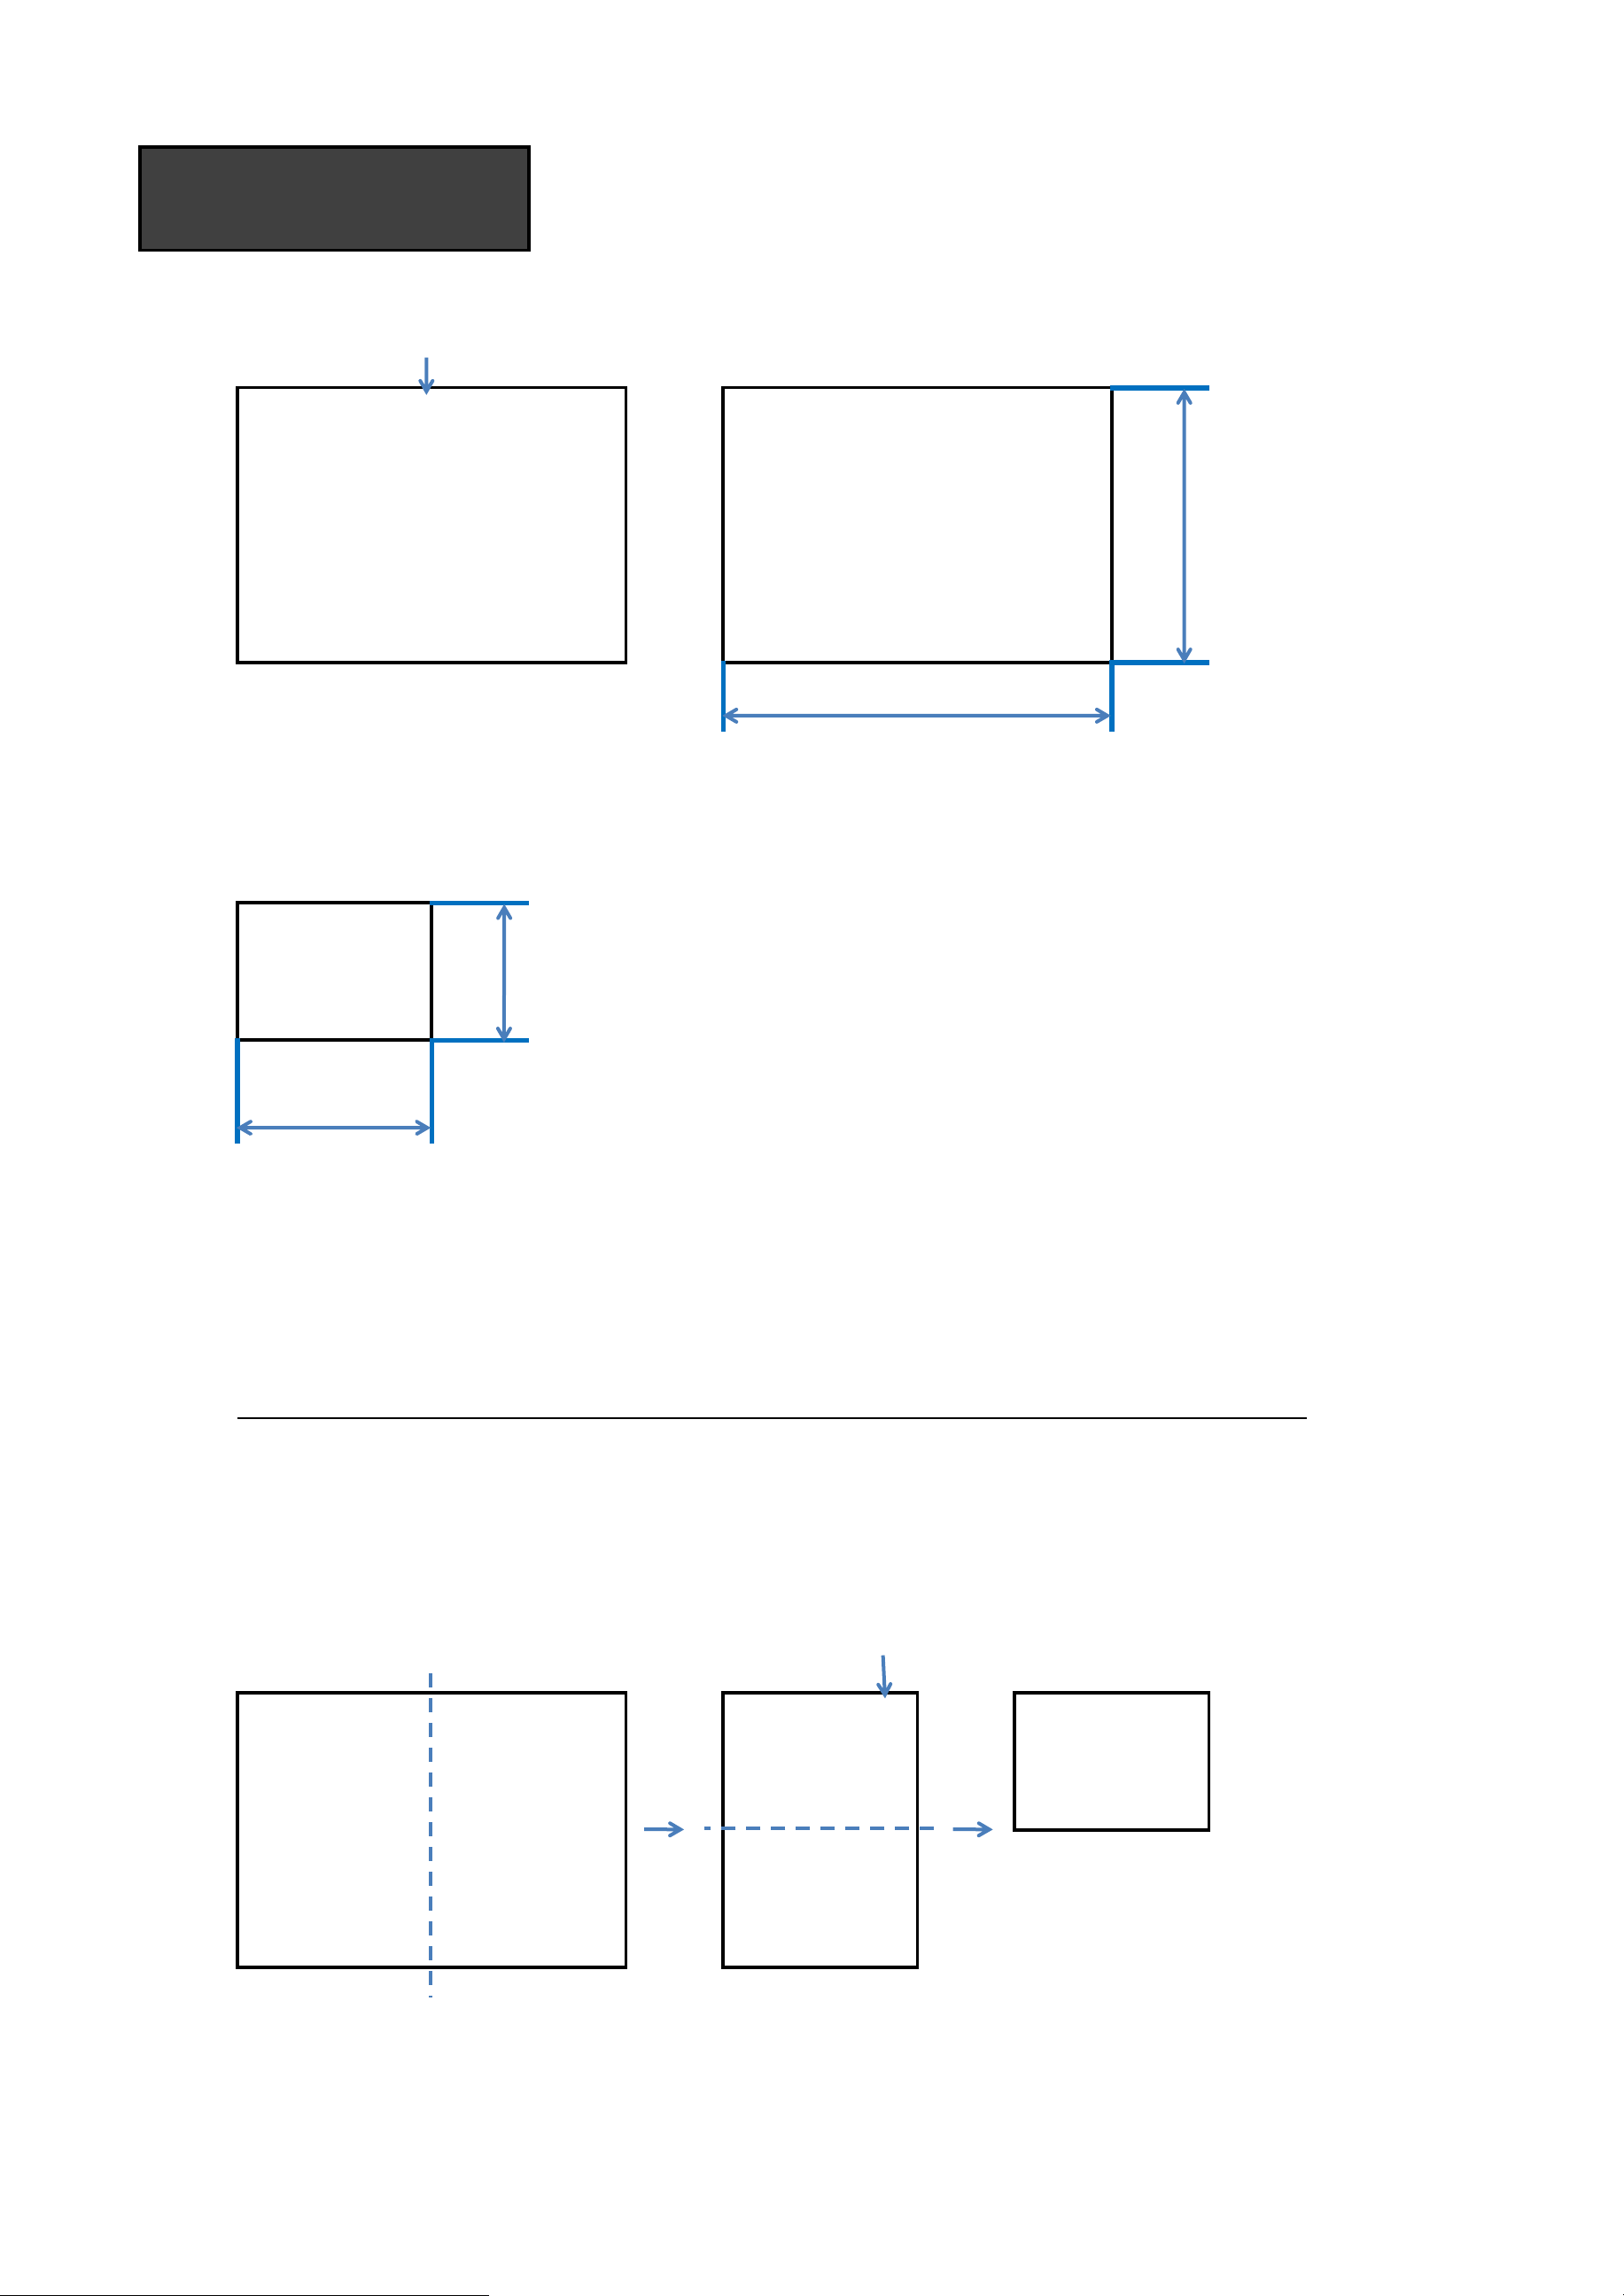
Dimensions (Width x Height x Depth) / Weight
Dimensions (Largeur x Hauteur x Profondeur) / Poids
Dimensiones (ancho x alto x profundidad) / Peso
To view the Owner's manual /
Pour consulter le manuel d'utilisation /
Para consultar el manual de usuario /
2191.8 mm x 1246.8 mm x 69.4 mm / 87.3 kg
2 191,8 mm x 1 246,8 mm x 69,4 mm / 87,3 kg
2191.8 mm x 1246.8 mm x 119 mm / 88.1 kg
2 191,8 mm x 1 246,8 mm x 119 mm / 88,1 kg
* For more details on how to operate the remote control,
please refer to the CD manual. * Pour plus d’informations sur le fonctionnement de la
télécommande, reportez-vous au manuel du CD.
FRAENG
(POWER) : Turns the monitor on or off.
1
MONITOR ON/OFF : Turns the monitor on. /
Turns the monitor off.
2
Volume Up / Down Button : Adjusts the volume.
3
SETTINGS : Accesses the main menus or saves your
input and exit menus.
4
Navigation Buttons : Scrolls through menus or options.
OK : Selects menus or options and conrms your input.
5
BACK: Allows you to move back one step in the user
interaction function.
6
USB Menu Control Buttons: Controls media playback.
7
ENERGY SAVING: Reduces power consumption by adjust-
ing peak screen brightness.
8
INPUT: Selects the input mode.
9
BRIGHTNESS Button: Adjust the brightness by pressing
the Up and Down buttons on the remote control. (Depending
upon the model, this feature may not be supported.)
10
AUTO: Automatically adjusts picture position and minimiz-
es image instability (available for RGB input only).(Depend-
ing upon the model, this feature may not be supported.)
11
(MARCHE) : Permet d'allumer ou d'éteindre le moniteur.
1
MONITOR ON/OFF: Permet d'allumer le moniteur. / Per-
met d'éteindre le moniteur.
2
Bouton de réglage du volume: Permet de régler le volume.
3
SETTINGS: Permet d'accéder aux menus principaux ou
d'enregistrer votre entrée et de quitter les menus.
4
Boutons de navigation: Permettent de parcourir les menus
ou options.
OK: Permet de sélectionner les menus ou options et de con-
rmer votre entrée.
5
BACK: Vous permet de revenir à l'étape précédente dans
une application interactive.
6
Touches de contrôle du menu USB : Permettent de con-
trôler un lecteur multimédia.
7
ENERGY SAVING: Permet de réduire la consommation
d’énergie en réglant le pic de luminosité de l’écran.
8
INPUT: Permet de sélectionner le mode d'entrée.
9
Bouton BRIGHTNESS : Permet de régler la luminosité
de l'image. Ce modèle ne prend pas en charge la fonction
PAGE. (Selon le modèle, cette fonctionnalité ne sera pas
prise en charge.)
10
AUTO: Permet de régler automatiquement la position de
l'image et de réduire l'instabilité de l'image (uniquement
disponible pour l'entrée RGB). (Selon le modèle, cette fonction-
nalité ne sera pas prise en charge.)
11
* Para obtener más información sobre cómo utilizar el
mando a distancia, consulte el manual del CD.
ESP
(ENCENDIDO/APAGADO) : Permite encender y
apagar el monitor.
1
MONITOR ON/OFF: Enciende el monitor. / Apaga el monitor.
2
Botón de volumen arriba/abajo: Permiten ajustar el nivel
de volumen.
3
SETTINGS : Permite acceder a los menús principales,
guardar la información introducida y salir de los menús.
4
Botones de navegación: Permiten desplazarse por los
menús y las opciones.
OK : Permite seleccionar menús u opciones y conrmar las
entradas.
5
BACK: Permite al usuario retroceder un paso en sus
acciones de interacción.
6
Botones de control del menú USB: Permite controlar la
reproducción de medios.
7
ENERGY SAVING: Reduce el consumo de energía
ajustando brillo de la pantalla al máximo.
8
INPUT: Permite seleccionar el modo de entrada.
9
Botón BRIGHTNESS: Ajusta la luminosidad de la pantalla.
La función de PAGE no es compatible con este modelo.
(Dependiendo del modelo, esta función podría no estar
disponible).
10
AUTO: Ajusta automáticamente la posición de la imagen
y minimiza su inestabilidad (disponible solo para entrada
RGB). (Dependiendo del modelo, esta función podría no
estar disponible).
11
1
4
6
8
9
10
11
13
2
3
5
7
12
EXIT: Quit all OSD tasks and applications.
13
EXIT: Quitter toutes les tâches et les applications OSD.
13 EXIT: Salga de todas las aplicaciones y tareas OSD.
13
12 HOME: Activates the Launcher.
12 HOME: Permet de revenir à la page d'accueil. 12 HOME: Activa el Iniciador.
Connecting the power /
Raccordement à l'alimentation /
Conexión a la alimentación
ENG
FRA
ESP
Power turn On/Off
Marche/Arrêt
Apagado / encendido
Alimentación AC 100-240 V~ 50/60 Hz 6,0 A

Other manuals for 98ls95a

2

This manual suits for next models

1

Other LG Digital Signage manuals

LG 75XS2C Quick start guide

LG

LG 75XS2C Quick start guide

LG LAT140GT82 User manual

LG

LG LAT140GT82 User manual

LG 75XS2E Quick start guide

LG

LG 75XS2E Quick start guide

LG LDAA012-MD User manual

LG

LG LDAA012-MD User manual

LG 98LS95D Quick start guide

LG

LG 98LS95D Quick start guide

LG 42SH7DB-B User manual

LG

LG 42SH7DB-B User manual

LG 98LS95A-5B.AUS User manual

LG

LG 98LS95A-5B.AUS User manual

LG WP600 User manual

LG

LG WP600 User manual

LG 110UM5K-B User manual

LG

LG 110UM5K-B User manual

LG VH7C Series User manual

LG

LG VH7C Series User manual

LG 49UH5C-B User manual

LG

LG 49UH5C-B User manual

LG 55VL5F User manual

LG

LG 55VL5F User manual

LG 86UL3G User manual

LG

LG 86UL3G User manual

LG 49VH7C Quick start guide

LG

LG 49VH7C Quick start guide

LG 65TC3D User manual

LG

LG 65TC3D User manual

LG 49LS75A User manual

LG

LG 49LS75A User manual

LG 47WV30BS User manual

LG

LG 47WV30BS User manual

LG 49VL5F User manual

LG

LG 49VL5F User manual

LG MP700 User manual

LG

LG MP700 User manual

LG 42LS73D User manual

LG

LG 42LS73D User manual

LG 47TS30MF-B.ATC User manual

LG

LG 47TS30MF-B.ATC User manual

LG 98ls95a User manual

LG

LG 98ls95a User manual

LG 49VL5PF User manual

LG

LG 49VL5PF User manual

LG 88BH7G User manual

LG

LG 88BH7G User manual

Popular Digital Signage manuals by other brands

EYEZONE P070-10x user manual

EYEZONE

EYEZONE P070-10x user manual

EYEZONE P070S-5 user manual

EYEZONE

EYEZONE P070S-5 user manual

Hi Sharp HS-MP3200 user manual

Hi Sharp

Hi Sharp HS-MP3200 user manual

Signaltech PHX Series troubleshooting guide

Signaltech

Signaltech PHX Series troubleshooting guide

EcLine ECMB002-S user manual

EcLine

EcLine ECMB002-S user manual

EYEZONE P102-1 user manual

EYEZONE

EYEZONE P102-1 user manual

protech prox KF-P231 user manual

protech

protech prox KF-P231 user manual

HIK VISION DS-D6065UN user manual

HIK VISION

HIK VISION DS-D6065UN user manual

protech prox KF-P230 Quick reference guide

protech

protech prox KF-P230 Quick reference guide

ViewSonic EP5555T specification

ViewSonic

ViewSonic EP5555T specification

Aroma360 ISK instruction manual

Aroma360

Aroma360 ISK instruction manual

Advanced Kiosks Outdoor Monolith owner's manual

Advanced Kiosks

Advanced Kiosks Outdoor Monolith owner's manual

AXIOMTEK OPS885 Series user manual

AXIOMTEK

AXIOMTEK OPS885 Series user manual

IBASE Technology SI-60E user manual

IBASE Technology

IBASE Technology SI-60E user manual

Samsung LH75OMREBGB user manual

Samsung

Samsung LH75OMREBGB user manual

All Traffic Solutions Shield quick start guide

All Traffic Solutions

All Traffic Solutions Shield quick start guide

BenQ DH551F user manual

BenQ

BenQ DH551F user manual

Enoch Systems DisplayVue A15 user manual

Enoch Systems

Enoch Systems DisplayVue A15 user manual

manuals.online logo
manuals.online logoBrands
  • About & Mission
  • Contact us
  • Privacy Policy
  • Terms and Conditions

Copyright 2025 Manuals.Online. All Rights Reserved.