LG 19LS4R Series User manual

담 당 관리자
MODEL BRAND
Printing Specification
1. Trim Size (Format) : 148mm x 210 mm
2. Printing Colors
•Cover : 1 COLOR (BLACK)
•Inside : 1 COLOR (BLACK)
3. Stock (Paper)
•Cover : Coated paper , S/W 150 g/㎡
•Inside : Uncoated paper , 백상지 60 g/㎡
4. Printing Method : Off-set
5. Bindery : Perfect bind
6. Language : English / German / French / Italian / Spanish / Portuguese
/ Netherlands / Greek / Hungarian/ Polish/ Czech/ Slovak/ Romanian/ Bulgarian
/ Swedish/ Norwegian/ Finnish/ Danish/ Estonia/ Lithuania/ Latvia/Slovenian (22)
7. Number of pages : 316
Model Description
Part No.
2.
User’s Guide Specification
1.
User’s Guide Specification
Changes
4.
REV.
NO. MM/DD/YY SIGNATURE CHANGE NO. CHANGE CONTENTS
2
3
4
5
7
6
SUFFIX
SHIN HJ
07.01.31
LG MFL33997808
(0707-REV03)
KIM JONG OK
07.01.31
(1) Origin Notification
* LGEIN : Printed in Indonesia * LGEWA : Printed in U.K.
* LGESP : Printed in Brazil * LGEMX : Printed in Mexico
* LGEND : Printed in China * LGEIL : Printed in India
8
9
Special Instructions3.
Product Name 17/20LS5R
19/22LS4R
EU
17/20LS5R-ZA
19/22LS4R-ZA
1
This part contain Eco-hazardous substances (Pb, Cd, Hg, Cr6+, PBB, PBDE, etc.) within LG standard level,
Details should be followed Eco-SCM management standard[LG(56)-A-2524].
Especially, Part should be followed and controlled the following specification.
(1)Eco-hazardous substances test report should be submitted when Part certification test and First Mass Production.
(2) Especially, Don’t use or contain lead(Pb) and cadmium(Cd) in ink.
Notes
03/06/06 SHIN.H.J. S7-74340 Amended Polish Language
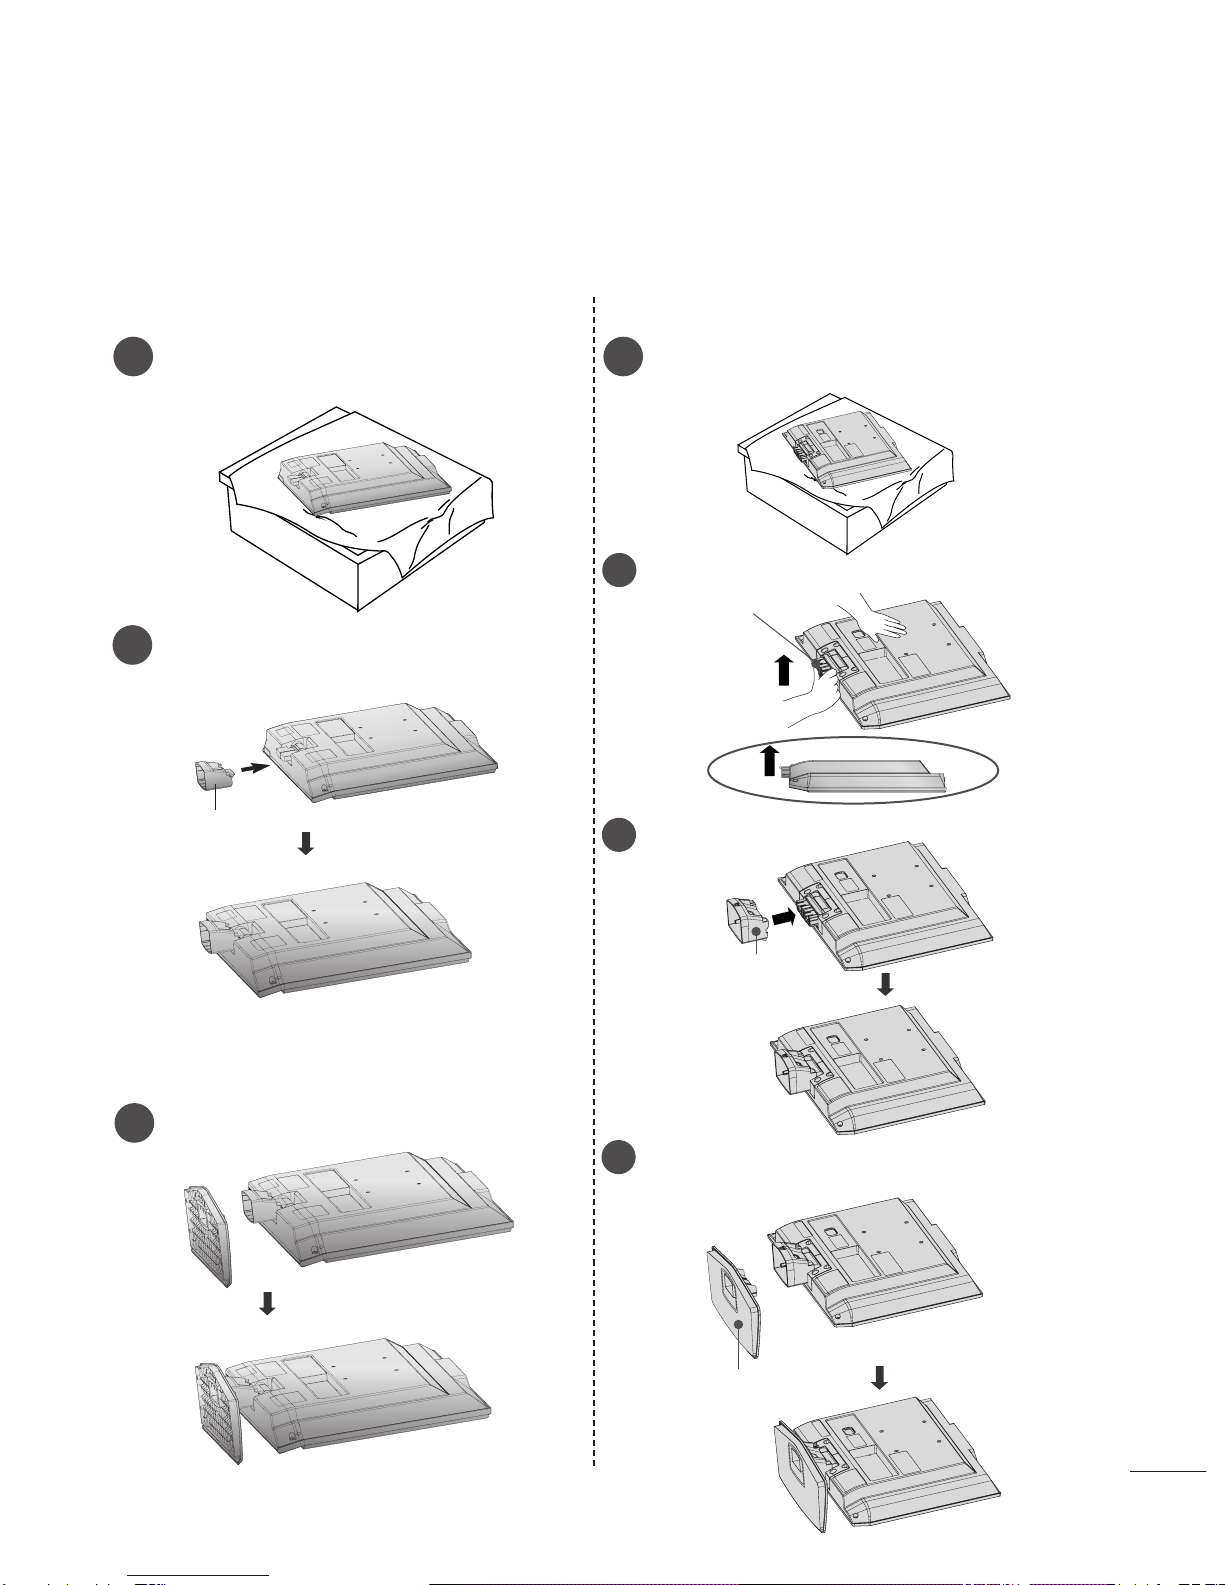
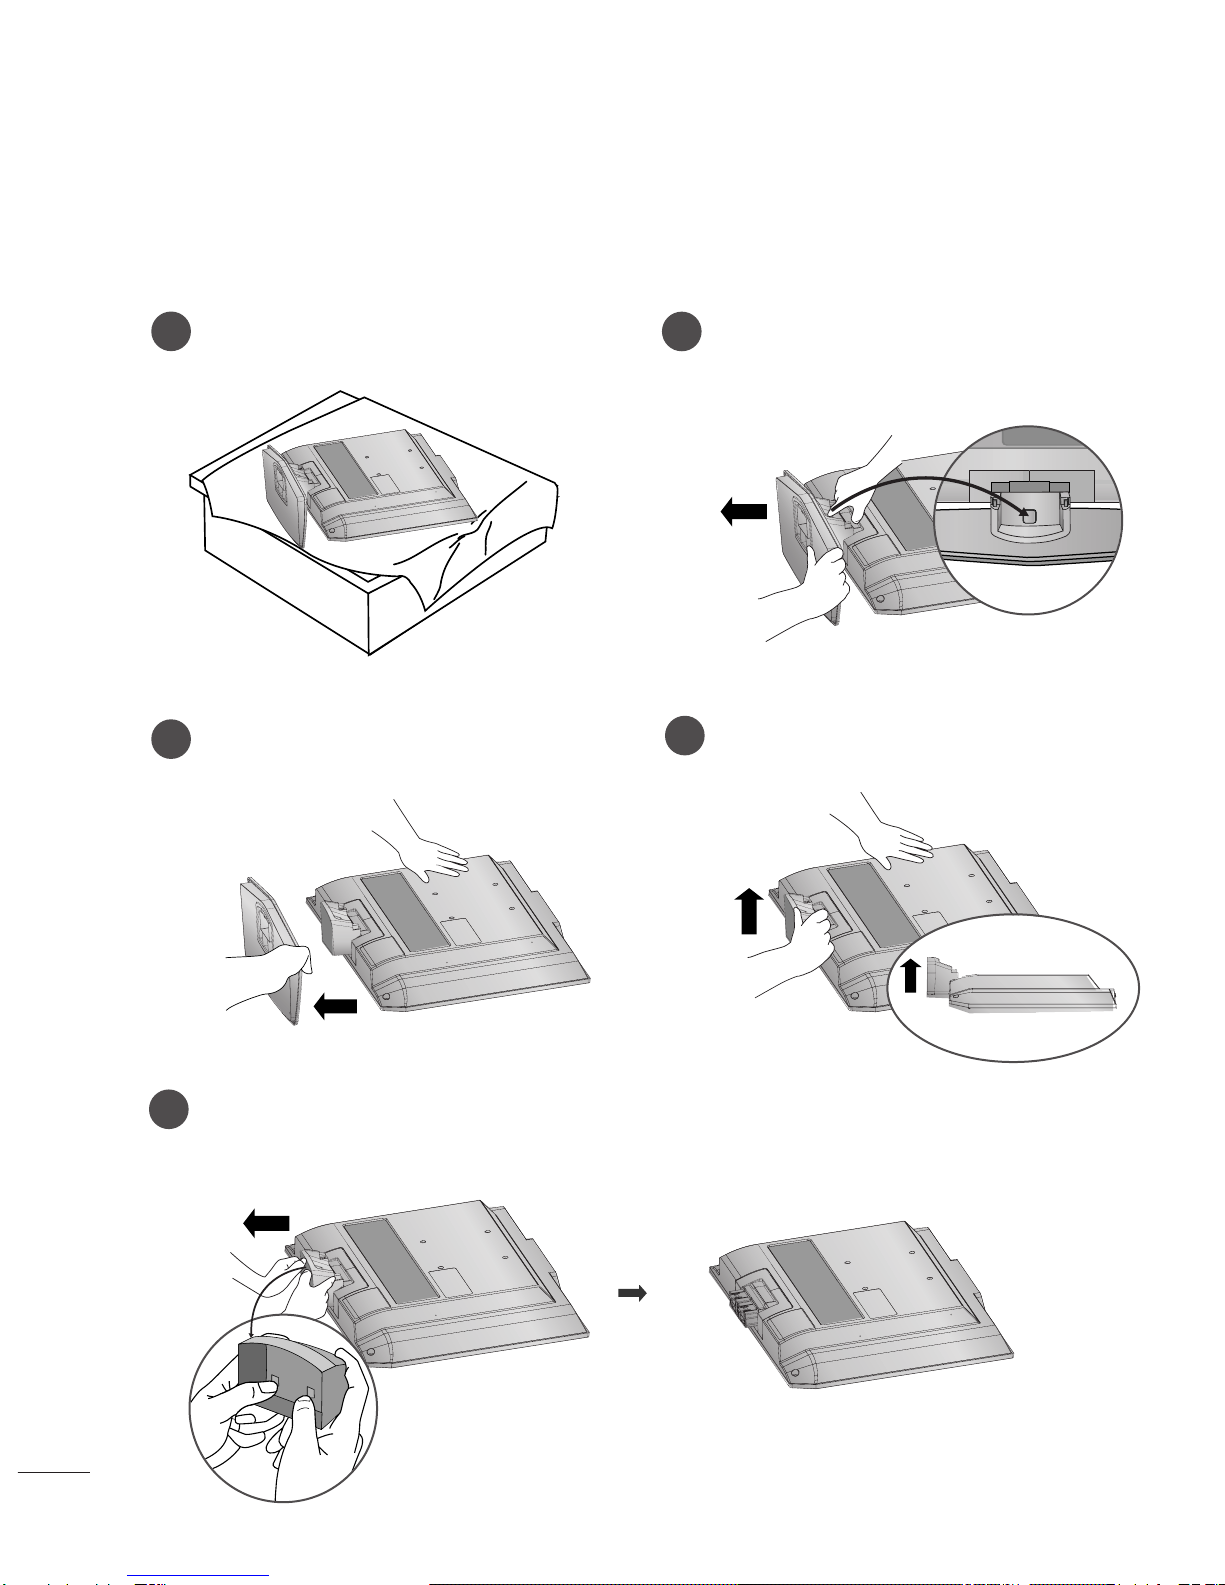
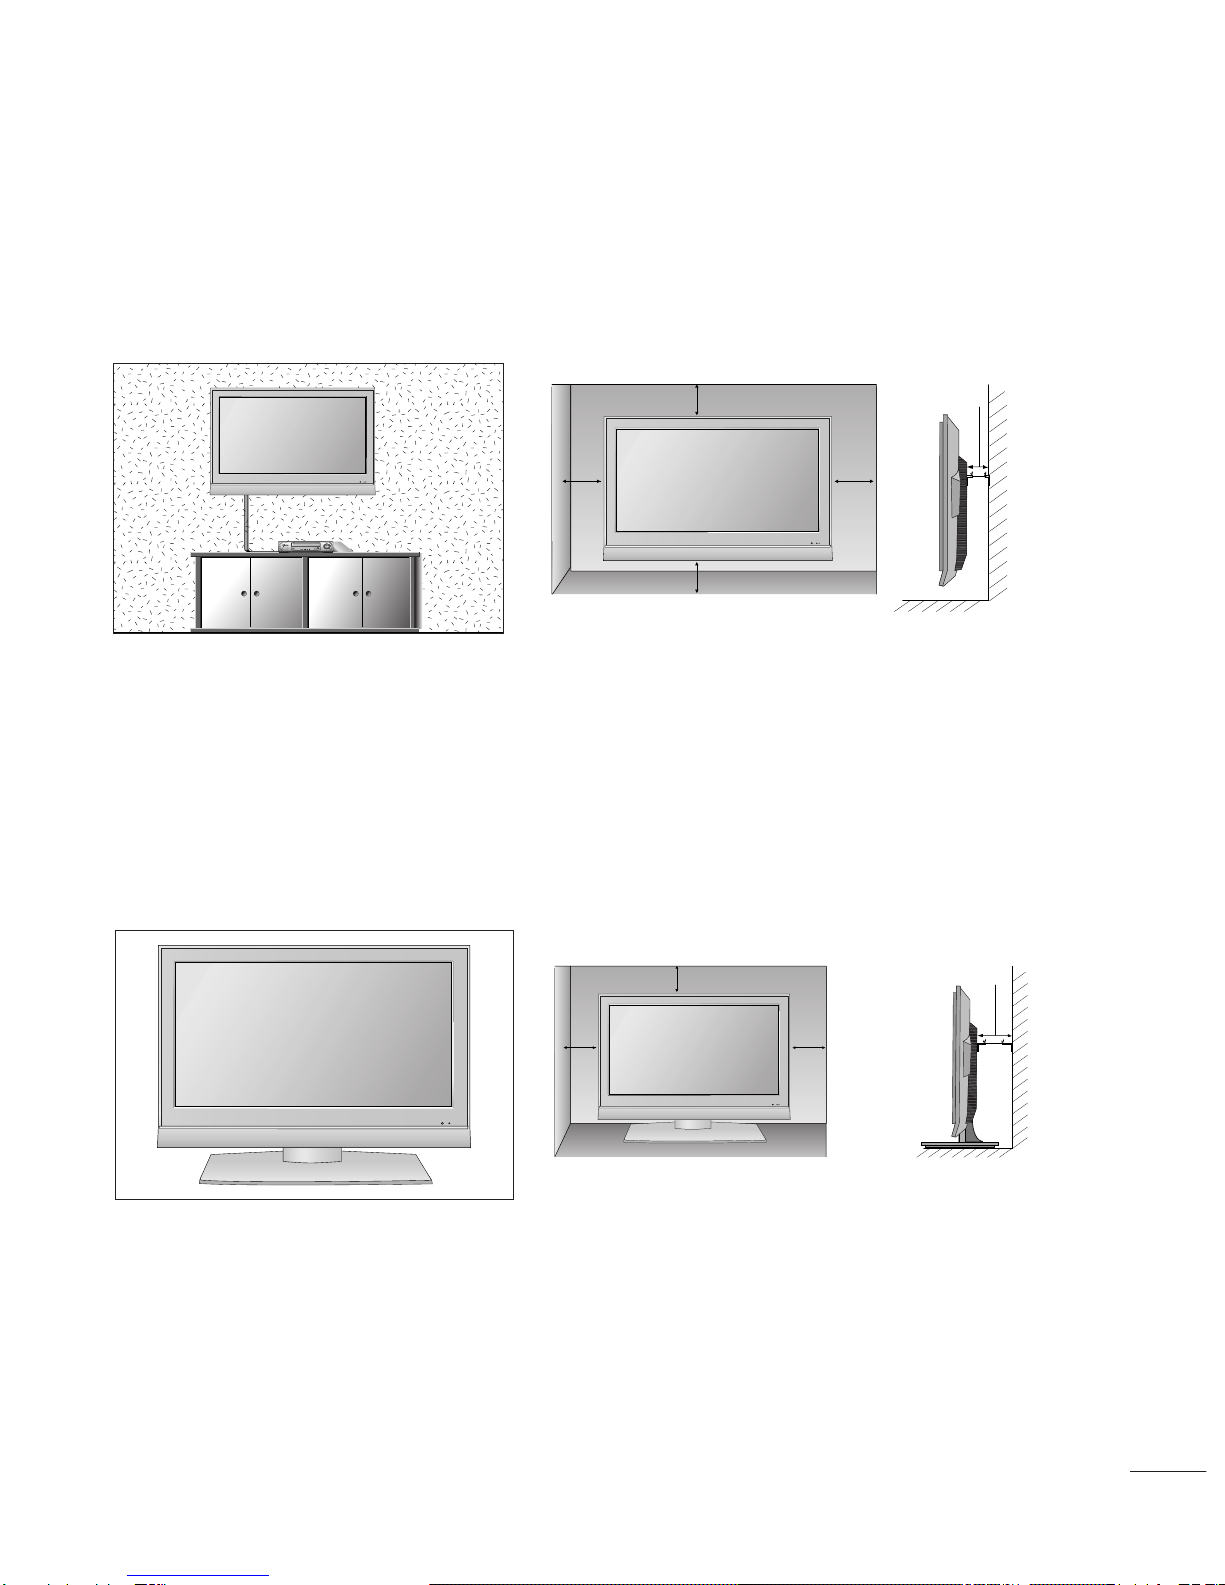
04/25/07 SHIN.H.J. S7-80786 Amended Stand installation
07/23/07 Hwang MG S7-88619 Added model for 20LS5RC-ZA and Weight.

Pagination sheet
Pagination sheet P/NO. MFL33997808
Total pages : 316 pages
Blank 1…. 9
Common part
Blank 1…9
LG(EN)
LG(GE)
LG(FR)
Rear cover
Rear cover
Rear cover
LG(IT)
Rear cover
LG(SP)
Rear cover
LG(PO)
Rear cover
LG(NE)
Rear cover
LG(GR)
Rear cover
10
Blank 1…. 9
Blank 1…. 9
Blank 1…. 9
Blank 1…. 9
Blank 1…. 9
Blank 1…. 9
10
10
10
10
10
10
LG(EN)
P/no Blank I….
Front cover
LG(EN)
Front cover
Multi part
LG(GE)
LG(FR)
LG(IT)
Front cover
Front cover
Front cover
LG(SP)
Front cover
LG(PO)
Front cover
LG(NE)
Front cover
LG(GR)
Front cover
LG(HU)
Front cover
11
11
11
11
11
11
11
10 11
IV VIV
….

Pagination sheet
Pagination sheet P/NO. MFL33997808
Total pages : 316 pages
Blank 1…. 9
Blank 1…9
LG(HU)
LG(PL)
LG(CZ)
Rear cover
Rear cover
Rear cover
LG(SK)
Rear cover
LG(RO)
Rear cover
LG(BU)
Rear cover
LG(SW)
Rear cover
LG(NO)
Rear cover
10
Blank 1…. 9
Blank 1…. 9
Blank 1…. 9
Blank 1…. 9
Blank 1…. 9
Blank 1…. 9
10
10
10
10
10
10
LG(PL)
LG(CZ)
LG(SK)
Front cover
Front cover
Front cover
LG(RO)
Front cover
LG(BU)
Front cover
LG(SW)
Front cover
LG(NO)
Front cover
LG(FI)
Front cover
11
11
11
11
11
11
11
10 11
Blank 1…. 9 10
LG(DA)
Front cover
11
LG(FI)
Reart cover

Pagination sheet
Pagination sheet P/NO. MFL33997808
Total pages : 316 pages
LG(SV)
Reart cover
Blank 1…. 9
Blank 1…9
LG(DA)
LG(EE)
LG(LI)
Rear cover
Rear cover
Rear cover
LG(LA)
Rear cover
10
Blank 1…. 9
Blank 1…. 9
Blank 1…. 9
10
10
10
LG(EE)
LG(LI)
LG(LA)
Front cover
Front cover
Front cover
LG(SV)
Front cover
11
11
11
11
10 11

An extended Owner’s Manual that contains information on the advanced fea-
tures of these LG TV sets is located on the CD- ROM rovided in an electronic
version.
To read these files, you will need to use a Personal Com uter (PC) equi ed
with a CD- ROM drive.
Please read this manual carefully before operating your set.
Retain it for future reference.
Record model number and serial number of the set.
See the label attached on the back cover and quote
this information to your dealer when you require service.
LCD TV
OWNER’S MANUAL
LCD TV MODELS
19LS4R*
22LS4R*
17LS5R*
20LS5R*
P/NO MFL33997808 (0707-REV03)
Printed in Korea

7-0323B_2-ne 4/10/06 7:24 PM Page 76

I
PREPARATION
STAND INSTALLATION
1
Carefully place the product screen side down on a cushioned
surface that will protect product and screen from damage.
■
Here shown may be somewhat different from your TV.
3Place the product stand on the product as shown.
17/20LS5R*
1
Carefully place the product screen side down on a cushioned
surface that will protect product and screen from damage.
19/22LS4R*
2
Assemble parts of stand body with
the product
of the stand.
Insert stand body into
the product
until clicking sound.
stand body
Hold the hhiinnggee bbooddyyand bend it upward.
2
Hinge Body
Insert the ssttaanndd bbooddyyinto the product until clicking sound.
Stand Body
3
Assemble the parts of the ssttaanndd bbooddyywith
ccoovveerr bbaasseeof the product.
4
Cover Base

II
PREPARATION
DETACHING STAND
12
3
Place the set with its front facing downward on a
cushion or soft cloth. Pull cover base backward during pressing botton
on stand body.
Hold cover base and pull with shake it backward
to separate from stand body. 4Hold the stand and bend it upward.
5Pull stand body to separate from set during
pressing 2 latches.
■
Here shown may be somewhat different from your TV.

III
DESKTOP PEDESTAL INSTALLATION
For proper ventilation, allo a clearance of 4inches on each side from the all.
WALL MOUNT: HORIZONTAL INSTALLATION
For proper ventilation, allo a clearance of 4" on each side and from the all. Detailed installation
instructions are available from your dealer, see the optional Tilt Wall Mounting Bracket Installation and
Setup Guide.
4 inches
4 inches
4 inches 4 inches
4 inches
4 inches
4 inches4 inches
4 inches

IV
PREPARATION
FRONT PANEL CONTROLS
■
This is a simplified representation of the front panel. Here shown may be somewhat different from your TV.
■
If your product has a protection film attached, remove the film and then wipe the product with a polishing
cloth.
17LS5R*/ 20LS5R*
INPUT MENU VOL PR
/I OK
INPUT MENU VOL PR
/I OK
POWER
Button INPUT
Button MENU
Button OK
Button VOLUME
Buttons
Remote Control
Sensor
Po er/Standby Indicator
• illuminates red in standby mode.
• illuminates green when the set is switched on.
17LS5R*
20LS5R*
19LS4R*/ 22LS4R*
INPUT MENU VOL PR
/I
OK
Remote Control Sensor
Po er/Standby Indicator
• illuminates red in standby mode.
• illuminates green when the set is
switched on.
VOLUME
Buttons PROGRAMME
Buttons
PROGRAMME
Buttons
POWER
Button INPUT
Button MENU
Button OK
Button

V
17LS5R* / 20LS5R*
BACK PANEL INFORMATION
■
This is a simplified representation of the back panel. Here shown may be somewhat different from your TV.
H/P
RGB(PC/DTV) IN ANTENNA IN
AUDIO
(RGB) IN
S-VIDEO
AV IN 2
VIDEO
AV 1
23
45 6 7
1
Power Cord Socke
This TV operates on an AC power. The voltage is
indicated on the Specifications page. Never
attempt to operate the TV on C power.
RGB/Audio Inpu
Connect the monitor output from a PC/ TV to
the appropriate input port.
An enna Inpu
Connect over-the-air signals to this jack.
Euro Scar Socke (AV1)
Connect scart socket input or output from an
external device to these jacks.
Audio/Video Inpu
Connect audio/video output from an external
device to these jacks.
S-Video Inpu
Connect S-Video out from an S-VI EO device.
Headphone Inpu
SERVICE ONLY
RS-232C Inpu (SERVICE ONLY)
(only 20LS5RC model)
Connect the serial port of the control devices
to the RS-232C jack.
1
2
3
4
5
6
7
8
9
17LS5R*
20LS5R*
1
H/P
ANTENNA IN
S-VIDEO
AV IN 2
VIDEO
AV 1
SERVICE ONLY
RS-232C
(SERVICE ONLY)
389
5 6 74

VI
BACK PANEL INFORMATION
PREPARATION
19LS4R* / 22LS4R*
RGB (PC/DTV) IN
AV 1
S-VIDEO
AV IN 2
VIDEO LR
AUDIO
Y
PB
PR
LR
VIDEO
COMPONENT IN
AUDIO
HDMI/DVI IN
AUDIO
(RGB/DVI) IN
H/P
ANTENNA IN
234
5 96 7
Power Cord Socke
This TV operates on an AC power. The voltage is
indicated on the Specifications page. Never
attempt to operate the TV on C power.
HDMI/DVI IN Inpu
Connect a H MI signal to H MI IN.
Or VI(VI EO)signal to H MI/ VI port with VI
to H MI cable.
RGB/Audio Inpu
Connect the monitor output from a PC/ TV to
the appropriate input port.
An enna Inpu
Connect over-the-air signals to this jack.
Euro Scar Socke (AV1)
Connect scart socket input or output from an
external device to these jacks.
Audio/Video Inpu
Connect audio/video output from an external
device to these jacks.
Componen Inpu
Connect a component video/audio device to
these jacks.
S-Video Inpu
Connect S-Video out from an S-VI EO device.
Headphone Inpu
1
2
3
4
5
6
7
8
9
8
1

An extended Owner’s Manual that contains information on the advanced fea-
tures of these LG TV sets is located on the CD- ROM rovided in an electronic
version.
To read these files, you will need to use a Personal Com uter (PC) equi ed
with a CD- ROM drive.
Please read this manual carefully before operating your set.
Retain it for future reference.
Record model number and serial number of the set.
See the label attached on the back cover and quote
this information to your dealer when you require service.
LCD TV
OWNER’S MANUAL
LCD TV MODELS
19LS4R*
22LS4R*
17LS5R*
20LS5R*


1
ENGLISH
SAFETY INSTRUCTIONS
• Please read these safety precautions carefully before using the product.
• In this manual, illustrations sho n may differ slightly from your product.
If these arning messages are ignored, you risk serious injury, accident or death.
If these caution messages are ignored, you risk injury or damage to the product.
PPrreeccaauuttiioonn iinn IInnssttaalllliinngg tthhee PPrroodduucctt
WARNING
WARNING
CAUTION
Keep away from heat sources like electrical heaters.
- Electrical shock, fire, malfunction or deformation may occur.
If you can smell smoke, or other odors, or hear a
strange sound; unplug the power cord and contact the
service center.
- If you continue to use without taking proper measures, elec-
trical shock or fire can occur.
Do not use the product in a damp place such as a bath-
room or any place where it is likely to get wet.
- This may cause a fire or could give an electric shock.
Install the product on a flat and stable place that
has no risk of dropping the product.
- If the product is dropped, you may be injured or the
product may be damaged.
Keep the product away from direct sunlight.
- The product could be damaged.
Do not place the product in a built-in installation
such as bookcase or cabinet.
- Ventilation required.
EElleeccttrriiccaall PPooeerr RReellaatteedd PPrreeccaauuttiioonnss
Make sure to connect the power cable to an electrical
ground.
- You may be electrocuted or injured.
Do not touch the power plug with wet hands.
Additionally, it the cord pin is wet or covered with
dust, dry the power plug completely or wipe dust off.
- You may be electrocuted due to excess moisture.
During a thunder or lightning storm, unplug the
power cable or signal cable.
- You may be electrocuted or a fire could break out.
Protect the power cord from physical or mechanical
abuse, such as being twisted, kinked, pinched, closed in
a door, or walked upon. Pay particular attention to plugs,
wall outlets, and the point where the cord exits the
appliance.
PPrreeccaauuttiioonnss iinn MMoovviinngg tthhee PPrroodduucctt
Do not shock the product when moving it.
- You may be electrocuted or the product could be dam-
aged.
Make the panel face forward and hold it with both
hands to move.
- If you drop the product, the damaged product could
cause an electric shock or fire. Contact the service cen-
ter for repair.
Make sure to turn off the product.
Make sure to remove all cables before moving the
product.
- You may be electrocuted or the product could be dam-
aged.
PPrreeccaauuttiioonnss iinn UUssiinngg tthhee PPrroodduucctt
Do not disassemble, repair or modify the product in
any way.
- Fire or electrocution could occur.
- Contact the service center for check, calibration or
repair.
To reduce the risk of fire or electric shock, do not
expose this apparatus to rain or moisture.
The apparatus should not be exposed to dripping
or splashing and no objects filled with liquids, such
as vases, should be placed on the apparatus.
Refer all servicing to qualified service personnel.
Servicing is required when the apparatus has been
damaged in any way, such as if power supply cords or
plugs have been damaged, liquid has been spilt, objects
have fallen in the product, the product has been
exposed to rain or moisture, the product does not
operate normally, or the product has been dropped.
WARNING
WARNING
CAUTION
CAUTION
CAUTION
CAUTION
WARNING

2
ENGLISH
5
1
2
3
4
6
5
7
8
9
[[iitthh AARRCC]]
WATCHING TV / PROGRAMME CONTROL
REMOTE CONTROL KEY FUNCTIONS
When using the remote control, aim it at the remote control sensor on the TV.
POWER
TV
INPUT
Switches the set on from standby or off to standby.
Returns to the TV viewing from any mode.
Switches the set on from standby.
If you press the button once, the input source OSD will
appear on screen as shown. Press the DD/ EEbutton and
then OK button to select the desired input source.
(19/22LS4R* TV, AV1, AV2, Component, RGB, HDMI/DVI)
(17LS5R* TV, AV1, AV2, RGB)(20LS5R* TV, AV1, AV2)
0~9 number
button Selects a programme.
Selects numbered items in a menu.
Switches the set on from standby.
LIST
Q.VIEW
Displays the programme table.
Returns to the previously viewed programme.
[[iitthhoouutt AARRCC]]
2
1
3
MUTE
PSM
SSM
Switches the sound on or off.
Recalls your preferred picture setting.
Recalls your preferred sound setting.
4
THUMBSTICK
(Up/Do n/Left/
Right)
OK
Allows you to navigate the on-screen menus and adjust
the system settings to your preference.
Adjusts the volume.
Selects a programme.
Switches the set on from standby. (Up/Down)
Accepts your selection or displays the current mode.
Coloured
buttons
TELETEXT
BUTTONS
These buttons are used for teletext (only TTEELLEETTEEXXTT
models) or PPrrooggrraammmmee eeddiitt.
These buttons are used for teletext.
For further details, see the ‘Teletext’ section.
6
5
8

3
ENGLISH
/
1
2
7
4
6
5
3
8
9
Installing Batteries
■
Open the battery compartment cover on the back side and install the
batteries matching correct polarity (+with +,-with -).
■
Install two 1.5V AAA batteries. Don’t mix old or used batteries with
new ones.
■
Close cover.
I/II Selects the sound output.
7
ARC
*
Select your desired picture format.
No function
8
MENU
SLEEP
Selects a menu.
Sets the sleep timer.
9

4
ENGLISH
WATCHING TV / PROGRAMME CONTROL
ANTENNA CONNECTION
ANTENNA IN
ANTENNA IN
■For optimum picture quality, adjust antenna direction.
■An antenna cable and converter are not supplied.
Multi-family Dwellings/A artments
(Connect to wall antenna socket)
Single-family Dwellings /Houses
(Connect to wall jack for outdoor antenna)
Outdoor
Antenna
Wall
Antenna
Socket
RF Coaxial Wire (75 ohm)
Antenna
UHF
Signal
Am lifier
VHF
■In poor signal areas,to get better picture quality, install a signal amplifier to the antenna as shown to the right.
■If signal needs to be split for two TVs,use an antenna signal splitter for connection.
■To prevent the equipment damage, never plug in any po er cords until you have finished connecting all equipment.

5
ENGLISH
Press the VVOOLL F// Gbutton to adjust the volume.
If you want to switch the sound off, press the MMUUTTEEbutton.
You can cancel the Mute function by pressing the MMUUTTEE, VVOOLLF// G
oorrII//IIIIbutton.
PROGRAMME SELECTION
TURNING ON THE TV
If your TV ill be turned on, you ill be able to use its features.
First, connect power cord correctly.
At this moment, the TV switches to standby mode.
■In standby mode to turn TV on, press the , IINNPPUUTT, PPRR DD // EE,
button on the TV or press the PPOOWWEERR, TTVV, IINNPPUUTT, PPRR DD // EE,
NNuummbbeerr((00~99))button on the remote control and then the TV will
switch on.
1
VOLUME ADJUSTMENT
Press the PPRRDD // EEor NNUUMMBBEERRbuttons to select a programme number.
2
3
1
1

6
ENGLISH
WATCHING TV / PROGRAMME CONTROL
ON-SCREEN MENU LANGUAGE / COUNTRY SELECTION
Press the DD // EE // F//G button and then, OOKK button to select your
desired language.
Press the DD // EE // F//G button and then, OOKK button to select your
country.
Press the MMEENNUUbutton and then use DD // EE button to select the Special
menu.
Press the Gbutton and then use DD // EEbutton to select Language.
The menus can be shown on the screen in the selected language.
Or, Press the Gbutton and then use DD // EEbutton to select Country.
Press the Gbutton and then use DD // EEbutton to select your desired lan-
guage or country.
Press the OOKK button.
Repeatedly press the MMEENNUUbutton to return to normal TV viewing.
1
2
3
4
5
Installation guide menu appears on TV screen when it is turned on for the first time.
1
2
* If you want to change Language/ Country selection
NOTE
!
GGIf you don’t finish set up IInnssttaallllaattiioonn GGuuiiddee by pressing MMEENNUUbut-
ton or time out of OSD (On Screen Display) display, it will continuously
appear until completing set up whenever the set is turned on.
GGIf you select wrong local country, the teletext may not appear correctly
on the screen and some problem may happen during teletext operation.
GGHebrew is added to CCoouunnttrryyof IInnssttaallllaattiioonn GGuuiiddee according to the
countries which using Hebrew language.
Other manuals for 19LS4R Series
4
This manual suits for next models
3
Table of contents
Other LG LCD TV manuals