LG 60PB6500 User manual

Please read this manual carefully before operating
your TV and retain it for future reference.
OWNER’S MANUAL
PLASMA TV
www.lg.comP/NO: MFL68103412 (1402-REV01)
50PB560B
60PB5600
50PB650B
60PB6500
*MFL68103412*

ENGLISH
2IMPORTANT SAFETY INSTRUCTIONS
yDo not allow the television to become wet.
yClean only with a dry cloth.
yDo not block any ventilation openings. Install
in accordance with the manufacturer’s
instructions.
yDo not install near any heat sources such
as radiators, heat registers, stoves, or other
apparatus (including amplifiers) that produce
heat.
yDo not defeat the safety purpose of the
polarized or grounding-type plug. A polarized
plug has two blades with one wider than
the other. A grounding type plug has two
blades and a third grounding prong. The
wide blade or the third prong are provided
for your safety. If the provided plug does not
fit into your outlet, consult an electrician for
replacement of the obsolete outlet (Can differ
by country).
yDo not press strongly upon the panel with a
hand or a sharp object such as a nail, pencil
or pen, or make a scratch on it.
Read these instructions.
Keep these instructions.
Heed all warnings.
Follow all instructions.
IMPORTANT SAFETY INSTRUCTIONS
Always comply with the following precautions to avoid dangerous situations and ensure peak
performance of your product.
Short-circuit
Breaker
Power Supply
WARNING/CAUTION
RISK OF ELECTRIC SHOCK
DO NOT OPEN
TO REDUCE THE RISK OF ELECTRIC
SHOCK DO NOT REMOVE COVER (OR
BACK). NO USER SERVICEABLE PARTS
INSIDE. REFER TO QUALIFIED SERVICE
PERSONNEL.
WARNING/CAUTION
RISK OF ELECTRIC SHOCK
DO NOT OPEN
The lightning flash with arrowhead
symbol, within an equilateral triangle,
is intended to alert the user to the presence
of uninsulated “dangerous voltage” within
the product’s enclosure that may be of
sufficient magnitude to constitute a risk of
electric shock to persons.
WARNING/CAUTION
RISK OF ELECTRIC SHOCK
DO NOT OPEN
The exclamation point within an
equilateral triangle is intended to alert
the user to the presence of important
operating and maintenance (servicing)
instructions in the literature accompanying
the appliance.
WARNING/CAUTION
- TO REDUCE THE RISK OF FIRE AND
ELECTRIC SHOCK, DO NOT EXPOSE THIS
PRODUCT TO RAIN OR MOISTURE.
WARNING
If you ignore the warning message, you
may be seriously injured or there is a
possibility of accident or death.
CAUTION
If you ignore the caution message, you may
be slightly injured or the product may be
damaged.
NOTE
The note helps you understand and use
the product safely. Please read the note
carefully before using the product.

ENGLISH
3
IMPORTANT SAFETY INSTRUCTIONS
yProtect the power cord from being walked on
or pinched particularly at plugs, convenience
receptacles, and the point where they exit
from the apparatus.
yOnly use attachments/accessories specified
by the manufacturer.
yUse only with a cart, stand, tripod, bracket,
or table specified by the manufacturer, or
sold with the apparatus. When a cart is used,
use caution when moving the cart/apparatus
combination to avoid injury from tip-over.
yUnplug this apparatus during lightning storms
or when unused for long periods of time.
yRefer all servicing to qualified service
personnel. Servicing is required when
the apparatus has been damaged in any
way, such as power-supply cord or plug is
damaged, liquid has been spilled or objects
have fallen into the apparatus, the apparatus
has been exposed to rain or moisture, does
not operate normally, or has been dropped.
yDo not stick metal objects or any other
conductive material into the power cord. Do
not touch the end of the power cord while it
is plugged in.
yKeep the packing anti-moisture material or
vinyl packing out of the reach of children. Anti-
moisture material is harmful if swallowed. If
swallowed by mistake, induce vomiting and
go the nearest hospital. Additionally, vinyl
packing can cause suffocation. Keep it out of
the reach of children.
yCAUTION concerning the Power Cord
(Can differ by country):
It is recommended that appliances be
placed upon a dedicated circuit; that is, a
single outlet circuit which powers only that
appliance and has no additional outlets or
branch circuits. Check the specification page
of this owner’s manual to be certain. Do not
connect too many appliances to the same
AC power outlet as this could result in fire or
electric shock. Do not overload wall outlets.
Overloaded wall outlets, loose or damaged
wall outlets, extension cords, frayed power
cords, or damaged or cracked wire insulation
are dangerous. Any of these conditions could
result in electric shock or fire. Periodically
examine the cord of your appliance, and
if its appearance indicates damage or
deterioration, unplug it, discontinue use of
the appliance, and have the cord replaced
with an exact replacement part by an
authorized service. Protect the power cord
from physical or mechanical abuse, such as
being twisted, kinked, pinched, closed in a
door, or walked upon. Pay particular attention
to plugs, wall outlets, and the point where
the cord exits the appliance. Do not move
the TV with the power cord plugged in. Do
not use a damaged or loose power cord. Be
sure do grasp the plug when unplugging the
power cord. Do not pull on the power cord to
unplug the TV.
yWarning - To reduce the risk of fire or
electrical shock, do not expose this product
to rain, moisture or other liquids. Do not
touch the TV with wet hands. Do not install
this product near flammable objects such
as gasoline or candles, or expose the TV to
direct air conditioning.
yDo not expose to dripping or splashing and
do not place objects filled with liquids, such
as vases, cups, etc. on or over the apparatus
(e.g. on shelves above the unit).

ENGLISH
4IMPORTANT SAFETY INSTRUCTIONS
yGrounding
(Except for devices which are not grounded.)
Ensure that you connect the earth ground
wire to prevent possible electric shock
(i.e. a TV with a three-prong grounded AC
plug must be connected to a three-prong
grounded AC outlet). If grounding methods
are not possible, have a qualified electrician
install a separate circuit breaker. Do not try to
ground the unit by connecting it to telephone
wires, lightening rods, or gas pipes.
Short-circuit
Breaker
Power
Supply
yAs long as this unit is connected to the AC
wall outlet, it is not disconnected from the
AC power source even if the unit is turned
off.
yDo not attempt to modify this product in
any way without written authorization from
LG Electronics. Unauthorized modification
could void the user’s authority to operate this
product.
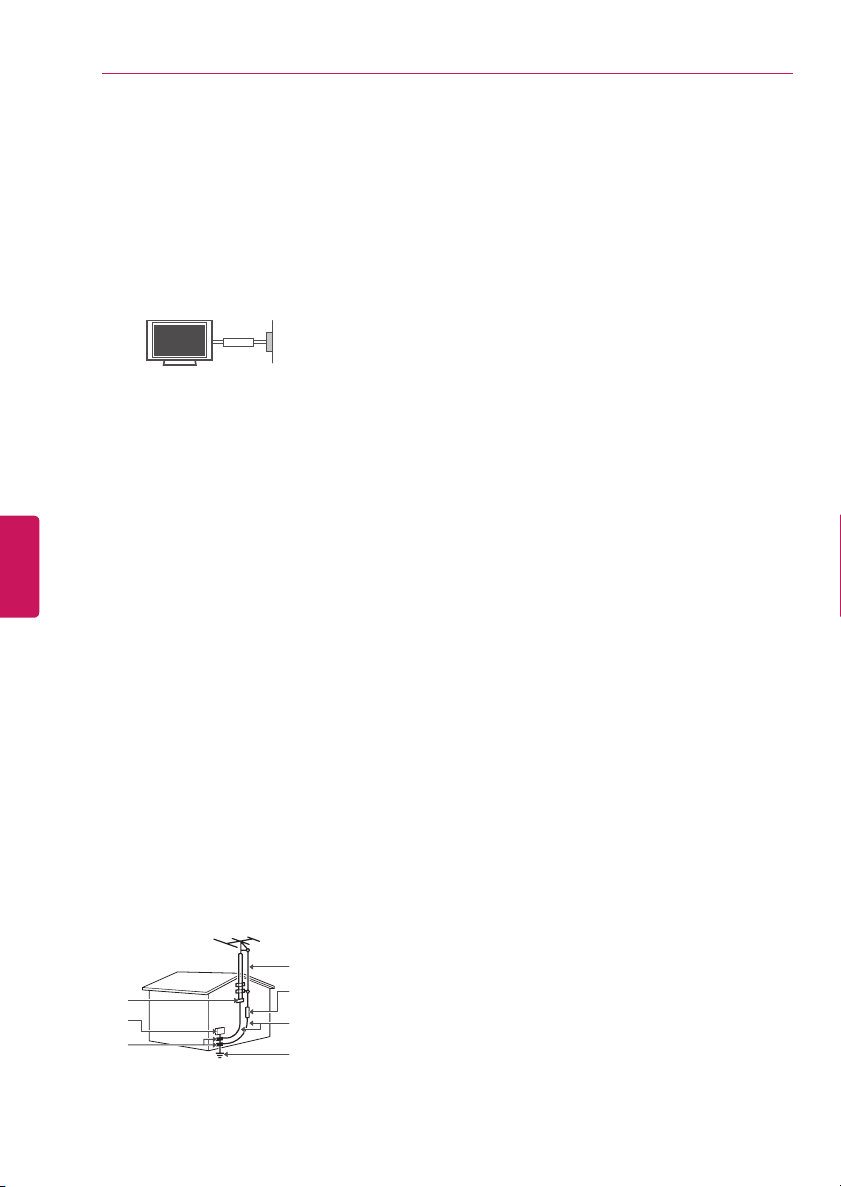
yOutdoor Antenna Grounding (Can differ by
country):
If an outdoor antenna is installed, follow
the precautions below. An outdoor antenna
system should not be located in the vicinity
of overhead power lines or other electric light
or power circuits, or where it can come in
contact with such power lines or circuits as
death or serious injury can occur. Be sure the
antenna system is grounded so as to provide
some protection against voltage surges
and built-up static charges. Section 810 of
the National Electrical Code (NEC) in the
U.S.A. provides information with respect to
proper grounding of the mast and supporting
structure, grounding of the lead-in wire to
an antenna discharge unit, size of grounding
conductors, location of antenna discharge
unit, connection to grounding electrodes and
requirements for the grounding electrode.
Antenna grounding according to the National
Electrical Code, ANSI/NFPA 70
Short-circuit
Breaker
Power Supply
Ground Clamp
Grounding Conductor
(NEC Section 810-21)
Antenna Lead in Wire
Electric Service
Equipment
Antenna Discharge Unit
(NEC Section 810-20)
Ground Clamp Power Service Grounding
Electrode System
(NEC Art 250, Part H)
NEC: National Electrical Code
yCleaning
When cleaning, unplug the power cord and
wipe gently with a soft cloth to prevent
scratching. Do not spray water or other
liquids directly on the TV as electric shock
may occur. Do not clean with chemicals such
as alcohol, thinners, or benzine.
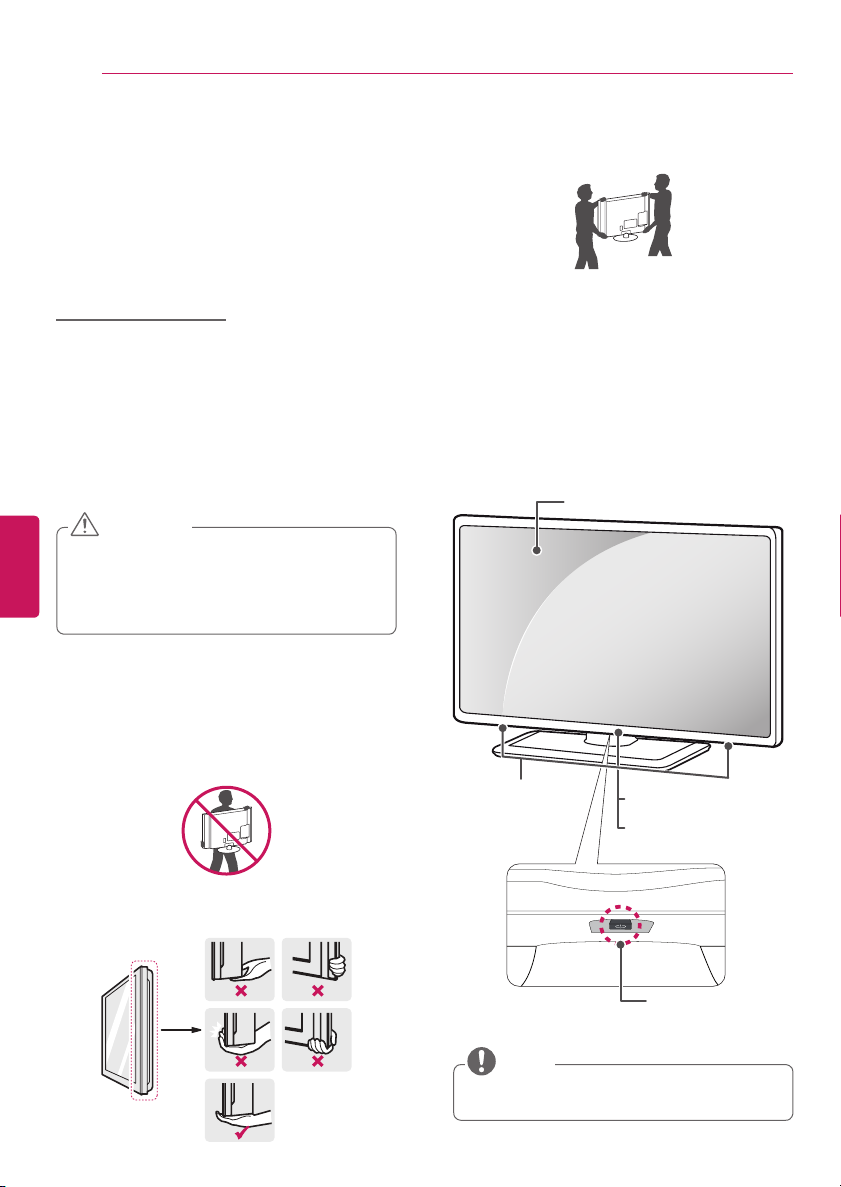
yMoving
Make sure the product is turned off,
unplugged, and all cables have been
removed. It may take 2 or more people to
carry larger TVs. Do not press or put stress
on the front panel of the TV.
yVentilation
Install your TV where there is proper
ventilation. Do not install in a confined space
such as a bookcase. Do not cover the product
with cloth or other materials while plugged.
Do not install in excessively dusty places.
yIf you smell smoke or other odors coming
from the TV, unplug the power cord and
contact an authorized service center.
yKeep the product away from direct sunlight.
yNever touch this apparatus or antenna during
a lightning storm.
yWhen mounting a TV on the wall, make sure
not to install the TV by hanging the power
and signal cables on the back of the TV.
yDo not allow an impact shock, any objects to
fall into the product, and do not drop anything
onto the screen.
yDisconnecting the Main Power
The power outlet used with this device must
remain easily accessible.
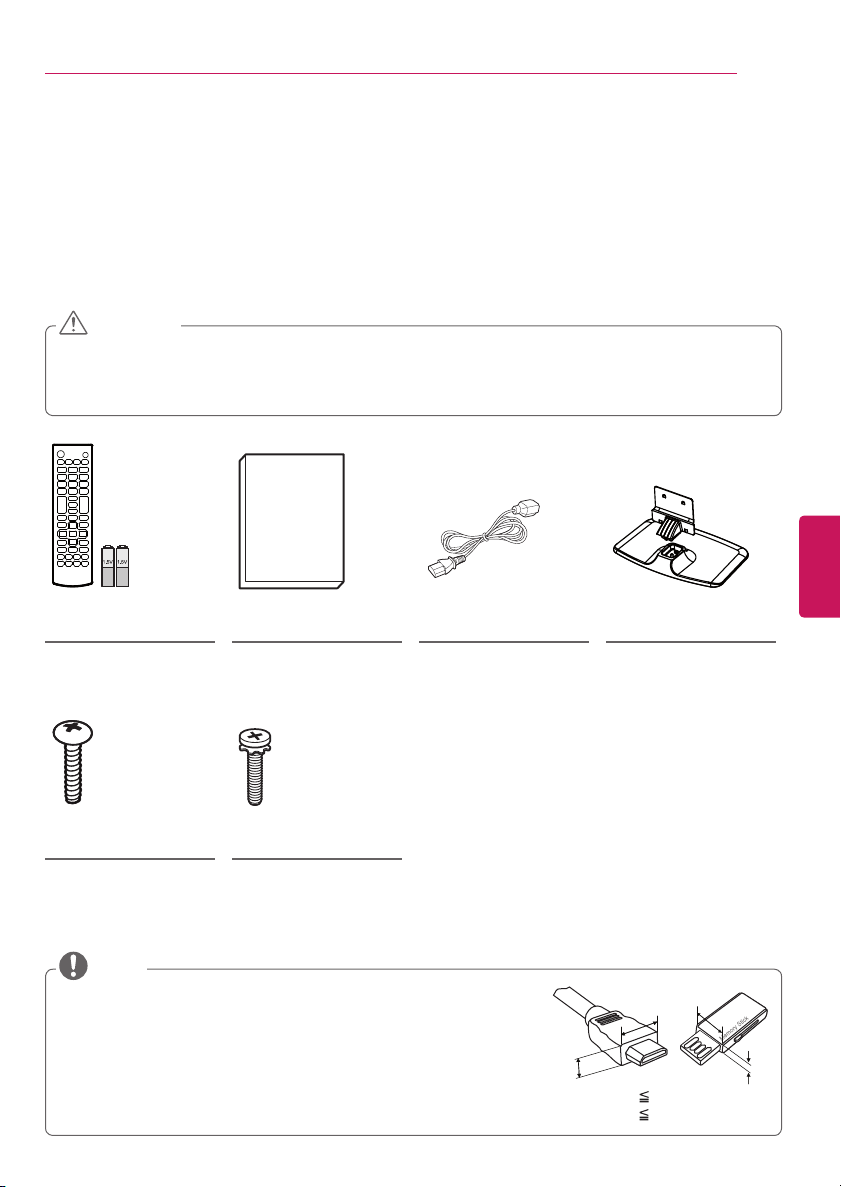
yStore the accessories (battery, etc.) in a safe
location out of the reach of children.
yThis apparatus uses batteries. In your
community there might be regulations that
require you to dispose of these batteries
properly due to environmental considerations.
Please contact your local authorities for
disposal or recycling information.
yDo not dispose of batteries in a fire.
yDo not short circuit, disassemble, or allow
the batteries to overheat.

ENGLISH
5
IMPORTANT SAFETY INSTRUCTIONS
yDot Defect
The panel is a high technology product with
resolution of two million to six million pixels.
In a very few cases, you could see fine dots
on the screen while you’re viewing the TV.
Those dots are deactivated pixels and do not
affect the performance and reliability of the
TV.
yGenerated Sound
Cracking noise: A cracking noise that occurs
when watching or turning off the TV is
generated by plastic thermal contraction
due to temperature and humidity. This noise
is common for products where thermal
deformation is required.
Electrical circuit humming/panel buzzing: A
low level noise is generated from a high-
speed switching circuit, which supplies a
large amount of current to operate a product.
It varies depending upon the product.
This generated sound does not affect the
performance and reliability of the product.
yTake care not to touch the ventilation
openings. When watching the TV for a long
period, the ventilation openings may become
hot. This does not affect the performance of
the product or cause defects in the product.
yDo not install this product on a wall if it
could be exposed to oil or oil mist. This may
damage the product and cause it to fall.
Preventing image burn or burn-in on your
TV screen
yIf a fixed image displays on the TV screen for
a long period of time, it will be imprinted and
become a permanent disfigurement on the
screen. This is image burn or burn-in and not
covered by the warranty.
yIf the aspect ratio of the TV is set to 4:3 for a
long period of time, image burn may occur on
the letterboxed area of the screen.
yAvoid displaying a fixed image on the TV
screen for a long period of time (2 or more
hours for LCD, 1 or more hours for the
Plasma TV) to prevent image burn.

ENGLISH
6LICENSES / OPEN SOURCE SOFTWARE NOTICE
LICENSES
Supported licenses may differ by model. For more information about licenses,
visit www.lg.com
.
Manufactured under license from Dolby Laboratories. “Dolby” and the
double-D symbol are trademarks of Dolby Laboratories.
The terms HDMI and HDMI High-Definition Multimedia Interface,
and the HDMI logo are trademarks or registered trademarks of HDMI
Licensing LLC in the United States and other countries.
ABOUT DIVX VIDEO: DivX®is a digital video format created by DivX,
LLC, a subsidiary of Rovi Corporation. This is an official DivX Certified®
device that has passed rigorous testing to verify that it plays DivX video.
Visit divx.com for more information and software tools to convert your
files into DivX video.
ABOUT DIVX VIDEO-ON-DEMAND: This DivX Certified®device must
be registered in order to play purchased DivX Video-on-Demand (VOD)
movies. To obtain your registration code, locate the DivX VOD section
in your device setup menu. Go to vod.divx.com for more information on
how to complete your registration.
“DivX Certified®to play DivX®video up to HD 1080p, including premium
content.”
“DivX®, DivX Certified®and associated logos are trademarks of Rovi
Corporation or its subsidiaries and are used under license.”
“Covered by one or more of the following U.S. patents:
7,295,673; 7,460,668; 7,515,710; 7,519,274”
OPEN SOURCE SOFTWARE NOTICE
To obtain the source code under GPL, LGPL, MPL and other open source licenses, that is contained in
this product, please visit
http://opensource.lge.com
.
In addition to the source code, all referred license terms, warranty disclaimers and copyright notices are
available for download.
LG Electronics will also provide open source code to you on CD-ROM for a charge covering the cost of
performing such distribution (such as the cost of media, shipping and handling) upon email request to
product.
yImage shown may differ from your TV.
yYour TV’s OSD (On Screen Display) may differ slightly from that shown in this manual.
yThe available menus and options may differ from the input source or product model that you are
using.
yNew features may be added to this TV in the future.
NOTE

ENGLISH
7
ASSEMBLING AND PREPARING
Unpacking
Check your product box for the following items. If there are any missing accessories, contact the local
dealer where you purchased your product. The illustrations in this manual may differ from the actual
product and item.
yDo not use any unapproved items to ensure the safety and product life span.
yAny damages or injuries by using unapproved items are not covered by the warranty.
ySome models appear to have a thin film on the screen. It is actually part of the screen; do not
remove it.
CAUTION
Remote Control,
Batteries (AAA) Owner’s Manual Power Cord Stand Body,
Stand Base
Stand Screws
3 EA, M5 x L25 Stand Screws
4 EA, M4 x L14
yThe items supplied with your product may vary depending upon the
model.
yProduct specifications or contents of this manual may be changed
without prior notice due to upgrade of product functions.
yFor an optimal connection, HDMI cables and USB devices should
have bezels less than 10 mm thick and 18 mm width.
yUse an extension cable that supports USB 2.0 if the USB cable or
USB flash drive does not fit into your TV’s USB port.
NOTE
B
AA
B
*A 10 mm
*B 18 mm

ENGLISH
8ASSEMBLING AND PREPARING
Lifting and moving the TV
When moving or lifting the TV, read the
following to prevent the TV from being
scratched or damaged and for safe
transportation regardless of its type and size.
yAvoid touching the screen at all times, as
this may result in damage to the screen.
yDo not place the product on the floor with
its front facing down. Failure to do so may
result in damage to the screen.
CAUTION
yIt is recommended to move the TV in the
box or packing material that the TV originally
came in.
yBefore moving or lifting the TV, disconnect
the power cord and all cables.
yWhen holding the TV, the screen should face
away from you to avoid damage.
yHold the top and bottom of the TV frame
firmly. Make sure not to hold the transparent
part, speaker, or speaker grill area.
Optional Extras
Optional extras can be changed or modified for
quality improvement without any notification.
Contact your dealer to buy these items.
These devices only work with certain models.
The model name or design may be changed
manufacturer’s circumstances or policies.
LG Audio Device
yUse at least two people to move a large TV.
yWhen transporting the TV by hand, hold the
TV as shown in the following illustration.
yWhen transporting the TV, do not expose the
TV to jolts or excessive vibration.
yWhen transporting the TV, keep the TV
upright; never turn the TV on its side or tilt
towards the left or right.
Parts and Buttons
Screen
Joystick Button
Power Indicator
Remote Control Sensor
Speakers
yJoystick button is located below the
screen of TV.
NOTE

ENGLISH
9
ASSEMBLING AND PREPARING
Using the joystick button
You can operate the TV by pressing the button or moving the joystick left, right, up, or down.
Basic Functions
Power On When the TV is turned off, place your finger on the joystick button,
press it once and release it.
Power Off When the TV is turned on, place your finger on the joystick button,
press it once for a few seconds and release it.
Volume Control If you place your finger over the joystick button and move it left or
right, you can adjust the volume level you want.
Channels Control If you place your finger over the joystick button and move it up or
down, you can scroll through the saved channels you want.
yWhen your finger over the joystick button and push it to the up, down, left or right, be careful not to
press the joystick button. If you press the joystick button first, you can not adjust the volume level
and saved channels.
NOTE
Adjusting the Menu
When the TV is turned on, press the joystick button one time.
You can adjust the Menu items ( , , , ) moving the joystick button up, down, left, or right.
TV Off Turns the power off.
Settings Accesses the main menu.
Close Clears on-screen displays and returns to TV viewing.
Input List Changes the input source.

ENGLISH
10 ASSEMBLING AND PREPARING
1 3
Setting up the TV
You can mount your TV to a wall or attach the stand if you wish to place the TV on an entertainment
center or other furniture.
Attaching the stand
If you are not mounting the TV to a wall, use the following instructions to attach the stand.
yWhen attaching the stand to the TV
set, place the screen facing down on a
cushioned table or flat surface to protect the
screen from scratches.
CAUTION
4 EA
M4 x L14
2
3 EA
M5 x L25
Stand Body
Stand Base
Front
yTighten the screw fully, otherwise the set
may lean or fall.
CAUTION
yWhen assembling the stand base and the
stand body, press the stand body until you
can hear a clicking sound in the hook.
CAUTION

ENGLISH
11
ASSEMBLING AND PREPARING
Mounting on a table
1Lift and tilt the TV into its upright position on
a table.
- Leave a 10 cm (minimum) space from the
wall for proper ventilation.
10 cm
10 cm
10 cm
10 cm
2Connect the power cord to a wall outlet.
yDo not place the TV near or on sources
of heat, as this may result in fire or other
damage.
CAUTION
Securing the TV to a wall (optional)
(Depending upon model)
1Insert and tighten the eye-bolts, or TV
brackets and bolts on the back of the TV.
- If there are bolts inserted at the eye-bolts
position, remove the bolts first.
2Mount the wall brackets with the bolts to
the wall.
Match the location of the wall bracket and
the eye-bolts on the rear of the TV.
3Connect the eye-bolts and wall brackets
tightly with a sturdy rope or cable.
Make sure to keep the rope parallel to the
flat surface.
yMake sure that children do not climb on or
hang on the TV.
CAUTION
yUse a platform or cabinet that is strong and
large enough to support the TV securely.
yBrackets, bolts and ropes, are optional. You
can obtain additional accessories from your
local dealer.
NOTE

ENGLISH
12 ASSEMBLING AND PREPARING
Mounting on a wall
An optional wall mount can be used with your
LG Television. Consult with your local dealer for
a wall mount that supports the VESA standard
used by your TV model. Carefully attach the
wall mount bracket at the rear of the TV.
Install the wall mount bracket on a solid wall
perpendicular to the floor. If you are attaching
the TV to other building materials, please
contact qualified personnel to install the wall
mount. Detailed instructions will be included
with the wall mount. We recommend that you
use an LG brand wall mount.
10 cm
10 cm
10 cm
10 cm
Make sure to use screws and wall mounts that
meet the VESA standard. Standard dimensions
for the wall mount kits are described in the
following table.
Model 50PB560B
60PB5600
50PB650B
60PB6500
VESA (A x B)
A
B
400 x 400
Standard screw M6
Number of screws 4
Wall mount bracket
(optional)
PSW420BX
yDisconnect the power before moving or
installing the TV. Otherwise electric shock
may occur.
yIf you install the TV on a ceiling or slanted
wall, it may fall and result in severe
injury. Use an authorized LG wall mount
and contact the local dealer or qualified
personnel. When using a third-party wall
mount, it is not covered by the warranty.
yDo not over tighten the screws as this may
cause damage to the TV and void your
warranty.
yUse the screws and wall mounts that meet
the VESA standard. Any damages or injuries
by misuse or using an improper accessory
are not covered by the warranty.
CAUTION
yUse the screws that are listed in the VESA
standard screw specifications.
yThe wall mount kit includes an installation
manual and necessary parts.
yThe wall mount bracket is optional. You can
obtain additional accessories from your local
dealer.
yThe length of screws may differ depending
upon the wall mount. Make sure to use the
proper length.
yFor more information, refer to the manual
supplied with the wall mount.
NOTE

ENGLISH
13
MAKING CONNECTIONS
MAKING CONNECTIONS
You can connect various external devices to the TV. Supported external devices are: HD receivers, DVD
players, VCRs, audio systems, USB storage devices, PC, gaming devices, and other external devices.
For more information on external device’s connection, refer to the manual provided with each device.
yIf you record a TV program on a DVD recorder or VCR, make sure to connect the TV signal input
cable to the TV through a DVD recorder or VCR. For more information about recording, refer to the
manual provided with the connected device.
yThe external device connections shown may differ slightly from illustrations in this manual.
yConnect external devices to the TV regardless about the order of the TV port.
yIf you connect a gaming device to the TV, use the cable supplied with the gaming device.
yRefer to the external equipment’s manual for operating instructions.
NOTE
Connecting to an antenna or cable
Connect an antenna, cable, or cable box to watch TV while referring to the following. The illustrations
may differ from the actual items and an RF cable is optional.
CABLE
IN
ANTENNA
IN
CABLE
IN
ANTENNA
IN
VHF Antenna
UHF Antenna
Antenna
Coaxial (75Ω)
Wall Jack
or
(*Not Provided)
Coaxial (75Ω)
(*Not Provided)
Terminal
yMake sure not to bend the copper wire of
the RF cable.
Copper wire
yComplete all connections between devices,
and then connect the power cord to the
power outlet to prevent damage to your TV.
CAUTION yTo improve the picture quality in a poor
signal area, please purchase a signal
amplifier and install properly.
yUse a signal splitter to use more than
2 TVs.
yIf the antenna is not installed properly,
contact your dealer for assistance.
yDTV Audio Supported Codec: MPEG,
Dolby Digital plus (AC3, E-AC3, AAC,
HE AAC)
NOTE

ENGLISH
14 MAKING CONNECTIONS
Other connections
Connect your TV to external devices. For the best picture and audio quality, connect the external device
and the TV with the HDMI cable as shown. Depending upon the model, a cable may be provided.
COMPONENT IN
/ AV IN 2
PC-AUDIO INY P
B
P
R
VIDEO L/MONO-AUDIO-R
PBPRY RL
VIDEO AUDIO
COMPONENT IN
/ AV IN 2
PC-AUDIO INY P
B
P
R
VIDEO L/MONO-AUDIO-R
OPTICAL
DIGITAL
AUDIO OUT
OPTICAL AUDIO IN
USB ININ (MHL/PC)
HDMI
ANTENNA
IN
CABLE
IN
AV IN 1
VIDEO L/MONO-AUDIO-R
AUDIO OUT DVI OUT
COMPONENT IN
/ AV IN 2
PC-AUDIO INY
B
P
R
VIDEO L/MONO-AUDIO-R
AV IN 1
VIDEO L/MONO-AUDIO-R
VIDEO
MONO
( )
AUDIOL R
Digital Audio
System
DVD / Blu-Ray / HD Cable Box / VCR
DVD / Blu-Ray / PC /
HD Cable Box / HD STB
USB / HDD
YELLOW
WHITE
RED
Mobile phone
MHL passive cable
GREEN
BLUE
RED
WHITE
RED
GREEN
BLUE
RED
WHITE
RED
YELLOW
WHITE
RED

ENGLISH
15
REMOTE CONTROL
REMOTE CONTROL
The descriptions in this manual are based on the buttons on the remote control.
Please read this manual carefully and use the TV correctly. To install batteries,
open the battery cover, replace batteries (1.5 V AAA) matching the and
ends to the label inside the compartment, and close the battery cover. Failure
to match the correct polarities of the battery may cause the battery to burst
or leak, resulting in fire, personal injury, or ambient pollution. To remove the
batteries, perform the installation actions in reverse.
yDo not mix old and new batteries, as this may damage the remote control.
CAUTION
This remote uses infrared light. When in use, it should be pointed in the direction of the TV’s remote
sensor.
Brazil
REC
LIVE TV
(POWER) Turns the TV on or off.
TV Returns to the last TV channel.
CAPTION Activates or deactivates the subtitles.
SLEEP Sets the length of time until the TV to turns off.
RATIO Resizes an image.
INPUT Changes the input source. Turns the TV on if it is off.
Number button Enters numbers.
- (Dash) Inserts a dash between numbers such as 2-1 and 2-2.
LIST Accesses the saved channel list.
Alternates between the two last channels selected (pressing repeatedly).
VOL Adjusts the volume level.
FAV Accesses your favorite channel list; Selects a menu or option.
GUIDE Displays the program event according to the scheduled time.
MUTE Mutes all sounds.
CH Scrolls through the saved channels.
PAGE Moves to the previous or next screen.
PICTURE Changes the image mode.
INFO Shows information on the current program.
SOUND Changes the sound mode.
SETTINGS Accesses the main menu.
Q.MENU Accesses the quick menu.
Navigation buttons Scrolls through menus or options. (up/down/left/right)
OK Selects menus or options and confirms your input.
BACK Returns to the previous screen.
EXIT Clears all on-screen displays and returns to TV viewing.
(Soccer Mode) Optimizes picture and audio settings for soccer.
REC Adjusts Time Machine mode.
LIVE TV Returns to the LIVE TV.
Control buttons ( , , , , ) Controls SIMPLINK compatible devices
(USB,SIMPLINK).
(Freeze) Freezes the current frame (Not supported when using USB Mode and
Simplink).
Color buttons These access special functions in some menus.
(: Red, : Green, : Yellow, : Blue)

ENGLISH
16 SETTINGS
SETTINGS
To set up the channels automatically
SETTINGS ➾ CHANNEL ➙Auto Tuning
Memorizes automatically the channels being
broadcast.
yThe channels will not be memorized properly
if the antenna/cable is not installed correctly.
yAuto Tuning memorizes the channels that
are currently being broadcast.
yIf Lock System is turned on, a pop-up
window will appear asking for password.
About Interactivity (DTVi)
(Depending upon country)
This TV has the interactivity feature of Digital
TV (DTVi) that allows using applications, also
known as Ginga®.
yBy selecting a digital channel that has
interactivity, it will be possible to visualize
and interact with applications transmitted
by broadcasters. The contents can vary and
some examples are: weather forecast, real
time news, traffic situation, soap operas and
program descriptions, interactive games,
access to bank accounts, government
services, soccer information and other sports.
yThe interactivity return channel is available
only on those TV models that have an
Ethernet port and that are set correctly.
To adjust pictures with Picture Wizard
SETTINGS ➾ PICTURE ➙Picture Wizard III
This function calibrates and adjusts for optimum
picture quality with the remote control and
the Picture Wizard without expensive pattern
devices or help from a specialist. Follow
the instructions on the screen to obtain the
optimum picture quality.
To select Picture Mode
SETTINGS ➾ PICTURE ➙Picture Mode
Select the picture mode optimized for the
viewing environment or the program.
yVivid:Heightens contrast, brightness and
sharpness to display vivid images.
yStandard:Displays images in standard levels
of contrast, brightness and sharpness.
yEco:The Energy Saver feature changes
settings on the TV to reduce power
consumption.
yCinema / Game:Displays the optimum
picture for movie, game.
ySoccer:Optimised picture mode for football
matches. The pitch and kits are presented
in vibrant colours, with crystal-clear images
even for fast movements.
yExpert: Menu for adjusting picture quality
that allows experts and amateurs to enjoy the
best TV viewing. This menu for adjustment
is provided for ISF-certified picture tuning
professionals. (ISF logo can only be used on
ISF-certified TVs.) ISFccc: Imaging Science
Foundation Certified Calibration Control
yDepending upon input signal, available range
of picture modes may differ.
yExpert mode is for picture tuning
professionals to control and fine-tune using
a specific image. For normal images, the
effects may not be drastic.
To set advanced control
SETTINGS ➾PICTURE ➙Picture Mode ➙
Advanced Control / Expert Control
For each picture mode, screen can be
calibrated; or for a special screen, picture
settings can be adjusted.
Select the desired Picture Mode.
yDynamic Contrast:Adjusts the contrast to
the optimal level according to the image’s
brightness.
yDynamic Color:Adjusts colors to make the
image appear in more natural colors.
ySkin Color: Skin color spectrum can be
separately set to implement the skin color as
defined by the user.
ySky Color: Sky color is set separately.
yGrass Color: Natural color spectrum
(meadows, hills, etc.) can be separately set.
yGamma: Sets the gradation curve according
to the output of picture signal in relation to
the input signal.
yColor Gamut: Selects the range of colors that
can be expressed.
yEdge Enhancer: Shows clearer and distinctive
yet natural edges of the video.
yExpert Pattern: Patterns used for expert
adjustment.
yColor Filter: Filters a specific color spectrum
in RGB colors to fine-tune color saturation
and hue accurately.
yColor Temperature: Adjusts the overall tone
of the screen as desired. In Expert mode,
detailed fine-tuning can be set via Gamma
method, etc.

ENGLISH
17
SETTINGS
yColor Management System: This system is
used by experts to adjust color with a test
pattern. They can select from six color areas
(Red/ Green/Blue/ Cyan/Magenta/Yellow)
without affecting other colors. For normal
images, adjustments may not result in
noticeable color changes.
yDepending upon input signal or other picture
settings, the range of detailed items for
adjustment may differ.
To set additional picture options
SETTINGS ➾PICTURE ➙Picture Mode ➙
Picture Option
Adjusts detailed setting for images.
yNoise Reduction:Eliminates noise in the
picture.
yMPEG Noise Reduction:Eliminates noise
generated while creating digital picture
signals.
yBlack Level: Adjusts the brightness and
contrast of the screen to suit the black level.
yReal Cinema: Optimizes the screen for movie
viewing.
yMotion Eye Care: [Depending upon model]
Saves power consumption by adjusting the
brightness corresponding to the movement
of the image on the screen.
yDepending upon input signal or other picture
settings, the range of detailed items for
adjustment may differ.
To use Energy Saving feature
SETTINGS ➾PICTURE ➙Energy Saving
Saves electric power by adjusting screen
brightness.
yOff: Turns off the Energy Saving.
yMinimum / Medium / Maximum: Applies the
pre-set Energy Saving.
yScreen Off: Screen is turned off and only
sound is played. Press any button on the
remote control to turn the screen back on.
To use TV speaker
SETTINGS ➾AUDIO ➙ Sound Out ➙TV Speaker
Sound is output through the TV speaker.
To use External Speaker
SETTINGS ➾AUDIO ➙Sound Out ➙
External Speaker (Optical)
[Only available for models with an optical port]
Sound is output through the speaker connected
to the optical port.
ySIMPLINK is supported.
To use Digital Sound Out
SETTINGS ➾AUDIO ➙ Sound Out ➙External
Speaker (Optical) ➙Digital Sound Out
[Depending upon model]
Sets up Digital Sound Out.
Item Audio Input Digital Audio output
Auto
MPEG
Dolby Digital
Dolby Digital Plus
HE-AAC
PCM
Dolby Digital
Dolby Digital
Dolby Digital
PCM All PCM
To connect and use LG audio device
SETTINGS ➾AUDIO ➙ Sound Out ➙
LG Sound Sync (Optical)
Connect LG audio device with the logo to
the optical digital audio output port.
LG audio device allows you to enjoy rich
powerful sound easily.
To set AV Sync. Adjust
SETTINGS ➾AUDIO ➙ AV Sync. Adjust
Synchronizes unmatched video and audio.
Select AV Sync. Adjust to On to synchronize
audio output (TV speaker or SPDIF) with the
video.

ENGLISH
18 SETTINGS
To use SIMPLINK
SIMPLINK controls and manages multimedia
devices conveniently with the TV remote
control through the SIMPLINK menu.
1Connect the HDMI IN terminal and
SIMPLINK device’s HDMI output terminal
using an HDMI cable.
- [Depending upon model] For home theater
units with SIMPLINK function, connect
HDMI terminals as above, and use an
optical cable to connect Optical Digital
Audio Out from the TV to Optical Digital
Audio In of the SIMPLINK device.
2Select INPUT ➾SIMPLINK. SIMPLINK
menu window appears.
3In SIMPLINK Setting window, set SIMPLINK
function to ON.
4In SIMPLINK menu window, select the
device to control.
yThis function is only compatible with devices
having the SIMPLINK logo.
yTo use SIMPLINK function,use
high-speed HDMI®cable
(with CEC (Consumer Electronics Control)
feature added). High-speed HDMI®cable
has No. 13 pin connected for information
exchange between devices.
yWhen changing to another input, the
SIMPLINK device stops.
yIf a third-party device with HDMI-CEC
support is added, the SIMPLINK device may
not work normally.
y[Depending upon model] When selecting or
playing the media of the device with home
theater function, HT Speaker is automatically
connected. Be sure to connect with Optical
cable (sold separately) to use HT Speaker
function.
SIMPLINK function description
yDirect Play: Plays the multimedia device on
the TV instantly.
ySelect multimedia device: Selects the desired
device through SIMPLINK menu and control
the device from the TV screen instantly.
yDisc playback: Manages the multimedia
device with the TV remote control.
yPower off all devices: When you power off
the TV, all connected devices are turned off.
ySync Power on: When the equipment with
SIMPLINK function connected HDMI terminal
starts to play, the TV will automatically turn
on.
ySpeaker: [Depending upon model] Selects
either home theater unit or TV speaker.
To set the password
SETTINGS ➾LOCK ➙ Set Password
Set or change the TV password.
yThe initial password is set to 0000.
To set the caption
SETTINGS ➾OPTION ➙ Caption
View captions when the TV station provides
captioned programming. Program captions work
only on digital/analog broadcasts or external
input.
Change Caption to On and select caption
settings.
yMode
CC 1-2 (Closed Captioning) / Text 1-2:
Displays the audio portion of a TV program
as text on the TV screen. CC1 is the most
common mode in use.
Digital:This is only available for the digital
broadcasting system.
To return to initial settings
SETTINGS ➾OPTION ➙ Initial Setting
Returns to initial default mode by deleting all
optional setup. Once initialization is completed,
the TV will turn off and on by itself.
yWhen Lock System is in place, a pop-up
window appears and asks for password.
yDo not turn off the power during initialization.

ENGLISH
19
SETTINGS
To remove the USB device
Q.MENU ➾USB Device
Select a USB storage device and remove it.
Once the message that the USB device was
removed is displayed, remove the device from
the TV.
yAfter selecting to remove USB device, the
USB storage Device cannot be read. Remove
the USB storage device and then reconnect
it.
Warning when using USB storage devices
yUSB storage devices with a built-in auto
recognition program or its own driver may
not work.
ySome USB storage devices may not work or
may work improperly.
yUse only those USB storage devices
formatted with FAT32 or NTFS File System
provided by Windows.
yFor external USB HDD, use devices with less
than 5V-rated voltages and 500 mA-rated
current.
yIt is recommended to use USB flash drive
with 32 GB or less and USB HDD with 1 TB
or less.
yIf a USB HDD with power-saving function
does not work properly, turn the power off
and on. For more information, refer to the
user manual of USB HDD.
yData in the USB storage device can be
damaged so back up important files in other
devices. Data maintenance is the user’s
responsibility. The manufacturer is not
responsible for data loss.
My Media Supported Files
yMaximum data transfer rate:
20 Mbps (Mega bit per second)
yExternal supported subtitle formats:
*.smi, *.srt, *.sub (MicroDVD, SubViewer
1.0/2.0), *.ass, *.ssa, *.txt (TMPlayer), *.psb
(PowerDivX)
yInternal supported subtitle formats: XSUB
(Supports internal subtitles generated from
DivX6)
Supported Photo Formats
yCategory: 2D (jpeg, jpg, jpe)
[Available file type]
SOF0: Baseline,
SOF1: Extend Sequential,
SOF2: Progressive
[Photo size] Minimum: 64 x 64,
Maximum: Normal Type: 15,360 (W) x 8,640 (H),
Progressive Type: 1,920 (W) x 1,440 (H)
yCategory: BMP
[Photo size] Minimum: 64 x 64,
Maximum: 9,600 x 6,400
yCategory: PNG
[Available file type] Interlace, Non-Interlace
[Photo size] Minimum: 64 x 64,
Maximum: Interlace: 1,200 x 800,
Non-Interlace: 9,600 x 6,400
yBMP and PNG format files may be slower to
display than JPEG.
Supported Audio Formats
yFile type: mp3
[Bit rate] 32 Kbps - 320 Kbps
[Sample freq.] 16 kHz - 48 kHz
[Support] MPEG1, MPEG2, Layer2, Layer3
yFile Type: AAC
[Bit rate] Free Format
[Sample freq.] 8 kHz ~ 48 kHz
[Support] ADIF, ADTS
yFile Type: M4A
[Bit rate] Free Format
[Sample freq.] 8 kHz ~ 48 kHz
[Support] MPEG-4
yFile Type: WMA
[Bit rate] 128 Kbps ~ 320 Kbps
[Sample freq.] 8 kHz ~ 48 kHz
[Support] WMA7, WMA8, WMA9 Standard
yFile Type: WMA
[Bit rate] ~ 768 Kbps
[Channel / Sample freq.]
M0: up to 2 Channel @ 48 kHz (Except LBR
mode),
M1: up to 5.1 Channel @ 48 kHz,
M2: up to 5.1 Channel @ 96 kHz
[Support] WMA 10 Pro
yFile Type: OGG
[Bit rate] Free Format
[Sample freq.] ~ 48 kHz
[Support] OGG Vorvis

ENGLISH
20 SETTINGS / TO SEE WEB MANUAL
Supported Video Formats
yMaximum: 1,920 x 1,080 @ 30p (only Motion
JPEG 640 x 480 @ 30p)
y.asf, .wmv
[Video] MPEG2, MPEG4 Part2, DivX3.11,
DivX4, DivX5, DivX6, XViD, H.264/AVC,
VC1(WMV3, WVC1), MP43
[Audio] WMA Standard, WMA9(Pro), MP3,
AAC, AC3, MP3, 3D WMV Single Stream
y.divx, .avi
[Video] MPEG2, MPEG4 Part2, DivX3.11,
DivX4, DivX5, DivX6, XViD, H.264/AVC
[Audio] HE-AAC, LPCM, ADPCM, MPEG1
Layer I, MPEG1 Layer II, Dolby Digital,
MPEG1 Layer III (MP3)
y.ts, .trp, .tp, .mts, .m2ts
[Video] H.264/AVC, MPEG2, AVS, VC1
[Audio] MPEG1 Layer I, MPEG1 Layer II,
MPEG1 Layer III (MP3), Dolby Digital, Dolby
Digital Plus, AAC, HE-AAC
y.vob
[Video] MPEG1, MPEG2
[Audio] Dolby Digital, MPEG1 Layer I, MPEG1
Layer II, DVD-LPCM
y.mp4, .m4v, .mov
[Video] MPEG2, MPEG4 Part2, DivX3.11,
DivX4, DivX5, DivX6, XVID, H.264/AVC
[Audio] AAC, MPEG1 Layer III (MP3)
y.mkv
[Video] MPEG2, MPEG4 Part2, DivX3.11,
DivX4, DivX5, DivX6, XVID, H.264/AVC
[Audio] HE-AAC, Dolby Digital, MPEG1 Layer
III (MP3), LPCM
ymotion JPEG
[Video] MJPEG
[Audio] LPCM, ADPCM
y.mpg, .mpeg, .mpe
[Video] MPEG1, MPEG2
[Audio] MPEG1 Layer I, MPEG1 Layer II,
Dolby Digital, LPCM
y.dat
[Video] MPEG1, MPEG2
[Audio] MP2
y.flv
[Video] Sorenson H.263, H.264/AVC
[Audio] MP3, AAC, HE-AAC
y.3gp, .3gp2
[Video] H.264/AVC, MPEG4 Part2
[Audio] AAC, AMR(NB/WB)
TO SEE WEB MANUAL
Web manual allows you to easily access
detailed TV information.
Go to
http://www.lg.com
.
Other manuals for 60PB6500
1
This manual suits for next models
7
Table of contents
Languages:
Other LG Plasma TV manuals