Lifepro ECOSTRIDE User manual

READY,
SET, PRO
USER MANUAL
ECOSTRIDE TREADMILL

HELLO THERE.
Joel and I are athletes who suffered from
severe ACL injuries a few months apart.
We purchased multiple pieces of wellness
equipment for our in-home rehab but were
left disappointed and frustrated by wellness
and recovery devices that made big promises
but gave no support, no well-thought-out
plan to follow, and no results. And that’s how
Lifepro came about, and why the Endurance
Training collection was created — we’ve set
out to change all of that. It’s why every piece
of equipment bearing our name not only
undergoes rigorous scrutiny to make sure it
delivers on power and efficacy, but comes with
built-in support from our ‘guiding angels’
and a built-in lifetime warranty so that
you’re never left hanging.
Welcome to Lifepro.
We’re in this together now.

Not everyone can afford to hire a personal trainer or a team of professionals
to help them feel and look their best. But the good news is: you don’t have to.
Lifepro brings the gym to you. With the Lifepro EcoStride Treadmill, you can build
cardiovascular fitness, strength, and stamina from the comfort of your own home.
The EcoStride Treadmill has a speed range of 0.6 mph to 6.3 mph and 12 preset
training programs to provide you with endless training challenges. The three
training modes allow you to set distance, time, or calorie training goals. You
can begin a manual workout instantly with the touch of just one button. Pulse
sensors and a BMI calculator built into the handrails let you track your heart
rate during your workout so you can train within the most effective heart rate
for your fitness goals. A handy tablet and phone holder allows you to use your
device while training. Walk, jog, or run to improve your strength, stamina, and
cardiovascular health.
Whether you’re getting back into endurance training after starting a family or
career or someone who has never done cardio before, the Lifepro EcoStride has
everything you need to boost your metabolism and increase stamina. See results
in as few as 15-20 minutes a day.
Redefine your workouts and experience the transformative power of the Lifepro
Ecostride.
Redefine your workouts and experience the
transformative power of the Lifepro EcoStride:
Increase strength and stability: improves muscle tone and muscle tone.
Regulate weight: boosts your heart rate and burns calories.
Decrease chronic pain: improves core strength and circulation.
Boost your metabolism: encourages your body to burn fat faster.
Decrease your stress: increases serotonin and decreases cortisol.
Lower blood pressure: improves circulation.
Develop stronger bones: increases bone density.
Check out the information in this manual for ways to get started using your
EcoStride Treadmill. Next,besure to visit ourwebsite ecostride.lifeprofitness.com
for access to our FREE library of workout videoswhich demonstrate how to
easily incorporate the EcoStride into your fitness routine.
FIRST STEPS
UNPACKING THE COMPONENTS
1. Remove the hardware and components from the shipping box.
2. Inspect all items for shipping damage.
3. Compare the parts and hardware to the items listed in WHAT’S IN
THE BOX on the next page.
4. Read carefully through this user manual and all safety instructions
before assembling and using the EcoStride.
5. Follow the steps in the TREADMILL SETUP GUIDE on page 9 to
begin assembling your workout bench.
6. Go to warranty.lifeprofitness.com and register your product within 14
days of purchase to activate your lifetime warranty.
CAUTION
• Always use proper lifting techniques, the shipping box is quite heavy.
• Assemble on a flat, sturdy floor that’s free of obstructions.
CUSTOMER SUPPORT
If you have any questions about setting up or using your EcoStride,
we’re here to help. Call or email us and an experienced customer
support representative will be happy to assist you: (800) 563-6604
or support@lifeprofitness.com.
ECOSTRIDE
TREADMILL
ENDURANCE TRAINING
4EcoStride User Manual Lifepro Endurance Training Collection 5

WHAT’S IN THE BOX
214
×2
×2
64
×6×2
PQ
46 50 54
55 57 61
62 64 65
69
×6×2
1
214
×2
×2
64
×6×2
PQ
46 50 54
55 57 61
62 64 65
69
×6×2
1
214
×2
×2
64
×6×2
PQ
46 50 54
55 57 61
62 64 65
69
×6×2
1
214
×2
×2
64
×6×2
PQ
46 50 54
55 57 61
62 64 65
69
×6×2
1
214
×2
×2
64
×6×2
PQ
46 50 54
55 57 61
62 64 65
69
×6×2
1
Treadmill
Flat Washer
M6 x 30 mm Bolt
Silicone Oil
Media Holder
Console
M8 x 16 mm Bolt
Magnetic Safety Key
Open Wrench
Lock Pin/Knob
M6 Nut
Curved Washer
Hex Key
NOTE: Some hardware is attached to the
console and some is in the hardware bag.
PARTS OF THE ECOSTRIDE
Console (Control Panel,
Console Display)
Running
Belt
Transport Wheels
(Left & Right)
FRONT
REAR
Foot Rails
(Left & Right)
Lock
Pin/Knob
Motor
Housing
Power
Switch
Handrails
(Left and Right)
Upright Posts
(Left and Right)
Media
Holder
Magnetic Port
Pulse Sensors
(Left and Right)
Incline Adjusters
(Left & Right)
6EcoStride User Manual Lifepro Endurance Training Collection 7
Safety Key

IMPORTANT SAFETY INFORMATION
Please read the entire manual before using the EcoStride.
Keep this manual for reference.
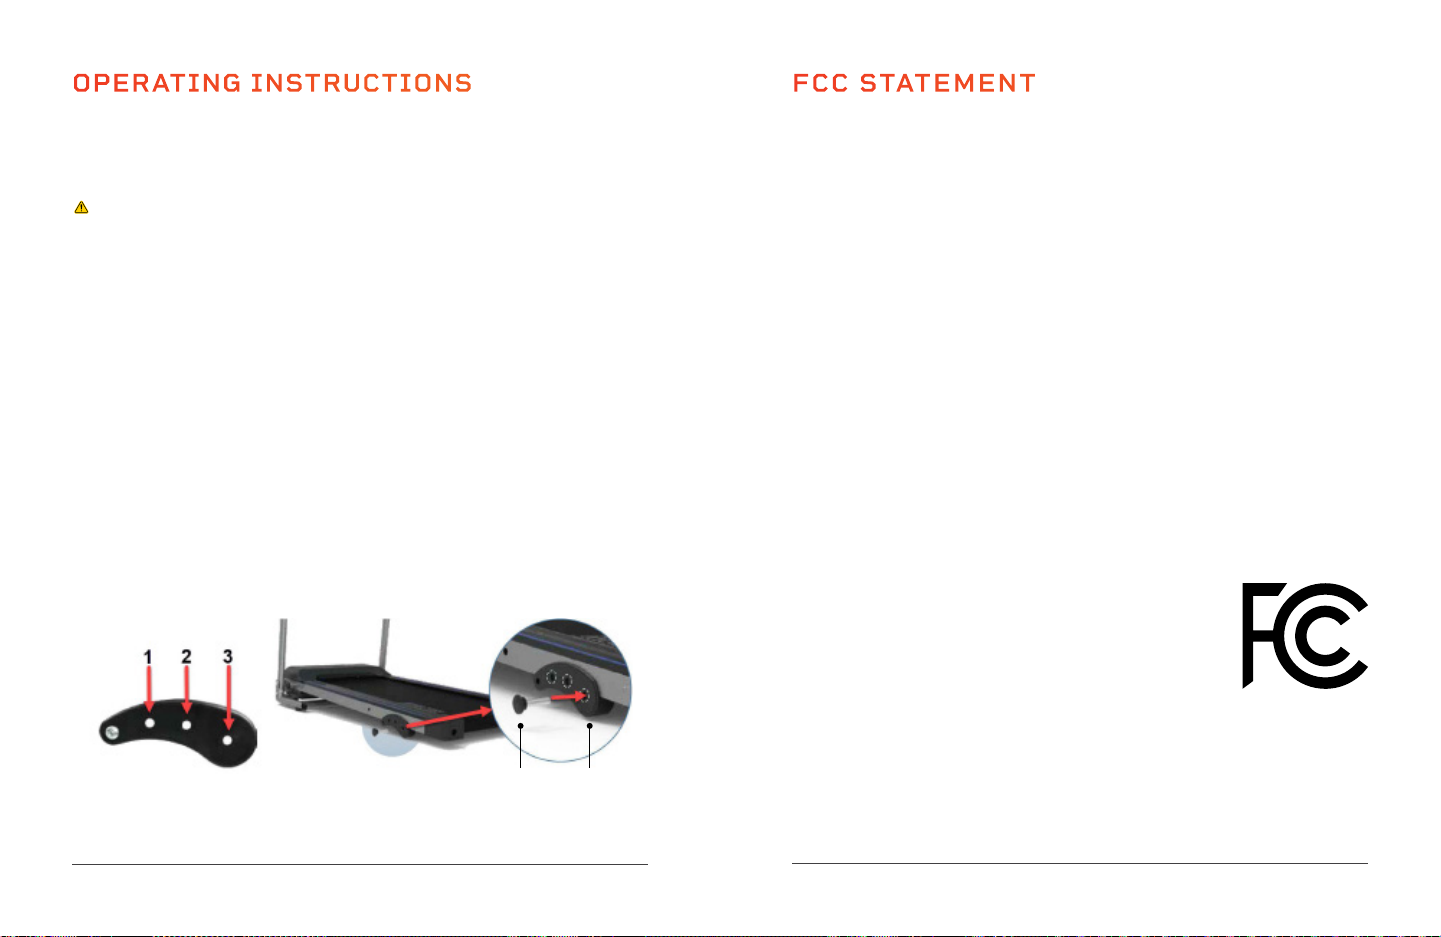
USING THE MAGNETIC SAFETY KEY
WARNING: The magnetic safety key MUST be in place before the equipment can
be used.
The error code “E00” or “ERR” will show on the display until the magnetic safety key
is in place on the magnetic port on the front of the treadmill console. If the safety
key is removed from its port during training, the treadmill will stop automatically and
cannot be restarted until the safety key is back in position.
WHAT TO DO IN AN EMERGENCY
WARNING: You must wear the magnetic safety key clipped to your clothing every
time you use the treadmill.
• Stop training immediately if you realize that you cannot keep up with the pace, if
you start feeling sick, or if any other emergency arises.
• It’s a good idea to practice quickly and safely getting off the treadmill so that you
will know what to do if you trip, lose your balance, or an emergency arises.
• Make sure that all third parties are familiar with the safety instructions.
DISABLING THE TREADMILL FOR SAFETY
To prevent the treadmill from being used by unauthorized users, always remove the
magnetic safety key when you have finished training. Keep the safety key stored
in a separate place, out of reach of unauthorized people, especially children. Never
leave children unattended in the same room with the treadmill, especially when it is
connected to power.
DURING EXERCISE
• Keep your body and head facing forward at all times.
• Make sure to breathe regularly and calmly during exercise.
• Stay hydrated before, during, and after exercise.
• Wear light, comfortable clothing and well-fitting, dirt-free athletic shoes. Do not
wear loose clothing that could become caught in the treadmill and result in falling
or injury.
• Check your pulse regularly and stop if it becomes too high.
8EcoStride User Manual Lifepro
TREADMILL SETUP GUIDE
SETUP WARNINGS:
• Adult setup is required. Keep children away during setup.
• Properly dispose of all packaging especially plastic bags, which can present a
suffocation hazard to small children, before setup.
• Ensure you have at least a 6 by 6 foot space around you for setup.
• Assembly requires two people since the treadmill is bulky and heavy.
• Always use proper lifting techniques as the treadmill is quite heavy.
NOTE: Your treadmill comes pre-lubricated. You do not need to lubricate the
running belt before using it for the first time.
SAFE PLACEMENT OF YOUR ECOSTRIDE TREADMILL
• Only operate and store the EcoStride on a flat, non-slip floor.
• Ensure the running deck is level to the ground. If the deck is positioned on an
uneven surface, it could cause damage to the electrical system.
• Set up with at least 7 feet of clearance from walls and furniture at the back
and at least 4 feet of clearance at the front and sides of the treadmill.
• Do not use outdoors or in high-moisture or high-temperature environments.
• If setting up in a carpeted room, check underneath the treadmill to ensure
clearance between the carpet and the running deck. If there is not enough
clearance, or you’re not sure, place a mat or rug under the EcoStride. Ensure
the mat or rug is at least 60” × 46” and will not slip during use.
Endurance Training Collection 9
Aerobic exercise has enormous benefits
for your body, brain, and mental health.
At least 75 minutes of vigorous aerobic exercise,
such as walking or running on a treadmill, are
recommended each week for optimal health.

LAY OUT THE TREADMILL PARTS AND HARDWARE
1. Place the folded body of the treadmill on a flat floor.
2. Place all of the hardware and tools nearby.
1
ASSEMBLE THE UPRIGHT POSTS
1. Lift both upright posts up at the same time.
2. Use four M8x16 mm bolts (50), two curved washers (57), and
two flat washer (46) on the base of the posts to fix both upright
posts in the upright position.
2
ATTACH THE CONSOLE
1. First connect the cables on the right side as in the diagram
below.
2. Then remove the two M6x30 bolts (55) and M6 nuts (54)
from the console and use the same bolts and nuts to affix
the console on the upright post.
3. Use two M8x16 bolts (50) and two curved washers (57) to
affix the console on the upright post tightly as seen below.
3
10 EcoStride User Manual Lifepro Endurance Training Collection 11
TREADMILL SETUP GUIDE (Continued)
5046 5750
50
57
55
54

ATTACH THE MEDIA HOLDER AND SAFETY KEY
1. Attach the media holder (69) to the console.
2. Place the safety key (61) onto the magnetic port on the front of
the treadmill.
4
CONNECT TO POWER
Plug the power cord into a dedicated wall socket.
5
12 EcoStride User Manual Lifepro
USING YOUR TREADMILL
READY THE ECOSTRIDE
1. Flip the Power switch on the front to the ON
position. The display will light up.
2. Place the safety key onto the magnetic port on
the front of the treadmill.
3. Clip the other end of the safety key securely to your clothing.
GET ON THE TREADMILL
1. Stand with your feet on the foot rails, one foot on either side of
the running belt.
2. Press the Start button on the control panel. Wait for the
countdown.
3. As the treadmill begins to move, begin walking along the
running belt.
1
GET OFF THE TREADMILL
1. Press the Stop button on the control panel to stop the
running belt.
2. Wait until the treadmill has come to a complete stop
before removing the safety key and getting off the
treadmill.
POWER OFF AND UNPLUG THE ECOSTRIDE
1. Once the treadmill is stopped, flip the Power switch to the
OFF position.
2. Unplug the power cord.
2
2
1
STARTING THE TREADMILL
STOPPING THE TREADMILL
OFF
ON
Endurance Training Collection 13
69
61
TREADMILL SETUP GUIDE (Continued)

OPERATING INSTRUCTIONS
USING THE CONTROL PANEL ON THE CONSOLE
1. Start Button: Press the button to start the running-belt movement
after a countdown. The Power switch must be in the ON position for the
EcoStride to start.
2. Program Button: Toggle through the preset programs P01–P12.
3. Mode Button: Press to toggle through the three goal-defined training
modes: time goal, distance goal, and calorie goal.
4. Stop Button: Press the button to stop running-belt movement.
5. Speed + Button: Use the button to increase the speed, in 0.1 mi/hr
increments, from 0.6 to 6.3 mi/hr. When a goal-defined mode has been
selected, use the button to increase a goal (time, distance, or calories
burned). Hold it down to increase the parameter quickly.
6. Speed - Button: Use the button to decrease the speed, in 0.1 mi/hr
increments, from 0.6 to 6.3 mi/hr. When a goal-defined mode has been
selected, use the button to decrease a goal (time, distance, or calories
burned). Hold it down to decrease the parameter quickly.
7. Display Panel: Displays time, speed, distance, and calories. Also shows
program choice and important error information. Refer to PAGE 20.
DISTANCE DISPLAY
CALORIESTIMESPEEDSCAN MODE
SPEED PROG MODE SPEED
START STOP
253.062*160.22mm
1 2 3 4
5
14 EcoStride User Manual Lifepro
6
7
Endurance Training Collection 15
USING THE DISPLAY PANEL
The display panel shows distance, your chosen program, and the display
window alternates between showing speed, time, and calories, as indicated
by the corresponding illuminated LED.
CAUTION: Do not stare down at the display panel for long periods while
the running belt is moving to avoid injury or falling.
1. Distance Window: Shows the distance run (0 to 61.5 miles) or the
distance remaining until your training distance goal is reached.
2. Display Window: Alternates between showing the time elapsed,
distance run, calories burned, and speed.
3. Speed Indicator LED: Indicates the value shown in the display window
is the speed in mi/hr (0.6 to 6.3 mi/hr).
4. Time Indicator LED: Indicates the value shown in the display window is
the running time elapsed in minutes and seconds (0 to 99 minutes) or
the time remaining until your training time goal is reached.
5. Calorie Indicator LED: Indicates the value shown in the display window
is the number of calories burned (0 to 990 calories) or the calories
remaining until your calorie goal is reached.
DISTANCE DISPLAY
CALORIESTIMESPEEDSCAN MODE
SPEED PROG MODE SPEED
START STOP
253.062*160.22mm
3 4 521

ADJUSTING THE INCLINE
You can manually adjust the EcoStride to be used flat or at one of three
incline settings.
WARNING: This step may require two people; the treadmill is heavy and
bulky.
To adjust the incline of the treadmill:
1. Remove an adjuster pin from the incline adjuster at the rear of the
treadmill.
2. Lift that rear corner of the treadmill.
3. Flip the incline adjuster down and place the adjuster pin in one of the
three holes.
• Hole 1 = high incline.
• Hole 2 = moderate incline.
• Hole 3 = low incline.
4. Return the treadmill to the floor.
5. Repeat steps 1-4 for the other side.
6. Inspect the treadmill to see if it is level and sturdy. Both adjuster
pins should be in incline adjuster holes with the same number or the
treadmill will not be level.
Adjuster
Pin
Incline
Adjuster
16 EcoStride User Manual Lifepro
FCC STATEMENT
This device complies with part 15 of the FCC Rules. Operation is subject
to the following two conditions: (1) this device may not cause harmful
interference, and (2) this device must accept any interference received,
including interference that may cause undesired operation.
NOTE: Changes or modifications not expressly approved by the party
responsible for compliance could void the user’s authority to operate the
equipment.
NOTE: This equipment has been tested and found to comply with the
limits for a Class B digital device, pursuant to part 15 of the FCC Rules.
These limits are designed to provide reasonable protection against harmful
interference in a residential installation. This equipment generates, uses
and can radiate radio frequency energy and, if not installed and used in
accordance with the instructions, may cause harmful interference to radio
communications. However, there is no guarantee that interference will
not occur in a particular installation. If this equipment does cause harmful
interference to radio or television reception, which can be determined by
turning the equipment off and on, the user is encouraged to try to correct
the interference by one or more of the following measures:
• Reorient or relocate the receiving antenna.
• Increase the separation between the equipment and receiver.
• Connect the equipment into an outlet on a circuit
different from that to which the receiver is
connected.
• Consult the dealer or an experienced radio/TV
technician for help.
Endurance Training Collection 17
OPERATING INSTRUCTIONS (Continued)

UNFOLDING THE TREADMILL
To unfold the EcoStride:
1. Place the treadmill on a flat surface with plenty of room to bring down
the running plate.
2. Unscrew the lock pin/knob (14)
from the EcoStride where the
upright post is pinned to the
running board while supporting
the running deck so it does not
slam down suddenly.
3. Screw the lock pin/knob in the
lower hole on the bottom front of
the treadmill.
MOVING THE TREADMILL
The EcoStride has wheels to make it easier to move. To move the folded
treadmill:
1. Test to see if the treadmill is securely locked before moving or storing
it.
2. Remove the media holder.
3. Grasp the back end of the treadmill with one
hand and the locked upright posts with the
other. Lift at an angle so it rests on the two
front transport wheels.
4. Move it slowly towards your desired location.
FOLDING, MOVING, & STORING
WARNING:
• Always power OFF the treadmill at the Power switch and unplug the
power cord before folding, moving, storing.
• Never allow children to fold, move or store the treadmill.
• Always ensure there are no children, pets, or objects in the way when
folding, moving or storing the treadmill.
• Store the safety key separately to prevent unauthorized use, especially
by children.
• Store in a cool, dry, indoor location where it will not be knocked over
easily.
• Do not store in direct sunlight, in a high-temperature or high-moisture
environment, or near heat sources.
FOLDING THE TREADMILL
To fold up the EcoStride:
1. Unscrew the lock pin/knob (14) from the EcoStride.
2. Return the incline adjuster to the base level.
3. From the rear of the treadmill, lift the running board until it is upright.
4. Secure the running board to the upright posts by inserting the lock pin/
knob (14) through the hole on the upright posts and through the hole
on the side of the running board. Turn clockwise to tighten fully.
14
18 EcoStride User Manual Lifepro Endurance Training Collection 19

USING THE TRAINING PROGRAMS
The EcoStride has many ways to help you reach your fitness goals: a
customizable workout, 3 goal-defined modes, and 12 preset programs
(P01–P12).
TRAINING WITH A CUSTOM WORKOUT
To begin a quick and simple custom (manual) workout:
1. Press the Start button to begin. The treadmill will begin automatically
after a 5-second countdown. The default speed is 0.6 mi/hr.
2. Use the Speed +/- buttons to adjust the speed.
3. Press the Stop button to stop training at any time.
TRAINING IN GOAL-DEFINED MODES
To begin a goal-defined workout:
1. Press the Mode button to toggle through the three goal-defined modes:
time-, distance-, and calorie-defined. Your choice is shown on the
indicator LEDs on the display.
2. Use the Speed +/- buttons to adjust the goal. Ranges for each goal are
as follows:
a. Time: 5 to 99 minutes.
b. Distance: 0.3 to 61.5 miles.
c. Calories: 10 to 990 calories.
3. Press the Start button to begin. The treadmill begins automatically
after countdown. The default speed is 0.6 mi/hr. You may adjust the
speed at any time using the Speed +/- buttons.
4. The treadmill stops automatically when the goal is complete or when
you press the Stop button on the control panel.
TRAINING WITH PRESET PROGRAMS (P01–P12)
There are 12 built-in programs. To workout using a preset training program:
1. Press the Program button to toggle through the programs. Choose one
of the preset training programs: P01–P12.
20 EcoStride User Manual Lifepro
2. The default time of “30:00” will show on the display. Use the
Speed +/- buttons to adjust workout time from 5:00–99:00, in
1-minute increments.
3. Press the Start button to begin the preset program. The treadmill will
begin automatically after a 5-second countdown. You may adjust the
speed at any time using the Speed +/- buttons.
4. Press the Stop button to stop training at any time.
PRESET PROGRAM (P01-P12) SPEED CHARTS
The 12 preset training programs are each divided into 10 segments. Each
segment has a set speed. The amount of time spent at each speed is
dependent on the total amount of time set for the program. The charts
below show a graph for each program. The taller the vertical stack of dots,
the higher the speed for that segment of the program.
Endurance Training Collection 21
P1 P2 P3 P4 P5 P6
P7 P8 P9 P10 P11 P12

20Age
200
150
130
110
195
146
127
107
100%
75%
65%
55%
of maximum heart rate
190
143
124
105
185
139
120
102
180
135
117
99
175
131
114
96
170
128
111
94
165
124
107
91
160
120
104
88
155
116
101
85
150
113
98
83
145
109
94
80
140
105
91
77
135
101
88
74
100
98
85
72
25 30 35 40 45 50 55 60 65 70 75 80 85 90
PULSE AND HEART RATE
Calculate your target heart rate when training based on your fitness goals:
MAXIMUM HEART RATE
This value represents your maximum heart rate (“max HR”) and serves as a basis from
which to calculate your training heart rate.
HEALTH & WELLNESS TRAINING
• Ideal for people who are overweight, older, beginners, or who do not exercise often.
• Burn approx. 4–6 calories per minute to produce energy in this zone.
FAT BURNING TRAINING
• Ideal for athletes and sports people who aim to lose weight.
• Burn approx. 6–10 calories per minute to produce energy in this zone.
CONDITIONING & FITNESS TRAINING
• Ideal for athletes and sports people who want to improve their stamina and/or
conditioning.
• Burn approx. 10–12 calories per minute to produce energy in this zone.
For best results, calculate the average value of the selected target zone (see chart above):
• Health & Wellness: target zone average = 55% of max HR (max HR x 0.55)
• Fat Burning: target zone average = 65% of max HR (max HR x 0.65)
• Conditioning & Fitness: target zone average = 75% of max HR (max HR x 0.75)
Target Zone = 70-80% of Max HR
Target Zone = 50-60% of Max HR
220 - Your Age = Max Heart Rate
Target Zone = 60-70% of Max HR
PULSE RATE MONITORING
WARNING: Pulse rate monitoring system may be inaccurate. Excessive training
can cause serious injury or even death. If you feel unwell and/or lightheaded, stop
training immediately. Make sure all users of this unit are familiar with this information,
understand it, and apply it unconditionally.
PULSE RATE MONITORING USING THE HAND SENSORS
The EcoStride is equipped with hand pulse sensors integrated into the handrail. These
hand sensors are used for short-term determination of the pulse rate. To do this, you
need to cover the sensors with both hands at the same time. The pulse measuring
system is based changes in electrical skin resistance measured by the hand sensors
due to the heartbeat and blood pressure fluctuations. These changes are summarized
as a mean value and shown after a short time on the display as the current pulse rate.
CAUTION: For large parts of the population, the pulse-induced skin resistance
change is so minimal that usable values cannot be derived from the measurement
results. Also callouses on the palms, damp hands, and body tremors may prevent
correct measurement. In such cases, the pulse value may be displayed incorrectly or
not at all.
If the pulse fails to display or displays incorrectly, check to see if the same problem
occurs for other users. If the problem occurs only with one user, the EcoStride is not
defective.
CAUTION:The pulse sensors’ measurements are only for the purpose of
displaying the current pulse during exercise. This value says nothing about the
safety and effectiveness of the training. Also, this type of measurement is in no way
designed or suitable for medical diagnostic purposes.
Therefore, it is important to discuss with your physician the most suitable exercise
type, duration, and exertion level for you and to create a suitable exercise plan before
you begin using the EcoStride.
This applies especially to those who:
• Are older than 35 years.
• Have too high or too low blood pressure.
• Have heart problems.
22 EcoStride User Manual Lifepro Endurance Training Collection 23

BMI CATEGORY BMI
Underweight Below 18.5
Normal Weight 18.5–24.9
Overweight 25.0–29.9
Obesity 30.0 or Above
MEASURING BODY MASS INDEX BMI
CALCULATING BMI WITH THE ECOSTRIDE
The sensors on the handrails can
be used to measure your body
fat composition. Note that the
fat reading is a measure of the
relationship between height and
weight (BMI), not body proportion.
The ideal fat composition is within
the 20 to 25 range. If the fat data
is 19 or less, it indicates that the
person might be too slim. If the fat data is above 25, it indicates that the person
might be overweight. Fat data over 30 indicates that the person might be obese.
1. At the setting state (before starting your exercise) hold down the Program
button until “FAT” shows in the display window.
2. Press the Mode button and F1 is displayed.
3. Using the Speed +/- buttons, cycle through the settings and enter the
information required.
a. “F1” will be shown on the display. Select your gender by pressing the
Speed +/- buttons to select “1” for male or “2” for female. Confirm your
selection by pressing the Mode button.
b. “F2” will be shown on the screen. Enter your age, from 0–99, by pressing
the Speed+/- buttons. Press the Mode button to confirm your selection.
c. “F3” will be shown on the display. Enter your height, from 39–87 inches,
by pressing the Speed +/- buttons. Press the Mode button to confirm
your selection.
d. “F4” will be shown on the display. Enter your weight, from 44–330
pounds, by pressing the Speed +/- buttons. Press the Mode button to
confirm your selection.
4. ”F5” will be shown on the display. Keep holding the sensors for 2-3 seconds
or until the fat data displays. Your BMI will calculate and show on the display.
NOTES:
• This data is for reference purposes only; it should not be used as medical
data. If you are concerned, consult your medical provider.
• To ensure the most accurate measurement, ensure that your height and weight
are correct.
TRAINING RECOMMENDATIONS
BEFORE BEGINNING TRAINING
If you have not done endurance or cardio training for a long time, you should
make an appointment with your physician for a checkup and to discuss
your training goals. This is especially important for people who are over 35,
overweight, or have heart/circulatory problems.
TRAINING RECOMMENDATIONS
HYDRATION
Adequate hydration is essential before, during, and after exercise. During a
training session of 30 minutes, it is possible to lose up to 4 cups of liquid. You
should drink about 1.5 cups 30 minutes before beginning exercise. Take care
to maintain balanced hydration during the workout.
TRAINING FREQUENCY
Experts recommend endurance training 3–4 days a week to keep your
cardiovascular system fit. The more you train, the faster you will achieve
your training goals. However, it is important to plan sufficient breaks, to give
your body enough time for rest and recovery. After each training session, you
should take at least one day off.
EXERCISE INTENSITY
Many beginners make the mistake of training too intensely. If your goal is
to run a marathon, your training intensity will certainly be high. However,
most people have training goals such as weight reduction, cardiac/exercise
training, or stress reduction, and therefore should exercise at a lower
intensity. We recommend aiming for the appropriate target heart rate for your
particular training goal. See PULSE AND HEART RATE on page 22 for more
information.
DURATION OF INDIVIDUAL TRAINING SESSIONS
For optimal endurance or weight-reduction training, the duration of each
training session should be 25–60 minutes. Beginners and those who have not
exercised regularly for a long time should start with short training sessions of
10 minutes or less in the first week and slowly increase your training duration
from week to week.
24 EcoStride User Manual Lifepro Endurance Training Collection 25

TRAINING DOCUMENTATION
To stay motivated and to evaluate the success of your training, create a
training plan before beginning a new exercise routine. In your plan,
document data from each training session, such as distance, training time,
and pulse, as well as data, such as body weight, blood pressure, resting
heart rate (measured in the morning right after waking up), and how you
feel during exercise See the example training plan below.
EXAMPLE WEEKLY TRAINING PLAN
Day Date Exercise
Duration
Number of
Steps
Calories
Burned
Pulse
Rate Notes
Mon.
Tues.
Wed.
Thurs.
Fri.
Sat.
Sun.
Weekly Totals:
TRAINING INSTRUCTIONS
STEP 1: WARMUP PHASE
Spend about 5 minutes doing warm-up stretches before exercising; this
prevents pulled muscles and other exercise injuries. Stretching helps get
your blood flowing and loosen your muscles so they are ready for exercise.
While doing the following stretches, do not force or jerk your muscles,
and most importantly, if it hurts: STOP. After stretching, continue your
warm-up by walking on the treadmill for 3–5 minutes at a low speed.
TOUCH YOUR TOES
1. Bend your knees slightly. Let your back and shoulders
relax as you bend over and try to touch your toes.
2. Hold the stretch for 10–15 seconds. Repeat 3 times.
26 EcoStride User Manual Lifepro Endurance Training Collection 27
STRETCH YOUR LEGS, CALVES, AND GLUTES
1. Sit on the floor or on a cushion. Place your left
foot against your right inner thigh.
2. Bend toward your right foot and try to touch
your toes.
3. Hold the stretch for 10–15 seconds.
4. Switch legs and repeat. Stretch each leg 3 times.
STRETCH YOUR QUADS
1. Place your right hand on a wall or a table to help with
balance.
2. With your left hand, grab your left ankle. Pull your
heel in toward your buttocks.
3. Hold the stretch for 10–15 seconds.
4. Switch legs and repeat. Stretch each leg 3 times.
STRETCH YOUR GROIN AND INNER THIGH MUSCLES
1. Sit on the floor or a cushion with your knees bent
and the soles of your feet together.
2. Hold your ankles and bend forward at your hips.
3. Hold the stretch for 10–15 seconds. Repeat
3 times.
STEP 2: EXERCISE PHASE
During the exercise phase, you’re building muscle and stamina and
improving your cardiovascular health slowly over time. The most important
thing is to always listen to your body. If you are tired or sore, slow down or
stop training.
STEP 3: RECOVERY PHASE
After exercising, it’s important to give your body time to cool down and
recover. Walk on the treadmill for another 3–5 minutes at a low speed.
Then, spend 5 minutes completing the above stretches to continue cooling
down your muscles. Be careful not to force or jerk your muscles as you
stretch.

MAINTENANCE AND CARE
WARNING: Switch off the power and remove the power cord from the
electrical outlet before performing any care, cleaning, maintenance, repair,
or similar work on your treadmill. Only when all work is fully completed may
the treadmill be reconnected to an electrical outlet and powered on.
AFTER A LONG BREAK FROM TRAINING
Make sure that there is a continuous film of lubricant on the running deck.
If this is not the case, then use the included bottle of lubricating oil to
apply a lubricant film. See LUBRICATING THE RUNNING BELT on page 30.
The treadmill comes from the factory pre-lubricated, but should be
checked regularly.
MAINTENANCE & CLEANING INTERVALS
WIPE DOWN THE TREADMILL: AFTER EACH USE
Wipe down after every use. Clean only with a damp cloth. Be sure to clean
the exposed parts next to the running belt and the running belt itself.
CHECK THE LUBRICATION OF THE RUNNING BELT: ONCE A MONTH
If your regular inspection shows that there is no longer enough lubrication,
lubricate the belt immediately and shorten the inspection interval
accordingly. Please see LUBRICATING THE RUNNING BELT on page 30 for
instructions. If the treadmill has been in storage for a long time, check
whether there is still enough lubricant present.
CHECK THE ALIGNMENT OF THE RUNNING BELT: ONCE A WEEK
The alignment of the running belt must be checked regularly. If you notice
that the belt is running to one side, this must be corrected immediately.
Please see ADJUSTING THE RUNNING BELT on page 32.
WHY IS MAINTENANCE OF MY TREADMILL SO IMPORTANT?
In order to enjoy using your treadmill for many years, it is important to
regularly and consistently do basic maintenance. The maintenance interval
will depend very much on how often you use your treadmill, and therefore
the intervals may need to be shorter than specified.
28 EcoStride User Manual Lifepro
WHAT CAN HAPPEN IF THERE IS A LACK OF MAINTENANCE?
There is friction between the running belt and the running deck when
in use. Any kind of friction creates wear which reduces the life of your
treadmill. By lubricating between the running belt and the running deck
with the included lubricating oil, this friction is reduced, thus increasing the
life of both parts. If the treadmill runs dry, the running deck will get hot,
and the surface of the running deck and the running belt may be damaged
or destroyed. Friction can also lead to a static charge which can discharge
on contact with the frame. This is not only unpleasant but can also destroy
the treadmill’s electronics.
CLEANING & GENERAL MAINTENANCE
• Use a slightly damp cloth to wipe any dirt or moisture from the product
after each use. You may use a small amount of mild soap or detergent,
as needed. Dry the cleaned areas thoroughly.
• Do not use abrasive, corrosive, solvent, or chemical cleaners or harsh
detergents to clean the product.
• Vacuum the motor with a brush at least twice a year to extend the life of
your treadmill.
• Inspect for visible damage before use. Do not use if damaged or
malfunctioning.
• Only use with the original parts and accessories provided by the
manufacturer.
• Never open the motor hood unless you are vacuuming dust from inside,
which should only be done two to four times per year. Otherwise, do not
open the motor hood unless instructed to do so by an authorized service
representative. Servicing other than the procedures in this manual should
be performed by an authorized service representative only.
DAMAGE CAUSED BY NEGLECT OR LACK OF MAINTENANCE AND CARE
IS EXCLUDED FROM THE WARRANTY.
Endurance Training Collection 29

MAINTENANCE AND CARE (Continued)
WARNING:
• Switch off the power and remove the power cord from the electrical
outlet before lubricating the running belt.
• Keep the bottle of lubricating oil out of reach of children and pets at all
times to prevent accidental ingestion. In case of ingestion, contact your
physician or local poison control center immediately.
LUBRICATING THE RUNNING BELT
The most important maintenance for a treadmill is regular, timely
lubrication and care and maintenance of the running belt.
• The running belt must be lubricated if a significant increase in friction is
noted. This will be apparent if the belt makes jerking movements during
training.
• Insufficient lubrication and the resulting increase in friction will
inevitably lead to an increase in wear and cause damage to the
treadmill’s running belt, deck, motor, and circuit board.
• How often you use the treadmill will generally determine how often you
must perform maintenance. This treadmill is equipped with advanced
technology and will only need to be lubricated every 3–10 months.
However, as use-time will vary greatly from person to person, we
recommend you keep a maintenance log and set a specific day each
month in the first year of use to check the lubrication of the running belt.
• To check the belt lubrication, lift the front third of the belt and feel with
your hand for lubrication under the belt. If lubrication is present, then
write “OK” next to the date in your maintenance log. If there is little
or no lubrication present, then lubricate the belt and record it in your
maintenance log accordingly. Over time, you will be able to see how often
lubrication is needed.
NOTE: Even if you choose not to keep a maintenance log, you must check
the lubrication of the running belt at least once a month.
• If the treadmill is not used for a long period, you must check the
lubrication of the belt before use and lubricate it if necessary.
30 EcoStride User Manual Lifepro
NOTE: Only use the included bottle of silicone lubricating oil to lubricate
the running belt. Do not use any other kinds of lubricants or silicone sprays.
HOW TO LUBRICATE THE RUNNING BELT
1. Make sure that the treadmill is switched off and unplugged, and that
the belt is no longer moving.
2. Open the lid on the bottle of silicone oil.
3. Lubrication must be applied under
the belt. Lift one side of the belt high
enough that you can reach under it
with the end of the applicator tip. See
Figure 1.
4. Apply lubricating oil under the belt in
several places, from the front to the
back of the treadmill. See Figure 2.
NOTE: Do not apply more than 8–10 ml
of oil. If too much oil is applied, it can
lead to the running belt slipping. If this
occurs, use a dry cloth to remove the
excess oil from the running deck.
5. Put the cap on top of the nozzle to close it.
6. After applying the lubrication, wait one minute. Then let the running
belt run without any load (no one on the treadmill) at a speed of 3 mi/hr
for 5 minutes to evenly distribute the lubricating oil.
Figure 2
Endurance Training Collection 31
Figure 1
Running
Deck Running
belt
Silicone
Oil Bottle
Line of Silicone Oil
Line of
Silicone Oil
Motor
Housing

MAINTENANCE AND CARE (Continued)
ADJUSTING THE RUNNING BELT
To assure the longest service life possible, the running belt should always
be kept running straight along the center of the running deck. Therefore, it
is important to examine the belt before each training session to see if it is
straight and running in the center of the deck or if it has changed position.
Possible reasons for the running belt changing position are:
• The ground on which the treadmill is standing is either uneven or at an
incline.
• Personal running style (for example, distribution of weight to one side,
in- or out-turned feet).
NOTE: If the running belt has become so displaced that it is rubbing along
one of the foot rails, this will cause friction and damage the running belt.
Damage caused by failure to make adjustments to the belt or insufficient
adjustments will not be covered by the warranty.
HOW TO ADJUST THE RUNNING BELT
IF THE BELT IS RUNNING TO THE LEFT OF CENTER:
1. Start up the running belt at a
constant speed of 4.5 mi/hr.
2. Use the provided hex key to turn the
left adjustment screw, located at
the back end of the treadmill, ½ turn
clockwise.
3. Let the treadmill run at a speed of 4.5
mi/hr for about 2 minutes.
4. If the running belt is now running in
the center of the running deck, the
adjustment was successful. If the
belt is still off-center, turn the right
adjustment screw, located at the back
end of the treadmill, ½ turn counter-clockwise.
5. If necessary, repeat steps 1–4 until the belt is running in the center.
32 EcoStride User Manual Lifepro
IF THE BELT IS RUNNING TO THE RIGHT OF CENTER:
1. Start up the running belt at a speed of 4.5 mi/hr.
2. Use the provided hex key to turn the right adjustment screw, located at
the back end of the treadmill, ½ turn clockwise.
3. Let the treadmill run at a speed of 4.5 mi/hr for about 2 minutes.
4. If the running belt is now running in the center of the running deck,
the adjustment was successful. If the belt is still off-center, turn the
left adjustment screw, located at the back end of the treadmill, ½ turn
counter-clockwise.
5. If necessary, repeat steps 1–4 until the belt is running in the center.
NOTE: If the belt cannot be adjusted, please contact a support
representative.
RE-TENSIONING THE RUNNING BELT
If the running belt begins to jolt or skid noticeably during operation, the
belt is too loose and must be re-tensioned. The running belt is re-tensioned
using the same adjustment screws used when adjusting the belt, located at
the back end of the treadmill.
1. Start up the running belt and let it run at a constant speed of 3 mi/hr.
2. Use the provided hex key to turn one adjustment screw, then the other,
½ turn clockwise.
3. Confirm this fixed the tension. If not, repeat step 2.
4. Alternately, if the belt is too tight, you will feel excessive resistance or
pausing. In this case, use the provided hex key to turn one adjustment
screw, then the other, ½ turn counterclockwise. Repeat this procedure
if you still feel excessive resistance or pausing.
Endurance Training Collection 33

SAFETY INSTRUCTIONS
Keep this manual in a safe place for future reference.
Before using this product, read all safety warnings and setup and operating
instructions. Failure to do so may result in burns, fire, electric shock,
serious injury or death, or damage to the product or property.
CONTRAINDICATIONS
Users should consult with a medical professional before beginning a new
exercise program. Your physician should assist you in determining the heart
rate zone that is appropriate for your age and physical condition. Your
physician can help determine if you have any physical limitations that could
create a health risk or prevent you from properly using this product; some
exercise programs or fitness products may not be appropriate for all
people.
Consult your physician before using this product if you:
• Are over the age of 35 or have pre-existing health conditions.
• Have orthopedic conditions, spinal injuries, osteoporosis, fractures,
herniated or slipped discs, chronic back pain, sciatica, or other conditions
or disorders affecting the back or spinal column.
• Have joint pain, disorders, or conditions, including arthritis, rheumatoid
arthritis, and knee pain, previous knee injury, or previous surgery.
• Have a heart or vascular condition, hypertension, blood clots, or if you
are taking medication that affects heart rate.
• Have a pacemaker, artificial heart, or other medical implant.
• Are or may be pregnant, have recently had surgery, or have cancer or
malignant tumors.
• Experience dizziness or balance impairments or if you are taking drugs
that affect balance.
DISCLAIMER
• The health benefits suggested or implied in this manual, other product
literature, and company website are not certified or endorsed by any
regulatory authority or medical institute.
• The use of this product is entirely at the user’s discretion. Please
read all instructions and safety information carefully before using this
product. We assume no responsibility and expressly disclaim any and all
liability for personal injury, or property damage or loss sustained through
improper use, failure to follow the instructions and warnings in this
manual, improper setup, neglect, or inadequate or improper maintenance
of this product.
• It is the responsibility of the owner to ensure that all users of this
product are adequately informed of all warnings and cautions.
• Use this product only as instructed in this manual.
WARNING: CHOKING HAZARD
Children under 3 years old can choke or suffocate on small parts.
WARNING
To reduce the risk of burns, fire, electric shock, serious injury or death, or
damage to the product or property:
• Only power the machine using the included power cord.
• Only plug the machine into a properly grounded wall outlet, installed by a
certified electrician.
• Always unplug the power cord by pulling gently from the plug. Never
unplug by pulling on the cord itself.
• Never operate the machine, plug in, or unplug the power cord with wet
hands.
• Do not wrap the power cord around the machine. Do not squeeze or place
heavy objects on top of the power cord. Never place the power cord near
sharp objects.
• Only use and store indoors, away from moisture, dust, dirt, and heat
sources. Do not use or store in high-temperature or high-humidity
environments. Keep out of direct sunlight.
• Do not operate where aerosol products are used or where oxygen is
administered.
• Keep the power cord away from all heat sources.
• Never leave the machine unattended while it is running or plugged in.
Always unplug the power cord when the machine is not in use.
• Check the machine, power cord, and accessories for damage or loosened
screws before each use. Tighten any loosened screws before use. Do not
use if damaged, faulty, or defective.
34 EcoStride User Manual Lifepro Endurance Training Collection 35

SAFETY INSTRUCTIONS (Continued)
WARNING
To reduce the risk of serious injury or death:
• Excessive exercise or overexertion can be damaging to your health.
Always exercise within the target heart rate and time limits
recommended by your doctor.
• Drink plenty of fluids before, during, and after your session to avoid
dehydration. When you are dehydrated, your body cannot properly cool
itself, which may result in heat exhaustion. Heat exhaustion can lead to
heatstroke if left untreated, which can be fatal.
• Stop exercising immediately at the first sign of discomfort, and consult
your doctor if you experience any of the following symptoms: dizziness
or lightheadedness, sleepiness, cold or clammy skin, headache, nausea,
muscle cramping, irregular heartbeat, or shortness of breath.
• Do not use the product near swimming pools or other bodies of water.
• Adult setup required. Keep children away during setup. Children are
forbidden from setting up or moving the product.
• This product is for adult use only. Do not allow children or pets to use;
this product is not a toy.
• Keep children and pets away from the product and accessories at all times.
Never leave children unattended in the same room with the treadmill.
• Keep the bottle of lubricating oil out of reach of children and pets at all
times to prevent accidental ingestion. In case of ingestion, contact your
physician or local poison control center immediately.
• This product is not intended for use by people with reduced physical,
sensory, or mental capabilities unless supervised by a responsible adult.
CAUTION
To reduce the risk of minor or moderate injury, or damage to the product or
property:
• Do not allow more than one person to use the product at a time.
• Do not exceed the maximum weight-load capacity of 242 lbs.
• Always inspect the product for damaged, worn, or loose bolts,
nuts, or knobs before each use. Do not use if damaged, worn, rusty,
malfunctioning, or missing bolts, nuts, or knobs. Do not use the product
again until the problem has been fixed.
• Never use the product while under the influence of drugs or alcohol. Do
not use during or immediately after eating or when you feel tired. Do not
use if injured, ill, or if you have a fever.
• Use the product only on a flat, sturdy, non-slip floor. Place in a location
away from traffic where it will not create a tripping hazard.
• Ensure adequate clear space around the product during use (at least
seven feet on all sides). Remove any obstacles or objects in the area, in
case of falls or accidents.
• Plug the treadmill into a dedicated socket that is not shared with any
other devices.
• Only an adult may move or set up the product.
• Never attempt to jump or turn around on the treadmill while the running
belt is moving.
• Do not perform other activities while using the product to avoid
accidents or injury.
• Always properly warm up before exercise and cool down after exercise to
prevent sports injuries.
• Keep hair, hands, feet, and clothing away from moving parts.
• Never insert your fingers or objects into any opening.
• Always wear appropriate athletic clothing and shoes. Appropriate
clothing should be comfortable and allow you to move freely. Do not
wear muddy shoes.
• Remove items, especially sharp objects, from your pockets before using.
• Do not wear baggy or loose clothing or clothing with drawstrings or ties
that could get snagged and cause injury or falling.
• Do not wear jewelry, belts, or other accessories that could get snagged
and cause injury or falling.
• Always increase or decrease the speed slowly.
• Do not use accessories not approved by the manufacturer.
• Do not use outdoors. This product is intended for indoor use only.
NOTICE
• The product is intended for in-home use only. Do not use the product in
any commercial, rental, institutional, or therapeutic setting.
• Dispose of the product and accessories according to local and federal
regulations.
• Keep sharp objects away from the product to avoid damaging it.
36 EcoStride User Manual Lifepro Endurance Training Collection 37

TROUBLESHOOTING & ERROR CODES
Quickly troubleshoot simple issues you might experience with the EcoStride
using the following tables.
Please contact a customer support representative for additional assistance
when needed at: support@lifeprofitness.com or (800) 563-6604. Please do
not attempt to repair the device.
38 EcoStride User Manual Lifepro
PROBLEM POSSIBLE REASON HOW TO RESOLVE
Treadmill is
not working.
No power. Plug the power cord into an outlet
and flip the Power switch ON.
Treadmill is in sleep mode. Press any button to exit sleep
mode.
Magnetic safety key is not
in position.
Place the magnetic safety key in
place on the magnetic port on the
front of the treadmill.
Power surge.
Flip the Power switch to the OFF
position. Then flip the Power
switch ON.
Short circuit or fuse out. Contact customer support.
Running belt
is skidding. Running belt is loose. Adjust the belt. See ADJUSTING
THE RUNNING BELT on page 32.
Running belt
is not smooth.
Not enough lubrication. See LUBRICATING THE
RUNNING BELT on page 30.
Running belt is tight. Adjust the belt. See ADJUSTING
THE RUNNING BELT on page 32.
Endurance Training Collection 39
CODE PROBLEM POSSIBLE REASON SOLUTION
E00 OR
ERR No safety key Key magnet is not
engaged.
Check that the
magnetic safety key
is securely installed.
E2 Console malfunction The console is damaged. Contact Lifepro.
E04 Display is not
working. Faulty cable connection. Check cable.
E02 Running belt is not
working.
Improper voltage,
burned motor, or speed
sensor failure.
Contact Lifepro.
E05 Treadmill is not
working.
Overcurent protection
initiated, possibly due to
a motor blockage.
Remove motor cover
and check if there’s
an obvious blockage.
If not, contact
Lifepro.
E06 Treadmill is not
working.
Burned motor or faulty
controller. Contact Lifepro.
E07 Controls not
working
Connector wires
damaged or incorrectly
connected
Contact Lifepro.
E08
Overcurent
protection initiated,
possibly due to a
power surge.
Power surge or the user
is too heavy.
Flip the Power
switch to OFF
position. If your
model has a reset
button on the front,
press it. If not,
unplug the power
cord and plug it back
in. Then flip the
Power switch ON.
E09 Treadmill is not
level.
Not on level ground, or
incline needs adjusting.
Check that the
floor is level. Check
the incline is set
correctly.
Table of contents
Other Lifepro Treadmill manuals