Light Emotion LE60 Operator's manual

www.lightemotion.com.au
LE60
60w LED Moving Head Spot
User’s instruction manual
This manual contains important information about the safe installation and use of this product
Please read this instruction manual carefully before installing or operating
Please keep these instructions in a safe place for future reference
V1.00

1
Contents
1. Safety Instructions 2
2. Installation 3
3. Features 3
4. Menu Operation 4
5. Stand Alone Operation 5
6. Master/Slave Operation 5
7. DMX Table 5
8. DMX Connection 7
9. DMX Address Setting 7
10. DMX Terminator 8
11. Cleaning and Maintenance 8
12. Technical Data 9
13. Warranty 10

2
Introduction
Thank you for the purchase of your LE60 LED Moving Head Spot by Light Emotion. We are
confident you will be satisfied with your purchase and enjoy many years of use from this
Professional Light Emotion product. Please read these instructions carefully to ensure the
product is well look after and used correctly to avoid any potential problems.
Please note that as part of our ongoing commitment to continuous improvement and product
development, the specifications in this manual are subject to change without notice. Whilst
every care has been taken in the preparation of this manual we reserve the right to change
specifications in the course of product improvement.
What is in the box:
- 1 x LE60 Moving Head
- 1 x Power Cable
- 1 x Mounting bracket
- This user manual
1. Safety Instructions:
Please read these instructions carefully. It includes important information about the installation
usage and maintenance of this product.
- Please keep this User Manual for future consultation. If you sell the unit to another user, be
sure that they also receive this instruction booklet.
- Always make sure that you are connecting to the proper voltage and that the line voltage you
are connecting to is not higher than that stated on the sticker of the fixture.
- This fixture is designed for indoor use only and cannot be used for outdoor applications or
exposed to moisture.
- Make sure there are no flammable materials close to the unit while operating.
- The unit must be installed in a location with adequate ventilation, at least 50cm from adjacent
surface. Be sure that no ventilation slots are blocked.
- Always disconnect from power source before servicing.
- Secure fixture to stands, trussing and the like using a safety chain.
- Due to the fact this is a moving head, be sure that the movement of the head is free from any
obstructions which could damage the unit if come into contact.
- Maximum ambient temperature is 40˚C. Do not operate fixture at temperatures higher than
this.
- In the event of serious operating problem, stop using the unit immediately. Never try to repair
the unit by yourself. Repairs carried out by unskilled people can lead to damage or malfunction.
Please contact the nearest authorized technical assistance centre.

3
- Make sure power cord is never crimped or damaged.
- Never disconnect power cord by pulling or tugging on the cord.
- Never carry the fixture directly from the cord. Carry by holding the chassis of the unit.
- Avoid direct eye exposure to the light source while it is on.
2. Installation:
Caution: For safe mounting of this product, please read the following carefully.
- When mounting the product, do not stand directly underneath the product.
- When mounting in fixed installation, use the provided brackets. Please ensure the unit is
being attached securely to any surface – consult a professional for the installation if need be.
- Always use a safety chain when mounting the product on stands, trussing or bars. Make sure
the breaking strain rating of the chain is at least 10 times the weight of the product.
- Product will work in either upright or upside down orientation. It cannot work in a
perpendicular orientation where the base is on the side as such – for example you cannot
mount the base to a wall with the moving head protruding out from the wall – this will cause
severe damage to the driver motors and ultimate failure.
- Make sure there is adequate ventilation around the product.
- Never look directly into the LED light sources of the product.
- Keep out of reach of children.
3. Features
This product is designed as a professional LED moving head and is only intended to be used as
such for entertainment, display and architectural applications. Due to our ongoing commitment
to constantly reviewing and improving products, features and specifications are subject to
change without prior notice.
- LED: 60w white LED source with average 50000 hours lifespan -
- Beam angle
:
12º
- Control: DMX, built-in programs, sound activation and Master/slave
- 9 and 11 channel DMX modes
- Pan 540 º Tilt 230 º
- 0-100% linear dimming
- LCD display menu with 4 control buttons
- Colour Wheel: 7 colours + open, rainbow flow effect
- Gobo Wheel: 7 fixed gobos + open, flow effect and gobo shake
- Weight: 3kg
- Product size: 194x151x285mm

4
4. Menu Operation
Used for setting up or operating the product without DMX control
Menu: Press each time to access features – see table below.
UP: Increase setting
DOWN: Decrease setting
Enter: Confirm and save setting.
Menu Table:
Show Value Function
Addr 001 – 512 DMX Address
Chnd 9 Ch
11 Ch Choses 9 or 11 DMX channel mode
Shnd
Sh 1
Sh 2
Sh 3
Sh 4
Show 1-4
SLnd
Nast
SL 1
SL 2
Master
Slave 1
Slave 2
Soun On
oFF
Turn on or off sound activation (used in
conjunction with Shows 1-4)
Send 0-99 Sound sensitivity level adjustment
Blnd Yes
no Blackout mode
Pan Yes
no Pan Inversion
Tilt Yes
no Tilt Inversion
Led On
oFF
LED Display – turns on or off the LED
menu display on the fixture
DISP dISP
dSIP
Display Normal
Display Inversion (for example when the
fixture is mounted upside down from
trussing or lighting stands)
Test Auto test
Tenp Displays fixture temperature in degrees C

5
Hour Fixture use time over its lifetime
rSET Reset
Focusing
The focus of the beam can be adjusted by twisting the front lens on the moving head. When the
beam appears blurry, you can turn the lens to focus the beam. The degree of focus will depend
on the distance of the projection. Please ensure the light is not moving when focusing.
5. Stand Alone Operation.
To run the fixture in stand alone mode, chose Shnd from the menu, then selct one of the 4
inbuilt shows to play. To have the shows move through their sequence via sound activation,
you then select Soun from the menu, press enter to toggle whether the sound activation is on or
off.
6. Master/Slave operation
Master/Salve operation is achieved by choosing SLnd from the menu. In order to use
master/slave, you need to connect the fixtures together using their DMX inputs and outputs
(see under DMX connections regarding connecting the fixtures to each other). On the first unit,
you chose “nast” from the menu – a light will show up indicating that fixture is the master. On
the slave units, chose SL1 or SL2. The slave units will then run a show coordinated by the
master using the built in programs.
You can also choose to invert the pan and/or the tilt from the menu which allows fixtures to
mirror each other in certain shows. This is especially useful when you have say one on either
side of a stage and you desire for the beams from the shows to look more like they are coming
together or moving away together.
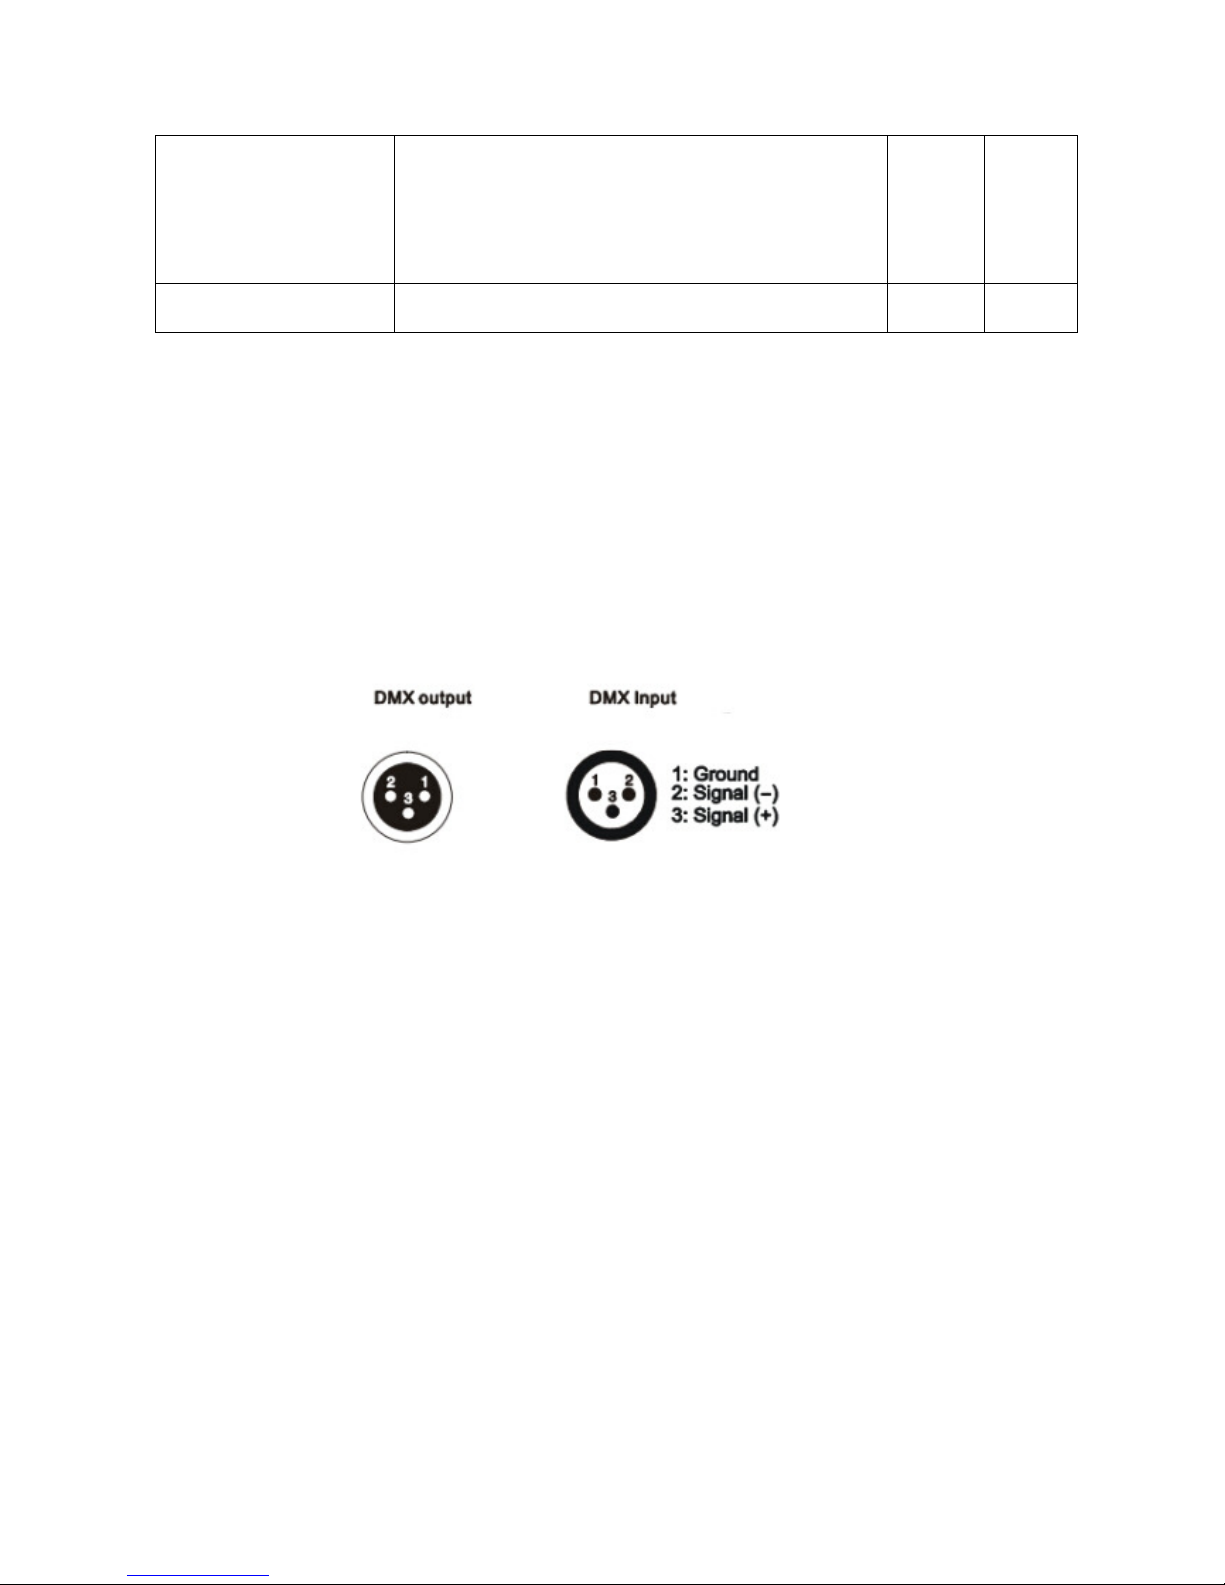
7. DMX Channel Allocation and functions tables.
There are 2 different DMX profiles for this fixture – 9 channel and 11 channel mode. In 11
channel mode, the two extra channels offer fine pan and fine tilt meaning the user, when the
fixture is controlled via DMX, can precisely position the beam where they would like. For
most moving light shows 9 channel mode without fine pan and tilt will do the job, but over
longer distances or when precise positioning is required to say highlight a specific part of a
venue, then the fine pan and tilt will allow fine tuning of the position of the beam.
The following is the DMX channel allocation for this fixture in both 9 and 11 channel DMX
modes.

6
Function Value
Mode
9CH
Mode
11CH
Pan 0-255 - 0° to 540° 1 1
Pan Fine 0-255 2
Tilt 0-255 - 0° to 230° 2 3
Tilt Fine 0-255 4
Pan/Tilt motor speed 0-255 From fast to slow 3 5
Dimming 0-255 - 0-100% 4 6
Strobe
0-7 - No function
9-99 - Strobe from slow to fast
100-149 - Strobe from fast to slow
150-199 - Strobe effect 1
200-245 - Strobe effect 2
246-255 – Full on (no strobing)
5 7
Colour
0-7 – White (no colour)
8 Red
16 Green
24 Blue
32 Yellow
40 Magenta
48 Cyan
56 Pink
64 Half white & red
72 Half red & green
80 Half green & blue
88 Half blue & yellow
96 Half yellow & magenta
104 Half magenta & cyan
112 Half cyan & pink
120 Half pink & white
128-191 Rainbow effect reverse colour order slow to fast
192-255 Rainbow effect in colour order slow to fast
6 8
Gobo
0-7 Clear (no gobo)
8 Six pointed star-like gobo
16 Square lightning-bolt-like gobo
24 Six blade fan-like gobo
32 Standard five pointed star gobo
40 Six random ovals gobo
48 Atomic orbits-like gobo
56 Five diamonds in a star formation gobo
64-127 Gobo shake for above each of the above
128-191 Gobo flow in reverse gobo order
192-255 Gobo flow in gobo order
7 9

7
Sound activated shows
0-127 No function
128 Show 1
160 Show 2
196 Show 3
228 Show 4
8 10
Speed / Reset 0–235 – Sensitivity and speed of shows
236-255 Reset 9 11
8. DMX-512 Control Connection
Using a 3 pin XLR cable, you can connect the product to a DMX controller and then to
other fixtures with 3 pin XLR inputs and outputs. When not using DMX, multiple
fixtures can be connected together and operate under master/slave control. The signal
cable should have two core with shielded cable, the signal connectors are XLR input
and output connectors. Please refer to the below diagram:
9. DMX Address Setting
When being used in conjunction with a DMX controller, each fixture must be set a specific
starting address. When receiving signal, fixture will receive channel control signals of this
address from the DMX controller.
For simplicity, the user can use the same address for multiple fixtures but this will result in
each fixture providing exactly the same output and fixtures with the same DMX address cannot
be individually controlled.
To control each fixture individually via DMX, each fixture must have its own unique DMX
address. Depending upon which DMX mode this fixture is set in, the individual DMX
addresses must be separated by at least the same number of channels. For example in 9 channel
mode, the DMX addresses must be at least 9 channels apart.
So for example – assuming the first fixture is DMX channel 1 and we are in 9 channel DMX
mode, the second fixture would need to be on channel 10, then the 3
rd
channel 19 and so on.
Some DMX controllers may group fixtures in lots of 16 channels – so in that case, fixture 1 on

8
channel 1, fixture 2 on channel 17, 3 on 33, and so on. Refer to your DMX controllers’
instruction manual on how best to manage your DMX channel allocation.
10. DMX Terminator:
A DMX terminator helps to reduce ‘noise’ on the DMX chain, and makes the light respond to
control more accurately. It should be plugged in to the last fixture in any chain. For Terminator
connections please see below:
11. Cleaning and maintenance
From time to time it is recommended the product is cleaned to ensure maximum light output
and performance. Before cleaning, please unplug mains power from the unit.
Use a wet cloth to clean the housing as well as the lenses and base. Glass cleaner is also
suitable but alcohol based cleaners and solvents cannot be used as they will cause damage to
the product.
When used in a fixed long term installation such as a venue or club, the unit should be
periodically taken down from the installation and professionally cleaned. Dust build-up within
the unit can cause damage and ultimately failure of components.
The manufacturer’s recommended regularity of cleaning is once every 3 weeks for the exterior
lens and every two months for the interior optics.

9
12. Technical Data
- Input voltage: 90-240VAC, 50 or 60Hz
- Power consumption: 65W
- LEDs: 1 high powered 60W LED with average 50000 hours lifespan
- Beam angle: 12º
- Control: DMX or on-board built-in programs, sound activation, master/slave
- 9 or 11 DMX channel mode
- Colour wheel: 7 colours + open (white), rainbow/flow effect
- Gobo wheel: 7 gobos + open (clear), gobo shake and gobo flow effect
- Electronic strobe rate: 1-25Hz
- Dimming: 0-100% linear dimming
- Built in programs
- Pan 540
°
- Tilt 230
°
- Weight: 3kg / 5kg gross
- Packed Dimensions: 194x151x285mm

10
13. Warranty
This product is warranted for 24 months (2 years) from your purchase date. We are confident
that this product will give many years of trouble-free operation but should an unlikely problem
arise, warranty claims must be via the original place of purchase, together with the original
purchase receipt. Please keep both your original purchase receipt and this instruction manual
together and in a safe place for future reference. Should the product be sold within the
warranty period, be sure to pass on both to the new purchaser so they are able to claim
warranty should they need to. We recommend you register your warranty online at
www.industrygear.com.au.
Purchased from:_________________________________________
Contact Details:_________________________________________
Date Purchased:_________________________________________
Invoice/Receipt Number:__________________________________
Copyright Light Emotion 2016. E&OE
Exclusively imported by LSW Imports and Distribution
PO Box 887, Kingsgrove, NSW, 2208
www.lightemotion.com.au
1800 643 111 (within Australia)
+612 9718 4900 (outside of Australia)
Table of contents
Other Light Emotion Dj Equipment manuals

Light Emotion
Light Emotion P64100RGB Operator's manual

Light Emotion
Light Emotion DERBY4 Operator's manual

Light Emotion
Light Emotion COB150RGBW Operator's manual

Light Emotion
Light Emotion MUSHROOMLED Operator's manual

Light Emotion
Light Emotion MOONSTAR4 Operator's manual

Light Emotion
Light Emotion RAZORTRI User manual

Light Emotion
Light Emotion P64LEDLITEWW Operator's manual

Light Emotion
Light Emotion Firefly Series User manual

Light Emotion
Light Emotion LE90 User manual

Light Emotion
Light Emotion HALFBALL Operator's manual