Light Emotion LE90 User manual

www.lightemotion.com.au
LE90
90w LED Moving Head Spot
User’s instruction manual
This manual contains important information about the safe installation and use of this product
Please read this instruction manual carefully before installing or operating
Please keep these instructions in a safe place for future reference
V1.00

1
Contents
1. Safety Instructions 2
2. Installation 3
3. Features 3
4. Menu Operation 4
5. Stand Alone Operation 4
6. Master/Slave Operation 5
7. DMX Table 5
8. DMX Connection 7
9. DMX Address Setting 7
10. DMX Terminator 8
11. Cleaning and Maintenance 8
12. Technical Data 9
13. Warranty 10

2
Introduction
Thank you for the purchase of your LE90 LED Moving Head Spot by Light Emotion. We are
confident you will be satisfied with your purchase and enjoy many years of use from this
Professional Light Emotion product. Please read these instructions carefully to ensure the
product is well look after and used correctly to avoid any potential problems.
Please note that as part of our ongoing commitment to continuous improvement and product
development, the specifications in this manual are subject to change without notice. Whilst
every care has been taken in the preparation of this manual we reserve the right to change
specifications in the course of product improvement.
What is in the box:
- 1 x LE90 Moving Head
- 1 x Power Cable
- 1 x Mounting bracket
- This user manual
1. Safety Instructions:
Please read these instructions carefully. It includes important information about the installation
usage and maintenance of this product.
- Please keep this User Manual for future consultation. If you sell the unit to another user, be
sure that they also receive this instruction booklet.
- Always make sure that you are connecting to the proper voltage and that the line voltage you
are connecting to is not higher than that stated on the sticker of the fixture.
- This fixture is designed for indoor use only and cannot be used for outdoor applications or
exposed to moisture.
- Make sure there are no flammable materials close to the unit while operating.
- The unit must be installed in a location with adequate ventilation, at least 50cm from adjacent
surface. Be sure that no ventilation slots are blocked.
- Always disconnect from power source before servicing.
- Secure fixture to stands, trussing and the like using a safety chain.
- Due to the fact this is a moving head, be sure that the movement of the head is free from any
obstructions which could damage the unit if come into contact.
- Maximum ambient temperature is 40˚C. Do not operate fixture at temperatures higher than
this.
- In the event of serious operating problem, stop using the unit immediately. Never try to repair
the unit by yourself. Repairs carried out by unskilled people can lead to damage or malfunction.
Please contact the nearest authorized technical assistance centre.

3
- Make sure power cord is never crimped or damaged.
- Never disconnect power cord by pulling or tugging on the cord.
- Never carry the fixture directly from the cord. Carry by holding the chassis of the unit.
- Avoid direct eye exposure to the light source while it is on.
2. Installation:
Caution: For safe mounting of this product, please read the following carefully.
- When mounting the product, do not stand directly underneath the product.
- When mounting in fixed installation, use the provided brackets. Please ensure the unit is
being attached securely to any surface – consult a professional for the installation if need be.
- Always use a safety chain when mounting the product on stands, trussing or bars. Make sure
the breaking strain rating of the chain is at least 10 times the weight of the product.
- Product will work in either upright or upside down orientation. It cannot work in a
perpendicular orientation where the base is on the side as such – for example you cannot
mount the base to a wall with the moving head protruding out from the wall – this can cause
damage to the driver motors and ultimate failure.
- Make sure there is adequate ventilation around the product.
- Never look directly into the LED light sources of the product.
- Keep out of reach of children.
3. Features
This product is designed as a professional LED moving head and is only intended to be used as
such for entertainment, display and architectural applications. Due to our ongoing commitment
to constantly reviewing and improving products, features and specifications are subject to
change without prior notice.
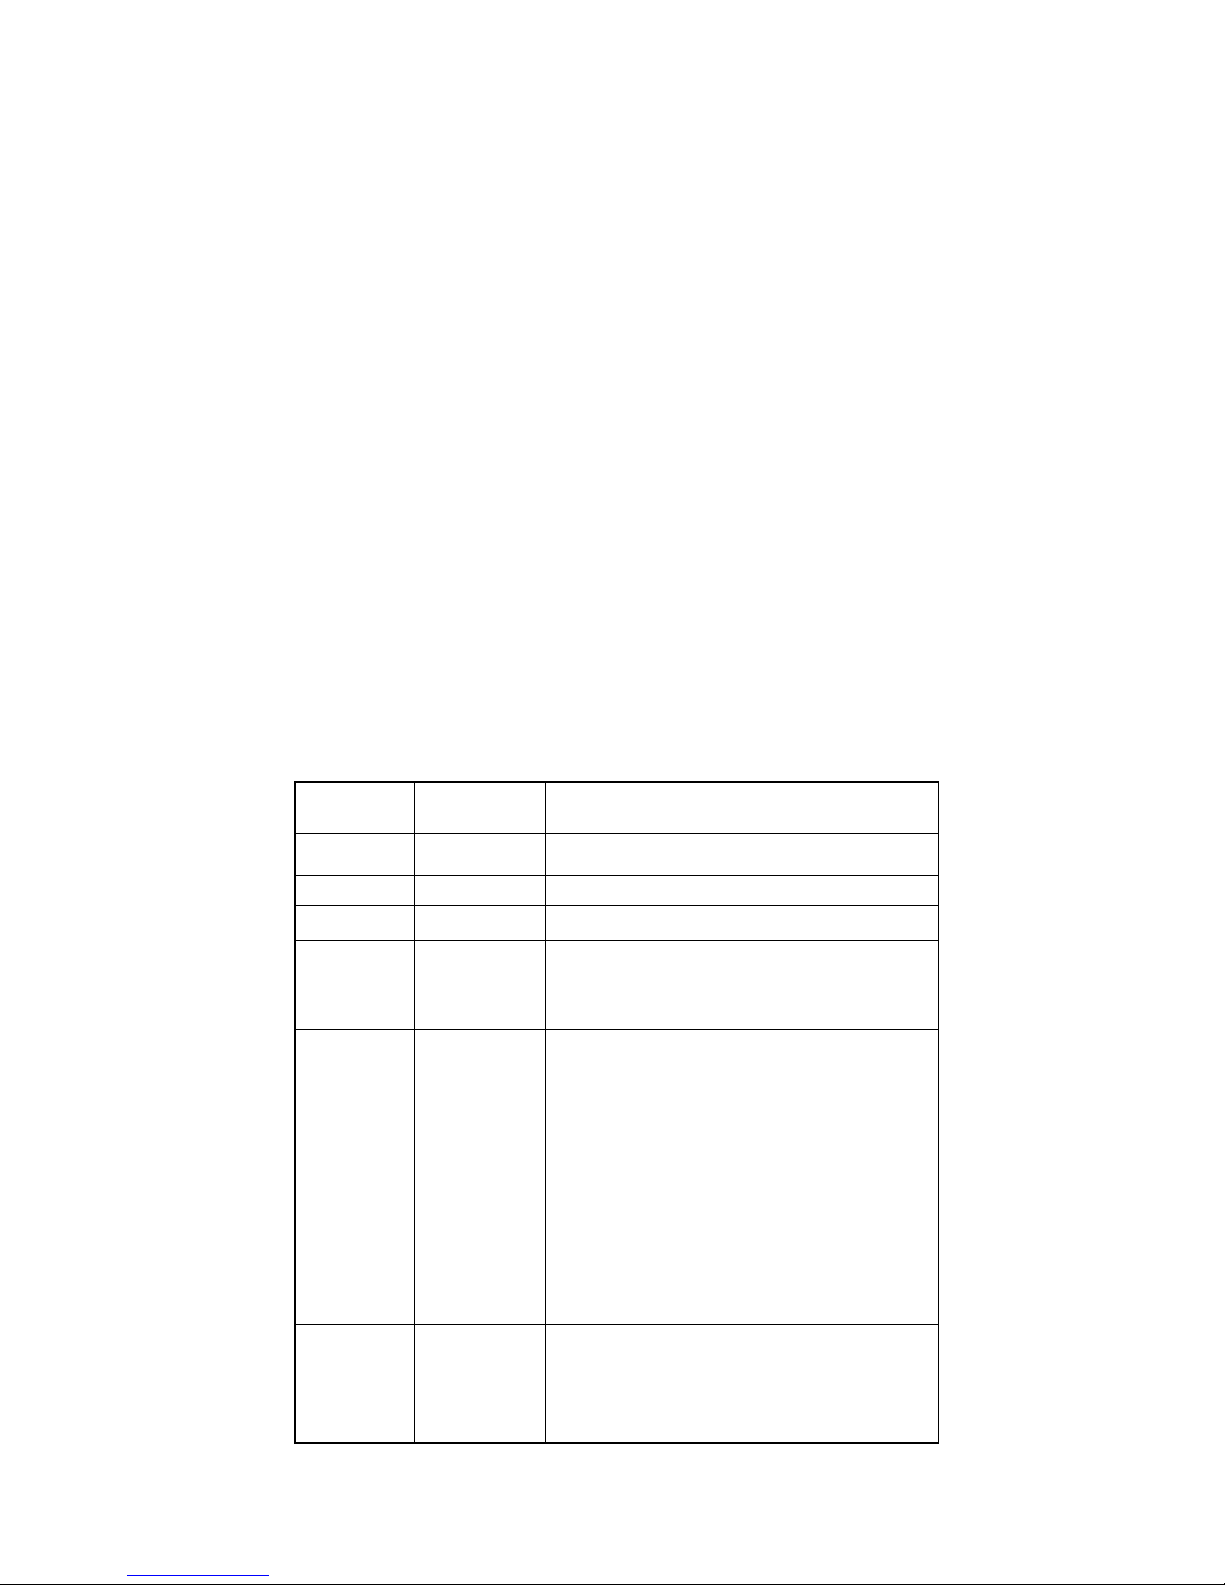
- LED: 90w white LED source with average 50000 hours lifespan -
- Beam angle
:
12º
- Control: DMX, built-in programs, sound activation and Master/slave
- 16 DMX channels
- Pan 540 º Tilt 270 º (plus 16 bit fine)
- 0-100% linear dimming
- Blue text LCD display menu with 4 control buttons
- Colour Wheel: 7 colours + open, rainbow flow effect
- Gobo Wheels: 8 fixed gobos + open, flow effect and gobo shake
6 rotating gobos + open, flow effect and gobo shake
- Weight: 6.8kg
- Product size: 260x250x350mm

4
4. Menu Operation
Used for setting up or operating the product without DMX control
Menu or Mode: Press each time to access features – see table below.
UP: Increase setting
DOWN: Decrease setting
Enter: Confirm and save setting.
Menu Map:
5. Stand Alone Operation.
To run the fixture in stand alone mode, press MODE or MENU until the display says SHOW
MODE. Then, press enter and use the UP / DOWN buttons to navigate between Slow Mode,
Fast Mode or Sound Mode. Once you have chosen the show, press Enter.
DMX SET
001
-
512
512 Add setting
Show Mode
D
MX
Mode
DMX control mode
Fast Mode
Fast running mode
Slow Mode
Show running mode
Sou
n
d
Sound running mode
Sound Sense
0
-
99
Sound sensitivity adjusting
Pan Inverse
OFF
X clockwise moving
ON
X anti
-
clockwise moving
T
ilt
Inverse
OFF
Y clockwise moving
ON
Y anti
-
clockwise movin
g
Default
confirm
YES
default
Fixture
REST
YES
reset
MENU UP DOWN ENTER

5
6. Master/Slave operation
To run in Master/Slave mode, chose on of the fixtures to be the master. Connect DMX cable
from the output of that fixture to the input of the second. For each additional fixture, connect
DMX cable from output of the previous fixture to the input of the next and so on. On the unit
deemed to be the Master, chose a show to play like you would in stand/alone mode.
For each of the slave units, chose DMX mode with the first slave (second fixture) set to
channel 1, the next to 17, the next to 33 and so on.
You can also choose to invert the pan and/or the tilt from the menu which allows fixtures to
mirror each other in certain shows. This is especially useful when you have say one on either
side of a stage and you desire for the beams from the shows to look more like they are coming
together or moving away together.
In order to invert the pan or tilt, press the mode button until you reach pan or tilt inverse, press
enter, and use UP/DOWN to turn on or off.
7. DMX Channel Allocation and functions tables.
The following is the DMX channel allocation for this fixture which utilizes 16 DMX channels.
Channel Function Value
1 Pan 0-255 - 0° to 540°
2 Tilt 0-255 - 0° to 270°
3 Dimming 0-255 - 0-100%
4 Strobe
0-10 Full on
11-249 Strobe from slow to fast
250-255 Full on
5 Colour
0-9 White (no colour)
10 Red
20 Green
30 Blue
40 Yellow
50 Magenta
60 Light Green
70 Cyan
80-161 Half colours (in above order)
162-255 Rainbow effect from slow to fast
6 Gobo Wheel
1
0-35 No gobo (clear)
36 8 growing spots gobo
72 Five pointed star gobo
108 Three pointed overlap-style gobo

6
144 Ten pointed bicycle wheel-type gobo
180 Three comma-shapes in a circle
216 Eight diamonds gobo
220-255 Gobo flow from slow to fast
7 Gobo
Rotation
0-7 No effect
8-89 Gobo position indexing
90-167 Gobo rotation anti clockwise
168-255 Gobo rotation clockwise
8 Gobo Shake
0-10 No effect
11-249 Gobo shake from slow to fast
250-255 No effect
9 Gobo Wheel
2
0-26 No gobo (Clear)
27 Twelve blade fan-type gobo
54 Rose logo
81 Six comb-shapes gobo
108 Three flower-shapes gobo
135 Sixteen fan blade-like gobo
162 3D spots type gobo
189 Clouds gobo
216 Random pointy shapes gobo
220 Gobo-flow from slow to fast in order
10
Gobo shake
for gobo
wheel 2
0-10 No effect
11-249 Gobo shake from slow to fast
250-255 No effect
11 Focus 0-255 Focus from near to far
12 Prism
0-49 No effect
50-100 Prism on
101-255 Prism rotate from slow to fast
13 Speed 0-255 Speed from slow to fast
14 Pan fine 0-255 Fine pan adjust 16 bit
15 Tilt fine 0-255 Fine tilt adjust 16 bit
16 Reset 150-200 Resets the fixture.

7
8. DMX-512 Control Connection
Using a 3 pin XLR cable, you can connect the product to a DMX controller and then to
other fixtures with 3 pin XLR inputs and outputs. When not using DMX, multiple
fixtures can be connected together and operate under master/slave control. The signal
cable should be two core with shielded cable, the signal connectors are XLR input and
output connectors. Please refer to the below diagram:
9. DMX Address Setting
When being used in conjunction with a DMX controller, each fixture must be set a specific
starting address. When receiving signal, fixture will receive channel control signals of this
address from the DMX controller.
For simplicity, the user can use the same address for multiple fixtures but this will result in
each fixture providing exactly the same output and fixtures with the same DMX address cannot
be individually controlled.
To control each fixture individually via DMX, each fixture must have its own unique DMX
address. Depending upon which DMX mode this fixture is set in, the individual DMX
addresses must be separated by at least the same number of channels.
So for example – assuming the first fixture is DMX channel 1, the second fixture would need
to be on channel 17, then the 3
rd
channel 33 and so on as each fixture uses DMX 16 channels.
Refer to your DMX controllers’ instruction manual on how best to manage your DMX channel
allocation.

8
10. DMX Terminator:
A DMX terminator helps to reduce ‘noise’ on the DMX chain, and makes the light respond to
control more accurately. It should be plugged in to the last fixture in any chain. For Terminator
connections please see below:
11. Cleaning and maintenance
From time to time it is recommended the product is cleaned to ensure maximum light output
and performance. Before cleaning, please unplug mains power from the unit.
Use a wet cloth to clean the housing as well as the lenses and base. Glass cleaner is also
suitable but alcohol based cleaners and solvents cannot be used as they will cause damage to
the product.
When used in a fixed long term installation such as a venue or club, the unit should be
periodically taken down from the installation and professionally cleaned. Dust build-up within
the unit can cause damage and ultimately failure of components.
The manufacturer’s recommended regularity of cleaning is once every 3 weeks for the exterior
lens and every two months for the interior optics.

9
12. Technical Data
- Input voltage: 90-240VAC, 50 or 60Hz
- Power consumption: 95W
- LEDs: 1 high powered 90W LED with average 50000 hours lifespan
- Beam angle: 12º
- Control: DMX or on-board built-in programs, sound activation, master/slave
- 16 DMX channels
- Colour wheel: 7 colours + open (white), rainbow/flow effect
- 2 Gobo wheels: 6 gobos + open (clear), with rotating gobos, gobo shake and gobo flow effect.
2
nd
wheel 8 gobos + open (clear), gobo shake and gobo flow effect.
- Electronic strobe rate: 1-25Hz
- Dimming: 0-100% linear dimming
- Built in programs
- Pan 540
°
- Tilt 270
°
- Weight: 6.8kg
- Product size: 260x250x350mm

10
13. Warranty
This product is warranted for 24 months (2 years) from your purchase date. We are confident
that this product will give many years of trouble-free operation but should an unlikely problem
arise, warranty claims must be via the original place of purchase, together with the original
purchase receipt. Please keep both your original purchase receipt and this instruction manual
together and in a safe place for future reference. Should the product be sold within the
warranty period, be sure to pass on both to the new purchaser so they are able to claim
warranty should they need to. We recommend you register your warranty online at
www.industrygear.com.au.
Purchased from:_________________________________________
Contact Details:_________________________________________
Date Purchased:_________________________________________
Invoice/Receipt Number:__________________________________
Copyright Light Emotion 2016. E&OE
Exclusively imported by LSW Imports and Distribution
PO Box 887, Kingsgrove, NSW, 2208
www.lightemotion.com.au
1800 643 111 (within Australia)
+612 9718 4900 (outside of Australia)
Table of contents
Other Light Emotion Dj Equipment manuals

Light Emotion
Light Emotion LE60 Operator's manual

Light Emotion
Light Emotion P64100RGB Operator's manual

Light Emotion
Light Emotion BRUTE Operator's manual

Light Emotion
Light Emotion HALFBALL Operator's manual

Light Emotion
Light Emotion Firefly Series User manual

Light Emotion
Light Emotion DERBY4 Operator's manual

Light Emotion
Light Emotion RAZORTRI User manual

Light Emotion
Light Emotion MUSHROOMLED Operator's manual

Light Emotion
Light Emotion P64LEDLITEWW Operator's manual

Light Emotion
Light Emotion P64LEDLITE Operator's manual