Liko 25 User manual

Solo HighBack Sling holds the paent comfortably and securely. With its innovave ”wrap-around” design, Solo HighBack Sling
is very easy to put on and remove. Solo HighBack Sling is designed for adaptaon to paents without the need for individual
adjustments. A properly ed and carefully applied Solo HighBack Sling ensures a high degree of comfort and a good feeling
of security for the paent.
Solo HighBack Sling provides support for the enre body, and gives a slightly reclined sing posture, which is appropriate for
paents with poor torso stability. For larger sizes of the sling, a combinaon with a twin bar 670 can be the perfect choice.
Solo HighBack Sling is recommended for liing to and from the bed, wheelchair or toilet.
It is important to choose the right size to ensure opmal comfort and safety. A paent may be at risk of sliding out of a sling
which is too large, while a sling that is too small may be ght in the crotch and cause discomfort.
The Solo HighBack Sling can be used along with all of Liko’s overhead and mobile lis. You can choose between the overhead
lis LikoGuard™, Likorall™, and Mulrall™ or the mobile lis Golvo™, Viking™, Uno™, and Liko™ M220/M230.
In this document, the person being lied is referred to as the paent and the person helping them is referred to as the caregiver.
Solo HighBack Sling Mod. 25
Instrucons for Use
7EN160179 Rev. 7
ENGLISH 2019
Product Descripon
IMPORTANT!
Liing and transferring a paent always involves a certain level of risk. Read the instrucons for use for both the paent
li and liing accessories before use. It is important to completely understand the contents of the instrucons for use.
The equipment should only be used by trained personnel. Ensure that the liing accessories are suitable for the li used.
Exercise care and cauon during use. As a caregiver, you are always responsible for the paent’s safety. You must be aware
of the paent’s ability to make it through the liing situaon. If something is unclear, contact the manufacturer or supplier.

27EN160179 Rev. 7 • 2019 www.hillrom.com
These symbols can be found in this document and/or on the product.
Symbol Descripon
Symbol Descripon
Warning. Used were extra care and aenon is needed.
Read instrucons for use before use
CE mark
Legal manufacturer
Date of manufacturing
Ref number
Serial Number
Medical device
Do not wash
Latex Free
Do not use Product
(Only Solo products and visible aer wash when use is prohibited).
Facing Out Direcon upwards and symbol on outside of product
Facing Out Symbol on outside of product.
(01) 0100887761997127
(11) Y Y MM DD
(21) 012345678910
GS1 Data Matrix Barcode that may contain following informaon.
(01) Global Trade Item Number
(11) Producon Date
(21) Serial Number

37EN160179 Rev. 7 • 2019 www.hillrom.com
Safety Instrucons
Before liing, keep the following points in mind:
• A responsible person within your organizaon should decide on a case-by-case basis whether one or more caregivers are
needed.
• Ensure that the sling selected meets the paent’s needs with reference to model, size, fabric and design.
• The total maximum load for a li system is always determined by the product in the system with the lowest specied
maximum load.
• For safety and hygiene reasons, use individual slings.
• Plan the liing operaon so that it can be done as safely and smoothly as possible.
• Check that the liing accessory hangs vercally and can move freely.
• Although the Liko sling bars are equipped with latches, special cauon must be exercised. Before the paent is lied from
the underlying surface, but when the straps are fully extended, make sure the straps are correctly connected to the sling
bar hooks.
• Make sure the paent is sing securely in the sling before transferring to another locaon.
• Never li a paent higher o the underlying surface than is needed to complete the liing and transfer procedure.
• Never leave a paent unaended during a liing situaon.
• Make sure that the wheels on the wheelchair, bed, gurney, etc., are locked during the liing/transfer operaon.
• Ensure that no pointed or sharp objects come in contact with the product.
• Avoid pulling or tugging the sling when posioning the paent in a wheelchair or bed.
• Always work ergonomically. Use the paent’s ability to acvely parcipate in the operaons.
• It is recommended to remove the sling aer the transfer.
Incorrect aachment of sling to slingbar may cause severe injury to the paent.
Manually turning the paent in bed may cause injuries to the caregiver.
Medical Device Class I Product
PATENT www.hillrom.com/patents
May be covered by one or more patents. See above Internet address.
The Hill-Rom companies are the proprietors of European, US, and other patents and pending patent applicaons.
Product changes
Liko’s products undergo connuous development, which is why we reserve the right to make product changes without prior
noce. Contact your Hill-Rom representave for advice and informaon about product upgrades.
Design and Quality by Liko in Sweden
Liko is quality cered according to ISO 9001 and its equivalence for the medical device industry, ISO 13485.
Liko is also cered according to environmental standard ISO 14001.
Noce to Users and/or Paents in EU
Any serious incident that has occurred in relaon to the device, should be reported to the manufacturer and the competent
authority of the Member State in which the user and/or paent is established.

47EN160179 Rev. 7 • 2019 www.hillrom.com
Check the sling before each use. Check the following points with regard to wear and damage:
• Fabric
• Straps
• Seams
• Suspension loops
Do not use damaged liing accessories.
If anything is unclear, please contact the manufacturer or supplier.
Denions
1. Edging (size marking)
2. Product label
3. Label: Year/month of producon
4. Cauon label: Do not wash
5. Upper strap loop
6. Head support
7. Leg support
8. Leg support loop
9. Lower edge
8
7
6
9
4
2
1
3
5
Size Medium-Slim,
Medium, Large Size Extra Large
8
7
6
9
4
2
15
3
Expected Life Time
Solo HighBack Sling is a disposable item intended for individual use only. When the correct size has been determined for a
parcular paent write the paent’s name on the product label on the back secon of the sling.
The Solo HighBack Sling should no longer be used:
• if it is soiled or if it is suspected of being contaminated
• if it is damaged
• when the paent no longer requires it.
Dispose of the sling in accordance with hospital or care facility legislaon.
Recycling Instrucons
The enre product, including laths, padding material, etc. should be sorted as Combusble waste
Hill-Rom evaluates and provides guidance to its users on the safe handling and disposal of its devices to aid in the prevenon
of injury, including, but not limited to: cuts, punctures of the skin, abrasions, and any required cleaning and disinfecon of
the medical device aer use and prior to its disposal. Customers should adhere to all federal, state, regional, and/or local laws
and regulaons as it pertains to the safe disposal of medical devices and accessories.
If in doubt, the user of the device shall rst contact Hill-Rom Technical Support for guidance on safe disposal protocols.
Care and Inspecon
If the sling is washed this label disintegrates to display the DO NOT USE symbol. The sling must then be disposed of.
DO NOT WASH. The cauon label situated on the back secon of the sling displays the DO NOT WASH symbol.

57EN160179 Rev. 7 • 2019 www.hillrom.com
Sling bar Sling loops to sling bar hooks Correct
SlingGuard
Universal
SlingGuard Twin
Universal Twin
Cross-bar
Wrong!
How to Aach a Sling to Dierent Sling Bars

67EN160179 Rev. 7 • 2019 www.hillrom.com
How to Aach a Solo HighBack Sling to a Sling Bar with 4 Hooks
(Twin Bars and Cross Bars)
Upper strap loops
Leg support loops
The illustraons 1, 2, and 3 shows a twin bar but this
also applies to a Cross-bar.
BB
AA
B
B
A
A1.
2. 3.
A
B
With the palm of your hand, press the
lower edge of the sling down to the
paent’s coccyx, this is very important.
Correct posioning is facilitated if the
paent leans forward somewhat.
Place the sling behind the paent’s back
with the product label facing out.
Fold the lower edge over your ngerps
to make it easier to guide the sling into
posion.
It is recommended that two caregivers assist with the applicaon of the sling according to ergonomic principles. Normally, the paent
should be leaned forward somewhat during applicaon, and one caregiver must stand in front of the paent to prevent him/her from
falling forward.
Pull the leg supports out alongside the out-
side of the thighs. Helpful hint: By placing
your palm between the body and the leg
support, you can guide the leg support’s
lower edge strap down to the seat. At the
same me, pull the leg support forward
with your other hand to stretch it out.
Liing from a Seated Posion

77EN160179 Rev. 7 • 2019 www.hillrom.com
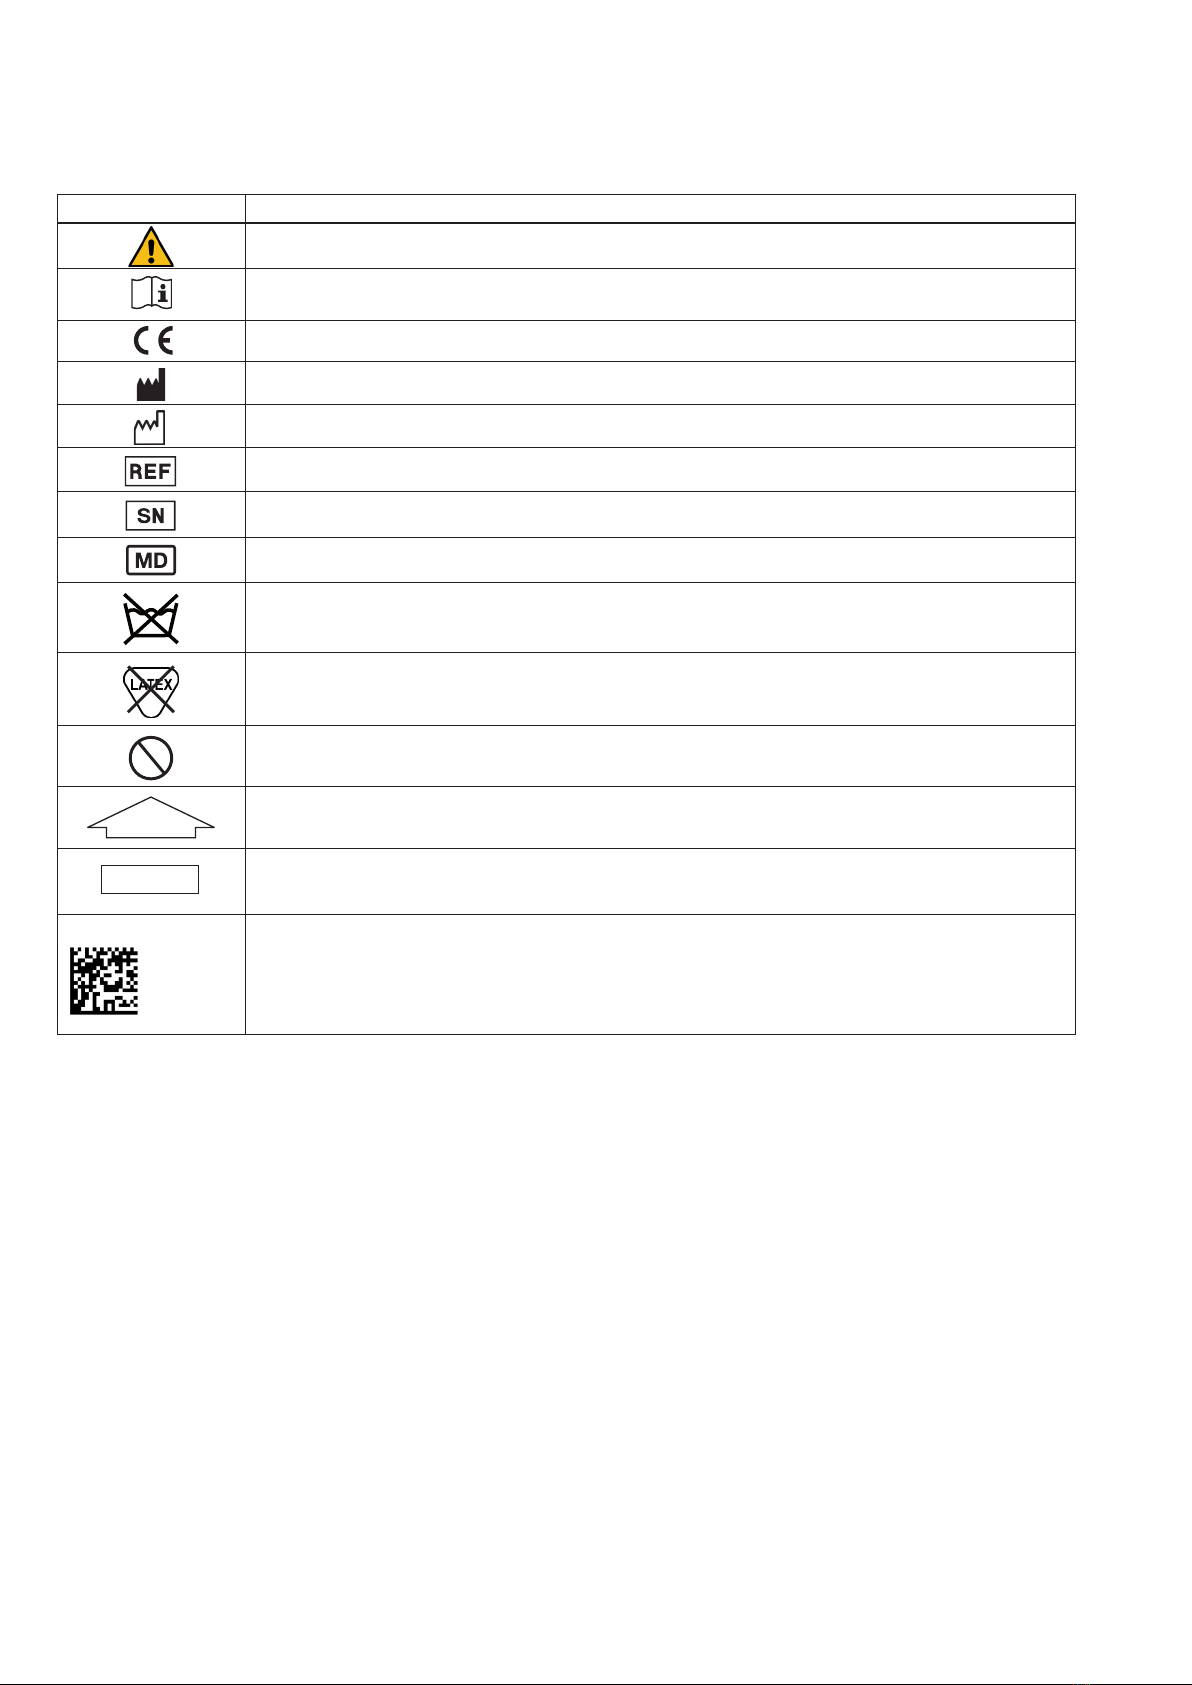
Normally, one leg support is passed
through the other to cross before they
are hooked to the slingbar. Hang the
upper strap loops on the slingbar, then
the leg support loops. See page 5-6 for
instrucons on how to aach the sling
loops to dierent sling bars. Li the
paent.
Guide the sling’s leg supports under each
thigh. Make sure the fabric is smoothed
out under the thighs and that it reaches
properly around the legs.
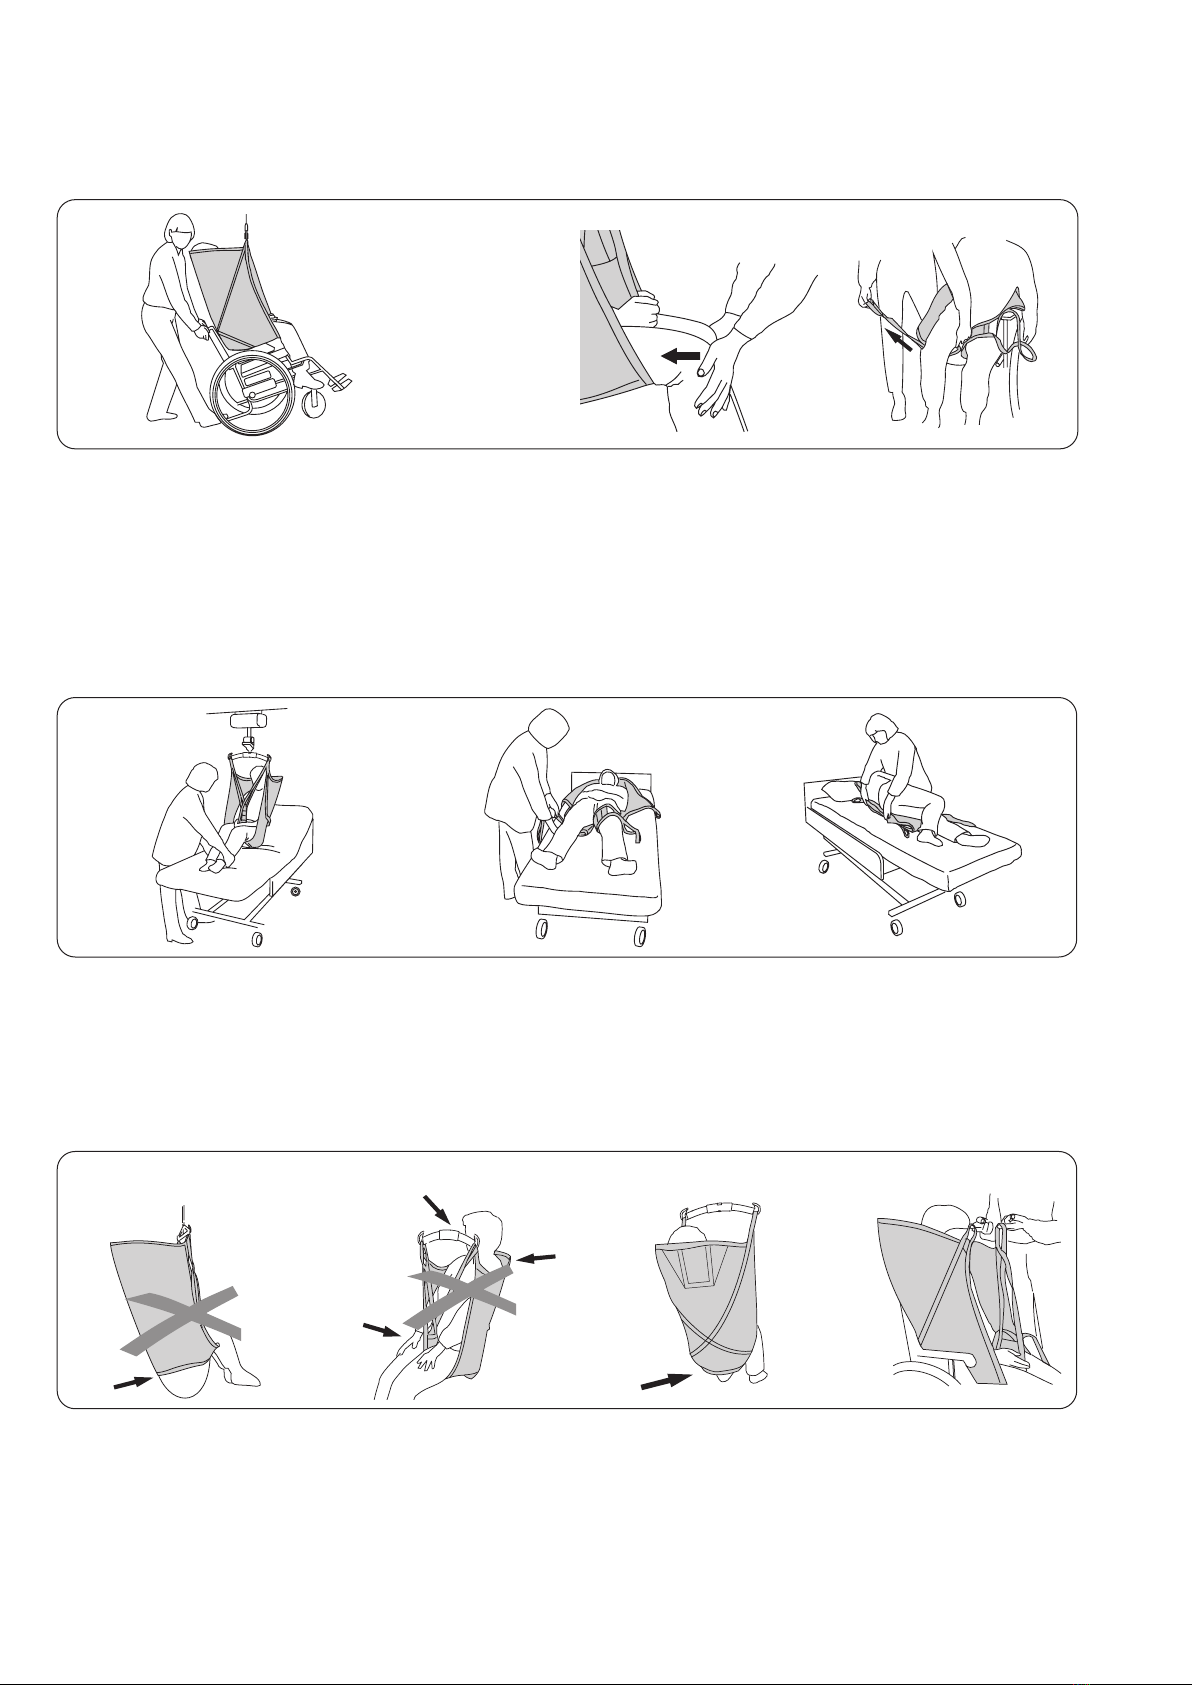
Helpful hint: Applying light pressure to
the kneecaps will allow you to pull the leg
supports taut against the buocks and
smooth out any creases near the back.
Make sure both leg supports reach equally
far forward.
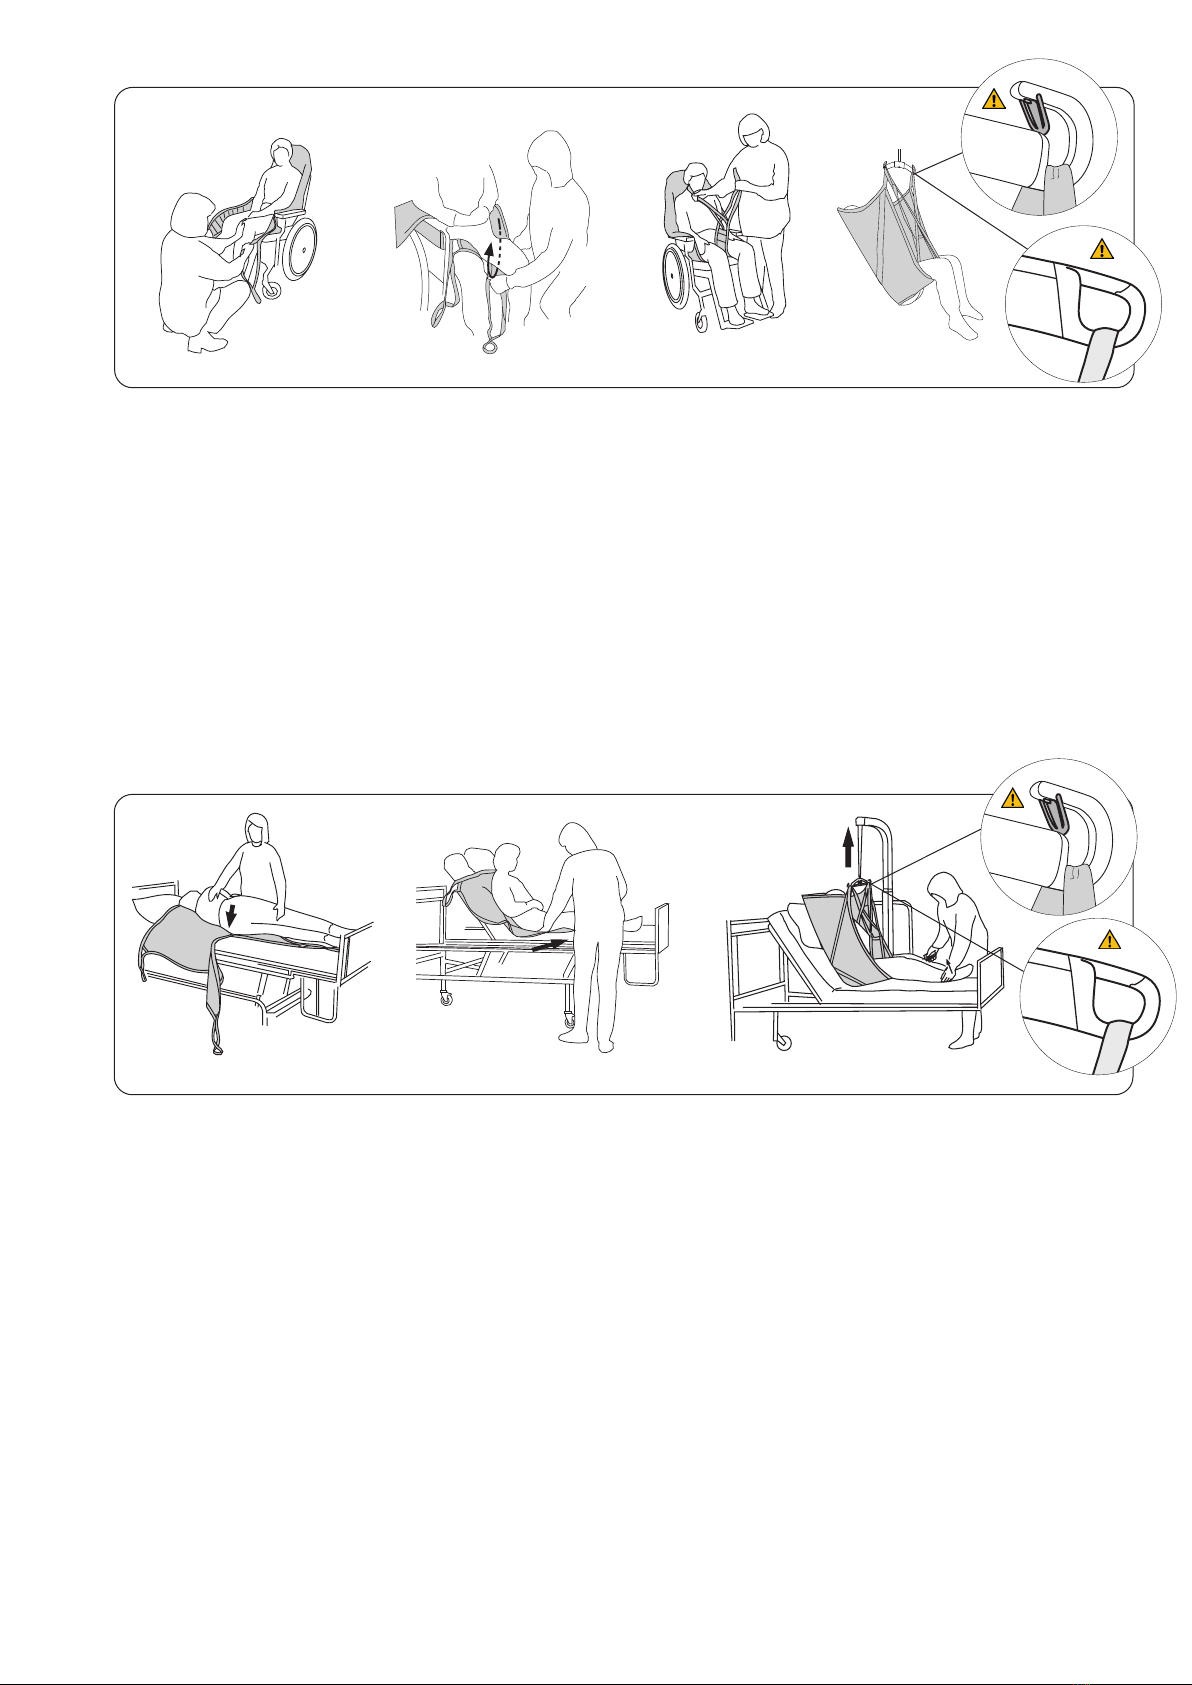
Liing from a Horizontal Posion
1. Turn the paent towards you to prevent
the risk of him/her falling out of the bed.
Place the lower edge of the sling as far
down under the paent as possible, so
that it is in level with the paent’s coccyx.
Bunch the sling together in a couple of
folds and lay it so that its “center of the
back” corresponds to the posion of the
paent’s spine when he/she is gently
turned back. Carefully work the sling out
from the opposite side. Raise the backrest
of the bed if available.
Consider your own working posture and the paent’s comfort. Use the bed’s raising and lowering funcons when
available.
123
NOTE!
See illustraon marked * on page 7.
3. If necessary, place a small pillow under
the paent´s head. Hang the upper strap
loops to the slingbar rst, then the leg
support loops. See page 5-6 for instrucons
on how to aach the sling loops to dierent
sling bars. Li the paent.
2. Slide the leg supports in place under
the thighs. This is easiest if the knees are
bent. Make sure the fabric is smoothed
out under the thighs and that it reaches
properly around the legs. The leg supports
can then be hooked to the slingbar in
dierent ways.

87EN160179 Rev. 7 • 2019 www.hillrom.com
Liing to a Horizontal Posion
Guide the paent over the bed and raise
the back support for best possible comfort.
Lower the paent to the bed. Lower the back
support.
Remove the leg supports by pulling the
strap loops out under the fabric.
Turn the paent carefully on one side
and roll the sling in under him/her. Turn
the paent gently on his/her back and
carefully remove the sling.
Consider your own working posture and the paent’s comfort. Use the bed’s raising and lowering funcons when available.
When placing the paent in the wheelchair it is important that he/she is placed far enough back in the chair to sit comfortably. There are
several ways to do this.
To facilitate placement in the chair, lt the chair back
somewhat during lowering. Let the paent’s boom
slide down the back of the chair during the nal stage of
lowering. Guide the posion of the wheelchair by placing
your foot on the pping lever.
Alternave: Press lightly under the paent’s knees during lowering so
that his/her boom is guided in towards the back of the chair.
Carefully remove the leg supports. The gentlest way is to pass the strap
beneath the leg support and pull it out under the fabric. Remove the
sling by pulling it carefully upwards.
Liing to a Chair
The sling’s lower edge is
in level with the coccyx.
Leg supports are correctly
posioned under the legs.
Helpful hint: Make sure
all strap loops are of equal
length, i.e., reach the same
height when they are
extended before liing. If
not, adjust the posion of
the sling.
The Paent does not Sit Well in the Sling – Why is this?
*
RIGHT!
A. The boom is hanging down. Risk of slipping out of the sling. The
sling may be too large. Another reason may be that the sling has not
been pulled far enough down the back during applicaon. Before
liing, make sure that the sling has been ghtened about the buocks
(by pulling on the leg supports).
B. A sling that is too small may result in the slingbar coming too close
to the face, being ght in the crotch and causing discomfort, and/or
not providing enough support for the back/head.
A. WRONG! B. WRONG!

97EN160179 Rev. 7 • 2019 www.hillrom.com
Product Prod. No. Size Paent weight¹ Maximum load²
Solo HighBack Sling 3525911 Medium Slim 30-50 kg (66-110 lbs) 200 kg (440 lbs)
Solo HighBack Sling 3525915 Medium 40-80 kg (88-176 lbs) 200 kg (440 lbs)
Solo HighBack Sling 3525916 Large 70-120 kg (154-265 lbs) 200 kg (440 lbs)
Solo HighBack Sling 3525917 Extra Large 110-250 kg (243-551 lbs) 500 kg (1100 lbs)
Overview Solo HighBack Sling, Mod. 25
¹ The indicated paent weight is a guideline only – there may be deviaons.
² To maintain maximum load, li/accessories intended for the same load or more are required.
If the sling is too large, the paent may risk slipping out of it.
A sling that is too small can be ght in the crotch and cause discomfort.
Material: Size MS, M and L are made of Nonwoven Polypropylen
Size XL is made of Nonwoven Polyester
Accessories: Lath, Prod. No. 31590007
¹ Sling bar 450 relates to Universal SlingBar 450 Prod. No. 3156075, 3156085, and 3156095, and also SlingGuard 450 Prod. No. 3308020 and
3308520.
² Twin bar 670 relates to Universal TwinBar 670 Prod. No 3156077, and 3156087, and also SlingGuard 670 Twin Prod. No. 3308040 and
3308540.
³ Sling bar 350 relates to Universal SlingBar 350 Prod. No. 3156074, 3156084, and 3156094.
⁴ Sling bar 600 relates to Universal SlingBar 600 Prod. No. 3156076 and 3156086.
⁵ Applicable only if the leg supports overlap under both legs.
Explanaon: 1 = Recommended, 2 = May work, 3 = Not advised, 4 = Inappropriate
Recommended Combinaons
Other Combinaons
Combinaons of accessories/products other than those recommended by Liko can result in risks for the safety of the paent.
Recommended combinaons of Solo HighBack
Sling and Liko slingbars:
Mini 220
Sling bar 350³
Standard 450
Sling bar 450¹
Sling bar 600⁴,⁵
Twin bar 670²
Sling Cross-bar 450
Sling Cross-bar 670
Univ. SideBars +
Universal 350
Univ. SideBars +
Universal 450
Solo HighBack Sling, MS 3211221121
Solo HighBack Sling, M 3211111111
Solo HighBack Sling, L 3311112111
Solo HighBack Sling, XL 4321112121
Accessories
Extension Loop, green, 12 cm (5 in) Prod. No. 3691102
Extension Loop, green 22 cm (9 in) Prod. No. 3691103
Extension Loop, grey, 12 cm (5 in) Prod. No. 3691302
Extension Loop, grey, 22 cm (9 in) Prod. No. 3691303
- 2 = 12 cm (5 in)
- 3 = 22 cm (9 in)

Liko AB
Nedre vägen 100
975 92 Luleå, Sweden
+46 (0)920 474700
Liko AB is a subsidiary of Hill-Rom Holdings, Inc.
www.hillrom.com
© Copyright Liko R&D AB 2019. ALL RIGHTS RESERVED
Table of contents
Other Liko Sling manuals

Liko
Liko Ultra LiftPants 920 Manual

Liko
Liko Hygiene SafetySling 45 Manual

Liko
Liko Sabina Seat Strap Manual

Liko
Liko MasterVest 64 Series Manual

Liko
Liko Hygiene Sling User guide

Liko
Liko HygieneSling 41 User manual

Liko
Liko Solo HighBack Sling Manual

Liko
Liko Ultra LiftPants 920 User manual

Liko
Liko UltraSling 6 Manual

Liko
Liko SilhouetteSling 22 Manual