Lilin NVR5832 User manual

User Manual
4K UHD Network Video
Recorder Series
User Manual
4K UHD Network Video
Recorder Series
4K UHD Network Video
Recorder Series

4K UHD Network Video Recorder User Manual
Page 1
Introduction
The NVR 4K UHD Series are network ideo recorders that offer a standalone solution for
managing IP cameras and systems. The built-in high-quality decoder can deli er
4K/5MP/3MP/1080p/720p/D1/VGA/CIF IP camera streams. Each channel can be indi idually
configured to record in SD or HD resolution to suit your needs.
The internal HDMI (VGA) engine supports adapti e motion refinement technology, which
pro ides a maximum resolution of HDMI 2.0 ( 4K 60P ) and VGA1080p. The NVR Series can be
easily installed in all en ironments through the TCP/IP network, and the support of IPScan utility
and Web Ser ices Dynamic Disco ery (WS-Disco ery) protocol allows for locating all the
cameras on the network and can generate a pre iew thumbnail of each channel. The self-
diagnostic feature can estimate remaining recording time and monitor S.M.A.R.T status, network
status, and other information.
Files recorded by the NVR can be exported to DVD and USB flash dri e, or the files can be
downloaded ia Backup Manager, Remote Player, FTP client software, or Network Places.
Mobile support for iOS, and Android allows for remote iewing of connected cameras at high
frame rates. Browser-based li e monitoring and ideo playback features are also supported.
The NVR also supports external METADATA de ice, such as POS, ATM, GPS, etc. METADATA can
be embedded within ideos and sa ed as a database where you can search for METADATA
history according to content, date, and time.
Features
Standalone NVR
Supports up to 4K UHD, and 1080p 120 FPS IP cameras
Each channel up to 9Mbps incoming network throughput
4K HDMI and 1080P VGA output
Compatible with iOS and Android de ices
Metadata can be embedded into ideos
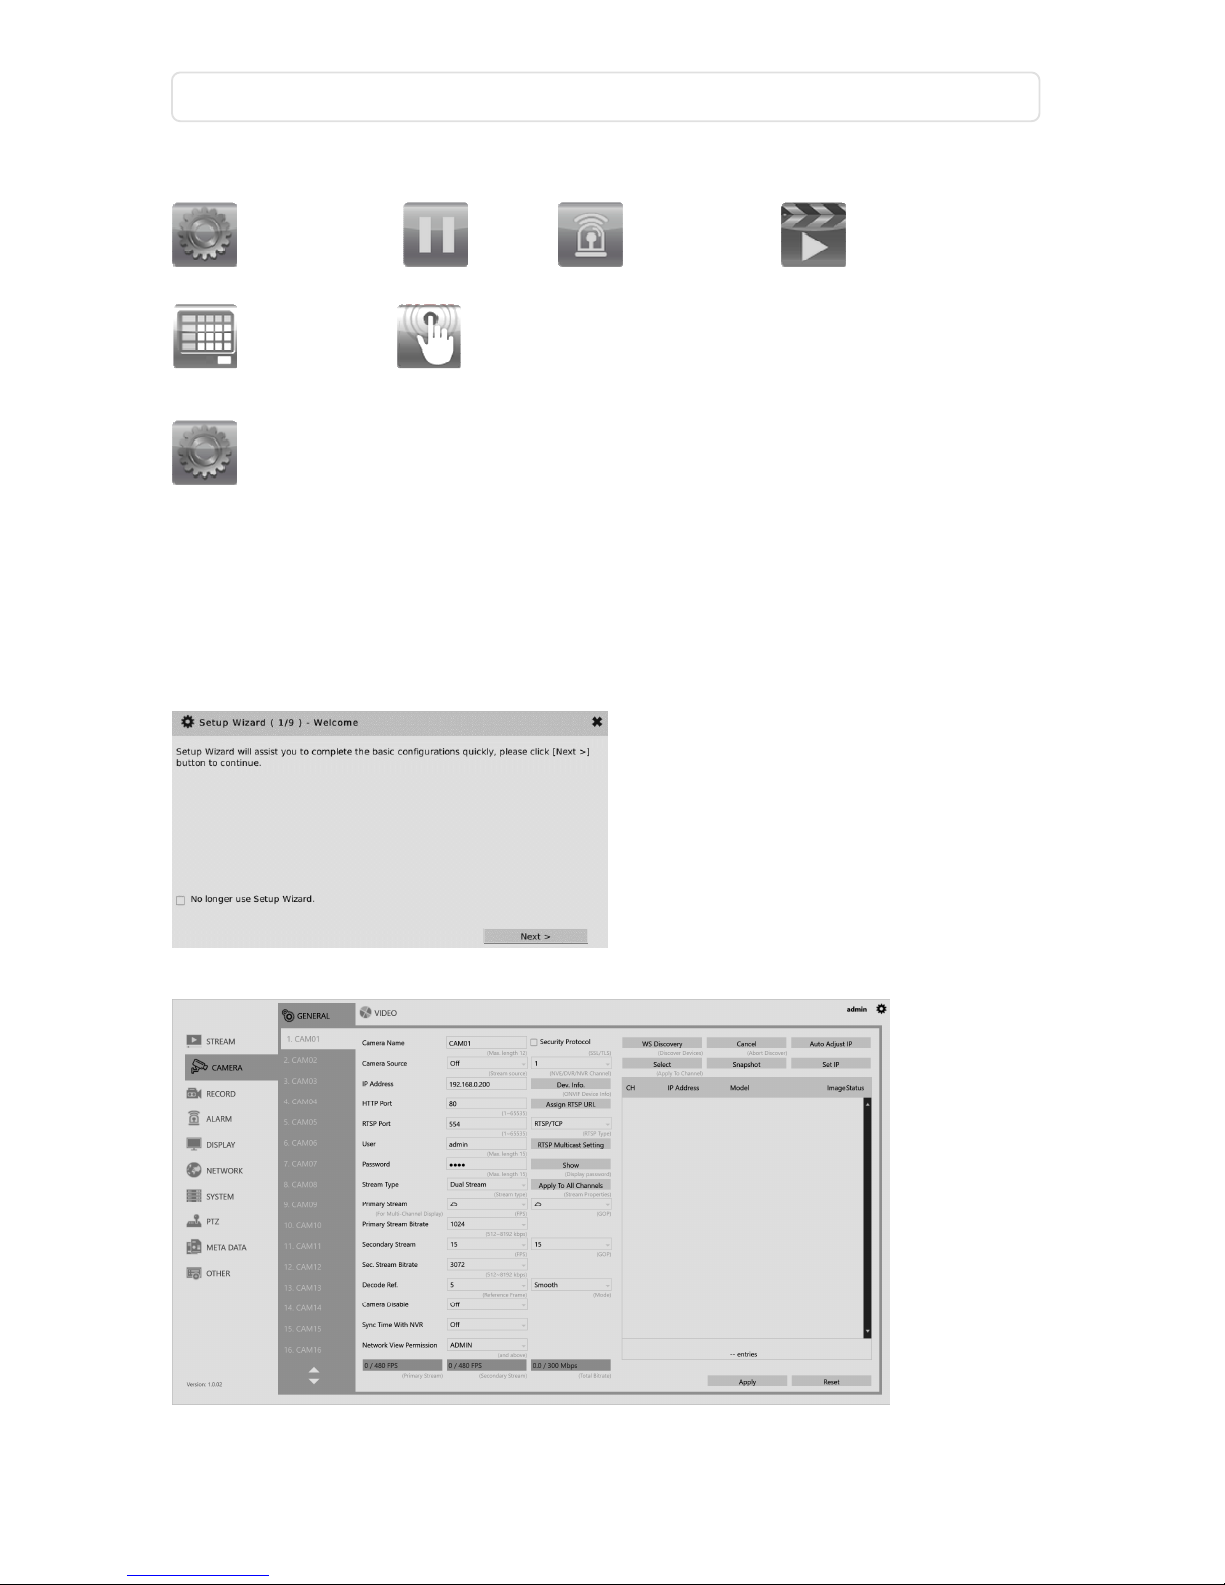
Supports Setup Wizard
HTML5 streaming multiple browser supported
P2P easy remote access supported

4K UHD Network Video Recorder User Manual
Page 2
Trademarks and registered
trademarks
Microsoft, Windows, Internet Explorer are registered trademarks of Microsoft Corporation in
the U.S and/or other countries
.
Adobe and Adobe PDF are registered trademarks of Adobe Systems Incorporated in the U.S
and/or other countries
.
Ja aScript and all Ja a-based trademarks and logos are trademarks or registered trademarks of
Sun Microsystems, Inc. in the U.S and/or other countries
.
Linux, Macintosh, Mozilla, and Netscape Na igator are registered trademarks of the respecti e
holders
.
Other names of companies and their products mentioned in this manual may be trademarks or
registered trademarks of their respecti e owners.
Caution
Do not drop or strike the equipment
Do not install the equipment near naked flames or heat sources
Do not expose this unit to rain, moisture, smoke or dusty en ironments
Do not co er the opening of the unit with cloth or plastic or install this unit in a
poorly- entilated place. Allow 10cm between this unit and its surroundings
Do not continue to operate the unit under abnormal conditions such as detection of
smoke, strange smell or no display on screen whilst power is turned on
Do not touch the power connection with wet hands
Do not damage the power cord or lea e it under pressure
To a oid unnecessary magnetic interference, do not operate this unit near magnets
,
speaker system, etc
.
All connection cables must be grounded properly
CAUTION
RISK OF EXPLOSION IF BATTERY IS REPLACED WITH AN INCORRECT TYPE.
DISPOSE OF USED BATTERIES ACCORDING TO THE INSTRUCTIONS.

4K UHD Network Video Recorder User Manual
Page 3
Product O er iew
Professional 2U 19” 8Bay Non-RAID NVR Front View
Number
Name
Function
1
HDD LED
Green, blinking
,
HDD acti ity indicator
2
LAN LED
Green, LAN acti ity indicator
3
ALARM LED
Red, blinking, indicator of triggered alarms
4
POWER LED
Amber, power on/off indicator
5
OLED
System acti ity information indicator
6
USB Port

4K UHD Network Video Recorder User Manual
Page 4
Professional 2U 19” NVR Rear View
Number Function
1 LINE IN
2 AUDIO OUT
3 VGA output connector
4 USB 3.0 port
5 e-SATA port 1
6 e-SATA port 2
7 Power socket
8 Gigabit RJ-45 connector 1
9 Gigabit RJ-45 connector 2
10 HDMI output
11 USB port
12 DI/DO, RS-485, KB
Note: DO No.3 has a status switch that when initialize.

4K UHD Network Video Recorder User Manual
Page 5
Hard Dri es Install Instruction
Professional 2U 19” 8Bay Non-RAID NVR Installation
Remo e the upper casing and loosen the screws on the both sides of the hard dri e bracket to
remo e it. Install hard dri es and tighten the hard dri e screws as instructed in the image below.
Screws loosened Screws tightened
Properly connect the SATA cables and power cables to the connectors, finally, complete the
hard dri e installation by closing the upper casing and tightening the screws.

4K UHD Network Video Recorder User Manual
Page 6
Remote control
Keys and functions of the remote control are described as follows
Key Function
Power switch
REC Start/stop manual recording
MENU Setup menu
ESC Escape/exit/stop
PIP (SHIFT) Switch between split and full
screen
ZOOM Digital ideo zoom
FREEZE Freeze ideo
Pause
Playback
Stop
Fast forward
Rewind
Next channel
Pre ious channel
4 split screens
8 split screens
9 split screens
13 split screens
16 split screens
AUDIO Audio on/off
BACKUP Video backup
DVR/NVR Addressable NVR control
LANGUAGE Language selection
BACKSPACE Delete character
Auto Pan Perform auto pan feature
Mo e up/tilt up
Zoom in Zoom in
Mo e down/tilt down
Zoom out
Zoom out
Mo e left/pan left
Preset Call preset
Mo e right/pan right
0 to 9 Numerical keys Enter/set

4K UHD Network Video Recorder User Manual
Page 7
Beginning using the NVR
You will see the following screen through HDMI or VGA connection once you power on the
NVR:
The information shown on the top of the screen is described as follows:
0.00 / 1000 (100) Mbps:
The left side of the slash is the combined transmission rate of all channels, and the right side
network speed.
HDD (1):(2)%:
(1) shows the current number of hard dri e being used for recording.
(2) storage capacity used.
P➊ ➋ :
Shows the power source used currently.
Note: This information is a ailable depending on models.

4K UHD Network Video Recorder User Manual
Page 8
Mo e mouse cursor slightly to display the NVR controls (as shown in the image below):
The below controls can be seen at the bottom of the screen:
/
:
Indicates whether the current split-screen controls are for HDMI or VGA.
Note: A ailable only when VGA Spot mode is on. This information is a ailable depending on
models.
:
Controls for the number of split-screens.
:
Click to broadcast your message through a microphone.
Note: This information is a ailable depending on models.
:
Click to acti ate the sequential mode, which will show ideos channels in the order you specify.
:
Click to acti ate a specific DO output.
Note: This information is a ailable depending on models.

4K UHD Network Video Recorder User Manual
Page 9
At the upper-left corner of the screen is the NVR controls, which are, from left to right:
NVR SETTINGS , FREEZE, ALARM EVENT, PLAYBACK/BACKUP,
SCHEDULE, and MANUAL Recording.
NVR SETTINGS
If you access the NVR SETTINGS for the first time, you will see Setup Wizard on the screen as
below, which pro ides you with quick configurations for the NVR, including language,
password, date, time, storage, network, P2P, and camera. Please follow the instructions to finish
necessary setup and start recording. To pre ent the wizard from appearing again, be sure to
check No longer use Setup Wizard. Whene er you want to run Setup Wizard again, go to
NVR SETTINGS> SYSTEM > MAINTENANCE, and click Run to start Setup Wizard.
Or, you may see the setting menu below:
Note: Click the gear icon at the upper-right corner of the screen to change the NVR language.

4K UHD Network Video Recorder User Manual
Page 10
FREEZE
Click to freeze the real-time ideo, and the icon will be highlighted in blue.
ALARM EVENT
Click to enter the ALARM EVENT page.
MOTION/SENSOR EVENT
If the motion detection function is enabled for your camera, any motion alarms triggered will
be recorded in motion e ent history, and the sensor alarms triggered in the sensor e ent
history (as shown in the images below).

4K UHD Network Video Recorder User Manual
Page 11
Press the drop-down menu at the top to sort the alarm e ents by date or channel (as shown in
the image below).
Press US to back up snapshot in USB storage, press E-MAIL to send a snapshot ia e-mail, or
press PLAY to iew recorded ideo.
MANUAL EVENT
When the recording mode is switched from Schedule to Manual, a record entry will be sa ed
here (as shown in the image below).

4K UHD Network Video Recorder User Manual
Page 12
PLAYBACK/BACKUP
Click to enter the PLAY ACK/ ACKUP page as shown below.
PLAYBACK
You can expand and collapse time line by year, month, day, hour, and minute. On the upper
timeline drag and select the time you want to start playing recorded ideo or alarm ideo to
enter the Playback as following screen:
Details of the controls at the bottom of the PLAY ACK screen are described as follows:
:
From left to right are
Step ackward, Rewind, Slow Rewind, Play, Slow Forward, Fast
Forward, Step Forward, and Pause. Click Rewind and Fast Forward repeatedly to adjust the
speed of respecti e actions (up to 64x).

4K UHD Network Video Recorder User Manual
Page 13
:
Click to return to the PLAY ACK/ ACKUP screen.
:
Click to return to li e ideo.
:
Click to export the recorded ideo to a USB de ice.
:
Click to turn on/off sound.
:
Choose the number of split-screens according to your needs.
/ :
Indicates whether the current split-screen controls are for HDMI or VGA.
Note: This information is a ailable depending on models.
BACKUP
If you need to back up recorded files, click and drag the timeline at the bottom of the screen
to select the backup range. Press CHANNELS to show the FILE FORMAT/CHANNELS SELECT
dialog (as shown in the below image), where you can choose the channel(s) to back up and file
format:
Choose ESTIMATE to show the ACKUP FILE SIZE ESTIMATE dialog:

4K UHD Network Video Recorder User Manual
Page 14
Choose ACKUP to show the DEVICE/EXECUTE dialog:
You may determine to back up the ideo in DVD, USB storage de ice, or the temporary space
of the NVR.
/ SCHEDULE/MANUAL
Indicates whether the current recording setting is scheduled recording or manual recording.
Click to switch.

4K UHD Network Video Recorder User Manual
Page 15
NVR SETTINGS
SYSTEM
Click to enter NVR SETTINGS and click SYSTEM in the left pane, where
you are allowed to adjust system configurations of the NVR. The details of the tabs are
described as follows:
GENERAL
De ice ID:
Assign an ID for the NVR to be controlled by the remote controller.
Audio Out Volume:
Adjust the olume of the NVR.
Li e OSD:
On, off, or no camera name.
System Lock:
Switch on/off the system lock.
Sound On Button Press:
Switch on/off the sound when pressing remote control buttons.
Buzzer:
Switch on/off the sound when an alarm is triggered.
Last Boot Time:

4K UHD Network Video Recorder User Manual
Page 16
Shows the last time the system is rebooted.
Power Supply Status:
Shows the status of the power supply currently in use.
Note: This information is a ailable depending on models.
Line Out Volume:
Adjust the audio olume.
RS-232:
Press Test to test the functionality of the RS-232 port.
Note: This information is a ailable depending on models.
TIME
Date/Time:
Set the date/time of the NVR.
Date Format:
Modify the date display format.
Time OSD:
Switch on/off the time to be displayed on the screen.
Time Zone:
Change the time zone of the location where the NVR is installed.
Time Sync Mode:
Choose how you would like the time to be synced.
NTP Ser er:

4K UHD Network Video Recorder User Manual
Page 17
Enter the NTP ser er you want to use.
Time Sync Inter al:
Choose the inter al for the time to be synced.
NTP Status:
The status of connection to selected NTP ser er will appear here.
USER
The NVR supports up to 15 sets of indi idual user settings (including default user administrator,
operator, and guest), to which you can assign different access pri ileges.
User:
Enter the name of the user (applicable only to User01–12).
Old Password, New Password, and Confirm Password:
If you would like to change the password, enter your pre ious password and enter the
new password and confirm the password. Press Show to re eal the password. The default
passwords for administrator, operator, and guest are 1111, 2222, and 3333, respecti ely.

4K UHD Network Video Recorder User Manual
Page 18
User Permission:
Set the access pri ileges of the user to administrator, operator, or guest.
Load Default:
Restore to the default settings.
STORAGE
HDD MGT
In HDD MGT., you are allowed to format, defrag, check malfunctioned blocks, or run an o erall
system check on any of the de ices. Select a desired de ice and click Format, File System
Defrag, ad lock Check, or Regular Check.
Regular Check:
Allows you to set the inter al between system checks:
Parameters...:
Click each de ice to enter the screen below.
System Reserve Ratio allows you to allocate the percentage of HDD space that will not be
occupied by recorded files. In Mount Option, choose the writing mode for the hard dri e.

4K UHD Network Video Recorder User Manual
Page 19
S.M.A.R.T.
The S.M.A.R.T. status of your hard dri e is displayed in S.M.A.R.T., where you can run analysis
(either short or extended) on the HDD. Choose between Short or Extended analysis and click
Analysis to start the process. You will see HDD status, information, attributes, and e ent
history under HDD S.M.A.R.T. Information.
USB MGT.
Connect a USB de ice (flash dri e or hard dri e) to the NVR, and check the one you want to
format under this page, and then click Format.
EVENT
SYSTEM
The search field in this page allows you to search for specific e ent reports at different time
and of different content. Press Download to export the e ent report, Reload to update.
Other manuals for NVR5832
1
Table of contents
Other Lilin Network Hardware manuals
Popular Network Hardware manuals by other brands

Amphenol
Amphenol C2LINX Series installation guide

MicroNet
MicroNet SP915G user manual

FibroLAN
FibroLAN Falcon-RX/812/G/A user guide

USAVision
USAVision UA-XVR1620 quick start guide

ADTRAN
ADTRAN HDSL4 Installation and Maintenance

Matrix Switch Corporation
Matrix Switch Corporation MSC-2HD3224S product manual

Motorola
Motorola M68MM01 manual

QNAP
QNAP QSW-M2106R-2S2T Quick installation guide

ADTRAN
ADTRAN NetVanta SHDSL Network Interface Module quick start guide

Idis
Idis DR-6308P-S installation manual

NETGEAR
NETGEAR ND508 - Network Drive - 8 GB installation guide

Lenovo
Lenovo ThinkAgile VX1320 hardware replacement guide