Lilin nvr400L User manual


Introduction
The LILIN NVR L Series comprises network video recorders that offer a standalone
solution for managing IP cameras and systems. The built-in high-quality H.264 decoder
can deliver 3MP/1080p/720p/D1/VGA/CIF IP camera streams. Each channel can be
individually configured to SD and or HD resolution to suit your needs.
The embedded HDMI (VGA) engine supports adaptive motion refinement technology,
which provides a maximum resolution of 1080p. The L Series can be easily installed in
all environments through the TCP/IP network, and the support of IPScan utility and
Web Services Dynamic Discovery (WS-Discovery) protocol allows for locating all the
cameras on the network and can generate a preview thumbnail of each channel. The
self-diagnostic feature monitors internal temperature, fan speed, HDD I/O speed,
S.M.A.R.T status, network status, and other information that can be accessed via the
health check report.
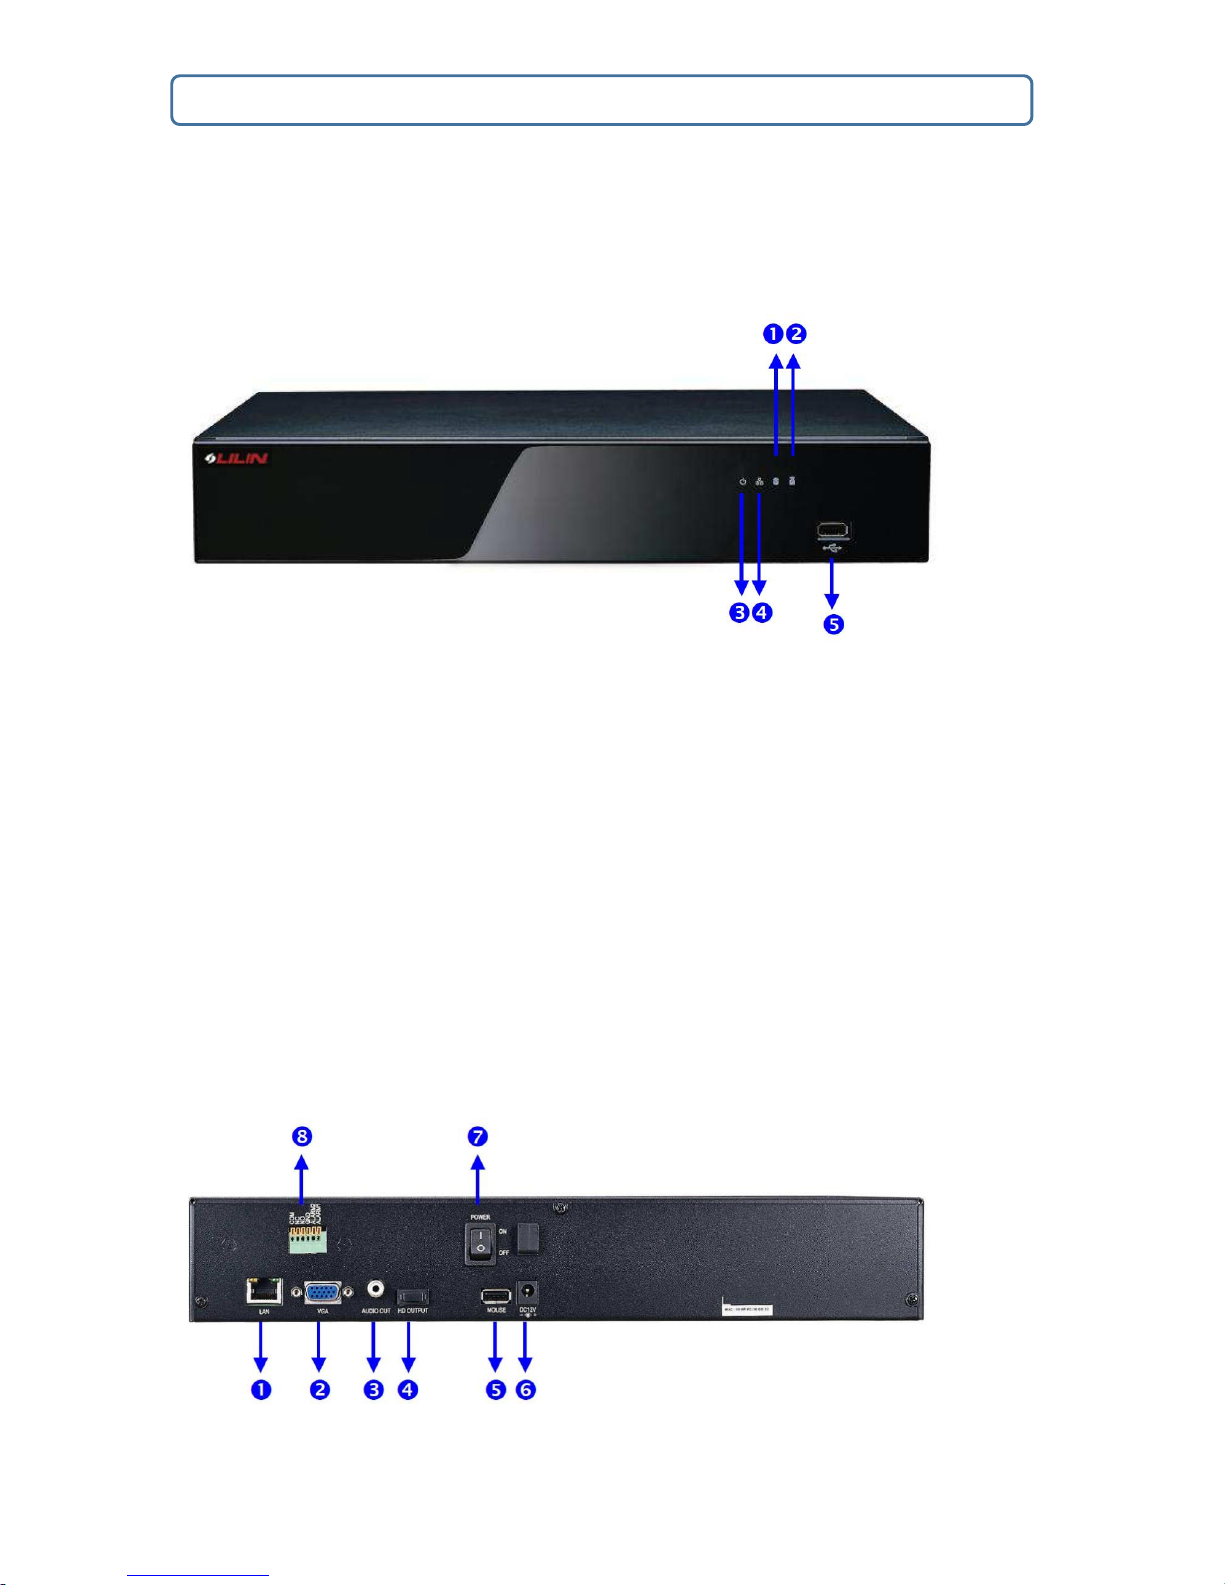
The NVR can be controlled with multiple methods; remote control, touchscreen
monitor, or USB mouse. When connected to a touchscreen monitor, gestures such as
“pinch-to-zoom” can be used to navigate the system.
Files recorded by the NVR can be exported to DVD and USB flash drive, or the files
can be downloaded online via Backup Manager or Remote Player. Mobile support for
iPhone, iPad, and Android allows for remote viewing of connected cameras at high
frame rates. Browser-based live monitoring and video playback features are also
supported.
LILIN IP Cameras adopt the latest compression technologies, which allow multiple
streaming of H.264 or MJPEG formats in different resolutions. LILIN’s multiple
streaming technology transmits digital video at various bit rates and frame rates to suit
both high and low bandwidth network environments.
Features
Standalone NVR
Supports multi-touch screens
Supports up to 3MP, 1080p, and 60 FPS IP cameras
Supports up to 48/40/32 Mbps network throughput; full HD 1920*1080p HDMI
and VGA output
Compatible with iOS and Android devices

LILIN NVR Start Guide Page2
Metadata history can be exported to USB devices
Supports IPScan utility and LILIN Navigator
Trademarks and registered
trademarks
Microsoft, Windows, Internet Explorer are registered trademarks of Microsoft
Corporation in the U.S and/or other countries.
Adobe and Adobe PDF are registered trademarks of Adobe Systems Incorporated in
the U.S and/or other countries.
JavaScript and all Java-based trademarks and logos are trademarks or registered
trademarks of Sun Microsystems, Inc. in the U.S and/or other countries.
Linux, Macintosh, Mozilla, and Netscape Navigator are registered trademarks of the
respective holders.
Other names of companies and their products mentioned in this manual may be
trademarks or registered trademarks of their respective owners.
Caution
Do not drop or strike the equipment
Do not install the equipment near naked flames or heat sources
Do not expose this unit to rain, moisture, smoke or dusty environments
Do not cover the opening of the cabinet with cloth or plastic or install this unit in a
ventilated place. Allow 10cm between this unit and its surroundings
Do not continue to operate the unit under abnormal conditions such as detection
of smoke, strange smell or no display on screen whilst power is turned on
Do not touch the power connection with wet hands
Do not damage the power cord or leave it under pressure
To avoid unnecessary magnetic interference, do not operate this unit near
magnets, speaker system, etc.
All connection cables must be grounded properly
CAUTION
RISK OF EXPLOSION IF BATTERY IS REPLACED BY AN INCORRECT TYPE.
DISPOSE OF USED BATTERIES ACCORDING TO THE INSTRUCTIONS

LILIN NVR Start Guide Page3
Product Overview
Front View
Rear View
1. Power LED (Yellow)
NVR power on/off indicator
4. Alarm LED (Red, blinking)
Indicator of triggered alarms
2. LAN LED (Green)
LAN activity indicator
5. USB 2.0 port
3. HDD LED (Green, blinking)
HDD activity indicator

LILIN NVR Start Guide Page4
Remote control
Keys and functions of the remote control are described as followed
1. RJ-45 Connector
5. USB 2.0 Port
2. VGA Connector
6. DC 12V Input
3. Audio Output
7. Power Switch
4. HDMI Output
8. DI/DO Connector (400L only)
Key
Function
Power switch
REC
Start/stop recording
MENU
Setup menu
ESC
Escape/exit/stop
PIP (SHIFT)
Switch between split and full screen
ZOOM
Digital video zoom
FREEZE
Freeze video
Pause
Playback
Stop
Fast forward
Rewind
Next channel
Previous channel
4 split screens
8 split screens
9 split screens
13 split screens
16 split screens
AUDIO
Audio on/off
BACKUP
Video backup
DVR/NVR
Addressable NVR control
LANGUAGE
Language selection
BACKSPACE
Delete character
Auto Pan
Perform auto pan feature
Move up/tilt up

LILIN NVR Start Guide Page5
Touchscreen
Pinch to zoom: Put your thumb and index finger together and put them on your touchscreen.
Glide them apart to zoom in, and glide them toward each other to zoom out.
Swipe to Navigate: Swipe the screen left and right to navigate through the menus.
Single Tap: Tap icons to select.
Zoom in
Zoom in
Move down/tilt down
Zoom out
Zoom out
Move left/pan left
Preset
Call preset
Move right/pan right
0 to 9
Numerical keys
Enter/set
Pinch to Zoom
Swipe to Navigate

LILIN NVR Start Guide Page6
First Time Using LILIN NVR
First, click System in the left pane, where you are allowed to adjust the
configurations of the NVR. The details of the tabs are described as followed:
General
Device ID: Assign an ID for the NVR to be controlled by the remote controller.
Audio Volume: Adjust the volume of the NVR.
Live OSD: Switch on/off the OSD.
System Lock: Switch on/off the system lock.
Sound On Button Press: Switch on/off the sound when pressing remote control buttons.
Last Boot Time: The last time the system is rebooted.

LILIN NVR Start Guide Page7
Time
Date/Time: Set the date/time of the NVR.
Date Format: Modify the date format.
Time OSD: Switch on/off the time to be displayed on the screen.
Time Zone: Change the time zone of the location where the NVR is installed.
Time Sync Mode: Choose how you would like the time to be synced.
NTP Server: Enter the NTP server you want to use (currently this setting cannot be altered).
Time Sync Interval: Choose the interval for the time to be synced (currently this setting cannot be
altered).
NTP Status: The status of the selected NTP server will appear here.
Note: click Apply for the changes to take effect.

LILIN NVR Start Guide Page8
User
LILIN NVR supports up to 15 sets of individual user settings (including administrator, operator, and
guest), to which you can assign different access rights.
User: Enter the name of the user (this field of administrator, operator, and guest cannot be
changed).
Old Password, New Password, and Confirm Password: If you would like to change the
password, enter your previous password and enter the new password and confirm the
password. Press Show to reveal the password. The default passwords for administrator,
operator, and guest are 1111, 2222, and 3333, respectively.
User Permission: Set the access rights of the user to administrator, operator, or guest.
Load Default: Restore to the factorydefault settings.
Note: click Apply for the changes to take effect.

LILIN NVR Start Guide Page9
Storage
HDD INFO.
In HDD INFO., you will see a list of storage devices attached to the NVR with their
individual information including the record start time, record end time, and HDD usage,
etc. Also, you are allowed to format or defrag any of the devices. Check the device you
want to format of defrag, and click Format or File System Defrag.
S.M.A.R.T.
The S.M.A.R.T. status of your hard drive is displayed in S.M.A.R.T., where you can run
analysis (either short or extended) on the HDD. Choose between Short or Extended
analysis and click Analysis to start the process. You will see HDD status, information,
attributes, and event history under HDD S.M.A.R.T. Information.
REGULAR CHECK
Set the interval between file system checks.

LILIN NVR Start Guide Page10
USB INFO.
Connect a USB device (flash drive or hard drive) to the NVR, and then check the one
you want to format under this page, then click Format.
Event
SYSTEM
The search field in this page allows you to search for specific event reports at different
time and of different content. Press Download to export the event report.
OPERATING

LILIN NVR Start Guide Page11
You can examine the operating status of different users under this page. Press
Download to export the event report.
Maintenance
Firmware Update: Choose a firmware file and click Update to proceed firmware update.
Export Settings: Click Export to save system settings as a configuration file (in XML format).
Import Settings: Insert a configuration fil (in XML format) to a USB flash drive, then press Import
to update the settings..
Factory Reset: Click Reset to restore the system to factory default settings.
Soft Reboot: Soft reboot the system.
Watchdog Test: Click to test the watchdog function. This may reboot the NVR.
Kernel Version: The kernel version of the system.
Network Setup
After you completed setting up the system configurations, you will have to connect the
NVR to a network before you can view video streams. Click Network in the
left pane.

LILIN NVR Start Guide Page12
General
Enter the required information in the fields:
IP Mode: Select the connection type of the NVR from Static, DHCP, and PPPoE.
IP Address: Enter the IP address you want to use, and press IP Test if necessary.
Subnet Mask: Enter the desired subnet mask.
Default Gateway: Enter the desired default gateway.
Primary DNS: Enter the first priority DNS server.
Secondary DNS: Enter the secondary DNS server in case if the primary DNS is not available.
Video Port: Specify the desired video port.
HTTP Port: Specifythe desired HTTP port.
FTP Port: Specify the desired FTP port.
MAC: This is the MAC address of your NVR.
PPPoE Account: If you choose to connect through PPPoE, enter the account name here.

LILIN NVR Start Guide Page13
PPPoE Password: Enter the required password for PPPoE connection.
PPPoE IP: Your PPPoE IP will be displayed here.
Hotspot IP: Your hotspot IP will be displayed here.
Advance
In this page, you are allowed to switch on/off TCP/IP addresses and run the IP Test if
necessary.
E-Mail
When an alarm is triggered, LILIN NVR can automatically send e-mail notifications to
the recipients you designated. The setting options are described below:

LILIN NVR Start Guide Page14
Send E-Mail: Check the box to enable sending e-mail notifications when an alarms is triggered.
E-Mail List: The list shows all saved e-mail addresses.
Edit Contact: Enter the email address you want to save as contacts and click Modify.
Authorization: Check if your e-mail account requires login authorization.
SSL: Check if you want to send/receive e-mail over SSL.
E-Mail Account: Enter the account name of your e-mail.
E-Mail Password: Enter the password of your e-mail.
Sender: Enter the name you would like to display in the e-mail.
E-Mail Host: Enter the IP address of your e-mail server.
Port: Enter the port of your e-mail server.
JPEG File:Check to also send JPEG photos when an alarm is triggered.
Motion, Sensor, and S.M.A.R.T. Err/HDD Err: Check to send e-mail notifications if any one of
these occasions occurs.
Video Loss: Choose how many seconds the NVR would wait before sending out e-mail
notifications.
Candidate: Choose an email address and press Down or Up arrows to add contacts as
recipients.
Receiver: The list of recipient(s).
Annotation:Content of the email notification.
Note: Click Send to send out the notification and click Apply for the changes to take
effect.

LILIN NVR Start Guide Page15
FTP
When an alarm is triggered, LILIN NVR can automatically send snapshots to the FTP
server you designated. The setting options are described below:
FTP Server: Enter the IP address of the FTP server.
Port: Enter the port of the FTP server.
Account: Enter the account name of the FTP server.
Password: Enter the password of the FTP server
Prefix & Postfix: The prefix and postfix of the FTP server.
File Name Format: Change the file name format to suit your need.
Continuously Send: Check to enable this function.
Continuously Send Dwell: Set the frequencyof sent notification.
Alarm FTP Send: Check to send alarm notification to the designated FTPaddress.
Alarm FTP Send Dwell: Set the frequencyof alarm notification sent to the FTP.

LILIN NVR Start Guide Page16
Camera
Check the cameras that you want to send notifications to the FTP when an alarm is triggered, and
specify the folder name where the images are saved.
DDNS
With DDNS, you can access an NVR connected to the Internet through the DDNS URL,
whatever the actual IP is. The setting options are described below:
Server: Choose the DDNS server you want to use.
Hostname: Enter the hostname of the DDNS server.
User: Enter the username to log in the DDNS server.
Password: Enter the password to log in the DDNS server.
WAN IP: Enter you WAN IP.
Check Interval: Choose the time interval you want the system to check DDNS connection.

LILIN NVR Start Guide Page17
Note: The DDNS feature requires Internet connection.
To activate DDNS, go to www.ddnsipcam.com. If the IP camera is on Internet with a
global IP address, use the last 6 digits of the MAC address as the host name with
default account and the default password,. The IP camera will automatically register to
www.ddnsipcam.com.
Other
LILIN NVR also supports other protocols such as UPnP and SDDP, and related
configurations can be modified in the OTHER tab. The setting options are described
below:
UPnP Device Name:Your device name shown on the UPnP network.
UPnP Service: Switch on/off the UPnP service.
SDDP Device Name: Your device name shown on the SDDP network.
SDDP Service: Switch on/off the SDDP service.
Network Places: Switch on/off Network Places to display shortcuts to shared devices.

LILIN NVR Start Guide Page18
Workgroup: Your workgroup name displayed in Network Places.
Device Name: Your device name displayed in Network Places.
IE Default Live View: Choose the default streaming type (H.264 or MJPEG) when streaming
using Internet Explorer.
Reset on Ethernet Error: Reset the NVR when an Ethernet error is detected.
JEPG Mode: Choose Single JPEG to attach JPEG snapshots.
Max Connections: Set the maximum number of simultaneous connections when streaming using
Internet Explorer.
Browser Auto Logout (30 Minutes): Check to log out after 30 minutes of inactivity.
Disable HTTP Auth.: Check to disable the required authorization when accessing the NVR
through the HTTP.
Connecting to Cameras
After you complete setting up System and Network, now you should connect to the
cameras. Press Camera in the left pane to enter the camera setup page.
The setting options are described below.

LILIN NVR Start Guide Page19
General
Camera Name: Enter the camera name to be displayed on the streaming screen.
Camera Source: Allocate a NVR channel for the camera.
IP Address: Enter the IP address of the camera you want to connect to, and press Dev. Info. to
check ONVIF capability.
HTTP Port: Enter the port for HTTP connection.
RTSP Port: Enter the port for RTSP connection.
User: Enter the username required for camera authorization.
Password: Enter the password required for camera authorization.
Stream Type: Choose whether to stream onlySD video or dual (SD & HD) video.
Primary Stream: Select the FPS and GOP for the primary stream.
Primary Stream Bitrate: Select the bitrate for the primary stream.
Secondary Stream: Select the FPS and GOP for the secondary stream (only if you choose Dual
Stream in Stream Type).
Other manuals for nvr400L
1
This manual suits for next models
2
Table of contents
Other Lilin Network Hardware manuals