Lindy 42856 User manual

© LINDY ELECTRONICS LIMITED & LINDY-ELEKTRONIK GMBH - SECOND EDITION (NOV 2002)
USB to Serial Converter
User Manual English
Benutzerhandbuch Deutsch
Manuel Utilisateur Français
Manuale d’uso Italiano
LINDY No. 42856 & 42857
www.LINDY.com

CONTENT
All brand names and product names used in this document are trademarks, or registered trademarks of their respective holders.
For detailed description of the DRIVER INSTALLATION with screen
shots included please refer to the ENGLISH manual.
The description in the german, french and italian manuals are as short
guide only.

English Manual
1. Overview
Congratulations on your purchase of the USB-Serial adapter. This device provides a
simple and easy way to connect Universal Serial Bus (USB) and Serial port interface.
With the advantage of USB port, users have the capability to utilize the peripheral with
serial port interface in an easy to use environment such as plug and play & hot swap
function. This adapter is designed for ideal connections to Cellular Phone, Digital
Camera, Modems or ISDN terminal adapter with over 120kbps data transfer rate.
The USB-Serial adapter and software drivers are capable of providing a no-firmware-
change feature that enable USB interface to be transparent to serial port peripherals with
minimum modifications.
2. Package Content
Hardware: USB-Serial adapter, USB type A to type B cable
CD-ROM with USB-Serial drivers and User’s Manuals
3. Product Features
USB Specification Rev. 1.1 compliant
Support the RS232 Serial interface
Over 120kbps data transfer rate
Support remote wake-up and power management
4. System Requirements
PC
IBM® PC 486DX4-100 MHz CPU or higher or compatible system
Available USB port
CD-ROM drive
Windows® 98, ME, 2000 or XP
MAC
Power G3 OR G4 CPU or I-MAC
Available USB port
CD-ROM drive
Mac OS 8.6 through 9.X
5. Driver Installation
5.1 Windows®98 Driver Installation
Following the steps below to install Windows®98 driver
5.1.1 Power on your computer and make sure that the USB port is enabled and
working properly.
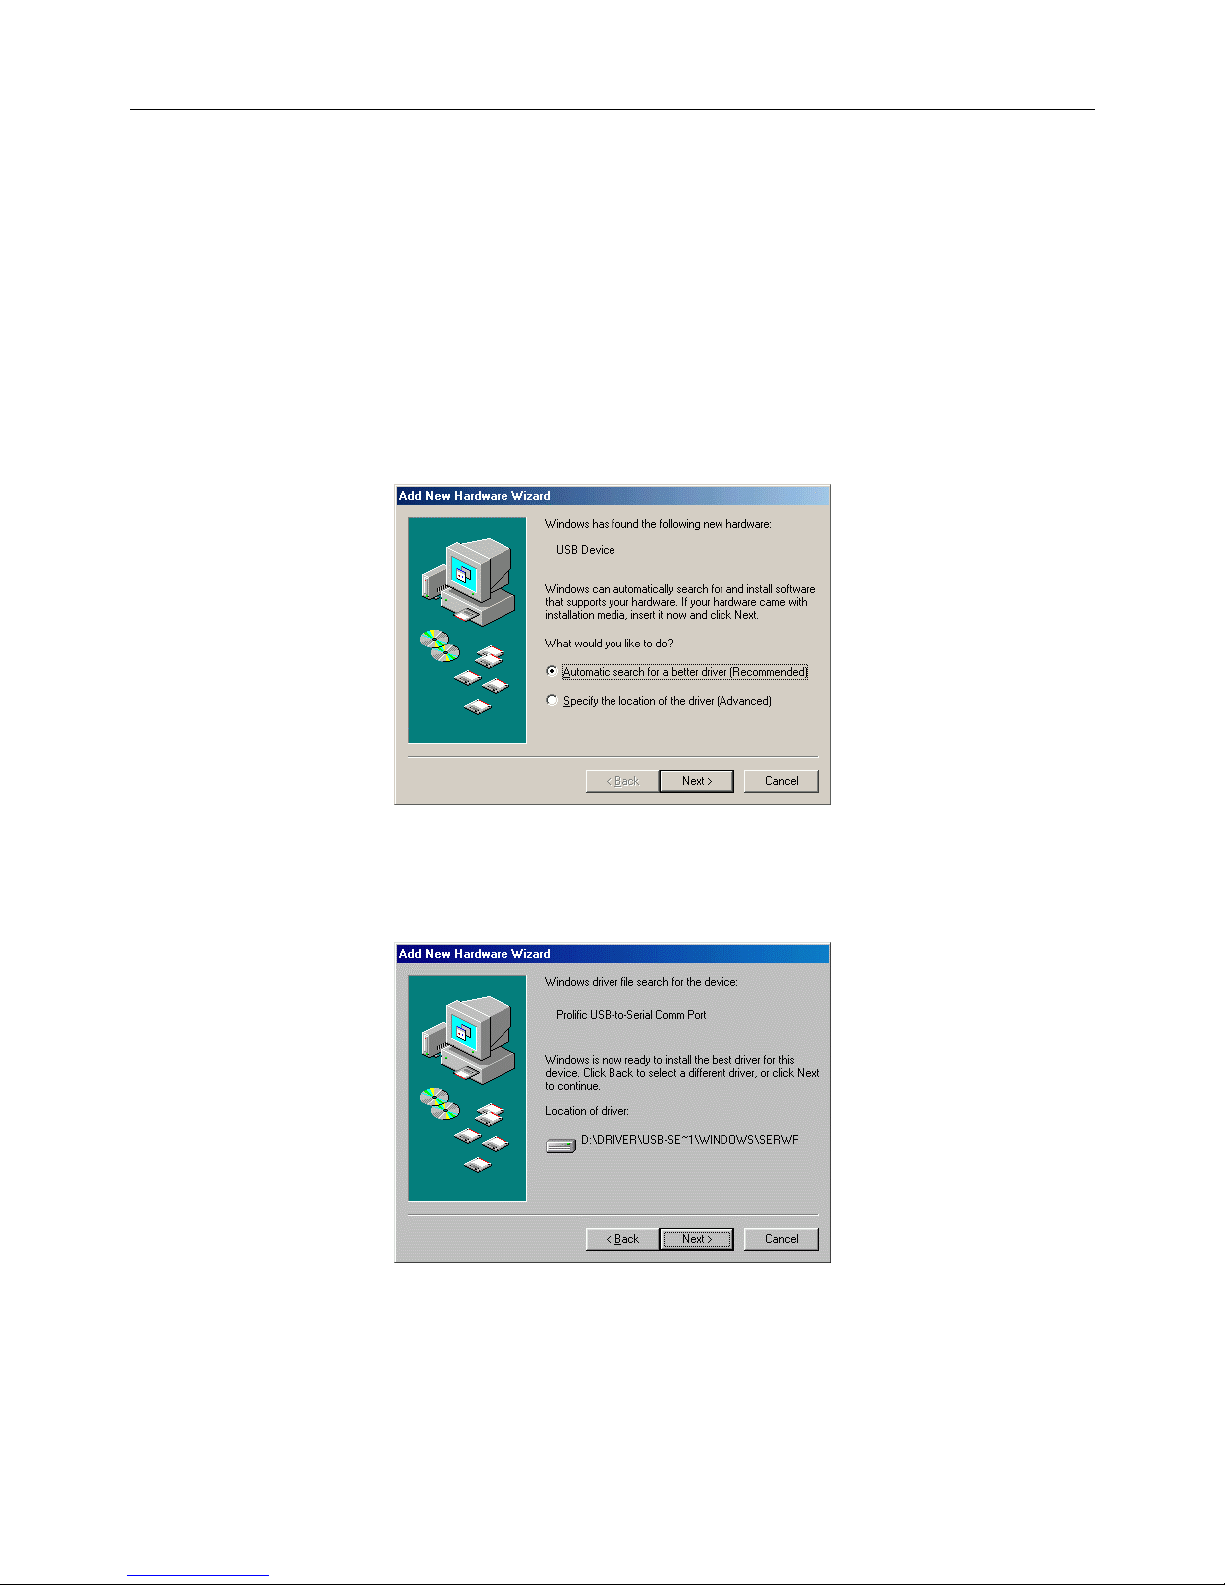
5.1.2 Plug in the USB-Serial adapter into the USB port and run the Add New
Hardware Wizard to assist you in setting up the new device. Click “Next”
to continue.

English Manual
5.1.3 Select “Search for the best driver for your device (Recommended)”,
and then click “Next” to continue.
5.1.4 Insert the USB-Serial adapter software driver into the CD-ROM drive and
select Specify a location and type the “D:\Driver\USB-SERIAL
ADAPTER\Windows” in the dialogue (D: represents CD-ROM)

English Manual
5.1.5 Windows®will detect the driver (SERWPL.INF) and shows the Prolific
USB-to-Serial Comm Port. Click “Next” to continue installation.
5.1.6 Click Next to continue and let Windows®copy the needed files to your hard
disk.
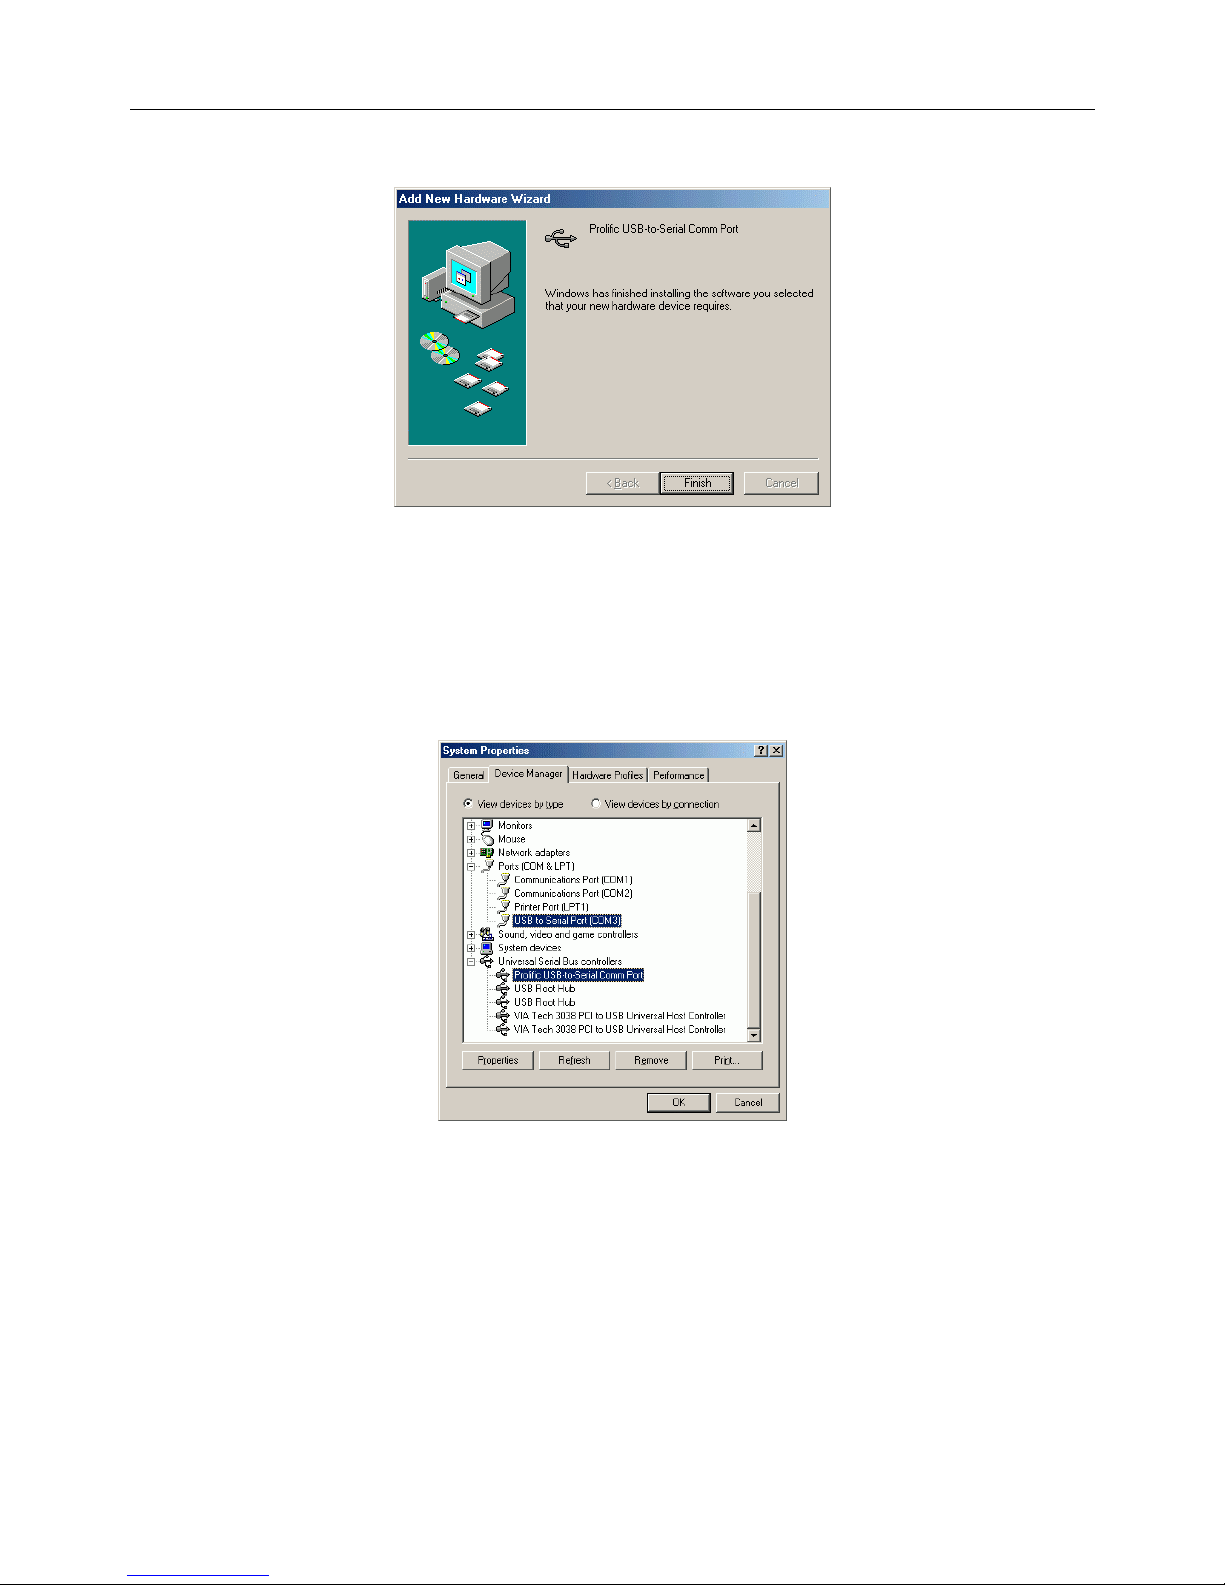
5.1.7 When Windows®finished installing the software, click “Finish”.
5.1.8 After install the driver, you have to check the “Control Panel”-“System”-
“Device Manager” to make sure the driver has already installed, you can
see a USB to Serial Port (COM3) under the Ports (COM & LPT) and a
Prolific USB-to-serial Com Port under the Universal Serial Bus
Controller.

English Manual
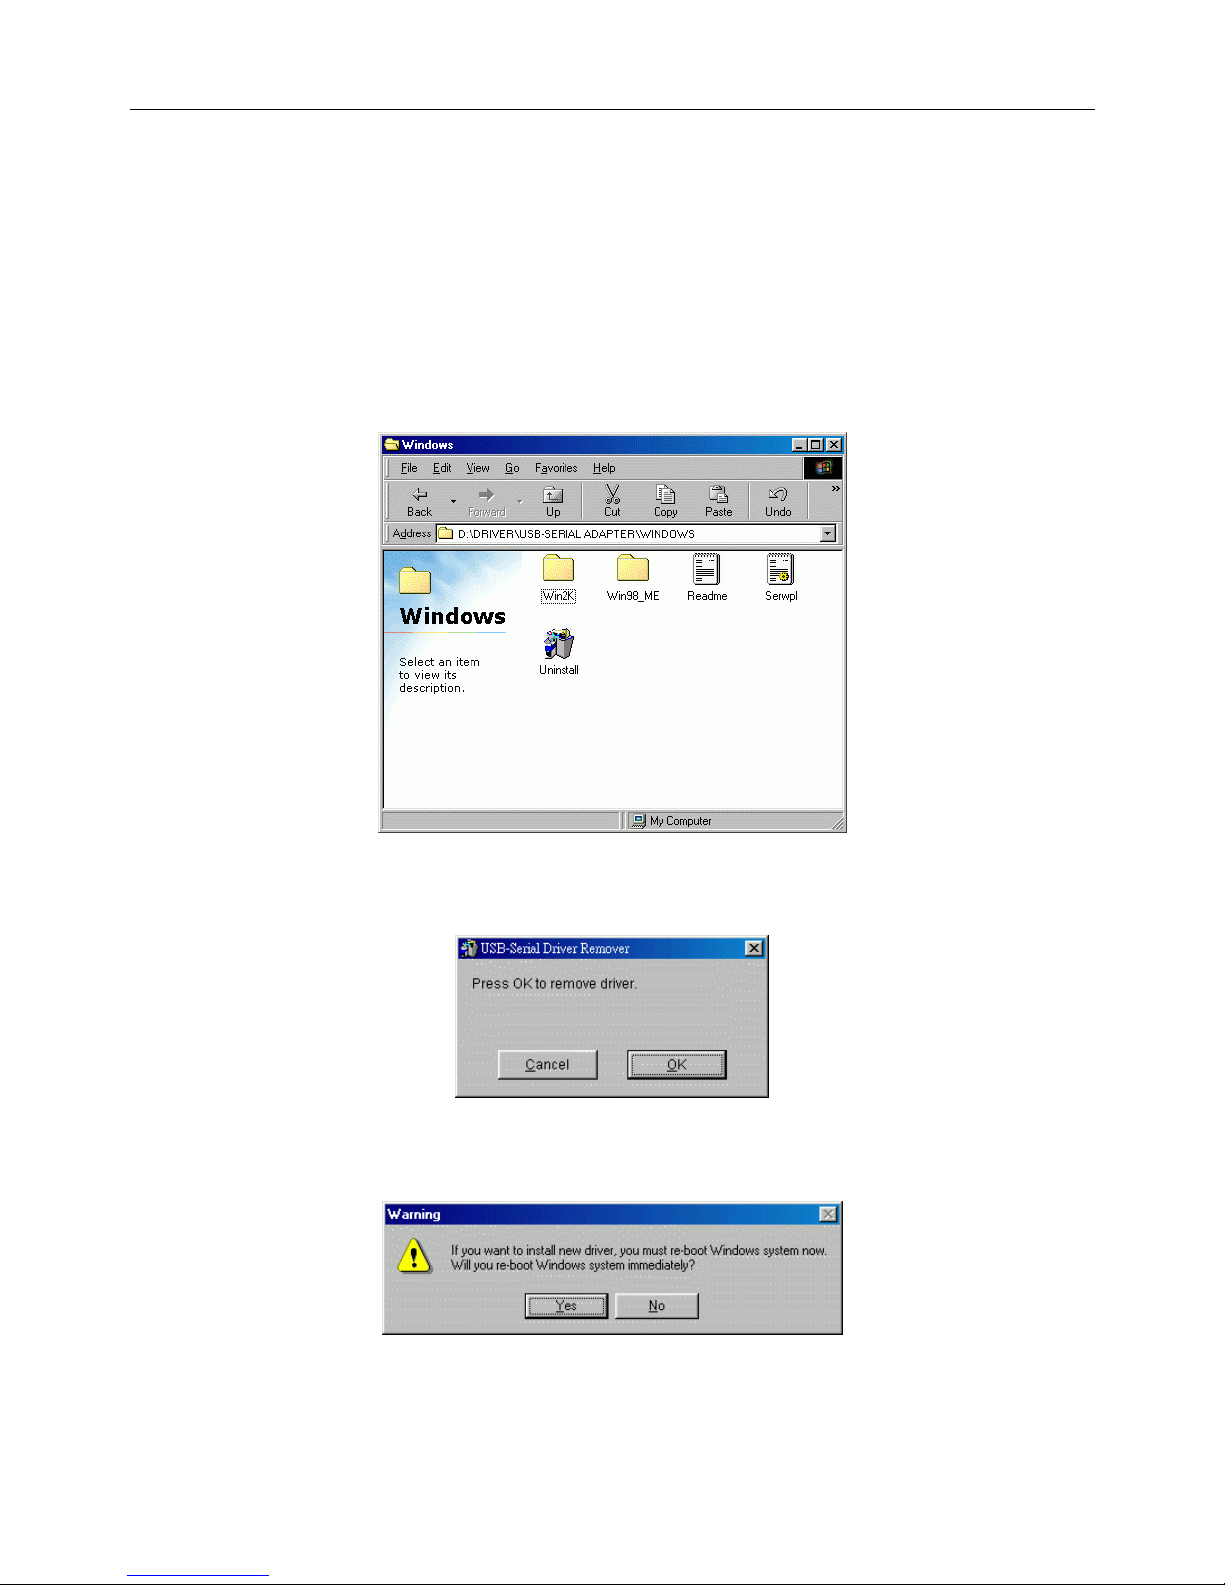
5.2 Windows®98 Driver Un-installation
If you want to remove the USB-Serial adapter driver, you can uninstall it by
following the steps below:
5.2.1 Unplug the USB-Serial adapter from your PC.
5.2.2 Run the D:\Driver\USB-SERIAL ADAPTER\WINDOWS\ Uninstall.exe
from the software CD-ROM.
5.2.3 Click “Ok” to continue.
5.2.4 After remove the driver, you have to reboot the PC

English Manual
5.3 Windows®ME Driver Installation
Follow the steps below to install Windows®ME driver
5.3.1 Power on your computer and make sure that the USB port is enabled and
working properly.
5.3.2 Insert the USB-Serial adapter software driver into the CD-ROM drive and
Plug in the USB-Serial adapter into the USB port; select the Automatic
search for a better driver (recommended), and then click “Next” to
continue.
5.3.3 Windows®will detect the driver (SERWPL.INF) and show the Prolific
USB-to-Serial Comm Port.

English Manual
5.3.4 When Windows®finished installing the software, click “Finish”.
5.3.5 After install the driver, you have to check the “Control Panel”-“System”-
“Device Manager” to make sure the driver has already installed, you can
see a USB to Serial Port (COM3) under the Ports (COM & LPT) and a
Prolific USB-to-serial Com Port under the Universal Serial Bus
Controller.

English Manual
5.4 Windows®ME Driver Un-Installation
If you want to remove the USB-Serial adapter driver, you can uninstall it by
following the steps below:
5.4.1 Unplug the USB-Serial adapter from your PC.
5.4.2 Run the D:\Driver\USB-SERIAL ADAPTER\WINDOWS\ Uninstall.exe
from the software CD-ROM.
5.4.3 Click “Ok” to continue.
5.4.4 After remove the driver, you have to reboot the PC

English Manual
5.5 Windows®2000 Driver Installation
Follow the steps below to install Windows®2000 driver:
5.5.1 Power on your computer and make sure that the USB port is enabled and
working properly.
5.5.2 Insert the USB-Serial adapter software driver into the CD-ROM drive and
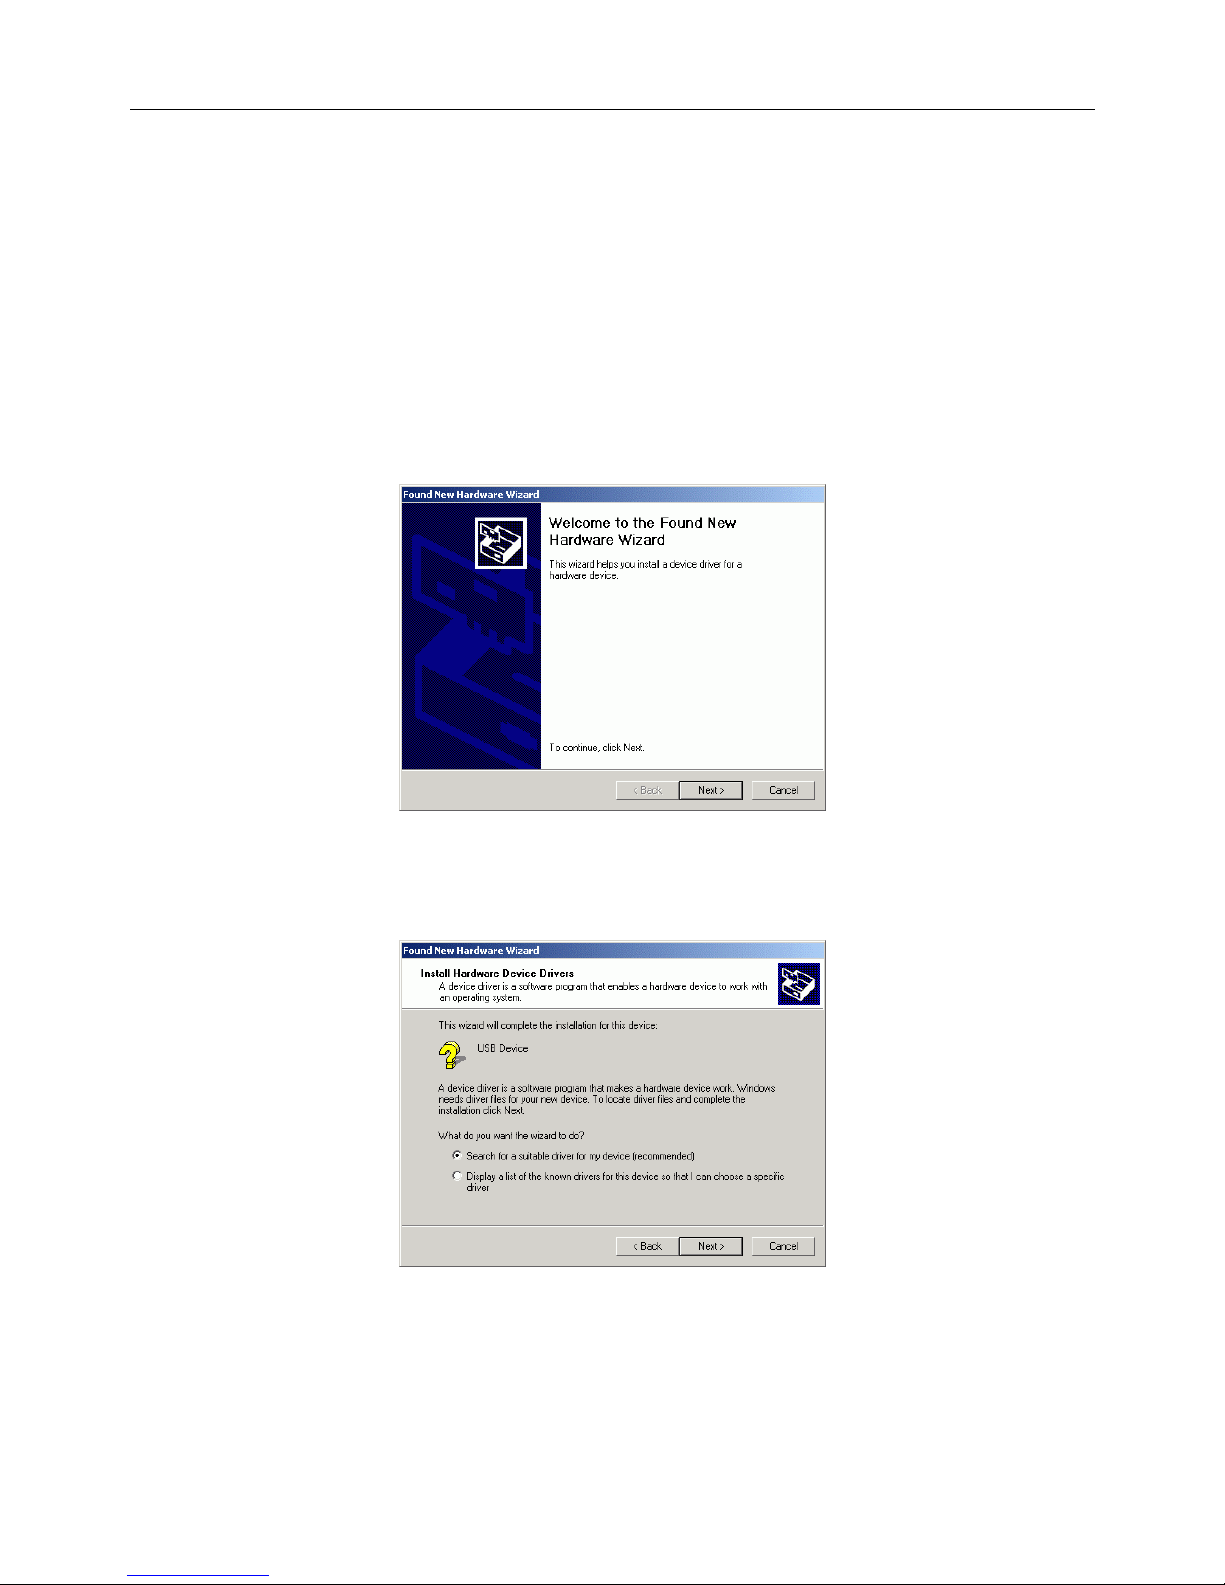
Plug in the USB-Serial adapter into the USB port, Windows will run the
Found New Hardware Wizard to assist you in setting up the new device.
Click “Next” to continue.
5.5.3 Select Search for a suitable driver for my device (recommend) and click
“NEXT” to continue.
5.5.4 Select the “Specify a location” drive and click “NEXT” to continue.

English Manual
5.5.5 Windows®will detect the driver (SERWPL.INF) and Click “Next” to
continue.
5.5.6 Click “Finish” to finish the step.
5.5.7 After the step, you have to check the “Control Panel”-“System”-
“hardware”-“Device Manager” and you can see the (Prolific USB to
Serial Comm Port) under the Ports (Com & LPT)

English Manual
5.6 Windows®2000 Driver Un-Installation
If you want to remove the USB-Serial adapter driver, you can uninstall it by
following the steps below:
5.6.1 Unplug the USB-Serial adapter from your PC.
5.6.2 Run the D:\Driver\USB-SERIAL ADAPTER\WINDOWS\ Uninstall.exe
from the software CD-ROM.
5.6.3 Click “Ok” to continue.
5.6.4 After remove the driver, you have to reboot the PC

English Manual
5.7 Windows®XP Driver Installation
Follow the steps below to install Windows®XP driver:
5.7.1 Power on your computer and make sure that the USB port is enabled and
working properly.
5.7.2 Insert the driver of USB-Serial adapter into CD-ROM drive and plug in the
USB-Serial adapter into the USB port, the “Found New Hardware
Wizard” will to assist you to setting up the new device.
5.7.3 Select the “Install the software automatically (Recommended)” then
click “Next” to continue.
5.7.4 The windows will auto detect the device (prolific USB-to-Serial Comm
Port) and install the driver into your system.
5.7.5 As the windows appear as below, click the “Finish” to continue.

English Manual
5.7.6 After install the driver, you can see a new Prolific USB-to-Serial Comm
Port (COM3) under the Ports (COM&LPT).

English Manual
5.8 Windows®XP Driver Un-Installation
If you want to remove the USB-Serial adapter driver, you can uninstall it by
following the steps below:
5.8.1 Unplug the USB-Serial adapter from your PC.
5.8.2 Run the D:\Driver\USB-SERIAL ADAPTER\WINDOWS\ Uninstall.exe
from the software CD-ROM, and then reboot the PC.
5.8.3 Click “OK” to remove the driver.
5.8.4 After remove the driver click “YES” to reboot your PC.

English Manual
5.9 MAC Driver Installation
Follow the steps below to install driver of USB-Serial adapter:
5.9.1 Power on your computer and make sure that the USB port is enabled and
working properly.
5.9.2 Insert the USB-Serial adapter software driver into the CD-ROM drive and
copy the “D:\Driver\USB-SERIAL ADAPTER\MAC\SETUP.SIT” to the
desktop from the CD-ROM.
5.9.3 Run the SETUP.SIT from the desktop, it will auto run the program and
create a PL-2303G on desktop.
5.9.4 Copy the “PL-2303G” to the “System Folder”-“Extensions”.
5.9.5 To make sure that your computer can use the device correctly, you have to
check the “Apple System Profiler”-“Device and Volumes”. It will show
the USB Device

English Manual
5.10 MAC Driver Un-Installation
If you want to remove the USB-Serial adapter driver, you can uninstall it by
following the steps below:
5.10.1 Unplug the USB-Serial adapter from your MAC machine.
5.10.2 Remove the “PL-2303G” into the trash and then reboot your MAC
machine.
6 Setting Up the RS232 Serial Device
Follow the steps below to connect your RS232 Serial Device (i.e.: Modem) to the USB
port of your PC:
6.1Turn off your Modem. Plug the DB 9 connector of the USB-Serial adapter into your
Modem. Connect the other end of the USB-Serial adapter to an USB type A to type B
cable. Turn on the Modem afterwards.
6.2Turn on your computer and plug in the USB connector of the USB-Serial adapter into
the USB port.
6.3If you have already installed a Modem device before, click Start, Settings, and
Modems. Open Modems Properties, select the Modem, and click Properties. In
General tab, please change the Port value to USB to Serial Port (COM3).
6.4After finishing these processes, you can use USB to Serial Bridge Cable to connect
RS232 Serial 56K FAX Modem and execute the Dial-up function to connect Internet,
and send the FAX with the FAX software (i.e.: Microsoft FAX) properly.

English Manual
7 Trouble Shooting
If you can successful install the driver but cannot use the USB-Serial Adapter with
connect the other device:
Go to the Control Panel-System-Device Manager and check the COM (COM&LPT), if
you cannot see this item:
Please check the BIOS setting →I/O configure setting →Onboard serial port 1,
choose the setting is enabled and choose the value. Then return to the windows and
check it again.
Go to the Control Panel →Add New Hardware, following the step and choose the
hardware from the list, select the Ports(COM&LPT) and following the step to install the
driver that is needed.(In this process you may need to put the WINDOWS CD into the
CD-ROM drive.)
8 Disclaimer
Information in this document is subject to change without notice. The manufacturer does
not make any representations or warranties (implied or otherwise) regarding the accuracy
and completeness of this document and shall in no event be liable for any loss of profit or
any other commercial damage, including but not limited to special, incidental,
consequential, or other damages.
No part of this document may be reproduced or transmitted in any form by any means,
electronic or mechanical, including photocopying, recording or information recording and
retrieval systems without the express written permission of the manufacturer.
All brand names and product names used in this document are trademarks, or registered
trademarks of their respective holders.

Deutsches Benutzerhandbuch
Einführung
Herzlichen Glückwunsch zum Kauf Ihres LINDY USB-Seriell Konverters! Dieser Konverter ermöglicht es
Ihnen serielle Geräte auf einfache Weise an den Computer über USB anzuschliessen.
Der Adapter ermöglicht über den USB Bus den Anschluss der meisten serielle Geräte wie z.B. Handys
mit serieller Schnittstelle, Digitalkameras, Modems, ISDN Terminaladapter seriell, u.v.a.m.
Lieferumfang
Zusammen mit dem LINDY USB-Seriell Konverters erhalten Sie ein USB Anschlusskabel und eine CD
mit Treibern sowie diesem Handbuch.
Systemvoraussetzungen
PC
IBM® PC 486DX4-100 MHz CPU oder höher oder kompatibles System
Freier USB 1.1 oder 2.0 Port
CD-ROM Laufwerk
Windows® 98, ME, 2000 oder XP
MAC
G3 oder G4 oder I-MAC
Freier USB Port
CD-ROM Laufwerk
MAC OS 8.6 bis 9.2 (nicht OS X – Stand 11/02)
Installation der Treiber
Folgen Sie bei der ersten Installation des LINDY USB Seriell Adapter dem unten angegebenen
Procedere (Sie finden eine ausführliche bebilderte Anleitung mit Screenshots im englischen Handbuch
am Anfang dieses Handbuches):
1) Schalten Sie den Computer ein und vergewissern Sie sich, daß der USB-Port
ordnungsgemäß funktioniert. Falls Sie nicht sicher sind, überprüfen Sie den Eintrag zu ”USB
Controller” im Gerätemanager (Start Einstellungen Systemsteuerung System
Gerätemanager).
2) Schließen Sie den USB Seriell Adapter am USB-Port an. Windows wird ein unbekanntes
Gerät identifizieren und startet automatisch den Hardwareassistenten um Ihnen bei der
Einrichtung des neuen Geräts zu helfen.
3) Legen Sie die LINDY Treiber-CD in das CD-Laufwerk ein und klicken Sie auf Weiter um
fortzufahren
Für Nutzer von WINDOWS 98:
a) Wählen Sie Nach dem besten Treiber für das Gerät suchen und klicken Sie auf Weiter.
b) Wechseln Sie in den Ordner Ihres CD-Laufwerks und klicken Sie auf Weiter.
c) Überprüfen Sie den Pfad den Windows anbietet. Klicken Sie auf Weiter.
d) Windows wird den Treiber finden (serwpl.inf) und das Prolific USB-to-Serial Comm Port
anzeigen. Klicken Sie auf Weiter um fortzufahren bis die Installation beendet ist.

Deutsches Benutzerhandbuch
Für Nutzer von WINDOWS ME:
e) Wählen Sie Nach dem besten Treiber für das Gerät suchen und klicken Sie auf Weiter.
f) Wechseln Sie in den Ordner Ihres CD-Laufwerks und klicken Sie auf Weiter.
g) Überprüfen Sie den Pfad den Windows anbietet. Klicken Sie auf Weiter.
Windows wird den Treiber finden (serwpl.inf) und das Prolific USB-to-Serial Comm Port
anzeigen. Klicken Sie auf Weiter um fortzufahren bis die Installation beendet ist.
Für Nutzer von WINDOWS 2000
a) Wählen Sie Nach einem passenden Treiber für das Gerät suchen (empfohlen) und
klicken Sie auf Weiter.
b) Klicken Sie auf CD-ROM-Laufwerk und klicken Sie auf Weiter.
c) WINDOWS durchsucht die CD und findet den Treiber. Sollten dies nicht die Treiber mit der
Bezeichnung „….(Windows 2000)“ sondern „…win98me…“ sein so klicken Sie auf das
Kästchen „EINEN DER ANDEREN TREIBER INSTALLIEREN“ und WEITER. Wählen Sie
aus der folgenden Liste den korrekten Treiber für Ihr Betriebssystem „….(Windows 2000)“
aus.
d) Klicken Sie auf Weiter um fortzufahren bis die Installation beendet ist.
Für Nutzer von XP:
a) Wählen Sie Software automatisch installieren (empfohlen) und klicken Sie auf Weiter.
b) Klicken Sie auf CD-ROM-Laufwerk und klicken Sie auf Weiter.
c) WINDOWS durchsucht die CD und findet den Treiber.
d) Klicken Sie auf Weiter um fortzufahren bis die Installation beendet ist.
De-Installation
Um die Treiber wieder aus Ihrem System zu entfernen, gehen Sie bitte folgendermaßen vor:
1) Ziehen Sie den USB-Stecker des USB Seriell Adapter aus der USB-Schnittstelle Ihres
Rechners.
2) Starten Sie Uninstall.exe im Ordner D:\Driver\USB-Serial Adapter\Windows der
Installations-CD
3) Klicken Sie auf OK um fortzufahren.
4) Nachdem der Treiber entfernt wurde, muss der Rechner neu gestartet werden.
LINDY-Elektronik GmbH behält sich das Recht vor, Informationen dieses Handbuchs an den Stand der
Technik anzupassen. LINDY-Elektronik GmbH übernimmt keinerlei Gewähr hinsichtlich der
Vollständigkeit und Richtigkeit der hier gemachten Angaben. Es wird keinerlei Haftung übernommen für
Schäden, die aus der Benutzung dieses Produktes entstehen.
Alle Rechte an diesem Handbuch liegen bei der LINDY-Elektronik GmbH. Wiedergabe und Nachdruck
auch von Teilen ist nicht gestattet.
This manual suits for next models
1
Table of contents
Other Lindy Adapter manuals

Lindy
Lindy 43123 User manual

Lindy
Lindy USB 2.0 SATA & IDE Adapter 42868v0 User manual

Lindy
Lindy 73013 User manual

Lindy
Lindy 43173 User manual

Lindy
Lindy 42711 User manual

Lindy
Lindy 32866 Quick start guide

Lindy
Lindy 38082 User manual

Lindy
Lindy 43900 User manual

Lindy
Lindy 38080 User manual

Lindy
Lindy 43356 User manual