Lindy 43173 User manual

© LINDY Group - THIRD EDITION (February 2018)
USB 3.0 HDMI Adapter
User Manual English
Benutzerhandbuch Deutsch
Manuel Utilisateur Français
Manuale Italiano
No. 43173
lindy.com
Tested to Comply with
FCC Standards
For Home and Office Use!

IMPORTANT NOTE:
You must install the driver from the CD before attaching
the USB 3.0 to HDMI Adapter to your computer!
WICHTIGER HINWEIS:
Sie müssen die Treiber von der beiliegenden CD
installieren bevor Sie den Adapter anschließen!
NOTE IMPORTANTE:
Vous devez installer le pilote du CD avant de connecter
l’adaptateur USB vers HDMI à votre ordinateur!
IMPORTANTE:
Occorre installare prima i driver dal CD incluso nella
fornitura prima di collegare l’adattatore USB / HDMI al
computer!

User Manual English
Introduction
Thank you for purchasing the LINDY USB 3.0 HDMI Adapter. This product has been designed to provide
trouble free, reliable operation. It benefits from both a LINDY 2 year warranty and free lifetime technical
support. To ensure correct use, please read this manual carefully and retain it for future reference.
The USB to HDMI Adapter allows you to connect any HDMI TV, LCD or Projector to your PC or notebook.
Thanks to SuperSpeed USB 3.0 and DisplayLink Technology, there is no need to add an additional
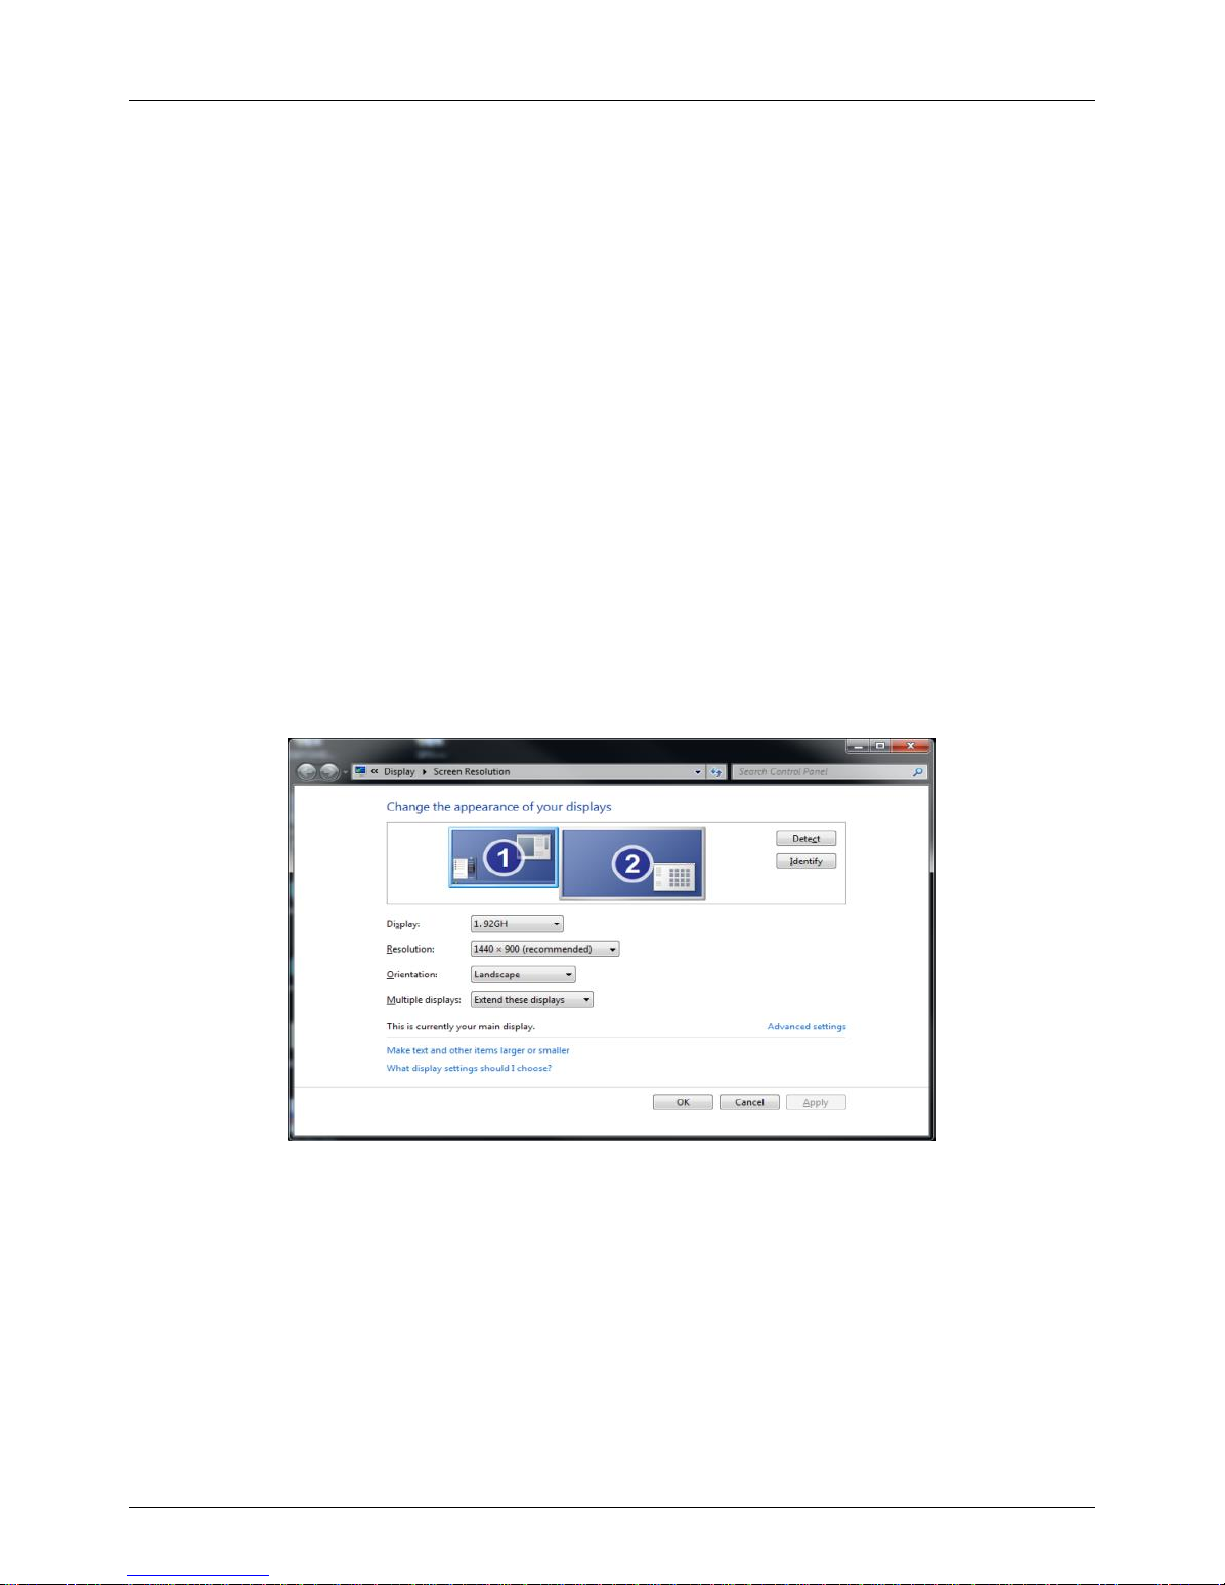
graphics cards to your computer.This additional monitor can be used as an additional standard Windows
monitor in mirror mode or extended desktop mode. It also can be configured to be used as a primary
monitor. It can be used to output a high resolution standard Windows desktop as well as for video
playback using Windows Media Player or appropriate software that supports Video playback on an
extended desktop.
Features
USB connectivity between PC/notebook to additional display monitor via HDMI connector (DVI Monitors
supported via HDMI/DVI Adapter).
Supports mirror, extended and primary display modes.
SuperSpeed USB 3.0 delivers higher resolution and performance for video and 3D graphics
Next generation DisplayLinkTM (DL3.0) compression technology
Equipped with USB to HDMI audio device to transfer the audio from PC to Monitor or TV
Supported Audio: Stereo, 5.1 Multi-Channel, LPCM 16bit, 32/44.1/48KHz
Supports resolutions up to 1080p@60Hz and 2560x1440@50Hz RGB
24-bit colour depth for high quality graphics
Display your PC contents (Internet, music, photo, and video as supported by your PC) to a Monitor, TV
or projector.
Add up to six displays per PC (dependent upon PC specification)
Supports standard (4:3) and widescreen (16:9,16:10) aspect ratios
Automatic display detection using VESA compliant protocols
Supports the following media players for video play: Windows media player 12, Win DVD8, Power DVD
7, Real Player 11

User Manual English
Supported Resolution Table
Resolution
Name
Refresh Rate
640x480
VGA
60 67 72 75 85
720x480
70 85 88
768x567
50 60
800x600
SVGA
56 60 72 75 85
832x624
75
800x480
60
848x480
60
1024x600
60
1024x768
XGA
60 70 75 85
1152x864
75
1152x870
75
1280x720
720p
50 60
1280x768
WXGA+
60 75 85
1280x800
WXGA
60
1280x960
60 85
1280x1024
SXGA
60 75
1360x768
60
1366x768
WXGA+
50 60
1368x768
60
1400x1050
SXGA+
60 75 85
1440x900
60
1600x900
60
1600x1200
UXGA
60
1680x1050
WSXGA+
60
1920x1080
1080p
50 60
1920x1200
WUXGA
60
2560x1440
WQHD
50
Before Installation
Check your PC requirements: DisplayLink software can be used on PCs, from Netbooks,
Notebooks/Laptops to Desktops, with a wide range of supported processors including Atom N270 based
PCs, basic single Core CPUs, and of course the latest Dual, Core i3/i5/i7 CPUs.
The performance of the software is dependent upon the processing power available as well as the
operating use (video or desktop), more capable systems will provide better performance.
DisplayLink software is available for the following Windows operating systems:
Windows 7 (32-bit or 64-bit)
Windows Vista SP 1 or 2 (32-bit or 64-bit)
Windows XP Home/Professional (incl. Tablet edition) SP 2 or 3
Windows Server 2003, 2008 and 2008 R2
Windows users may find most up to date information, DisplayLink manuals and driver software from
www.displaylink.com.

User Manual English
The recommended typical hardware requirements for the PC are:
Overall WEI (Windows Experience Index) score of at least 3 as recommended by Microsoft.
Update driver by windows update.
At least one USB 3.0 port.
30 megabytes (MB) of free disk space.
Computer screen for use with the USB 3.0 HDMI Adapter
Network access for software downloads, or access to a CD-ROM drive.
Software Installation
Install the software application first and do not connect the USB 3.0 HDMI Adapter to your PC
before the installation has completed!
a. Insert the supplied installation CD and run the E: \SETUP.EXE file (Assuming your CD ROM drive is
located at E:\)
b. Windows will pop up a “DisplayLink Software” screen as below, please click “I accept” to start installation
process. The set-up program will install the device driver & software application.

User Manual English
Note: The screen may flash or go black during the installation; no message will be shown at the end of
the installation process.
Hardware Installation
a. Connect your USB 3.0 HDMI Adapter via the USB cable to your PC. You will then see the following
message:
b. When connecting the USB 3.0 HDMI Adapter, your system will initiate the driver and software
application (the DisplayLink Software Configuration screen may flash or go black during the install).
Note: On some machines you may need to reboot before you can begin to use your USB 3.0 HDMI
Adapter.
c. Once the installation is complete connect your monitor to the USB 3.0 HDMI Adapter.
Controlling the Display
There are two ways to control the display:
(1) Use the DisplayLink Manager Menu
(2) Use Windows Display Properties

User Manual English
(1) To use the DisplayLink Manager Menu
When devices are attached, an icon appears in the taskbar. This gives you access to the DisplayLink
manager menu.
When devices are attached, an icon appears in the taskbar. This gives you access to the DisplayLink
manager menu.
a. From the taskbar, click the Show hidden icons arrow to show all available
icons.
b. Click the DisplayLink icon (circled above).
c. A menu will appear (as shown below) with several options, these are
described on the following pages.
Setting the Display into Extend Mode
In extend mode, the monitor attached to the USB 3.0 HDMI Adapter forms part of the extended Windows
desktop. The extra desktop area is a great productivity aid, allowing more applications or documents to be
visible at a time.
The device is now extended in the direction it was the last time the display was in this mode. For more
control, use the Extend To submenu and select one of the options. This puts the device into extend mode
and places it to the Left/Right/Above/Below the main (primary) monitor.

User Manual English
Setting the Display into Mirror Mode
In mirror mode, the monitor attached to the USB 3.0 HDMI Adapter will duplicate what is on the primary
display.
The resolution, colour depth and refresh rate of the primary screen are replicated on the monitor connected
to the USB 3.0 HDMI Adapter.
If the monitor connected to the USB 3.0 HDMI Adapter supports a lower resolution than the primary then
the primary graphics device will have its resolution changed automatically to ensure the whole picture fits
the external screen. When the monitor connected to the USB 3.0 HDMI Adapter is of a larger size than
primary screen the image will be letter-boxed to keep the aspect ratio correct.

User Manual English
Optimising the USB 3.0 HDMI Adapter for Video playback
Windows 7 and Vista users may select the option “Optimize for Video”. Please use this option for video
playback only and disable it for desktop use.
(2) Use Windows Display Properties
You can also configure the USB 3.0 HDMI Adapter from the Windows Display Properties dialog box.
To open the Windows Display Properties on Windows 7
a. Right-click on the Desktop.
b. Click Screen Resolution.
To open the Windows Display Properties on Windows Vista
a. Right-click on the Desktop.
b. Click Personalize.
c. Click Display Settings.
To open the Windows Display Properties on Windows XP
a. Right-click on the Desktop.
b. Select Properties.
c. The Display Properties dialog opens, select the Settings tab.
The Display Settings window will then open.
To set the display to Extend Mode using Windows Display properties
a. Select Extend the desktop onto this monitor checkbox.
b. Set the screen resolution using the Resolution slide bar (drop-down box on Windows 7).
c. Select the colour quality from the Colors drop-down list. (Advanced Settings >> Monitor on Windows 7)
d. Arrange its position with respect to the other monitors on the extended desktop in using the drag area.
e. Click Apply then OK to save your changes.
For more detailed mode setting, including the refresh rate, click Advanced Settings, then the Adapter tab,
then on the List all modes button.

User Manual English
To set the display into Mirror Mode
a. Uncheck the Extend the desktop onto this monitor checkbox or select duplicate these displays from the
drop down box (Windows 7)
b. Click Apply.
To make the USB 3.0 HDMI Adapter the Primary Display
a. Select the ‘This is my main monitor checkbox’.
b. Click Apply.
Note:
On some PCs and laptops it is necessary to disable the main display (clear the Extend the desktop onto
this monitor checkbox for the main display) as part of the same settings change. The reason for this is
that many primary graphics card drivers tend to make the laptop screen primary if it is enabled. The only
workaround for this is to disable the laptop screen to allow another screen to be primary.
To do this:
a. Select the ‘This is my main monitor checkbox’ of the USB 3.0 HDMI Adapter
b. Select the primary display.
c. Uncheck the Extend the desktop onto this monitor checkbox.
d. Click Apply.

Benutzerhandbuch Deutsch
Einführung
Wir freuen uns, dass Ihre Wahl auf ein LINDY-Produkt gefallen ist und danken Ihnen für Ihr Vertrauen.
Sie können sich jederzeit auf unsere Produkte und einen guten Service verlassen. Dieser LINDY USB
3.0 HDMI Adapter unterliegt einer 2-Jahres LINDY Herstellergarantie und lebenslangem kostenlosen
technischen Support. Bitte lesen Sie diese Anleitung sorgfältig und bewahren Sie sie auf.
Dieser Adapter erlaubt Ihnen den Anschluss eines Fernsehers, LCDs oder Projektors an Ihren PC oder
ans Notebook über die HDMI-Schnittstelle. Dank der hohen USB 3.0 Übertragungsrate und mit der
DisplayLink Technologie macht er den Einbau einer zusätzlichen Grafikkarte überflüssig.
Dieser zusätzliche Monitor kann im Windows Modus Gespiegelter Desktop, Erweiterter Desktop und sogar
Primärer Desktop konfiguriert werden.
Er kann sowohl als hochauflösender Windows Desktop wie auch für Videowiedergabe mit dem Windows
Media Player oder ähnlicher Software verwendet werden, die Videowiedergabe und Erweiterten Desktop
unterstützt.
Eigenschaften
USB-Verbindung zwischen PC/Notebook und zusätzlichem Monitor via HDMI (DVI Monitore
werden bei Verwendung eines HDMI/DVI Adapters unterstützt).
unterstützt Gespiegelten, Erweiterten und Primären Modus.
SuperSpeed USB 3.0 für höhere Auflösungen & bessere Performance
DisplayLinkTM (DL3.0) Kompression
USB - HDMI Audiounterstützung für die Audioübertragung vom PC zum Monitor/TV
Audioformat: Channel 5.1, LPCM 32, 44.1 & 48KHz, 16bit
Unterstützt hohe Auflösungen bis 1080p@60Hz und 2560x1440@50Hz RGB
24 Bit Farbtiefe
Gibt den Inhalt des PC-Bildschirms (Internet, Musik, Fotos und Video) auf einem Monitor,
Fernseher oder Projektor wieder.
Bis zu 6 Adapter / Monitore können an einem Rechner angeschlossen werden (abhängig von der
Spezifikation des PCs)
unterstützt Standard- (4:3) und Breitbildformat (16:9,16:10)
automatische Displayerkennung durch VESA-kompatible Protokolle
unterstützt folgende Mediaplayer für die Videowiedergabe: Windows Mediaplayer 12, Win DVD8,
Power DVD 7, Real Player 11

Benutzerhandbuch Deutsch
Unterstützte Auflösungen:
Auflösung
Name
Wiederholungsrate
640x480
VGA
60 67 72 75 85
720x480
70 85 88
768x567
50 60
800x600
SVGA
56 60 72 75 85
832x624
75
800x480
60
848x480
60
1024x600
60
1024x768
XGA
60 70 75 85
1152x864
75
1152x870
75
1280x720
720p
50 60
1280x768
WXGA+
60 75 85
1280x800
WXGA
60
1280x960
60 85
1280x1024
SXGA
60 75
1360x768
60
1366x768
WXGA+
50 60
1368x768
60
1400x1050
SXGA+
60 75 85
1440x900
60
1600x900
60
1600x1200
UXGA
60
1680x1050
WSXGA+
60
1920x1080
1080p
50 60
1920x1200
WUXGA
60
2560x1440
WQHD
50
Vor der Installation
Systemanforderungen
DisplayLink-Software kann mit PCs, Netbooks oder Notebooks mit einer Vielzahl von Prozessortypen
verwendet werden einschließlich Atom N270, Einzelkernprozessoren und natürlich den neuesten
Doppelkernprozessoren i3/i5/i7.
Für flüssige Videowiedergabe von bewegten Bildern, besonders in HDTV, wird dem Rechner sehr viel
Rechenleistung abverlangt; weniger leistungsfähige Prozessoren können nicht alle Bilder zeigen und zum
Ruckeln der Videos führen. DisplayLink-Software kann mit folgenden Windows-Betriebssystemen
verwendet werden:
Windows 7 (32/64bit)
Windows Vista mit Service Pack 1 oder 2 (32/64bit)
Windows XP Home/Professional (inkl. Tablet PC Edition) SP 2 or 3
Windows Server 2003, 2008 and 2008 R2

Benutzerhandbuch Deutsch
Die aktuellsten DisplayLink Treiber finden Sie auf www.displaylink.com
Empfohlene Hardware:
Windows Leistungsindex: mindestens Note 3 (Microsoft-Empfehlung)
Windows Treiberupdate
Ein freier USB 3.0 Port
30 MB freier Platz auf der Festplatte
Monitor für den USB 3.0 HDMI Adapter
Netzwerkzugang für Softwaredownloads bzw. CD-Laufwerk
Installation
Sie müssen die Treiber von der beiliegenden CD installieren bevor Sie den Adapter anschließen!
1. Anwender ohne CD/DVD Laufwerk können die Treiber und Handbücher von der LINDY Webseite
herunter laden.
2. Windows Anwender legen die Installations-CD in das Laufwerk, öffnen den Ordner DRIVER und
starten das Programm SETUP.EXE. Dies installiert die DisplayLink® Chipset-Treiber, die zum Betrieb
des Adapters benötigt werden, auf Ihrem Rechner. Folgen Sie den Bildschirmanweisungen und
erlauben Sie, dass die aktuellsten Treiber stets automatisch heruntergeladen und installiert werden,
sie befinden sich aktuell noch im Stadium der deutlichen Verbesserung. Während des
Installationsvorganges kann Ihr Monitor mehrmals kurz dunkel werden und die Auflösung ändern. Der
weitgehend automatisch ablaufende Installationsprozess sollte nach einigen Minuten beendet sein.
Nachdem die Installation beendet ist müssen Sie eventuell den Rechner neu starten.
3. Nach Abschluss dieses Prozesses können Sie den Adapter anschließen:
4. Schalten Sie Ihren zusätzlichen HDMI Monitor oder Ihr TV ein und schließen Sie ihn an die HDMI
Buchse des Adapters an.
5. Schließen Sie das beiliegende USB Kabel an Ihren Rechner an und den Micro-B Stecker am USB
Adapter.
6. Der Rechner sollte nun den Adapter erkennen und die Treiberinstallation für diesen Anschluss
fortsetzen, wenn er zum ersten Mal an dieser Buchse angeschlossen wurde.

Benutzerhandbuch Deutsch
Display Dienstprogramm / Taskleisten Icon
Nachdem die Treiber korrekt installiert worden sind
erscheint in der Taskleiste unten rechts ein neues
Icon, welches einen weiteren Monitor symbolisiert.
Durch Anklicken mit der rechten oder linken Maustaste dieses Icons öffnet sich der Konfigurationsdialog
für die Monitoreinstellungen. Alternativ können die Monitoreinstellungen auch über den traditionellen
Windows-Weg: rechtsklick auf den Desktop > Eigenschaften > Einstellungen geändert werden.
Wie bei jedem zusätzlichen Monitor unter Windows kann auch hier der Monitor sowohl als primärer wie
als erweiterter oder gespiegelter Desktop konfiguriert werden. Je nach Einstellung, Betriebssystem und
Monitoreigenschaften können Sie die Auflösung und die Drehung einstellen.
Abhängig vom Betriebssystem variieren diese Optionen und sind leicht unterschiedlich.
Unter Windows 7 und Vista können Sie die Option „Optimierung für Videowiedergabe“ wählen. Verwenden
Sie diese Option ausschließlich zur Wiedergabe bewegter Bilder.
Die DisplayLink Treiber arbeiten eng mit den Treibern der primären Grafikkarte und dem Betriebssystem
zusammen. Mit verschiedenen Grafikkarten kann es zu Kompatibilitätsproblemen kommen. Beim
Auftreten solcher Probleme gehen Sie wie folgt vor:
1. Installieren Sie die aktuellsten Treiber der Grafikkarte von der Herstellerseite
2. Aktualisieren Sie die DisplayLink Treiber / Software
Weitergehende detaillierte Informationen für die verschiedenen Betriebssysteme sowie eine Vielfalt von
Fragen und Antworten (FAQs) finden Sie auf den Supportseiten des Chipsetherstellers
www.displaylink.com.

Manuel Utilisateur Français
Introduction
Nous sommes heureux que votre choix se soit porté sur un produit LINDY et vous remercions de votre
confiance. Vous pouvez compter à tout moment sur la qualité de nos produits et de notre service. Cet
adaptateur LINDY USB 3.0 HDMI soumis à une durée de garantie LINDY de 2 année(s) et d’une
assistance technique gratuite à vie. Merci de lire attentivement ces instructions et de les conserver pour
future référence.
L’adaptateur USB vers HDMI vous permet de connecter une TV HDMI, LCD ou projecteur à votre PC ou
ordinateur portable. Grâce à la technologie SuperSpeed USB 3.0 et DisplayLink, il n’y a plus besoin
d’ajouter une carte graphique à votre ordinateur !
Cet écran additionnel peut être utilisé en mode bureau étendu ou en mode miroir sous Windows. Il peut
aussi être configuré comme écran primaire
Il peut être utilisé pour des vidéos via Windows Media Player ou tout autre logiciel de lecture supportant
la vidéo sur un écran étendu.
Caractéristiques
Connexion USB entre un PC/notebook vers un écran additionnel via une prise HDMI (écrans DVI
supportés via un adaptateur HDMI/DVI).
Supporte les modes miroir, étendu et primaire.
SuperSpeed USB 3.0 délivre une video haute résolution et des performances graphiques 3D
Nouvelle génération de la technologie de compression DisplayLinkTM (DL3.0)
Transfère également le son, de l’USB vers HDMI
Audio supportés: stéréo, 5.1 multi-canal, LPCM 16bits, 32/44.1/48KHz
Supporte des résolutions jusqu’à 1080p@60Hz et 2560x1440@50Hz RGB
Profondeur de couleurs : 24 bits
Affiche le contenu de votre PC (Internet, musique, photo, et vidéo) vers un écran, TV ou
projecteur.
Ajoute jusqu’à 6 écrans par PC (dépendant de la puissance du PC)
Supporte les écrans standard (4:3) et wide (16:9,16:10)
Détection automatique de l’écran en utilisant des protocoles VESA
Supporte les lecteurs video : Windows media player 12, Win DVD8, Power DVD 7, Real Player
11

Manuel Utilisateur Français
Tableau des résolutions supportées
Résolution
Nom
Taux de rafraichissement (Hz)
640x480
VGA
60 67 72 75 85
720x480
70 85 88
768x567
50 60
800x600
SVGA
56 60 72 75 85
832x624
75
800x480
60
848x480
60
1024x600
60
1024x768
XGA
60 70 75 85
1152x864
75
1152x870
75
1280x720
720p
50 60
1280x768
WXGA+
60 75 85
1280x800
WXGA
60
1280x960
60 85
1280x1024
SXGA
60 75
1360x768
60
1366x768
WXGA+
50 60
1368x768
60
1400x1050
SXGA+
60 75 85
1440x900
60
1600x900
60
1600x1200
UXGA
60
1680x1050
WSXGA+
60
1920x1080
1080p
50 60
1920x1200
WUXGA
60
2560x1440
WQHD
50
Avant l´installation
Vérifiez les recommandations PC: le logiciel DisplayLink peut être utilisé sur des PCs, ordinateurs
portables, avec une large gamme de processseurs, y compris Atom N270, les PC avec processeur
monocore, et les derniers Dual Core i3/i5/i7.
Les performances du logiciel dépendent de la puissance de votre ordinateur, ainsi que votre utilisation
(vidéo ou bureautique). Le logiciel DisplayLink fonctionne sous ces systèmes d’exploitation
Windows:
Windows 7 (32 bits ou 64 bits)
Windows Vista SP 1 ou 2 (32 bits ou 64 bits)
Windows XP Home/Professionnel (y compris la version pour Tablette) SP 2 ou 3
Windows Server 2003, 2008 et 2008 R2
Les utilisateurs Windows trouveront les derniers pilotes DisplayLink sur www.displaylink.com.

Manuel Utilisateur Français
Le matériel PC recommandé est:
La note de performance Windows minimum doit être de 3, comme recommandé par Microsoft.
Mettre à jour les pilotes via Windows update.
Au moins un port USB 3.0 libre.
30 Mo d’espace disque libre.
Ecran à utiliser avec l’adaptateur USB 3.0 HDMI
Accès réseau pour le téléchargement du logiciel ou accès à un lecteur CD-ROM.
Installation du logiciel
Installez d’abord le logiciel et ne connectez PAS l’adaptateur USB 3.0 HDMI à votre PC avant que
l’installation ne soit finie !
a. Insérez le CD fourni dans le lecteur et lancez E: \SETUP.EXE (ici, E:\ est votre lecteur CD ROM)
b. Windows affichera “DisplayLink Software” ci-dessous, cliquez “I accept” pour démarrer l’installation.
Le programme installera les pilotes et le logiciel.

Manuel Utilisateur Français
Note:
L’affichage de l’écran peut clignoter ou devenir noir pendant l’installation; aucun message ne sera
affiché lors de la fin de l’ installation.
Installation matérielle
a. Connectez votre adaptateur USB 3.0 HDMI via le câble USB à votre PC. Vous verrez le message
suivant :
b. Lors de la connexion de l’adaptateur USB 3.0 HDMI, votre système initialisera le pilote et le logiciel
(l’affichage de l’écran DisplayLink peut clignoter ou devenir noir pendant l’initialisation).
Note: sur certaines machines vous devrez redémarrer avant d’utiliser l’adaptateur USB 3.0 HDMI.
c. Une fois l’installation terminée, connectez l’écran à l’adaptateur USB 3.0 HDMI.
Contrôlez l´affichage
Il existe 2 manières de contrôler l’écran:
(1) Utiliser le menu DisplayLink Manager
(2) Utiliser les propriétés Windows Display Properties
(1) Pour utiliser le menu DisplayLink Manager
Si les appareils sont connectés, un icône apparaît dans la barre des tâches. Cela vous donne l’accès au
menu DisplayLink.

Manuel Utilisateur Français
a. Depuis la barre des tâches, cliquez sur la flèche “afficher les icônes
cachés” pour afficher les icônes disponibles.
b. Cliquez sur l’icône DisplayLink (cerclé en rouge).
c. Un menu apparaîtra avec différentes options, elles sont décrites sur les
pages suivantes.
Paramétrer l’écran en mode bureau étendu
Dans le mode bureau étendu, l’écran connecté à l’adaptateur USB 3.0 HDMI fait partie du bureau
Windows.
Pour plus d’options, utilisez le sous-menu “Extend To” et sélectionnez une des options. Cela met
l’adaptateur en mode étendu et e place à droite/gauche/au-dessus/en dessous de l’écran primaire.

Manuel Utilisateur Français
Paramétrer l’écran en mode miroir
En mode miroir, l’écran connecté à l’adaptateur USB 3.0 HDMI dupliquera l’image de l’écran primaire.
La résolution, la profondeur de couleur et le taux de rafraîchissement de l’écran primaire seront répliqués
sur l’écran connecté à l’adaptateur USB 3.0 HDMI.
Si l’écran connecté à l’adaptateur USB 3.0 HDMI supporte une plus basse résolution que le primaire,
alors l’écran primaire va modifier automatiquement sa résolution pour faire en sorte que l’image soit
parfaitement affichée sur l’écran externe.
Si l’écran connecté à l’adaptateur USB 3.0 HDMI a une résolution supérieure à l’écran primaire, l’image
sera alors sous dimensionnée sur l’écran externe (la taille de l’image sera réduite sur l’écran externe, en
hauteur et en largeur).
Optimiser l’adaptateur USB 3.0 HDMI pour la lecture de vidéo
Les utilisateurs de Windows 7 et Vista peuvent sélectionner l’option “Optimize for Video”. Merci d’utiliser
cette option uniquement pour la lecture de video et désactivez-la pour une utilisation bureautique.
(2) Utiliser les propriétés de l’affichage Windows
Vous pouvez aussi configurer l’adaptateur USB 3.0 HDMI depuis la boîte de dialogue de l’affichage
Windows.
Pour ouvrir les propriétés d’affichage Windows sur Windows 7
a. Clic droit sur le bureau.
b. Clic Résolution d’écran.
Pour ouvrir les propriétés d’affichage sur Windows Vista
a. Clic droit sur le bureau
b. Cliquez Personnaliser.
c. Cliquez Paramètres d’affichage
Table of contents
Languages:
Other Lindy Adapter manuals

Lindy
Lindy Ethernet Powerline Adaptor 25131 User manual

Lindy
Lindy 42711 User manual

Lindy
Lindy 70928 User manual

Lindy
Lindy TosLink User manual

Lindy
Lindy 43233 User manual

Lindy
Lindy SATA 51024 User manual

Lindy
Lindy 43232 User manual

Lindy
Lindy 42713 User manual

Lindy
Lindy 42699 User manual

Lindy
Lindy 42960 User manual

Lindy
Lindy 43174 User manual

Lindy
Lindy 52213 User manual

Lindy
Lindy 32115 User manual

Lindy
Lindy 41027 User manual

Lindy
Lindy 43164 User manual

Lindy
Lindy 43123 User manual

Lindy
Lindy USB 2.0 SATA & IDE Adapter 42868v0 User manual

Lindy
Lindy 25145 User manual

Lindy
Lindy 41038 User manual

Lindy
Lindy 42856 User manual