Lindy 42890 User manual

© LINDY ELECTRONICS LIMITED & LINDY-ELEKTRONIK GMBH - FIRST EDITION (MAY 2008)
USB 2.0 over IP Server
User Manual English
Benutzerhandbuch Deutsch
Manuel Utilisateur Français
Manuale d’uso Italiano
LINDY No. 42890
www.lindy.com


User Manual English
3
Introduction
Thank you for purchasing the LINDY USB 2.0 over IP Server! The USB IP Server enables you
to share your USB Printer or Storage Device with other users on your network.
Package Contents
LINDY USB 2.0 over IP Server
CD with drivers, software and manual
External Power Supply (5V DC, 1.2A)
This User Manual
Features
Compatible with USB enabled Printers and Storage Devices
Supports USB 2.0 high speed – backwards compatible with USB 1.1
Supports 10/100Base-TX networks
Supported Ethernet protocols: TCP/IP, WSD, UPnP
LED indicator for Power & Link connection
Compatible with Windows 2000, XP and Vista

User Manual English
4
Installation
Hardware
1. Connect the LINDY USB IP Server to your LAN Switch or Router, using a standard
patch cable.
2. Connect your USB Printer or Storage Device to the USB port on the LINDY USB IP
Server.
3. Attach the Power adapter to the mains power supply and the LINDY USB IP Server.
Software
You will need to install different software depending on whether you are using the USB Printer
or USB Storage feature of the USB 2.0 IP Server, please complete the following instructions
accordingly:
USB Printer
1. Move the USB Connection switch to the On position
2. Insert the supplied driver CD and navigate to Utility Driver >> Printer
3. Double click on the BonjourSetup.exe icon to begin the installation
4. Click Next to begin the installation
5. You will then be presented with the License Agreement for the software, please read
them, choose whether to accept and then click Next to continue
6. Click Next to continue, once you have read the Information about the application The
Window shown at the bottom of this page will appear, check/uncheck the boxes as
required and click Install to begin the installation

User Manual English
5
7. Click Finish to complete the installation
8. Open the Bonjour Printer Wizard, by double clicking on the icon on your desktop or by
navigating to Start >> All Programs >> Bonjour
9. Click Next to begin the Wizard
10. You will then see the printer you have connected to the USB 2.0 IP Server as shown in
the image below, using the Epson Stylus C41 as an example. Highlight your printer and
click Next to continue
11. The wizard will then prompt you to install the driver for the printer;
a. If you have already installed the printer on the computer you are using, the printer
should appear in the list (as shown below). Highlight your printer and click next to
continue. (Skip to point 14)
b. If you have not previously installed the driver please click on Have Disk
12. Insert the driver disk that came with your printer, and navigate to the appropriate driver,
then click Open
13. Bonjour will then show you the printer you have selected, click Next to confirm and
begin the installation
14. Once the installation has completed you can view the printer by navigating to Start >>
Control Panel >> Printers and Faxes

User Manual English
6
15. You may now use the printer as normal; simply select the printer from the Print menu in
the application you are using
USB Storage
The application used to access your USB Storage Device can be installed on multiple
computers across your network, however only one computer may connect to the Storage
Device at any given time.
1. Move the USB Connection switch to the On position
2. Insert the supplied driver CD and navigate to Utility Driver >> Storage
3. Open the folder for the Operating System you are using
4. Double click on the RallyStorage.exe icon to begin the installation
5. Choose your preferred language from the drop down menu and click OK to begin the
installation
6. Click Finish to complete the installation
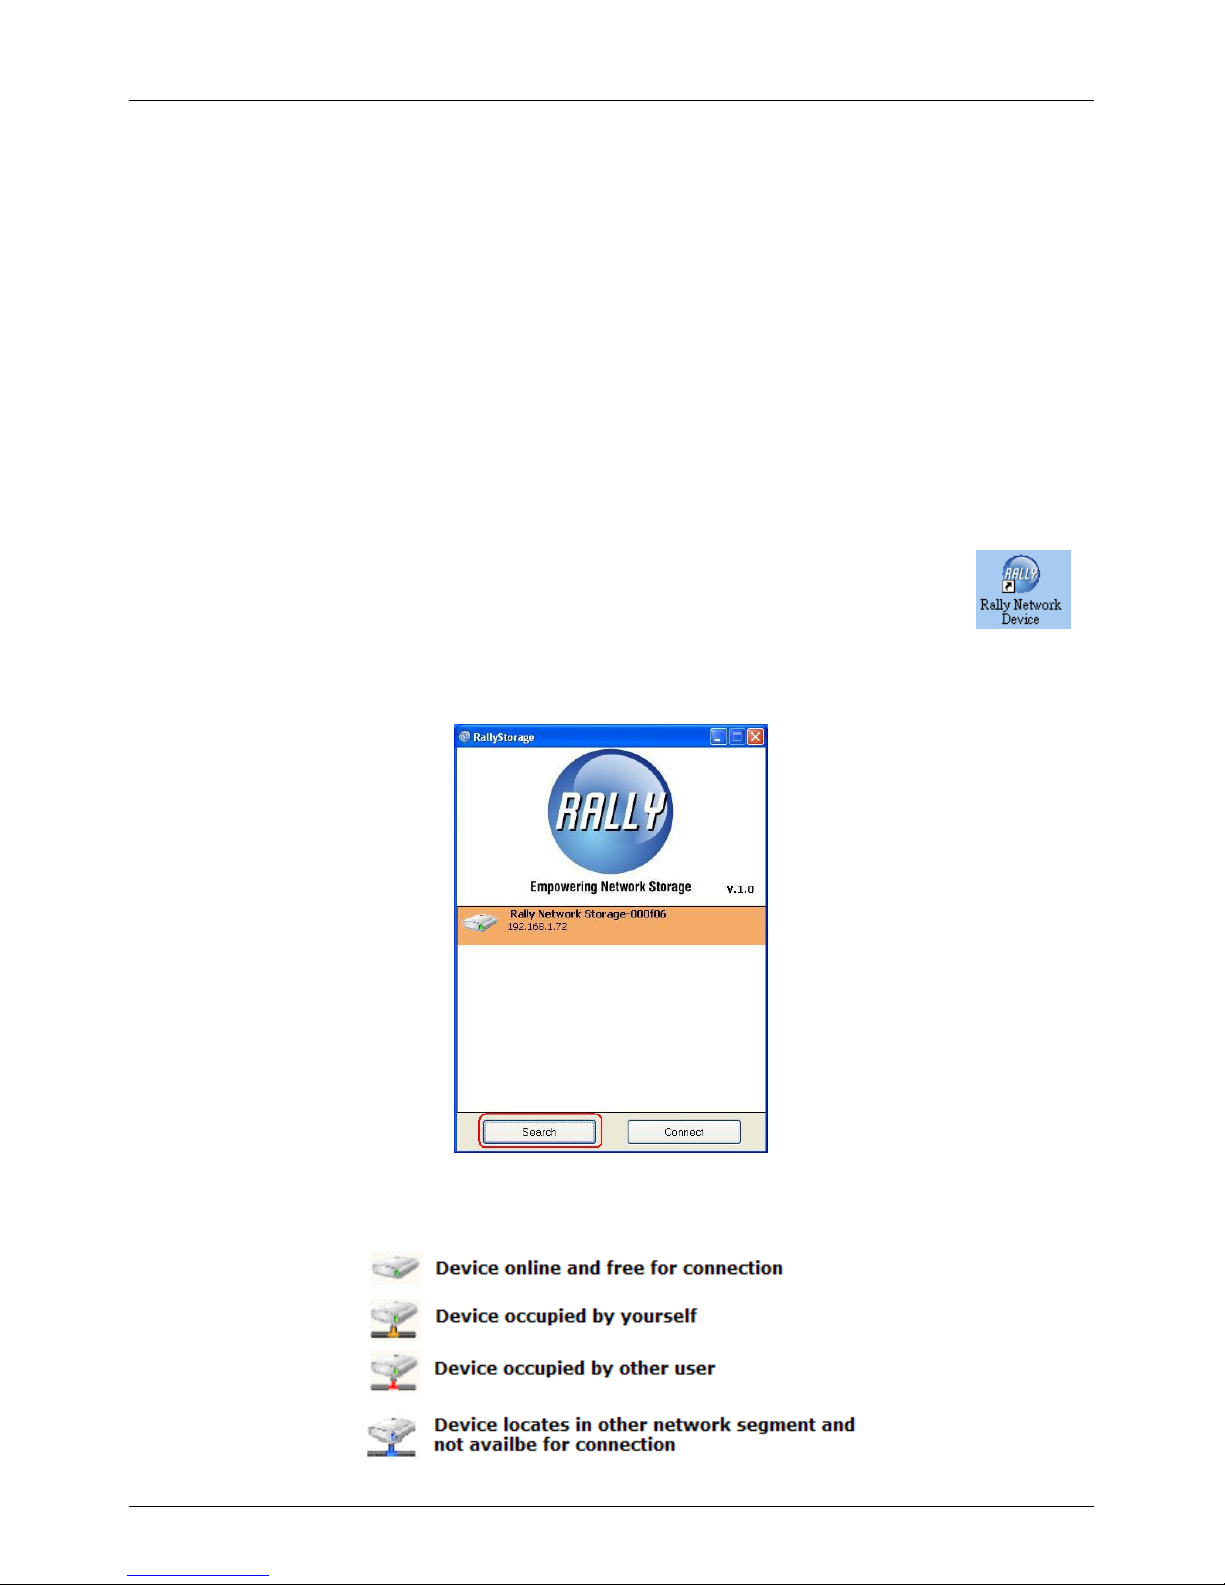
7. A shortcut for Rally Network Device will have been added to your desktop,
double click it to start the start the application
8. The New Hardware Found wizard will start, choose to Automatically
Detect Drivers and allow the installation to complete
9. Once Windows has completed the installation of the driver the Rally Storage Application
will open, click Search to begin searching for your connected Storage Device
10. When the search is complete your Storage Device will be displayed, along with one of
the following icons:

User Manual English
7
11. Before you can start using your Storage Device over the network, you must first connect
to it. To connect you can either double click on your Storage Device in the Rally Storage
Application, highlight your Storage Device and click Connect or right mouse click on the
Storage Device and choose Connect
12. Once you have connected to your Storage Device it will appear in My Computer as a
normal local drive
13. Now that you have successfully connected to the drive you may start using it as a
normal drive and can then select the minimise option within the Rally Storage
Application, which will move the utility to the system tray
14. If you need to disconnect from your Storage Device you can double click on your
Storage Device in the Rally Storage Application, highlight your Storage Device and click
Disconnect or right mouse click on the Storage Device and choose Disconnect

User Manual English
8
USB Storage Advanced Features
By using the Web Control utility it is possible to manage the USB 2.0 over IP Server, change its
settings and protect it with a password.
Start by right clicking on the Storage Device in the Rally Storage Application and select view
device web page. The Server page will load by default and you will see the following screen
which displays information for your device
By default the password is blank, and so it is recommended that for your security you enter a
password before you start using the NAS device. Click on the Password Change link and you
will see the following screen
Leave the Current Password field blank and enter your new password in both the New
Password and Confirm Password boxes. Click Submit to save your new password

User Manual English
9
By clicking on the Network Configuration link you can change the IP address and name of the
device and switch DHCP on or off. If you have changed your password from the default blank
password you will need to enter it when prompted, before your changes will be saved
If you need to reset your device from your computer, simply click on the Server Reset link and
then enter your password, before clicking Reset Server
If you need to return your device to its original settings you can click the Factory Default link
and enter your password, before clicking Reset Server
From time to time new firmware may be made available, to improve performance of your device.
You will need to download the firmware from www.lindy.com before starting this procedure and
it is also recommended that you exit any other applications running on your computer
Click the Firmware Update link and you will see the screen below. Enter your password and
click on the Browse button to navigate to the location that you have saved the firmware to and
click OK

User Manual English
10
Click Submit and the update procedure will start. It is extremely important that you do not
attempt to use the device until the upgrade has completed as any interruption to the update
process could cause damage to your device and stop it from working
Trouble Shooting
Q. When I search for the Storage Device it cannot be found
A. Check that the USB Switch is set to on
Q. I can find the Storage Device but I cannot connect to it
A. It is possible that the NAS device is attached to a different network segment of your
computer. Access the NAS device's control page by right clicking on the NAS device in the
Rally software and choose view device web page. Once in the Web Control utility click the
Network Configuration link. You will then see the screen below, enter the new IP address
(for the network segment that your computer is located in) and click submit to save your
changes

Benutzerhandbuch Deutsch
11
Einführung
Vielen Dank für den Kauf des LINDY USB 2.0 over IP Servers. Der USB IP Server ermöglicht
Ihnen die Nutzung eines USB Druckers oder USB Speichermediums im Netzwerk.
Lieferumfang
LINDY USB 2.0 over IP Server
CD mit Treibern, Software und Handbuch
Netzteil (5V DC, 1.2A)
Dieses Handbuch
Eigenschaften
Kompatibel mit USB Druckern und USB Speichermedien
USB 2.0 High Speed – abwärts kompatibel mit USB 1.1
unterstützt 10/100Base-TX Netzwerke
unterstützte Ethernetprotokolle: TCP/IP, WSD, UPnP
LED-Anzeige
Kompatibel mit Windows 2000, XP and Vista

Benutzerhandbuch Deutsch
12
Installation
Hardware
1. Verbinden Sie den LINDY USB IP Server mit dem Switch oder Router Ihres lokalen
Netzwerks. Nehmen Sie dazu ein Standard-Patchkabel.
2. Schließen Sie den USB Drucker bzw. das Speichermedium am USB Port des LINDY
USB IP Servers an.
3. Zuletzt schließen Sie das Netzteil an.
Software
Je nachdem ob Sie den USB IP Server mit einem Drucker oder einem Speichermedium
verwenden wollen, müssen Sie unterschiedliche Software installieren.
USB Drucker
1. Schieben Sie den Schalter USB connection am USB over IP Server auf On.
2. Legen Sie die beiliegende CD ein und wählen Sie unter Utility Driver “Printer” aus
3. Mit einem Doppelklick auf BonjourSetup.exe starten Sie die Installation.
4. Klicken Sie auf Weiter.
5. Wenn Sie die Lizenzvereinbarung akzeptiert haben, erhalten Sie Informationen über die
Anwendung.
6. Anschließend wählen Sie noch aus den vorgeschlagenen Optionen für die Installation
aus und klicken auf Installieren
7. Mit Fertigstellen beenden Sie die Installation.
8. Öffnen Sie den Druckerassistenten durch Doppelklick auf das Symbol, dann klicken Sie
auf Weiter.
9. Wählen Sie nun den gewüschten Drucker aus und klicken Sie auf Weiter.
Wenn Sie den Druckertreiber bereits auf dem Computer, den Sie benutzen, installiert
haben, erscheint dieser in einer Liste. Markieren Sie diesen und klicken Sie auf Weiter.
Wenn der Druckertreiber noch nicht auf Ihrem Computer installiert wurde, legen Sie bitte
die Treiber-CD Ihres Druckers ein und installieren den entsprechenden Treiber.
10.Nach erfolgter Installation können Sie den Drucker nun finden unter Start >>
Systemsteuerung >> Drucker und Faxgeräte.
11.Nun können Sie den Drucker verwenden.

Benutzerhandbuch Deutsch
13
USB Speichermedium
Die Anwendung für das USB Speichermedium kann auf mehreren Computern im Netz installiert
werden, jedoch kann jeweils nur ein Computer auf das Speichermedium zugreifen.
1. Schieben Sie den Schalter USB Connection am USB over IP Server auf On.
2. Legen Sie die beiliegende CD ein und wählen Sie unter Utility Driver “Storage” aus.
3. Öffnen Sie den Ordner mit dem Betriebssystem das Sie verwenden.
4. Mit einem Doppelklick auf RallyStorage.exe starten Sie die Installation.
5. Wählen Sie die gewünschte Sprache aus.
6. Klicken Sie nach erfolgter Installation auf Fertigstellen.
7. Ein Icon des Rally Storage Devices erscheint auf Ihrem Desktop, mit einem Doppelklick
starten Sie die Anwendung.
8. Der Hardwareassistent sucht automatisch nach Treibern, dann beenden Sie die
Installation.
9. Nach erfolgter Treiberinstallation öffnet sich die Rally Storage Anwendung. Suchen Sie
dann nach ihrem angeschlossenen Speichermedium.
10. Ihr Speichermedium wird dann mit einem der folgenden Icons angezeigt:

Benutzerhandbuch Deutsch
14
USB Storage – erweiterte Funktionen
Mit Hilfe der Web Control Utility können die Einstellungen des USB 2.0 over IP Servers
geändert sowie ein Passwort vergeben werden.
Klicken Sie in der Rally Storage-Anwendung mit der rechten Maustaste auf das
Speichermedium und wählen Sie View device web page aus. Die Serverseite wird automatisch
geladen und Sie sehen folgende Informationen über Ihr Device:
Aus Sicherheitsgründen empfehlen wir Ihnen ein Passwort einzugeben, bevor Sie das NAS-
Device verwenden. Klicken Sie auf Password Change, es erscheint folgendes Fenster:
Unter Current Password tragen Sie nichts ein. Geben Sie nur bei New Password und
Confirm Password ein neues Passwort ein. Sichern Sie das Passwort mit Submit.

Benutzerhandbuch Deutsch
15
Über den Link Network Configuration können Sie die IP Adresse und den Namen des Devices
ändern sowie DHCP ein- oder ausschalten. Wenn Sie ein neues Passwort eingegeben haben
müssen Sie dies nun erneut eingeben, damit Ihre Änderungen gespeichert werden.
Wenn Sie ein Reset durchführen müssen, klicken Sie auf den Link Server Reset, geben Ihr
Passwort ein und klicken dann auf Reset Server.
Wenn Sie Ihr Device auf die ursprünglichen Einstellungen zurücksetzen wollen, klicken Sie auf
den Link Factory Default, geben Ihr Passwort ein und klicken dann auf Reset Server.
Gelegentlich wird neue Firmware zur Verfügung gestellt um die Performance Ihres Devices zu
erhöhen. Diese kann von www.lindy.com heruntergeladen werden. Schließen Sie dazu bitte alle
anderen Anwendungen auf Ihrem Computer.

Benutzerhandbuch Deutsch
16
Klicken Sie auf den Link Firmware Update, geben Sie Ihr Passwort ein und suchen Sie über
Browse den Speicherplatz der Firmware. Bestätigen Sie mit OK.
Klicken Sie auf Submit und das Update wird gestartet. Beachten Sie bitte unbedingt, dass Sie
ihr Device erst wieder benutzen wenn das Update beendet wurde. Jede Unterbrechung des
Updates könnte Ihr Speichermedium beschädigen.
Fehlerbehebung
•Wenn das Speichermedium nicht zu finden ist
Überprüfen Sie ob der USB Connection-Schalter auf On steht
•Wenn keine Verbindung zum Speichermedium hergestellt werden kann
Möglicherweise ist das NAS Device mit einem anderen Netzwerksegment Ihres
Computers verbunden. Klicken Sie mit der rechten Maustaste auf das NAS Device in der
Rally-Software und wählen Sie View device web page. In der Web Control Utility klicken
Sie auf den Link Network Configuration, sie sehen dann das Fenster unten. Geben Sie
die neue IP-Adresse ein (für das Netzwerksegment in dem Ihr Computer sich befindet)
und klicken Sie auf Submit um die Änderungen zu speichern.

Manuel Utilisateur Français
17
Introduction
Merci d’avoir choisi l’extender LINDY USB 2.0 sur IP! Ce serveur USB IP vous permet de
partager votre imprimante USB ou système de stockage avec d’autres utilisateurs de votre
réseau.
Contenu du package
Serveur LINDY USB 2.0 over IP
CD avec pilotes, logiciel et manuel
Alimentation externe (5V DC, 1.2A)
Ce manuel utilisateur
Caractéristiques
Compatible avec les imprimantes et les périphériques de stockage USB
Supporte USB 2.0 high speed – compatible USB 1.1
Supporte les réseaux 10/100Base-TX
Protocoles ethernet supportés: TCP/IP, WSD, UPnP
Indicateurs LED pour l’alimentation et la connexion du lien
Compatible Windows 2000, XP et Vista

Manuel Utilisateur Français
18
Installation
Matériel / hardware
1. Connectez le serveur LINDY USB IP sur votre switch réseau ou routeur, en utilisant un
câble réseau standard.
2. Connectez l’imprimante ou le système de stockage USB au port USB du serveur LINDY
USB IP.
3. Connectez ensuite l’alimentation sur le serveur LINDY USB IP.
Logiciel
Vous devrez installer différents logiciels, dépendants de quel matériel USB vous utilisez
(imprimante USB ou système de stockage USB):
Imprimante USB
1. Mettez le switch “USB Connection” en position On
2. Insérez le CD de pilotes fourni et choisissez: Utility Driver >> Printer
3. Double cliquez sur l’icône BonjourSetup.exe pour démarrer l’installation
4. Cliquez Next
5. Vous serez dirigé vers l’accord de licence, merci de le lire, choisissez ensuite de
l’accepter et cliquez sur Next pour continuer
6. Cliquez Next pour continuer, la fenêtre ci-dessous apparaîtra, cochez/décochez les
options et cliquez sur Install
7. Cliquez sur Finish pour terminer l’installation
8. Démarrez le logiciel Bonjour Printer Wizard, en double cliquant sur l’icône de votre
bureau ou en faisant Démarrer >> Tous les programmes >> Bonjour
9. Cliquez Next pour lancer le Wizard

Manuel Utilisateur Français
19
10. Vous verrez ensuite que l’imprimante que vous avec connectée sur le serveur USB 2.0
IP Server ci-dessous, en utilisant Epson Stylus C41 comme un exemple. Mettez votre
imprimante en surbrillance et cliquez Next pour continuer
11. Le wizard s’affichera ensuite et installer le pilote pour l’imprimante;
a. Si vous avez déjà installé l’imprimante sur l’ordinateur que vous utilisez,
l’imprimante devrait apparaître dans la liste (voir ci-dessous). Mettez en surbrillance
votre imprimante et cliquez sur next pour continuer. (passez au point 14)
b. Si vous n’avez pas installé le pilote, cliquez alors sur Disque fourni
12. Insérez le cd du pilote de votre imprimante, choisissez le pilote approprié, puis cliquez
Open
13. Bonjour affichera ensuite l’imprimante que vous avez sélectionnée, cliquez sur Next
pour confirmer et lancer l’installation
14. Une fois que l’installation est complète, vous pouvez voir l’imprimante en faisant
Démarrer >> Panneau de configuration >> Imprimantes et télécopieurs
15. Vous pouvez maintenant utiliser l’imprimante comme d’habitude; sélectionnez
simplement l’imprimante depuis le menu d’impression (Print) dans l’application que vous
utilisez

Manuel Utilisateur Français
20
Stockage USB / USB Storage
L’application utilisée pour accéder à votre périphérique de stockage USB peut être installée sur
plusieurs ordinateurs de votre réseau, cependant un seul ordinateur à la fois peut se connecter
au périphérique de stockage.
1. Mettez le switch “USB Connection” en position On
2. Insérez le CD pilote fourni et faites Utility Driver >> Storage
3. Ouvrez le répertoire du système d’exploitation que vous utilisez
4. Double cliquez sur l’icône RallyStorage.exe pour lancer l’installation
5. Choisissez votre langue dans le menu et cliquez OK pour lancer
l’installation
6. Cliquez Finish pour terminer l’installation
7. Un raccourci pour Rally Network Device sera ajouté sur votre bureau,
double cliquez dessus pour démarrer l’application
8. Le wizard Nouveau matériel détecté se lancera, choisissez Détectez
automatiquement les pilotes pour permettre la finalisation de l’installation
9.
Une fois que Windows a terminé l’installation du pilote, le logiciel “Rally Storage
Application” s’ouvrira, cliquez Search pour lancer une recherche de périphériques de
stockage
10. Lorsque la recherche est terminée, votre périphérique de stockage sera affiché, suivant
ces icônes:
Table of contents
Languages:
Other Lindy Network Hardware manuals