7
DO9248J
www.domo-elektro.be
NL
GEBRUIK
MONTAGE
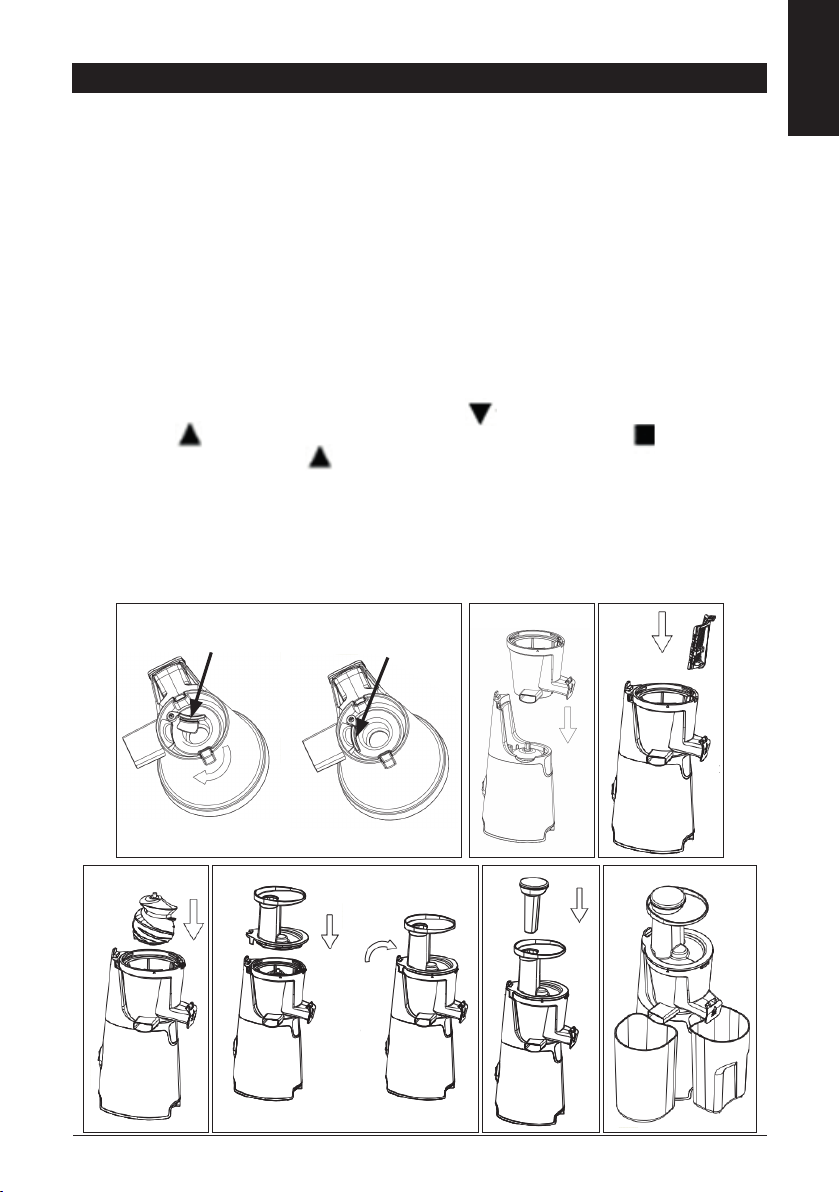
1. Zorg ervoor dat de stekker niet in het stopcontact zit en dat de aan-uitschakelaar uit staat vooraleer
het toestel te monteren.
2. Zet het motorblok op een stabiel, een oppervlak.
3. Draai de kom ondersteboven, aan de pulpuitlaat zie je een rubberen plaatje. Zorg dat het
buerplaatje onderaan de kom goed op zijn plaats zit in de pulpuitlaat.
4. Zet de kom op het motorblok. Zorg ervoor dat de kom goed rond de as van het motorblok zit en dat
de pulpuitlaat op de juiste plaats zit.
5. Plaats de gewenste zeef in de kom (de zeef met kleine gaatjes voor sap, de zeef met grotere gaatjes
voor jam/contuur of de zeef voor bevroren bereidingen, d.w.z. voor diepgevroren bananen en/of
bosbessen die vooraf voldoende zijn ontdooid om er met een vork in te kunnen prikken).
6. Duw de persschroef vast in het midden van de kom, zorg ervoor dat ze goed op haar plaats vastzit,
want anders zal het deksel niet sluiten.
7. Plaats het deksel op de kom en zorg dat het symbool “ ” op het deksel gelijk staat met het
symbool “ ” op de kom en draai het deksel dan in wijzerzin tot het symbool “ ” op het deksel
gelijk staat met het symbool “ ” op de kom. Druk dan de klem naar boven, zodat het deksel
vergrendeld wordt. Het deksel moet juist gemonteerd worden, want anders zal het apparaat niet
werken.
8. Steek ten slotte de voedselduwer in de vultrechter van het deksel.
9. Zet een maatbeker onder de sapuitlaat en een maatbeker onder de pulpuitlaat.
10. Open het sapuitlaatklepje. Het toestel is nu klaar voor gebruik.
11. Herhaal deze stappen in omgekeerde volgorde als je het apparaat opnieuw uit elkaar haalt.
3
6
4) Do not put overmuch materials in the juicer each time, therefore, the materials
with less moisture and hard fibre shall be put into the jar lid after being cut into
slices.
5) Do not put overmuch materials in the juicer each time, therefore, the materials
with less moisture and hard fibre shall be put into the jar lid after being cut into
slices.
6) Assemble the buffer plate well in position
The buffer plate shall be assembled well in the residue outlet after finish cleaning each
time.
ASSEMBLE YOUR SLOW JUICER
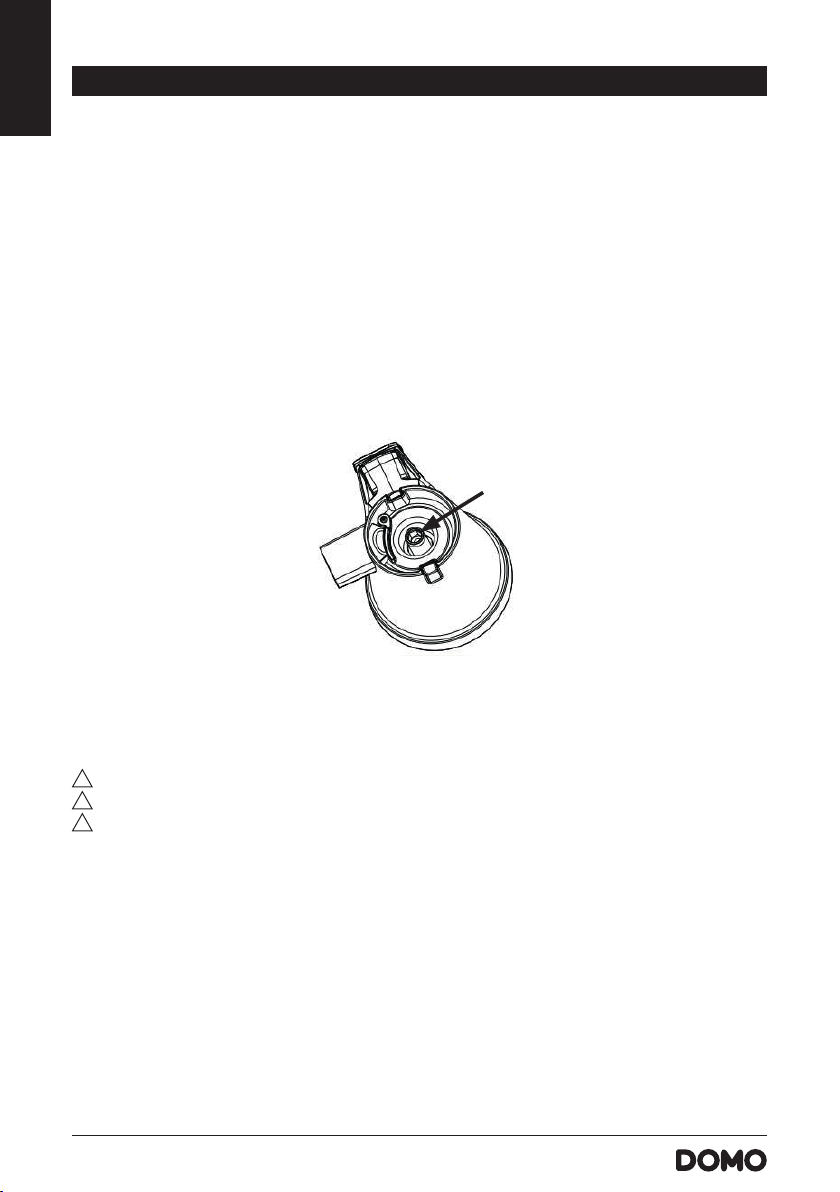
1. Put the jar downwards and make sure that the residue outlet shall be placed well in
position. The jar shall be assembled well in position properly otherwise the appliance will
not operate. Besides, before operating, please check the buffer plate and make sure that it
must be assembled well in the residue outlet (See Fig.2).
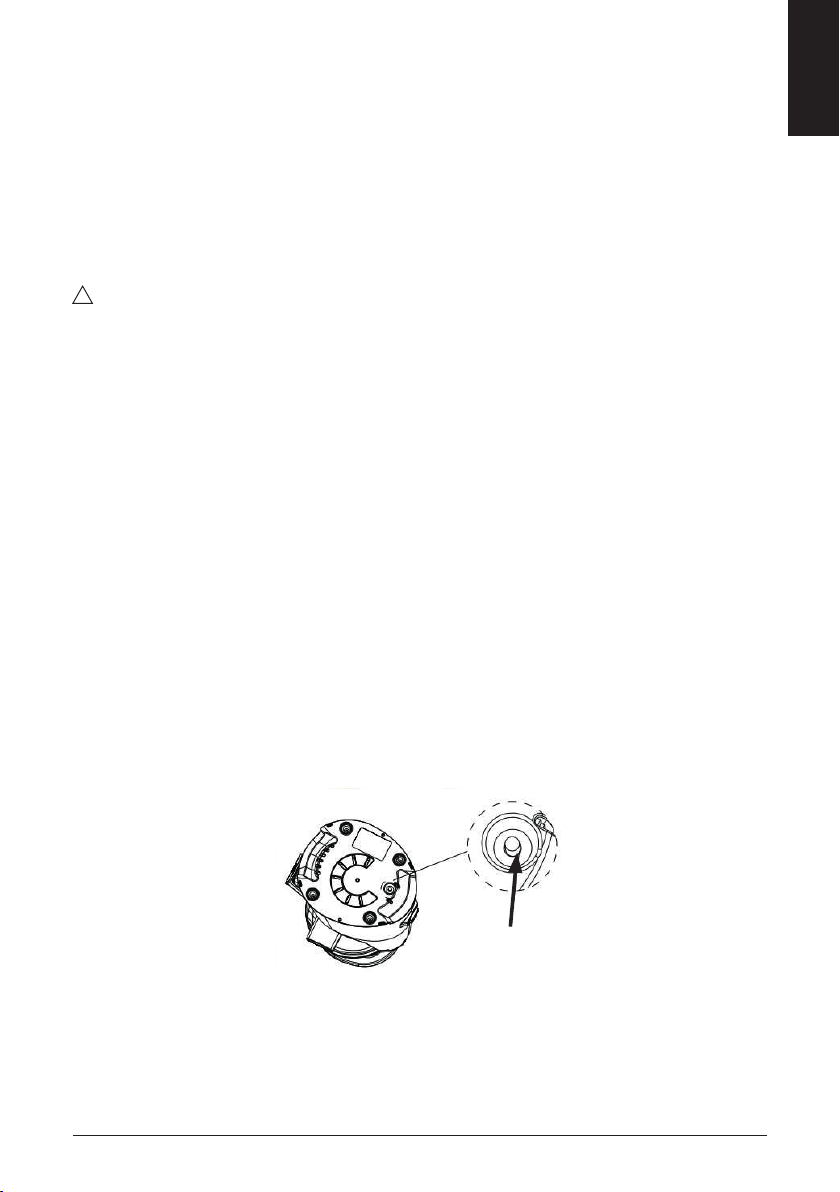
2. Then select the strainer based on your demand and then put it into the jar. There are
three strainers including juice strainer, jam strainer and frozen dish strainer for your
selection. After it, put the grinding head into the jar and ensure the grinding head is covered
well into the axis of the motor unit (see Fig.3).
NOTE: The three strainers including juice strainer, jam strainer and frozen dish strainer
can not be exchanged with each other when operate. Juice strainer is used for extracting
Fig.2
6
4) Do not put overmuch materials in the juicer each time, therefore, the materials
with less moisture and hard fibre shall be put into the jar lid after being cut into
slices.
5) Do not put overmuch materials in the juicer each time, therefore, the materials
with less moisture and hard fibre shall be put into the jar lid after being cut into
slices.
6) Assemble the buffer plate well in position
The buffer plate shall be assembled well in the residue outlet after finish cleaning each
time.
ASSEMBLE YOUR SLOW JUICER
1. Put the jar downwards and make sure that the residue outlet shall be placed well in
position. The jar shall be assembled well in position properly otherwise the appliance will
not operate. Besides, before operating, please check the buffer plate and make sure that it
must be assembled well in the residue outlet (See Fig.2).
2. Then select the strainer based on your demand and then put it into the jar. There are
three strainers including juice strainer, jam strainer and frozen dish strainer for your
selection. After it, put the grinding head into the jar and ensure the grinding head is covered
well into the axis of the motor unit (see Fig.3).
NOTE: The three strainers including juice strainer, jam strainer and frozen dish strainer
can not be exchanged with each other when operate. Juice strainer is used for extracting
Fig.2
4
6
4) Do not put overmuch materials in the juicer each time, therefore, the materials
with less moisture and hard fibre shall be put into the jar lid after being cut into
slices.
5) Do not put overmuch materials in the juicer each time, therefore, the materials
with less moisture and hard fibre shall be put into the jar lid after being cut into
slices.
6) Assemble the buffer plate well in position
The buffer plate shall be assembled well in the residue outlet after finish cleaning each
time.
ASSEMBLE YOUR SLOW JUICER
1. Put the jar downwards and make sure that the residue outlet shall be placed well in
position. The jar shall be assembled well in position properly otherwise the appliance will
not operate. Besides, before operating, please check the buffer plate and make sure that it
must be assembled well in the residue outlet (See Fig.2).
2. Then select the strainer based on your demand and then put it into the jar. There are
three strainers including juice strainer, jam strainer and frozen dish strainer for your
selection. After it, put the grinding head into the jar and ensure the grinding head is covered
well into the axis of the motor unit (see Fig.3).
NOTE: The three strainers including juice strainer, jam strainer and frozen dish strainer
can not be exchanged with each other when operate. Juice strainer is used for extracting
Fig.2
7
juice, jam strainer is used for making ketchup only while frozen dish strainer is used for
making frozen dish. Select the appropriate strainer based on your demand.
3. Assemble the jar lid on the jar correctly. Firstly, put the jar lid downwards and then
make the symbol “ ” on the jar lid align with the symbol “ ” on the jar and then rotate
the jar lid clockwise until the symbol “ ” on the jar lid aligns with the symbol “ ”on the
jar (See Fig.4). After it, press the fastener inwards to lock the jar lid well in position. The
jar lid shall be assembled well in position properly otherwise the appliance will not operate.
Finally, put the food pusher into the jar lid.
Fig.3
Fig.4
5
7
juice, jam strainer is used for making ketchup only while frozen dish strainer is used for
making frozen dish. Select the appropriate strainer based on your demand.
3. Assemble the jar lid on the jar correctly. Firstly, put the jar lid downwards and then
make the symbol “ ” on the jar lid align with the symbol “ ” on the jar and then rotate
the jar lid clockwise until the symbol “ ” on the jar lid aligns with the symbol “ ”on the
jar (See Fig.4). After it, press the fastener inwards to lock the jar lid well in position. The
jar lid shall be assembled well in position properly otherwise the appliance will not operate.
Finally, put the food pusher into the jar lid.
Fig.3
Fig.4
6
7
juice, jam strainer is used for making ketchup only while frozen dish strainer is used for
making frozen dish. Select the appropriate strainer based on your demand.
3. Assemble the jar lid on the jar correctly. Firstly, put the jar lid downwards and then
make the symbol “ ” on the jar lid align with the symbol “ ” on the jar and then rotate
the jar lid clockwise until the symbol “ ” on the jar lid aligns with the symbol “ ”on the
jar (See Fig.4). After it, press the fastener inwards to lock the jar lid well in position. The
jar lid shall be assembled well in position properly otherwise the appliance will not operate.
Finally, put the food pusher into the jar lid.
Fig.3
Fig.4
7
7
juice, jam strainer is used for making ketchup only while frozen dish strainer is used for
making frozen dish. Select the appropriate strainer based on your demand.
3. Assemble the jar lid on the jar correctly. Firstly, put the jar lid downwards and then
make the symbol “ ” on the jar lid align with the symbol “ ” on the jar and then rotate
the jar lid clockwise until the symbol “ ” on the jar lid aligns with the symbol “ ”on the
jar (See Fig.4). After it, press the fastener inwards to lock the jar lid well in position. The
jar lid shall be assembled well in position properly otherwise the appliance will not operate.
Finally, put the food pusher into the jar lid.
Fig.3
Fig.4
8
8
4. Place your juice container below the juice outlet and residue
container below the residue outlet (see Fig.5). Until now, the
Juicer is ready for operating.
Note: When need to remove the whole appliance, please grasp
the motor unit instead of the jar lid to remove it to avoid
accident.
USING YOUR JUICER
1. Before attaching the power cord into the outlet, make sure the
power switch is in the “O” position, the power switch has three settings: “I” indicates
“ON”, press the power switch to “I” position to activate the motor and start making juice;
“O” indicates “OFF” position, press the power switch to “O” position to turn off the
machine; “R” means reverse rotation, which is only used when something is stuck and you
need to unclog.
2. Make sure the juice container and the residue container are placed in position.
3. Cut fruits and vegetables into smaller pieces. For example, the carrots shall be cut into
thin slices with size of 15mm×15mm before being put into the machine.
NOTE:
A) Please remove any hard seeds before juicing.
B) It is forbidden to process coconuts, sugarcane or similar hard foodstuffs, since this
may damage the motor.
C
)
)))
It is not recommended to process hard fruit or vegetable rich in fiber and starch.
D) The peel and pits should be removed from oranges, lemons, grapefruits and melons.
4. Drop the prepared fruits or vegetables into the jar lid at an even speed and then let the
Fig.5
9