Linear Tube Audio Z40+ User manual
Z40+ INTEGRATED AMPLIFIER

USER GUIDE: Z40+ Integrated Amplifier
Linear Tube Audio Takoma Park, MD, USA
301-448-1534 [email protected]
WARNING: For safety, the cover of this amplifier should be secured
at all times.
This amplifier contains extremely high voltages and the user should
not attempt to service the amplifier. Furthermore, this amplifier
generates radio-frequency energy that can interfere with
communications equipment.
Introduction
The Z40+ Integrated Amplifier (Z40i+) combines our ZOTL40+ power
amplifier with a Berning-designed pre-amplification stage and
LTA’s digital control system. The result is an integrated amp with a
precision stepped attenuator, tube-coupled balanced inputs, and
a reference-level headphone amplifier, all able to be operated
via remote control.

Limited Two-Year Warranty
1. Your new product is covered by a limited two-year warranty
against defects in material and workmanship. Any repairs required
will be made at no charge within the first two years after purchase
as a new unit. This warranty is transferable to new owners within
the original warranty period.
2. Any units returned for warranty repair must be shipped prepaid
after receiving return authorization*. If possible, the unit should be
shipped in its original packaging. If such is not possible, the unit
should be well packed with particular attention paid to protection
of all corners and avoidance of any looseness in the carton.
*Handling and shipping costs are the responsibility of customers
outside the United States.
3. This warranty does not apply to damage resulting from physical
abuse or unauthorized alterations or repairs, or from tube rolling or
adapter use, or from the use of third-party components, or
damage to exterior finish after delivery.
4. The warranty is void if the serial number has been removed,
altered, or defaced.
5. This warranty is void if improper voltage is applied to any input or
output.
6. If Linear Tube Audio determines after receiving the unit that
damage was misrepresented and has been caused by something
not covered by the warranty, the customer must pay for any
necessary repairs before the unit is returned to the customer.
7. Linear Tube Audio reserves the right to improve or change its
products without obligation to modify previously manufactured
units.
Service Note
ZOTL amplifiers use a unique circuit and technicians familiar with
other tube amplifiers may not know how to correctly work on LTA
products. Please contact us before attempting any alteration or
repair, whether you are concerned about the warranty or not.

Specifications
Circuit Type: Push-Pull Class AB
Speaker Output: 51W (4 Ohm), 46W (8 Ohm)
Input Sensitivity: 0.6V RMS for full output
Input Impedance: 50K
Output impedance: 1.6 Ohms
Gain: 23dB (8 Ohm load)
Noise: -94dB
Frequency Response: +0, -0.5dB, 6Hz-60kHz (8 Ohm Load)
THD: 0.5%
Input Voltage Universal
Tube Complement: preamp: (2x) 12AU7
power: (2x) 12AU7, (2x) 12AX7, (4x) EL34 or KT77
Size: W: 16” (40.6cm), H: 5.125: (13cm), D: 17” (43.18cm)
Shipping Weight: 28 lbs (12.7kg)

Quick Start
Remove the Z40i+ from the box.
Attach the power cable to the IEC connector and plug into an
outlet. Turn the power switch next to the IEC connector on. This will
not turn the Z40i+ on.
Hook up your sources and speakers.
Once your system is fully connected, turn on your Z40i+ via the
power button on the front panel. While the other buttons on the
front plate are capacitive and do not depress, the power button
must be pushed in.
There is a turn-on delay of several seconds to allow the unit to
warm up.
It is usually best to turn on your components starting from the
beginning of the signal path and ending at the amplifier or
powered subwoofer(s). Power down your system in reverse order.
Operation
The unit is designed to be powered on indefinitely without harm.
The front panel power button powers down the amplifier but the
power supply remains on in a nearly idle state. To turn the amp
completely off, use the power switch next to the IEC connector.
The unit is air cooled and should be placed somewhere with
adequate ventilation.
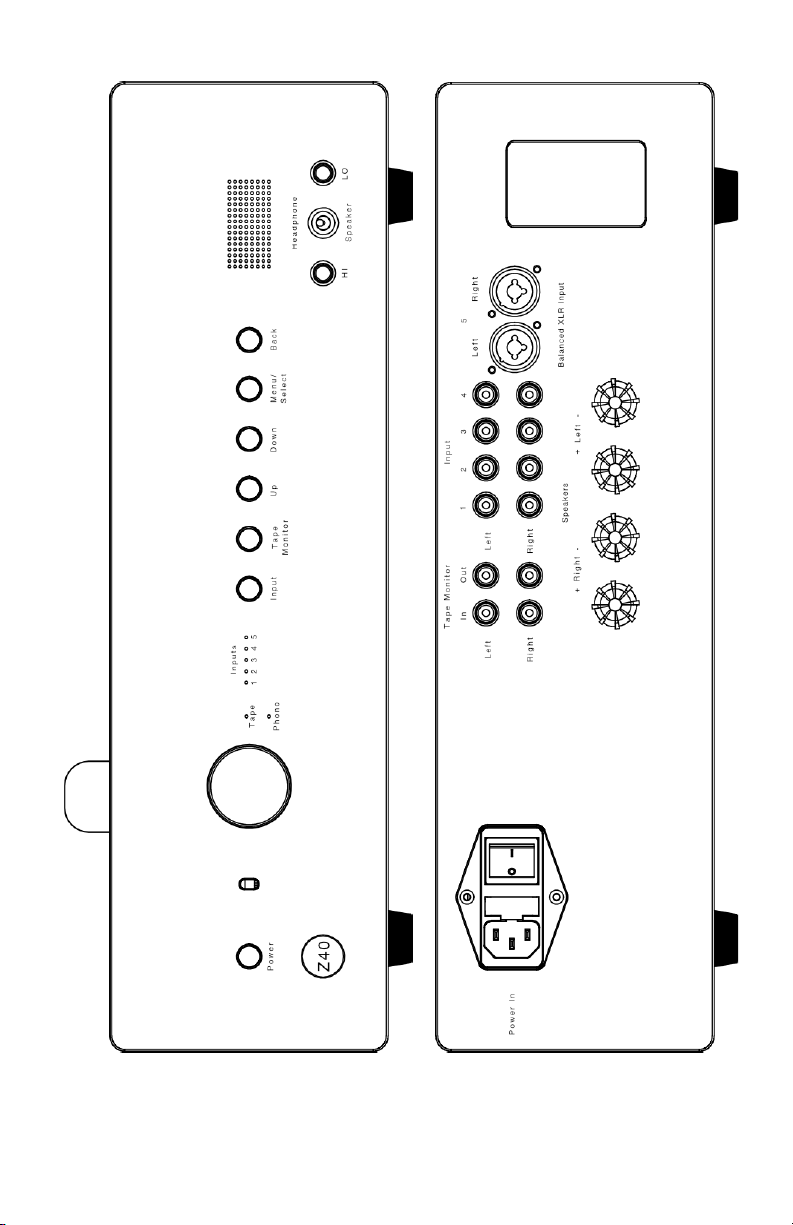
The front panel of the Z40i+ has the power button, IR sensor,
volume knob, tape and phono LEDs, input status LEDs, input
selection button, tape monitor button, menu navigation buttons,
display, headphone outputs, and headphone/speaker switch.

The back panel of the Z40i+ features the IEC connector, power
switch, tape in, tape out, four pairs of RCA inputs, one pair of XLR
inputs, one pair of RCA subwoofer outputs, and four binding posts.
Inputs
There are five total inputs: four RCA stereo pairs and one stereo
XLR pair. The XLR input provides a tube-coupled balanced input.
The preampfification stage converts the balanced input into a
single-ended signal that suffers no voltage loss. The Z40+ also
features the possibility of adding an optional MM/MC phono
preamplifier. For more information regarding the operation of the
phono preamp, please refer to our website or the additional
Phono User Guide included with your Z40i+.
Outputs
The speaker outputs use binding posts that allow you to use
banana plugs, spades, or bare wire.
There are two headphone outputs: one “HI” and one “LO”. These
refer to the output power, not the impedance. Use the HI output
for full-sized headphones that need more power and the LO
output for more sensitive headphones. Each uses a 1/4” jack.
There is a switch to use either the headphone outputs or the
speaker outputs. Always lower the volume before switching
between the two.
The Z40i+ also features an additional preamp-level SUB OUT which
is step-attenuated. This is a unity gain op-amp coupled, stereo
RCA preamplifier output meant to be used with low-pass filtered,
active subwoofer RCA inputs. The Sub Out is menu configurable for
Stereo, Mono or Mute. The Sub Out is automatically switched off
when the output switch is set for headphone operation.
Tape Monitor
When Tape Monitor is selected via the button on the front panel,
the selected input sends an unattenuated signal directly to the
Tape Output and the Z40i+ outputs the signal from the Tape Input.
User Interface and Controls
The front panel features a power switch, input switch, volume
knob, and display. The remote control is able to adjust volume,
mute, and access a menu with more configurable options.
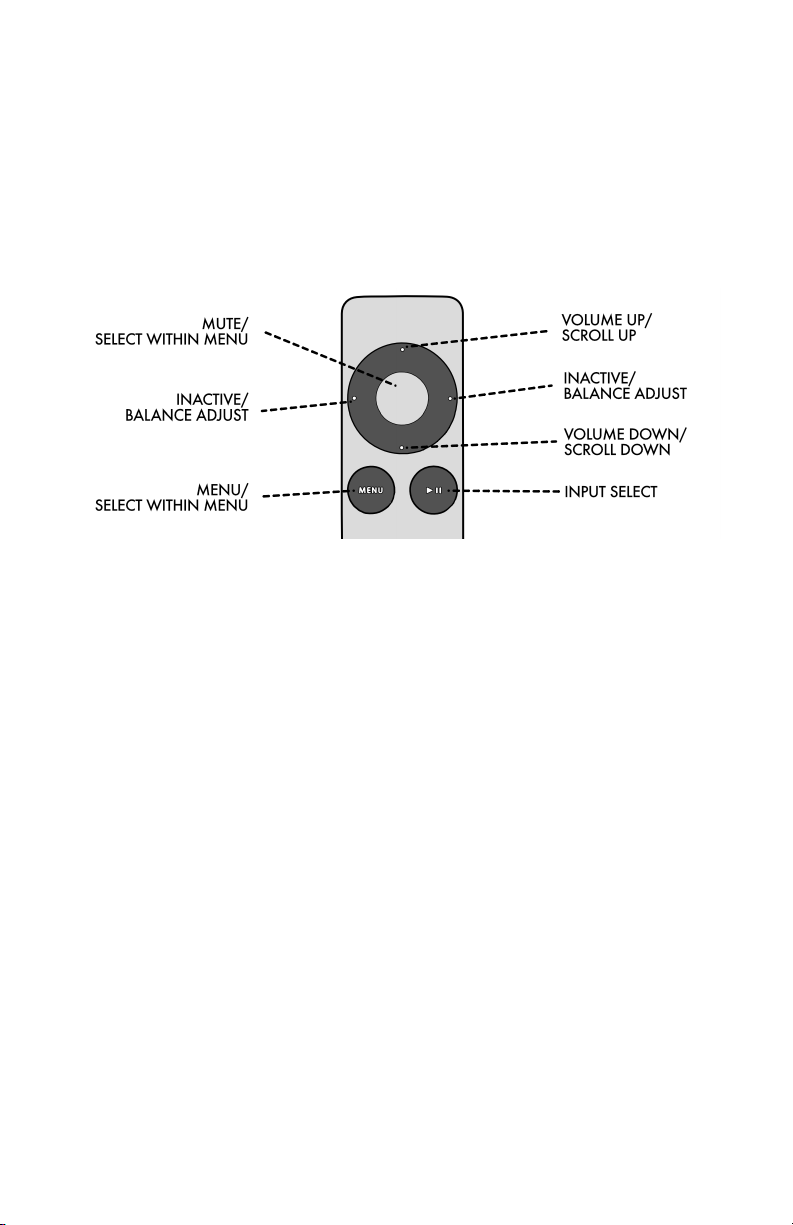
Remote Control
Up and Down Buttons: Volume Up and Volume Down. They can be
held down or used in a single step mode. In Menu mode, they
scroll up and down.
Left and Right Buttons: Unused unless activated in the menu to
function as Balance control or input selectors. In the Menu, they
act as selectors.
Center Button: Mute. When the unit is muted, there are two Xs on
the display. When in Menu, it acts as a Select button.
Menu Button: Enters Menu Mode. In the menu, this functions as a
Select button.
Play/Pause Button: Toggle inputs. [When held down for 30 seconds,
it will pair an Apple remote to the unit. Pairing confirmation
appears on the display when this is successful.]

Menu
The menu is accessed via the remote control or the buttons on the
front panel. Scroll with the up and down buttons to see menu
options. Pause on an option to see the entire title scroll by.
Balance: Use the right and left remote buttons to adjust the
balance. The front panel displays the balance setting as you
adjust - two bars in the center indicate that the balance is at 0
(both channels are equal). When the desired balance level is
selected, press the center button to save the setting. A message
will appear on the display to indicate which setting the balance
has been set to. The balance setting is saved across all inputs and
will be utilized upon power up to the last saved setting. The
maximum balance setting is 16 levels difference.
Gain Level: Adjusts the volume control to allow for finer low-level
attenuation when using sensitive speakers or headphones.
0dB is the default setting.
Volume Range: The attenuation range can be set for Default (100
steps) or Hi Res (0-199 steps). Hi Res (High Resolution) is a more
linear attenuation curve with an average 0.5dB step size.
Brightness: The front panel display can be set to 16 levels of
brightness. The brightness levels are saved and recalled upon
power on.
Home Theater Input: Home Theater Input locks a selected input at
a fixed volume level to allow external volume control. Select the
input desired to have a fixed volume. This setting is saved and the
selected input will henceforth be locked at that volume level until
the Home Theater mode is removed from that input.
Display Timeout: The volume display and input LEDs can be set to
turn off after 10 seconds. They will reappear if a button on the
remote control is pressed or the volume knob or front panel switch
is changed. There are 3 settings:
OFF - The volume display and input LEDs remain on.

VOL - The volume display turns off but the input LEDs remain on.
ALL - The volume display and input LEDs turn off.
L-R Remote Arrows: There are two functions that can be selected
for the Left-Right Arrow buttons as follows:
Off – the remote Left-Right arrow buttons are deactivated.
BAL – the remote Left-Right arrow buttons will control the balance.
Inp – the remote Left-Right arrow buttons will select the input.
Sub Out: The subwoofer output can be configured for Stereo,
Mono, or Mute. Stereo is the default output. Mono sums the two
stereo outputs. Mute disables the subwoofer output for all inputs
and outputs.
Phono: This sub-menu appears if you have an MM/MC phono
preamp installed in your Z40i+. Please refer to the separate Phono
manual for detailed information.
Power-On Override: When activated, the unit powers on when the
AC power is turned on without needing push the front panel
power button.
Reset to Default: The amplifier controls are set to Balance = 0, Gain
Level = 0dB, Display Timeout = Off, Home Theater Mode = None,
and Display Brightness = 1, and Remote Left-Right Arrow buttons
set to Not Active.
Tubes
The Z40i+ is supplied with selected vintage miniature dual-triode
tubes and premium Genalex KT77, our preferred current
production EL34 equivalent, or premium vintage EL34. The tubes
operate at low current, which allows them to have an extended
life.

Changing tubes:
EL34/KT77: The power tubes are self-biasing and do not need to be
matched for gain.
12AX7: The 12AX7s should be a matched pair.
12AU7: These are used in the preamp section (the smaller, vertical
circuit board) and in the power amp section. In both cases, the
12AU7s should be matched pairs and each individual tube should
have both of its triode sections matched as well.
The sockets are tight, so gently rock the tube pins until you are
able to remove the tubes. We use high-quality ceramic tube
sockets with gold pins which are designed in such a way that the
white ceramic part may shift slightly. This is an intentional design;
the tube socket is very secure.
Before changing tubes, turn off the amplifier and wait at least 10
minutes to allow the stored power to discharge. Avoid touching
any of the components on the circuit board, especially the
vertical circuit boards.
Fuses: The ZOTL40 has two fuses on the power board and two fuses
in the IEC assembly. The fuses on the power board are one
5x20mm, 4A, slow-blow fuse and one 5x20mm, 2.5A, fast-blow fuse.
In the IEC assembly, there are two 5x20mm, 4A, slow-blow fuses.
For more information and FAQs, please visit
www.lineartubeaudio.com or contact us at

NOTES
Other Linear Tube Audio Amplifier manuals

Linear Tube Audio
Linear Tube Audio MicroZOTL MZ2S User manual

Linear Tube Audio
Linear Tube Audio ZOTL10 Mk.II User manual

Linear Tube Audio
Linear Tube Audio Z10 Seriers User manual

Linear Tube Audio
Linear Tube Audio UL+ User manual

Linear Tube Audio
Linear Tube Audio Z10 Seriers User manual

Linear Tube Audio
Linear Tube Audio MZ3 User manual

Linear Tube Audio
Linear Tube Audio Z10 Series User manual

Linear Tube Audio
Linear Tube Audio ZOTL40 Reference User manual

Linear Tube Audio
Linear Tube Audio ZOTL ULTRALINEAR User manual

Linear Tube Audio
Linear Tube Audio Z10e User manual


