LiquiVac 2000 User manual
Assembly Instructions for LiquiVac Oil Change System: Model 2000
1. Place black (1-¼”) gasket inside cap-valve.
2. Screw cap-valve onto the tank to create a snug fit (without excessive force).
3. Insert clear hose into cap-valve as far as it will go to achieve an airtight connection. (If needed,
lubricate hose with soapy water to insert hose).
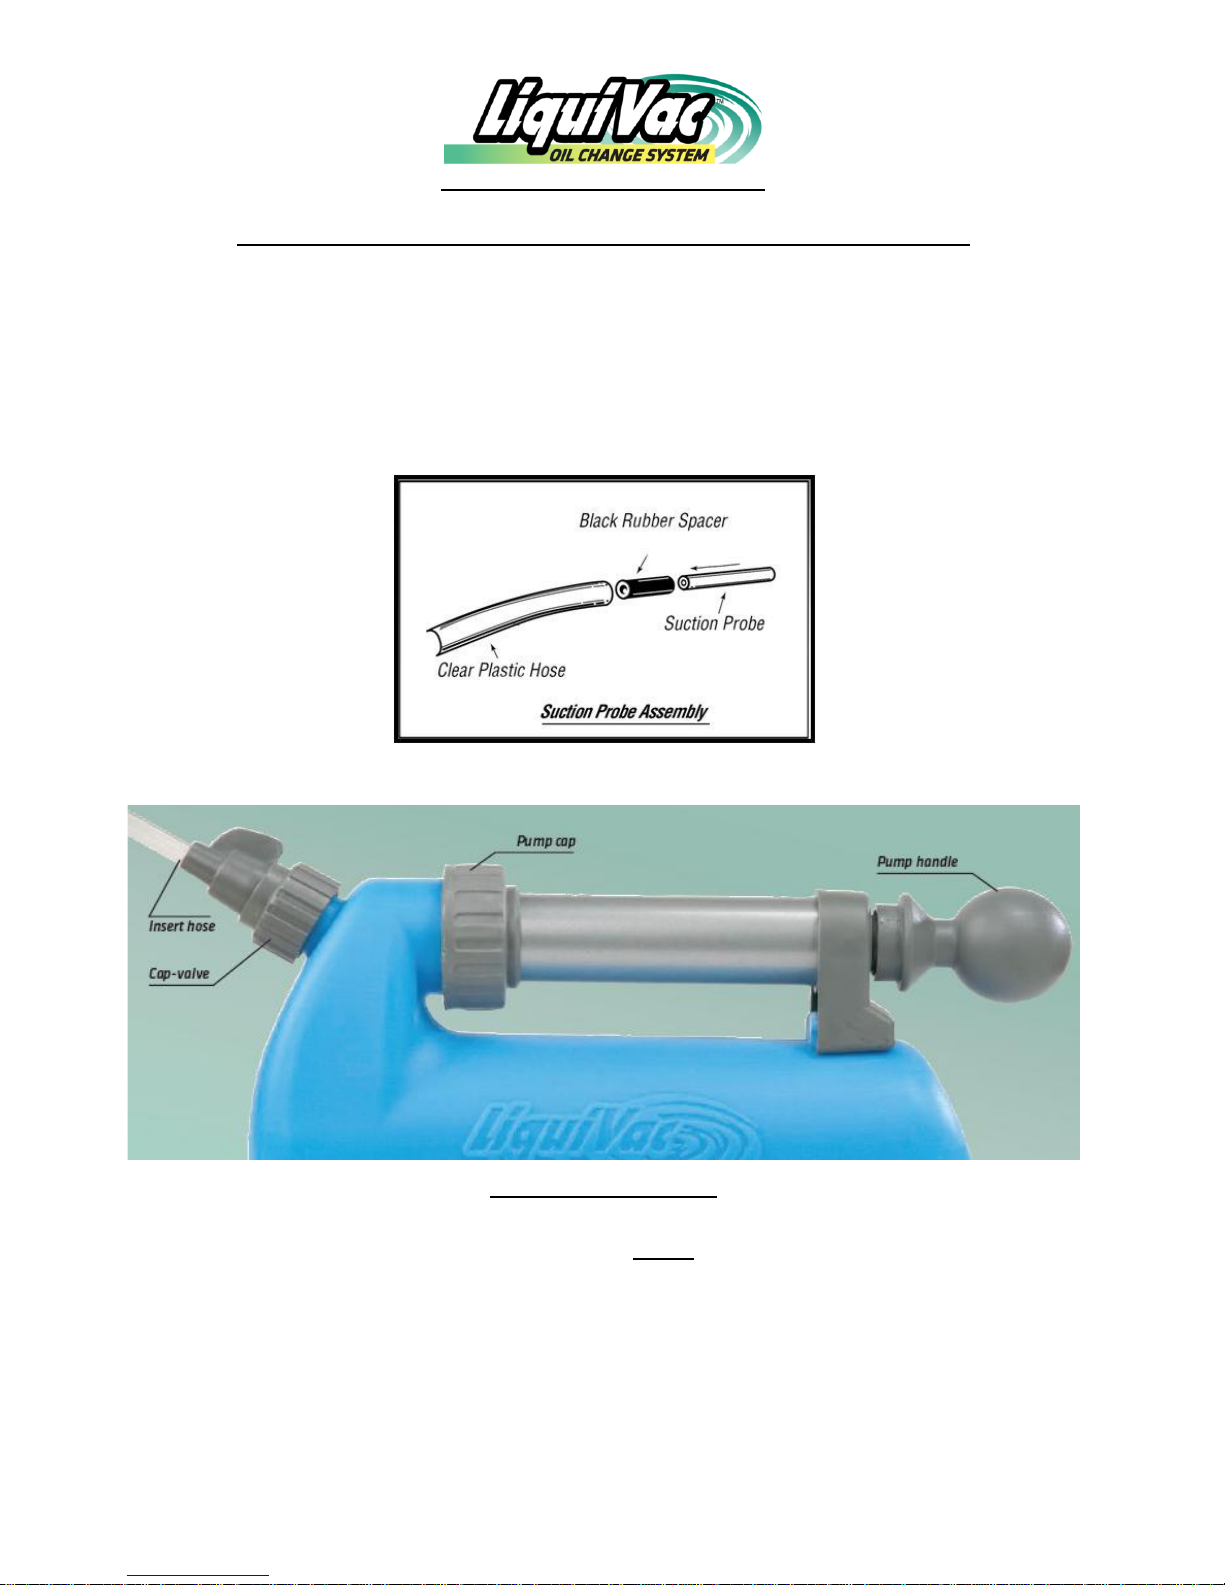
4. Connect the two different diameter hoses by inserting suction probe (long white hose) into the black
rubber spacer until flush. Then insert the black rubber spacer into the clear, more flexible hose. See
diagram below.
5. Check that pump cap is reasonably tightened onto tank.
Instructions for Use
Warm oil:
For best results, run cold engine for 2 minutes to slightly warm oil. Do not use with hot
engines (no more than 105 °F). Failure to comply may result in tank distortion and/or
collapse of hose and/or tank.
Close cap-valve.
Observe open and closed markings on cap-valve. Twist cap-valve clockwise to closed
position.
Pump to create vacuum for your project.
Small engines: 3 quarts of oil or less use 20-30 pump strokes to develop a vacuum.
Large engines: 4-5 quarts of oil use 45 to 50 pump strokes (max. 50) to
develop optimum vacuum pressure in the tank.

Insert correct sized hose into dipstick tube.
Small engines; Remove dipstick from engine. Since most small engines have larger dipstick tubes, the larger
diameter clear plastic hose may be used without the narrower white suction probe/hose. The larger diameter hose can
make oil changes even faster.
Large engines; Remove dipstick from engine. Straighten the narrow white suction probe and measure the length of
the dipstick against the suction probe. In fact we highly recommend that you mark this length with a pen.Slowly insert
the marked suction probe into dipstick tube. When you reach your mark on the probe then insert it carefully another 1 to 3
inches until you feel it “bump” into the oil pan. Stop inserting.
Careful: Do not insert the suction probe more than 3 inches beyond dipstick length.
Suction probe may become lodged in the engine cavity.
Open cap-valve.
Twist cap-valve dial counter clockwise to the open position. Watch for oil to flow through
the hose and into the tank.
Move hose to vacuum all oil.
If you hear a gurgling sound and perhaps see bubbles in the hose, immediately move the hose
slowly up and down just a fraction of an inch to ensure thorough and efficient oil removal. If more
vacuum power is needed to completely remove oil, twist the spout cap-valve dial back to the
closed position, pump 10 to 15 times, then twist dial to open and continue vacuuming oil.
Careful: Do not pump with dial in open position to avoid pulling oil into pump and possibly
out the handle.
Close cap-valve. Replace dipstick. Refill engine oil. Recycle used oil.
Twist cap-valve to closed position and screw pump handle onto tank in locked position.
Replenish oil supply following manufacturer’s recommended engine oil type and
capacity. To find a recycling center nearest you, visit www.recycleoil.org
Warning: Never use with gasoline or other flammable liquids. Do not use with hot liquids!
Troubleshooting
1. The key problem most people have operating the LiquiVac is that the gaskets are not sealing properly to hold the
vacuum. You can check this by listening for air leaks. Unscrew cap-valve from tank and remove gasket. Reinsert
gasket into cap-valve and screw onto tank as tight as possible using only your hands. Remove pump from tank.
Make sure the large black gasket is seated properly against the tank rim. Screw pump back onto tank and hand
tighten. If a leak is detected, check gaskets for wear and misalignment. Lubricate with motor oil, replace gaskets
and tighten cap until snug.
2. Make sure dial on cap-valve is in closed position when pumping, and hose is fully inserted tightly
into cap-valve.
3 If you have tried the above and each pump stroke does not result in increased resistance, then the internal leather
seals in the pump may need lubrication. Just apply several drops of oil onto the pump rod (at the handle end),
draw on the handle a few times to distribute the oil. Let pump rest in vertical position, handle side up, for 12–24
hours to allow leather to soften. After this time period, draw on handle a few more times then reattach to tank
making sure the large gasket is seated onto the tank rim. This may be necessary when the pump has been stored
for several months.
4 If you have accidentally over filled your tank or if the oil happens to enter the pump, you can unscrew the pump from
the tank and let the oil flow into a container (knob side down and unscrewed). After the oil is drained pump the
handle a few times to get the remaining drops of oil out. Keep in mind a small amount of oil in the pump is good for
the unit and actually prolongs the life of the pump by adding lubricity.
5 If you use the LiquiVac to extract water, please take the pump assembly off after use and allow water to drain out,
then add oil onto the pump rod at the handle end. This is necessary because the seal in the pump is made of
leather and must remain lubricated.
Customer Service: If you need further assistance or replacement parts, call the makers of the LiquiVac
(toll-free) at 1.800.225.2224 or visit our web site: www.liquivac.com . Parts Included: Clear vacuum hose,
suction probe, cap-valve, black rubber spacer and 1¼" gasket.
Table of contents
Popular Automobile Accessories manuals by other brands

Icom
Icom RMK-3 instructions

TREX
TREX Upper Class Series installation instructions

Global Sources
Global Sources BC56 user manual

SilverLeaf Electronics
SilverLeaf Electronics VMS 240 CL owner's manual

THB Bury
THB Bury UNI BlueAdapter Installation and operating manual

Air Lift
Air Lift RoadTamer 25325 quick start guide


Caraudio-Systems
Caraudio-Systems CXR-CAN instruction manual

Dirtydog 4x4
Dirtydog 4x4 DD-P-JK4-07 installation instructions

etrailer
etrailer XHD-e98973 Operator's manual

Jin-Wei
Jin-Wei WD-4KS user manual

Weather Guard
Weather Guard 9444-3-01 installation manual

FormFit
FormFit Tough Guard TG 7W07 installation instructions