Litchi SM1083 User manual

2/ 16
Table of Content
STAND MIXER SAFETY
Important Safeguards & Electrical Requirements.........................................................................................................................3
PARTS AND FEATURES
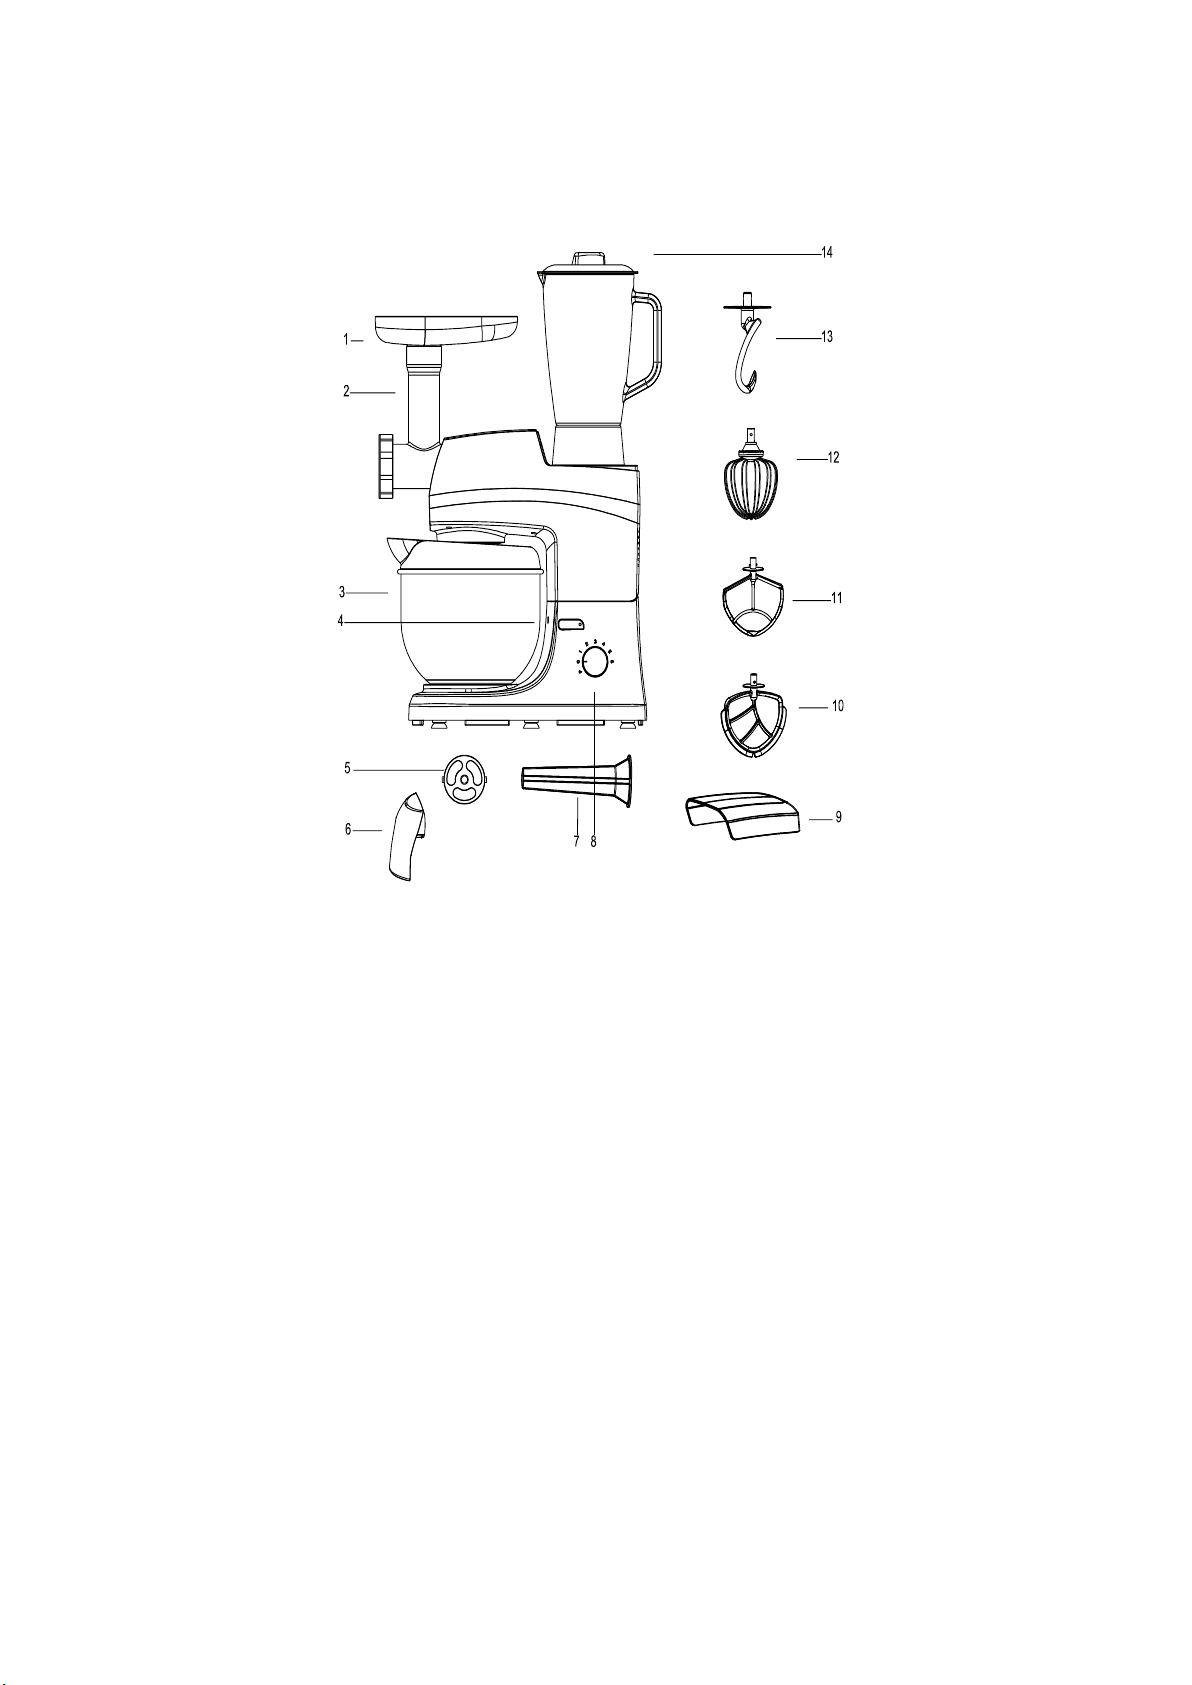
Stand Mixer Parts ........................................................................................................................................................................................4
ASSEMBLYING LITCHI STAND MIXER
To Attach/Remove Beaters......................................................................................................................................................................8
To Attach/Remove Bowl...........................................................................................................................................................................8
To Attach/Remove Pouring Shield........................................................................................................................................................8
To Raise/Put Down Motor Head............................................................................................................................................................9
To Operate Speed Dial................................................................................................................................................................................9
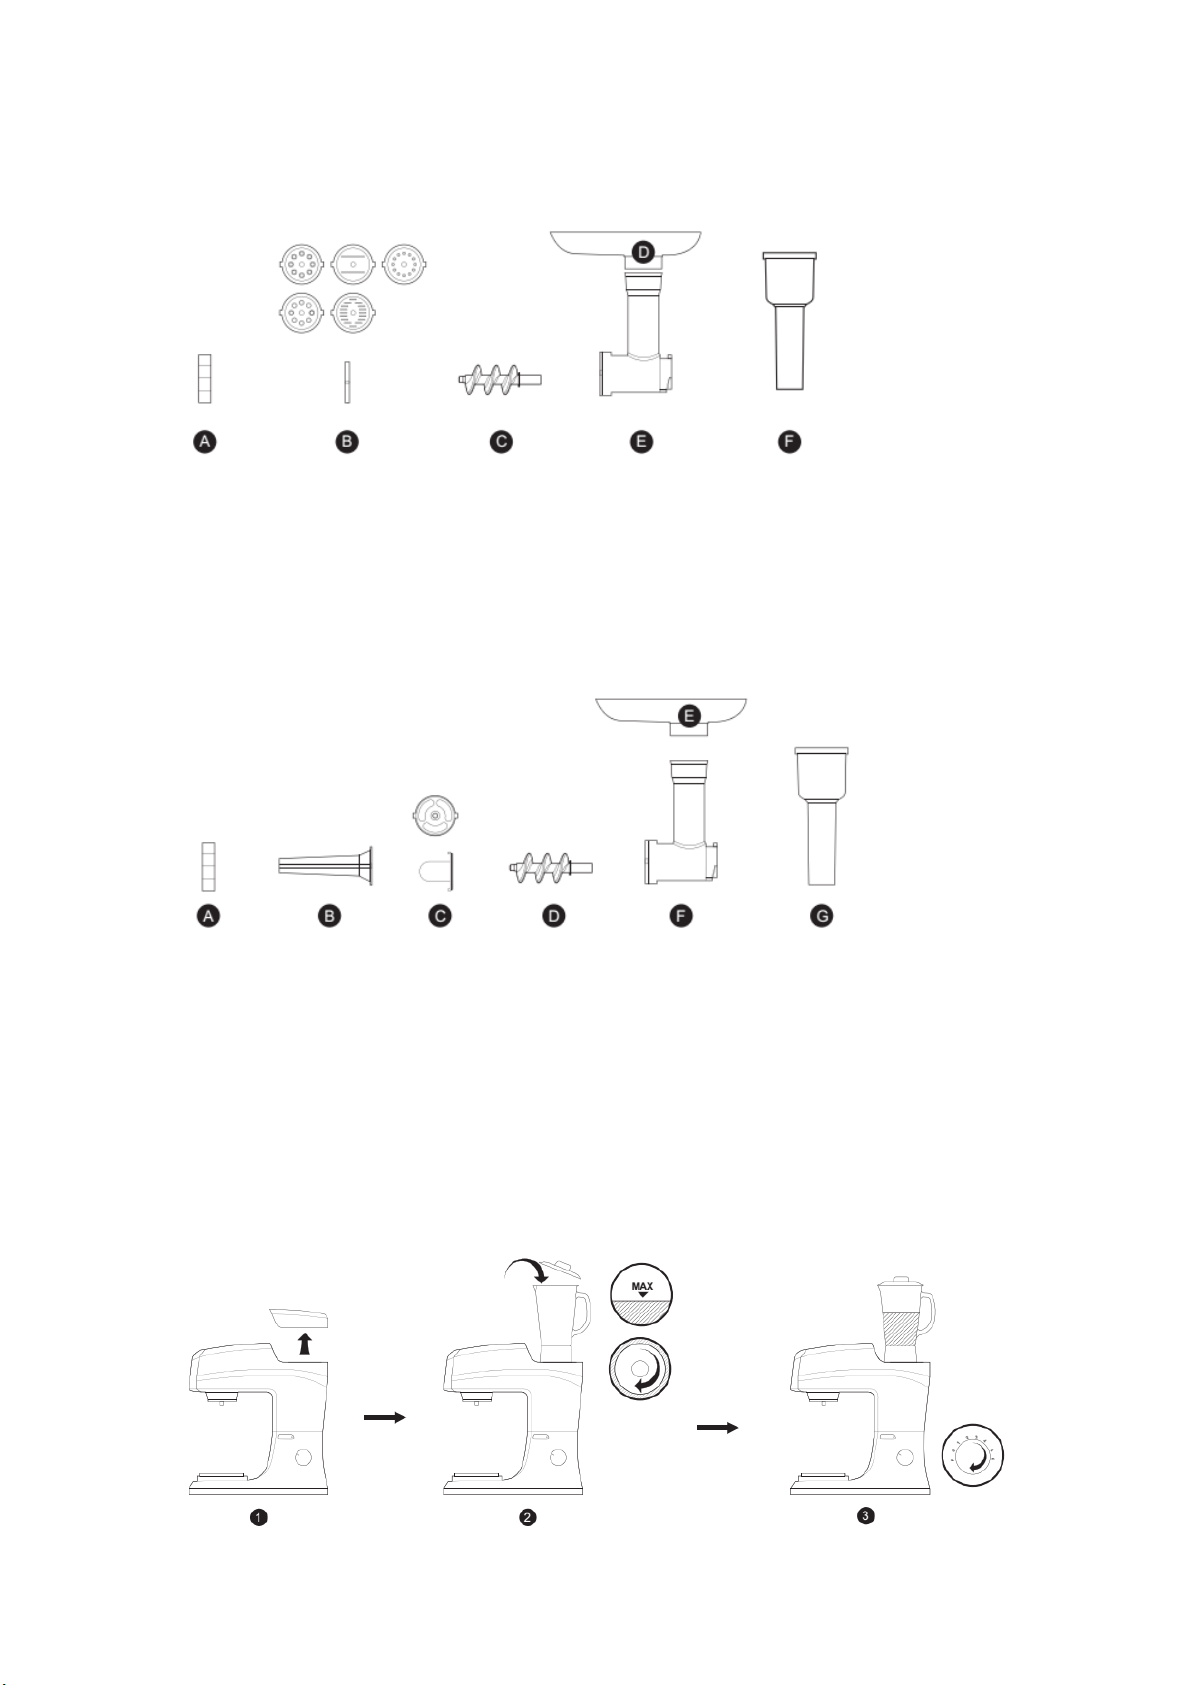
To Attach/Remove Glass Blender Jar...................................................................................................................................................9
To Install/Remove Meat Grinder Assembly......................................................................................................................................9
To Attach/Remove Sausage Stuffer.......................................................................................................................................................9
To Attach/Remove Pasta Dies.................................................................................................................................................................9
USING LITCHI ACCESSORIES
Using Dough Hook.......................................................................................................................................................................................9
Using Mixing Blade......................................................................................................................................................................................9
Using Wire Whisk.........................................................................................................................................................................................9
Using Flat Beater...........................................................................................................................................................................................9
Using Glass Blender Jar...........................................................................................................................................................................10
Using Meat Grinder Assembly............................................................................................................................................................. 10
Using Pasta Dies........................................................................................................................................................................................ 10
Using Sausage Stuffer Assembly......................................................................................................................................................... 10
SPEED CONTROL GUIDES & TIPS
Speed Control Guides & Mixing Tips ................................................................................................................................................10
CLEANING AND MAINTENANCE
Care and Cleaning .....................................................................................................................................................................................11
Troubleshooting & RFQs........................................................................................................................................................................12
STANDARD ACCESSORIES
Standard Accessories...............................................................................................................................................................................13
Order Accessories and Replacement Parts.....................................................................................................................................13
WARRANTY AND RETURNS
Warranty & Returns.................................................................................................................................................................................13
RECIPES
Recipes ..........................................................................................................................................................................................................14

3/ 16
IMPORTANT SAFEGUARDS
When using electrical appliances, basic safety precautions should always be followed
including the following:
1. Read all instructions.
2. To protect against risk of electrical shock, do not put Stand Mixer in water or other liquid.
3. Close supervision is necessary when any appliance is used by or near children.
4. Unplug Stand Mixer from outlet when not in use, before putting on or taking off parts and
before cleaning.
5. Avoid contacting moving parts. Keep hands, hair, clothing, as well as spatulas and other
utensils away from beater during operation to reduce the risk of injury to persons and/or
damage to the Stand Mixer.
6. Do not operate Stand Mixer with a damaged cord or plug or after the Stand Mixer
malfunctions or is dropped or damaged in any manner.
Return appliance to the nearest Authorized Service Center for examination, repair or
electrical or mechanical adjustment. Call the Litchi Customer Satisfaction Center at 1-844-
246-8462 for more information.
7. The use of attachments not recommended or sold by Litchi may cause fire, electrical shock
or injury.
8. Do not use the Stand Mixer outdoors.
9. Do not let the cord hang over edge of table or counter.
10. Remove Flat Beater, Wire Whisk, Dough Hook or Mixing Blade from Stand Mixer before
washing.
11. This product is designed for household use only.
SAVE THESE INSTRUCTIONS
FOR HOUSEHOLD USE ONLY
This appliance has a polarized plug (one blade is wider than the other). To reduce the risk of
electrical shock, this plug is intended to fit into a polarized outlet only one way. If the plug
does not fit fully into the outlet, reverse the plug. If it still does not fit, contact a qualified
electrician for assistance. DO NOT ATTEMPT TO MODIFY THE PLUG IN ANY WAY.
Any other servicing should be performed by an authorized service representative.
ELECTRICAL REQUIREMENTS
Volts: 120 V.A.C. Hertz: 60 Hz Power Rate: 650 W
The wattage rating for your Stand Mixer is printed on a tag under the mixer base. If the
power cord is too short, have a qualified electrician or serviceman install an outlet near the
appliance.

4/ 16
PARTS AND FEATURES
STAND MIXER PARTS:
①Hopper
②Meat Grinder Assembly
③Mixing Bowl
④Tilt Knob
⑤Sausage Holder
⑥Front Cover
⑦Sausage Tube
⑧Speed Dial
⑨Caudal Cover
⑩Flat Beater
⑪Mixing Blade
⑫Wire Whisk
⑬Dough Hook
⑭Glass Blender Jar

5/ 16
Glass Blender Jar Parts
①Measuring Cup
②Lid
③Glass Blender Jar
④Jar Base
⑤Sealing Ring
⑥Blade Base
Meat Grinder Assembly Parts
A. Meat Grinder Cover
B. Mincing Discs
C. Mincing Blade
D. Roller
E. Hopper
F. Meat Grinder Case
G. Food Pusher

6/ 16
Pasta Dies Parts
A. Meat Grinder Cover
B. Pasta Dies(6 discs)
C. Roller
D. Hopper
E. Meat Grinder Case
F. Food Pusher
Sausage Stuffer Assembly Parts
A. Meat Grinder Cover
B. Sausage Tube
C. Sausage Holder
D. Roller
E. Hopper
F. Meat Grinder Case
G. Food Pusher
Assembling Litchi Stand Mixer SM1083
To Install Glass Blender Jar

7/ 16
To Install Meat Grinder Assembly
To Install Pasta Dies
To Install Sausage Stuffer Assembly

8/ 16
ASSEMBLING YOUR TILT-HEAD STAND MIXER
To Attach Flat Beater, Wire Whisk, Dough Hook or Mixing Blade
1. Turn speed dial to speed 0.
2. Unplug Stand Mixer or disconnect power.
3. Tilt motor head back by turning the tilt knob.
4. Insert beater into the beater connector and press upward and turn it to right to lock.
5. Plug into an outlet.
To Remove Dough Hook, Mixing Blade, Wire Whisk or Flat Beater
1. Turn speed dial to speed 0.
2. Unplug Stand Mixer or disconnect power.
3. Tilt motor head back.
4. Press beater upward and turn left.
5. Pull beater from beater connector.
To Attach Bowl
1. Turn speed dial to speed 0.
2. Unplug Stand Mixer or disconnect power.
3. Tilt motor head back.
4. Place bowl on bowl clamping plate.
5. Turn bowl gently into clockwise direction.
6. Plug into an outlet.
To Remove Bowl
1. Turn speed dial to speed 0.
2. Unplug Stand Mixer or disconnect power.
3. Tilt motor head back.
4. Turn bowl counterclockwise.
To Attach Pouring Shield
1. Turn speed dial to speed 0.
2. Unplug Stand Mixer or disconnect power.
3. Attach Flat Beater, Dough Hook, Mixing Blade or Wire Whisk and bowl.
4. From the front of the mixer, slide the Pouring Shield over the bowl until the shield is
centered. The
bottom rim of the shield should fit within the bowl.
To Remove Pouring Shield
1. Turn speed dial to speed 0.
2. Unplug Stand Mixer or disconnect power.
3. Lift the front of the Pouring Shield clear of the bowl rim and pull forward.
4. Remove attachment and bowl.

9/ 16
If the mixer is an older version, please follow below steps to attach/remove splash guard.
1. Turn speed dial to speed 0.
2. Unplug Stand Mixer or disconnect power.
3. Tilt back the motor head.
4. Turn it counterclockwise to lock it (turn it clockwise to unlock it). The bottom rim of the
splash guard should fit within the bowl.
To Use Pouring Shield
1. For best results, rotate the shield so the motor head covers the “u” shaped gap in the
shield.
2. Pour the ingredients into the bowl through the pouring chute.
To Raise Motor Head
1. Turn the tilt knob clockwise.
NOTE: Motor head should always be kept in LOCK position when using mixer.
To Put Down Motor Head
1. Make sure motor head is completely down.
2. When the motor head is secured, the tilt knob will return its original position.
3. Before mixing, test lock by attempting to raise head.
To Operate Speed Dial
Speed dial should always be set on lowest speed for starting, then gradually moved to
desired higher speed to avoid splashing ingredients out of bowl.
Turn speed dial to “P” for Pulse function. When the speed dial is turned to “P”, the stand
mixer will operate in the highest speed. Use “P” for stirring or creaming.
USING YOUR LITCHI ACCESSORIES
C-Dough Hook mixes and kneads yeast dough with ease, saving you both the time and effort
of hand kneading.
Mixing Blade is perfect for quickly and thoroughly mashing potatoes, mixing cake batter
and cookie dough and so much more.
Wire Whisk quickly incorporates air into ingredients for fluffy whipped cream, perfect
boiled frostings and cakes with whipped egg whites.
Flat Beater is great scraping for creaming butter and eggs to fluffy perfection, preparing
frostings and pastry creams quickly.

10 / 16
Glass Blender Jar works great for whipping up fruit smoothies, mixing frozen margaritas,
blending pureed soups, stirring up zesty salsas, and more.
Meat Grinder Assembly comes with 3 different cutting accessories for coarse, medium, fine
grinds of meat that making stuffing and filling. Not only can be used for meat, but also fish,
pepper, vegetables and etc.
Pasta Dies include 6 quick change discs for different style of pasta.
Sausage Stuffer Assembly is ideal for making homemade bratwurst kielbasa and Italian or
Polish sausage. Ideal for making homemade bratwurst kielbasa and Italian or Polish sausage
SPEED CONTROL GUIDE & MIXING TIPS
1 Stir STIRRING:
For slow stirring, combining, mashing, starting all mixing procedures. Use to add flour and d
ry ingredients to batter, add liquids to dry ingredients, and combine heavy mixtures.
1-2 SLOW MIXING:
For slow mixing, mashing, faster stirring. Use to mix heavy batters and candies, start mashin
g potatoes or other vegetables, cut shortening into flour, mix thin or splashy batters, and mix
and knead yeast dough.
3-4 MIXING, BEATING:
For mixing semi-heavy batters, such as cookies. Use to combine sugar and shortening and to
add sugar to egg whites for meringues. Medium speed for cake mixes. For whipping up fruit
smoothies. Making pasta and grinding meat (speed 4).
5 BEATING, CREAMING
For medium fast beating (creaming), whipping or grinding meat. Use to finish mixing cake,
doughnut, and other batters. High speed for cake mixes.
6 FAST BEATING, WHIPPING
For whipping cream, egg whites, and boiled frostings. For grinding meat, mixing frozen
margaritas and making sausage.
NOTE: Mixer may not maintain fast speeds under heavy load.
NOTE: The Speed Dial can be set between the speeds listed in the above chart to obtain
speeds 3, 5, if a finer adjustment is required.
MIXING TIPS

11 / 16
NOTE: Do not scrape the bowl while the Stand Mixer is operating.
The bowl and beater are designed to provide thorough mixing without frequent scraping.
Scraping the bowl once or twice during mixing is usually sufficient. Turn the Stand Mixer off
before scraping.
The Stand Mixer may warm up during use. Under heavy load with extended mixing time, you
may not be able to comfortably touch the top of the Stand Mixer. This is normal.
Adding Ingredients
Always add ingredients as close to side of bowl as possible, not directly into the moving
beater. The Pouring Shield can be used to simplify adding ingredients.
Cake Mixes
When preparing packaged cake mixes, use Speed 2 for low speed, Speed 4 for medium speed,
and Speed 6 for high speed. For best results, mix for the time stated on the package
directions.
Liquid Mixtures
Mixtures containing large amounts of liquid ingredients should be mixed at lower speeds to
avoid splashing. Increase mixer speed only after the mixture has thickened.
Mix or Knead Dough:
1. Attach Dough Hook to the beater connector, mix flour and water at a ratio of 5:3. Flour max.
1200g and water max. 720g.
2. Do not use the dough hook longer than 30 seconds continuously at speed 1 or 2, and 3
minutes continuously at speed level 3.
3. When filling the mixing bowl, please ensure that the maximum quantity is not exceeded.
Whipping Egg Whites or Cream:
Place room temperature egg whites in a clean, dry bowl. Attach bowl and Wire Whisk. To avoid
splashing, start whipping at speed 1 for 30 seconds. Then, turn to speed 4 to speed 6, whip the
egg whites without stopping for about 5 minutes until stiff. Maximum quantity of egg whites
is 24.
To whip cream, whip 250ml fresh cream at speed 4 to 6 for about 5 minutes. When filling the
mixing bowl with fresh milk, cream or other ingredients, please make sure the ingredients do
not exceed the maximum quantity.
CARE AND CLEANING
Bowl, Flat Beater, Mixing Blade, Wire Whisk, Dough Hook, Glass Blender Jar, Pasta Dies (6
quick change pasta dies) and Sausage Stuffer (excluding the metal meat grinder parts) may
be washed in an automatic dishwasher. Or, clean them thoroughly in hot sudsy water and
rinse completely before drying.

12 / 16
NOTE: Always be sure to unplug the Stand Mixer before cleaning. Wipe the Stand Mixer with
a soft, damp cloth. Do not use household or commercial cleaners. Do not immerse in water.
Wipe off the beater connector frequently, removing any residue that may accumulate.
TROUBLESHOOTING PROBLEMS
Please read the following before calling your service center.
1. The Stand Mixer may warm up during use. Under heavy loads with extended mixing time
periods, you may not be able to comfortably touch the top of the Stand Mixer. This is normal.
2. The Stand Mixer may emit a pungent odor, especially when new. This is common with
electric motors.
3. If the Flat Beater hits the bowl, stop the Stand Mixer.
Keep a copy of the sales receipt showing the date of purchase. Proof of purchase will assure
you of in-warranty service.
If your Stand Mixer should malfunction or fail to operate, please check the following:
–Is the Stand Mixer plugged in?
–Is the fuse in the circuit to the Stand Mixer in working order? If you have a circuit breaker
box, be sure the
circuit is closed.
–Turn the Stand Mixer off for 10-15 seconds, then turn it back on. If the mixer still does not
start, allow it to
cool for 30 minutes before turning it back on.
RFQs
1. How to register the product warranty?
Answer: Please log in our website www.litchilive.com and click “warranty”on the front page,
or paste the link https://litchilive.com/warranty-registration/ to your browser.
2. How to remove the suction cups?
Answer: Just pull the suction cups from the base to remove it. Press them upward to install.
3. Is the pouring shield BPA free?
Answer: Yes, the pouring shield is BPA free.
4. Is there a larger bowl available for SM983?
Answer: Yes, you could order 6.9 Quart Stainless Steel Bowl for the model from us.
5. Why the splash guard can’t be removed?
Answer: If you are turning it clockwise, try with more pressure.
6. Where is the meat grinder assembly?
Answer: For early batch of product, the meat grinder assembly of model SM1083 is placed
underneath the bottom foam.

13 / 16
If the problem cannot be fixed with the steps provided in this section, then contact
Litchi or an Authorized Service Center:
www.litchilive.com
service@litchilive.com
8427 S Old Bingham Hwy,
West Jordan, UT, United States, 84088
Call: 844-246-8462
STANDARD ACCESSORIES
Main Unit
1 PCS
5.3 Quart Stainless Steel Mixing Bowl
1 PCS
Mixing Blade
1 PCS
Dough Hook
1 PCS
Flat Beater
1 PCS
Wire Whisk
1 PCS
Meat Grinder Assembly
1 SET
Sausage Stuffer Assembly
1 SET
Pasta Dies
1 SET
Glass Blender Jar
1 PCS
Instruction Manual
1 PCS
ORDER ACCESSORIES AND REPLACEMENT PARTS
Order from our Amazon stores, our official website www.litchilive.com or contact our
customer satisfaction center via email service@litchilive.com.
WARRANTY & RETURNS
Litchi Stand Mixers come with 2 Year Seller Warranty for the main machine and motor, 3
Months Warranty for the attachments. To return the product, please contact us directly and
get a RMA before returning product.
Litchi Returns
8427 S Old Bingham Hwy,
West Jordan, UT, United States
Call: 385-351-5383
Website: www.litchilive.com

14 / 16
RECIPES
COCOA ALMOND BISCOTTI
INGREDIENTS
70g caster sugar
2 large eggs
2g salt
25g cocoa powder
150g plain flour, sifted
1/2 tsp. baking powder
50g almond slices
METHOD
Step 1
Preheat oven to 325°F. Line a large baking paper.
Step 2
Place sugar, salt and one egg in a large bowl. Beat with flat beaters by speed 3.
Step 3
Fold in sifted flour, baking powder, cocoa powder and almond slides to wet mixture, first choose speed 5, beat the mixtur
e 4-5 minutes until it smooth, then turn to speed one to lightly knead dough.
Step 4
Form the mixture to about 22cm long x 4cm wide and place on prepared baking tray, brush with egg using another egg. B
ake for 35-40 minutes until the dough is firm to the touch. Remove from the oven and set aside to completely cool.
Step 5
Keep oven on
Step 6
Once dough is cool, cut the dough into 1.5cm slices.
Step 7
Lay slices flat on the baking tray and return to oven for another minute until completely both sides dried out. Remove fro
m oven and allow to cool completely.
Old-Fashioned Lemon Pound Cake
INGREDIENTS
3 cups all-purpose flour
1 teaspoon baking powder
1/4 teaspoon salt
2 1/2 cups sugar
1 cup butter, softened
1 teaspoon vanilla extract
1 teaspoon lemon extract
1 cup milk
6 eggs

15 / 16
*Do not use self-rising flour.
METHOD
Step 1
Combine dry ingredients in mixer bowl.
Step 2
Add butter, milk, lemon and vanilla.
Step 3
Attach bowl and flat beater to stand mixer.
Step 4
Turn to Speed 5 and beat about 2 minutes.
Step 5
Stop and scrape bowl. Turn to Speed 2 and add eggs, one at a time, mixing about 20 seconds after each addition.
Step 6
Turn to Speed 4 and beat about 30 seconds.
Step 7
Pour batter into prepared pan, smoothing the top.
Step 8
Bake until a toothpick inserted in center of cake comes out clean, about 1 hour 15 minutes.
Step 9
Cool completely then remove cake from pan.
Easy Bread
1⁄2 cup low-fat milk
2 tablespoons sugar
2 teaspoons salt
3 tablespoons butter
2 packages active dry yeast
11⁄2 cups warm water (105°F to 115°F)
5 cups all-purpose flour
Step 1.
Place milk, sugar, salt, and butter in a saucepan. Heat over low heat until butter melts and sugar dissolves. Then cool to lu
kewarm.
Step 2.
Dissolve yeast in warm water in warmed mixer bowl. Add warm milk mixture and 4 1/2 cups flour.
Step 3.
Attach bowl and dough hook to mixer. Turn to Speed 2 and mix about 1 minute. Continuing on Speed 2, add remaining flo
ur, 1/2 cup at a time, and mix until dough clings to hook and cleans sides of bowl, about 2 minutes. Knead on Speed 3 abo
ut 2 minutes longer, or until dough is smooth and elastic. Dough will be slightly sticky to the touch.
Step 4.
Place dough in greased bowl, turning to grease top. Cover. Let rise in warm place, free from draft, about 1 1/2 hour, or unt

16 / 16
il doubled in bulk.
Step 5.
Punch dough down and divide in half. Shape each half into a loaf. Place in two greased 9x5-inch loaf pans.
Step 6.
Cover. Let rise in warm place, free from draft, about 1 hour, or until doubled in bulk.
Step 7.
Bake at 400°F about 30-35 minutes until golden brown, and bread sounds hollow when tapped.
Remove from pans immediately and cool on wire racks.
How to Make Homemade Pasta
Ingredients
3 large eggs, beaten to blend
2 cups all-purpose flour
1 tablespoon olive oil
1 teaspoon kosher salt
METHOD
Attach the Flat Beater to the Litchi Stand Mixer. Place flour, salt, eggs and oil into mixing bowl. Turn to Speed 2 and mix
until mixture is combined. Remove Flat Beater and attach Dough Hook, then knead for 5 minutes on speed 1, or until
dough indents when touched. Cover dough and allow to rest for 30 minutes.
Once rested, with lightly floured hands, knead dough for about 30 seconds with Speed 2. Cut into 4 pieces.
Attach pasta die attachment to Stand Mixer. Insert roller into meat grinder case. Place selected pasta die into meat grinder
case so that the pasta plate’s tab inserts into roller base. Insert whole attachment shaft housing into the attachment hub.
Put hopper on the top. Start the stand mixer, slowly feed walnut-sized balls of dough into the hopper; dough should self-
feed through the roller. Use the cutter to cut pasta at desired length as it exits the press.
Lay pasta onto a lightly floured bench. Repeat rolling with remaining dough.
To Cook Pasta: Bring a large pot of water to a boil; Once boiled, season generously with salt. Add pasta and cook 2-3
minutes or until al dente. Note the cooking time may be less if using a thin roller. Strain pasta reserving about 2 cups of
the pasta liquid to add into your prepared sauce if needed
For more recipes, please visit our website www.litchilive.com or our official YouTube
Channel by browsing “litchilive” on YouTube.
Facebook: https://www.facebook.com/litchilive/
YouTube: https://www.youtube.com/channel/UCFcCd6MkUu-XcG4Z8ZbqG5w
Instagram: https://www.instagram.com/litchilive/
Table of contents
Other Litchi Mixer manuals