Lithionics Battery NeverDIE User manual

12V Engine Start Battery w/NeverDie®
User Manual
Voltage: 12.8V (Nominal), 10.8V (Min.), 14.4V (Max.)
Discharge Rate: 80A Max. Continuous for BMS Model 4M, and 100 Amps for BMS
Model 8M (Contact Lithionics Battery to Confirm Your BMS Installed)
Charge Rates:
12V or GT12V Series: 1C (Max) or 1 Times Amp Hours) Example: a 12V40A…MAX.
Charge Rate= 1C X 40 = 40 Amps
GT Series = 2C or 2 Times Amp Hour Capacity
Operating Conditions: Do Not Operate Under-The-Hood Until You Confirm the
Temperature and Air-Flow Characteristics of Your Vehicle (See Section 2.3)
Operating Temperature Range: 12V and GT12V Series: 25F to 125F
GT Series: 15F to 125F
Storage Temperature Range: -4F to 95F
Water Resistant
REMOVE THE BATTERY FROM THE PACKAGING AND IMMEDIATELY USE A VOLT
METER TO ENSURE THE BATTERY IS OFF BEFORE ATTEMPTING ANY INSTALLATION.
AFTER INSTALLATION SIMPLY TURN THE BATTERY ON.
12VNDE-R11

Lithionics Battery LLC |2013
Index
1. Product Warranty
1.1 - Product Warranty
1.2 - Warranty Registration
1.3 - Terms and Conditions
2. Operating Environment
2.1 - UNDOT Specification
2.2 - Waterproof Specification
2.3 - Temperature Specification
3. NeverDIE Battery Operation
3.1 - Connecting Your NeverDIE Battery
3.2 –Terminal Tightening Torque
3.3 –NeverDIE Pushbutton operation
3.4 - Optional NeverDIE Wireless Remote Operation
4. Charging Your Battery
4.1 - Supported Chargers
4.2 - Connecting Your Battery
5. Storing Your Battery
6. Troubleshooting

Lithionics Battery LLC |2013
1. Product Warranty
1.1 - Product Warranty:
Warranty: See WARRANTY STATEMENTS Document, Revision July 2013.
1.2 - Warranty Registration:
To ACTIVATE your product warranty please visit: www.LithionicsBattery.com and click the red “WARRANTY” tab
at the top, then fill out the warranty submission form and click “SUBMIT”.
The NeverDie® Battery Warranty Does Not Cover Damage to the Battery By Short Circuiting the Terminals. Be sure the
battery is OFF, using a volt meter before installation.
2. Operating Environment
2.1 - UNDOT Specification:
All Lithionics Batteries are tested to comply with United Nations DOT Manual 38.3 requirements.
Please contact Lithionics Battery for a copy of this safety testing protocol. UN DOT testing ensures
battery safety during commerical shipping and transportation operations. It represents the most
severe testing available. Passing this testing does not ensure that the Battery will continuously
perform to these test standards in your application.
THIS TEST DOES NOT CERTIFY THAT YOUR BATTERIES WILL ENDURE IN THIS ENVIRONMENT….IT IS A
TEST OF SAFETY TO SIMULATE CRASH CONDITIONS OR SHIPPING DAMAGE
2.2 - Water/Moisture Specification:
All Lithionics Batteries are water resistant, not waterproof. This means the battery is protected against
falling water when tilted up to 15 degrees in each direction from normal upright operating position.
Do NOT submerge the battery as it will cause permanent damage.
2.3- Temperature Specification:
See Page 1 of this Document for Operation Temperature Ranges Allowed
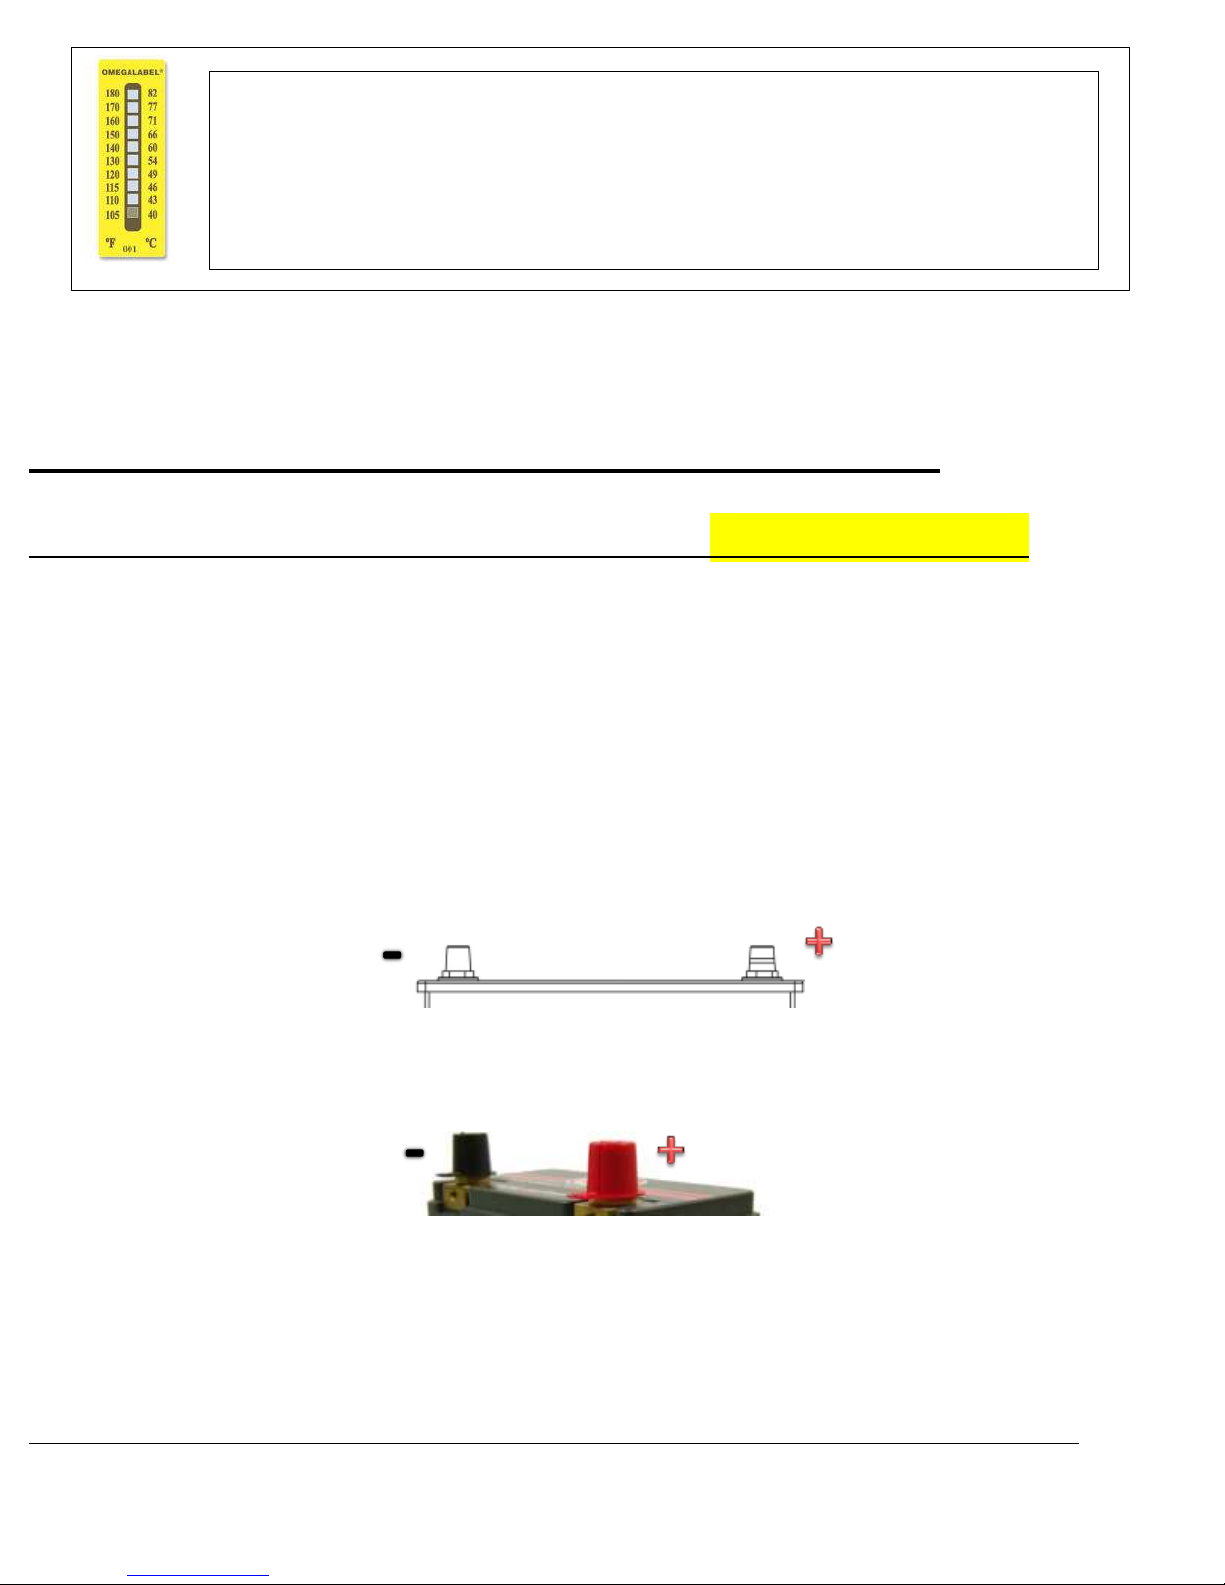
You will notice the yellow label pictured at left is on your battery. This will allow you to
understand if your battery is too close to an external heat source and whether that temperature
is too high for the battery. Ideally, the max. temperature reading should be 120 degrees F.
You will know that because the bottom 4 silver squares will go black. If you approach 130
degrees F, that will adversely affect the battery over time. At 140 F, your warranty is void. If
you see the temperature rising, contact us and we can provide thermal management solutions.

Lithionics Battery LLC |2013
3. NeverDIE Battery Operation
3.1 - Connecting Your NeverDIE Battery: TURN IT OFF FIRST!
Use a Volt Meter to Ensure Battery is OFF at Zero Volts Before
Connecting the Battery to the Vehicle to a PREVENT SHORT CIRCUIT
Which Can Damage the NeverDie® Electronics
Identify the positive and negative terminals. As pictured below, note the difference
between both terminals. The right terminal in this example has a stripe, this indicates
the positive connection.
When opening your package, you will find that each terminal has a black and a red
cap. The red indicates positive, and black indicates the negative output. Lithionics
Battery caps are placed like below:
Near your battery terminals, locate the red positive symbol like this: +
This symbol will always be found beside or at the bottom of the positive terminal.
Many vehicles are designed to ensure proper air-flow over the battery and have an insulated
battery box to ensure battery life. It is the responsibility of the user to ensure the suitability of
a lithium ion battery in your installation. Contact Lithionics Battery to obtain a free
temperature sensor shown at left to install in your current vehicle to measure actual
temperatures prior to purchasing a battery. Warranties do not cover over-heated batteries.

Lithionics Battery LLC |2013
3.2 - Tightening Torque:
All main battery terminal connections must be tightened to a max torque value as indicated below.
Do not exceed this value. Brass/copper conductors have a much lower shear strength than steel.
M6 Modular Terminals
60 inch pounds/7 N-m
5/16 Bolt SAE Style
Terminals
100 inch pounds/11 N-m
(Use a Crescent Wrench
to stabilize the base of
the Terminal)
3.3 - Push Button Operation: Turn the Battery “On” After Installation!
On top of your battery is EITHER a low-profile stainless-steel pushbutton momentary switch OR a red
push button which operates the batteries output. It operates simply by pressing once OR by pressing
and holding the button.
To turn your battery ON: Press and hold the button for 1 second and release.
To turn your battery OFF: Press and hold the button for 4 seconds and release.
3.4 - Optional Wireless Remote Operation:
With the optional Wireless Remote you can turn the battery on/off while being up to 100 feet away.
To turn battery output ON
To turn battery output OFF
Press the UNLOCK symbol on the remote.
Press the LOCK symbol on the remote.

Lithionics Battery LLC |2013
If you have a Wireless Remote Control, Maintenance Charging will be Required Using a
Lithionics Battery CHARGER as the Wireless Remote Control will Draw Power from the
Battery During Periods of Non-Use. Charge Your Battery Every 30 Days!
4. Charging Your Battery
4.1 - Supported chargers:
Lithionics Battery 12V engine start batteries can be charged with either a 12V rated alternator in
proper working order or a Lithionics Battery LiFePO4 Charger. Failure to do so will void the battery’s
warranty. Other chargers are factory approved but you must report that charger to the factory in an
email request to your sales representative or info@lithionicsbattery.com and obtain formal approval.
4.2 - Connecting Your Battery to a Charger:
Step 1.
Verify that the battery output is ON. This can be done by checking that the red pushbutton LED is lit or
by checking that battery voltage is present with a multi-meter. Pressing the ON-OFF button for 1 full
second will always turn the battery ON whether it is ON or OFF.

Lithionics Battery LLC |2013
Step 2.
1st: Connect the RED (positive) charger lead to the positive terminal on the battery.
2nd: Connect the BLACK (Negative) charger lead to the negative terminal on the battery.
Step 3.
Plug the charger into a wall outlet and turn on the charger, your battery is now charging!
5. Storing Your Battery
Hint: It’s Not a Nuclear Reactor!
To properly store your battery perform the following: CHARGE IT UP
THEN TURN IT OFF. NeverDie® means it will hold a charge for 3
months to 6 months if Properly Charged Before Storage. NeverDie®
Means the Battery Will Enter Sleep Mode with a Power Reserve But
Only for a Limited Time Before Recharging is Required.
1. Fully charge your battery.
2. Press the NeverDIE switch for 5 FULL SECONDS and confirm the battery is OFF.
DO NOT USE A SOLAR CHARGER OR SOLAR CHARGE CONTROLLER ON
ANY LITHIONICS ENGINE STARTING BATTERIES. THIS WILL VOID YOUR
WARRANTY. OUR ENGINE STARTING BATTERIES ARE DESIGNED TO
ABSORB THE ENERGY OF A FAILED ALTERNATOR TO ENSURE VEHICLE
SAFETY AND PREVENT VEHICLE DAMAGE. THIS MEANS THE ENGINE
STARTING BMS VERSION DOES PERMIT OVER-CHARGING VOLTAGES TO
ENTER THE BATTERIES WHICH ARE FIRE-PROOFED. SOLAR CHARGE
CONTROLLERS ARE MUCH MORE PRONE TO FAILURE THAN ALTERNATORS
AND THEREFORE YOU MAY LOSE YOUR INVESTMENT OF YOUR BATTERY.

Lithionics Battery LLC |2013
3. Place the battery in a cool, dry environment. Ideally 70-80F (21-26C).
Example: a battery installed into a JetSki, Classic Car or Boat planned for a 6 month
storage…filling the battery UP and turning it OFF will enable this storage period.
-Upon completion of long term storage, press the button for 1 second and attempt an engine
start within 10 seconds. If the battery fails to start the engine to initiate alternator
recharging, simply attach a low-cost Lithionics charger for 30 to 60 minutes.
6. Troubleshooting
Symptom
Cause
Remedy
No voltage
A. Battery output is off.
B. Battery is not charged.
C. Battery is overheated.
D. Battery was short circuited.
A. Turn battery on. See section
3.3.
B. Charge battery. See section
4.
C. Remove battery from heat
source or lessen load on
battery (max 80A
continuous). See section
2.3.
D. In the event battery has
been short circuited it will
auto power off. Remove
battery from short circuit
load and turn battery on.
See section 3.3.
Not charging
A. Battery is off.
B. Wrong charger connected.
A. Turn battery on. See
section 3.3.
B. Verify the correct
charger is applied. See
section 4.
Poor performance
A. Battery is not charged.
B. Wrong application.
A. Charge battery. See
section 4.
B. See front page for
operating specifications.
Other manuals for NeverDIE
1
Table of contents
Popular Other manuals by other brands

mundoclima
mundoclima MH-10-V5 User and installation manual

Alfalaval
Alfalaval Alfie instruction manual

Aero-motive
Aero-motive 11217 installation instructions

O.L.E. (UK)
O.L.E. (UK) T4020 Instruction & installation manual

ABB
ABB SACE Tmax XT UL installation instructions

Peak
Peak AQUATINE PLUS installation guide