Living Spaces SEVILLE POWER RECLINER LIFT CHAIR W/ AIR MASSAGE... User manual

1910$SEVILLE$POWER$RECLINER$LIFT$CHAIR$W/$AIR$MASSAGE$$
USER$MANUAL

Components:
•Hand wand –placed in the side pocket (outside LAF arm/RAF arm), controls all motors and functions (reclining,
power headrest, lifting, etc.) via a direct connection with motors. .
•AC wall plug – connects the power transformer to the power outlet.
•DC cord – connects the power transformer to the DC socket (mounted on the rear bottom of LAF arm/RAF arm
stump).
•DC socket – receives power from DC cord then transfer to motors.
•Power Transformer –A box-shaped unit to transfer 110V AC power to 25V DC power to supply for the furniture.
•Junction Box –splitter/extension cord connecting the power transformer to multiple motors/air baddders/heat padding/
hand wand.
•Seat / backrest / Headrest Motor –motors mounted on mechanism to drive movement on seat/headrest via hand wand
control.
•Battery- The battery was mounted at the top of transformer and could provide the power while can't get power.
•Air Bladders- mounted inside lower section of back, inflate the air bladders via hand wand control. Turns off
automatically after 30 minutes of use as safety feature.
•Heating pad – mounted inside lower section of back, produces heat via hand wand control. Turns off
automatically after 30 minutes of use as safety feature.

Quick Trouble-Shoot for Motors Malfunctioning:
Below are some possible reasons to cause motors to stop working:
1. Loose connection or wires not securely plugged in.
2. Broken side switch
3. Broken DC socket
4. Broken power transformer (especially when ALL motors stops working on one unit)
5. Power cords damaged
6. Motors failure
NOTE: In some cases a button on the switch might be stuck after being pushed, thus continuously
activating the motor. This can cause overheating or even damages on the power transformer.

Instruction$for$hand$wand

Air Massage Standard Functions
5
HC 4HR3B 04
HEAT
Description
Standard Function
The heat function is activated by pressing the HEAT button.
When active, the heat pad will provide up to 65 ⁰C of heat.
The heat function will be active while the HEAT button is illuminated.
To de-a cti va te he at , pr es s t he H EAT button again. Th e HE AT b utton will not be
illuminated when the heat function is off.
The heat function has a 30-minute timer. After 30 minutes, the heat pad will turn off
automatically, and the HEAT button will not be illuminated.
Error:
HEAT Button
illuminated but
no heat is
produced.
If the HEAT button is illuminated, but the heat pad is not producing heat, the
heat pad could have become disconnected.
1) Unplug the piece of furniture from the wall outlet
2) Wait at least 30 seconds
3) Lift the back panel to reveal zipper pouch.
4) Unzip pouch to reveal the Junction.
5) Locate the Heat Cord (shown below)
6) Ensure that the heat pad is securely connected.
7) Zip the pouch and reset the back panel.
8) If the heat pad still does not produce heat, please contact your furniture
provide so that they may repair or replace the faulty part.
Heat Cord
Note: Heat will be momentarily disabled if any Headrest/Footrest/Back/Lift/Home/Lumbar button is
pressed. Heat will be re-enabled when the button is released. This is to ensure safety for the user and to
improve system longevity.

HEADREST/
FOOTREST/
BACK/HOME/
LIFT/ LUMBAR/
Description
Standard Function
Headrest/Footrest/Back/Lumbar/Lift are sets of two buttons that control the
motion features of the piece of furniture.
The Home button is a singular button that controls motion features of the piece
of furniture. Headrest buttons will open and close the headrest cushion. Back
buttons will open and close the recline position. Lumbar buttons will open and
close the lumbar air cushion.
The Footrest and Lift buttons both control a single actuator that will lift or
lower the chair or open and close the footrest depending on how far the
motor has been extended.
All open buttons are located on the right side of the Hand Control, and all
close buttons are located on the left side of the Hand Control. The upper lift
button will raise the lift/lower the footrest. The lower lift button will lower the
lift/open the footrest.
6

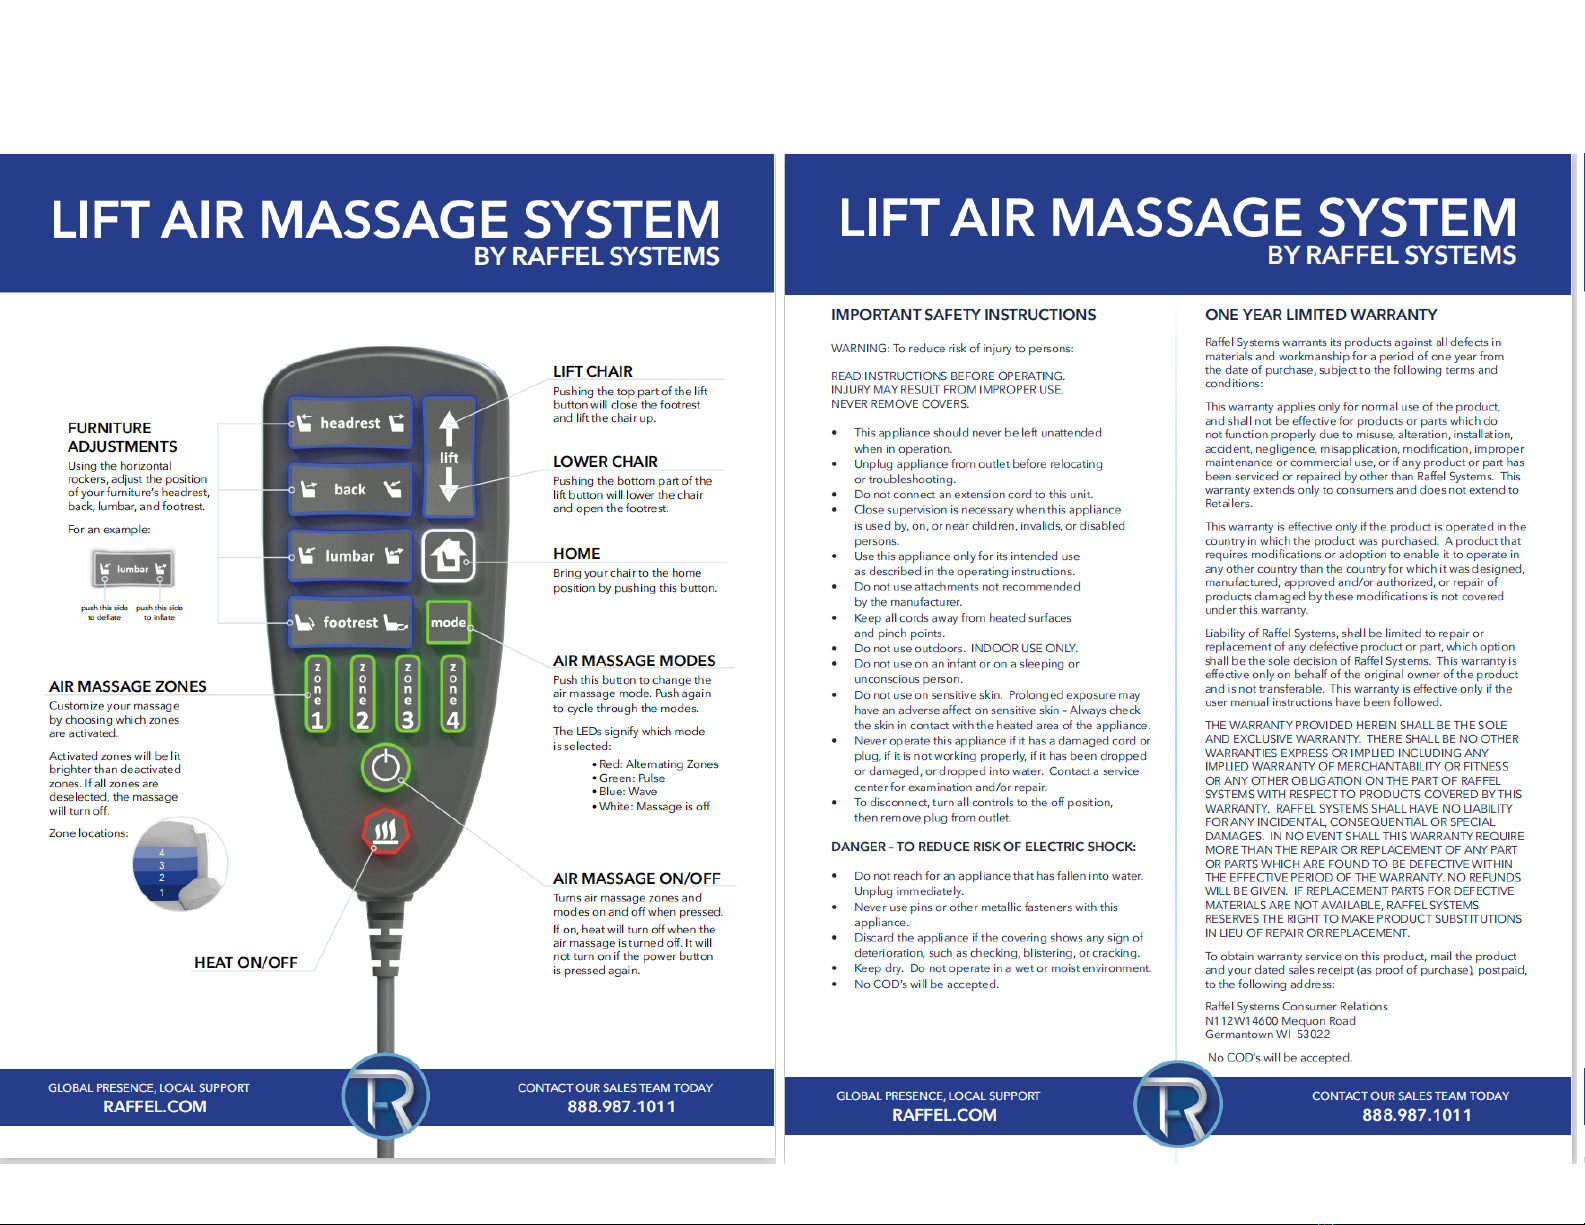
The home button will bring the furniture to the fully closed state. Pressing home
will close the headrest, raise the back, and close the footrest/raise the lift.
Note Using the Lumbar function will stop all other massage features. If the massage
feature is running and either Lumbar button is pressed, the massage will stop.
Headrest/Footrest/Back/Lumbar/Lift/Home buttons only allow one operation at a
time. This is to ensure safety for the user and longevity of the system.
The Home button controls more than one motor at a time. Please be aware of the
surrounding area before using the home button to ensure safe operation.
If the Hand Control is disconnected from the system and then reconnected, the
Hand Control will take several seconds to connect to the system. The Hand
Control will flash several times to indicate that it has successfully connected.
Error:
Button is pressed but
the system does not
show movement.
If a Headrest/Footrest/Back/Lumbar/Lift/Home button is pressed and no
motion occurs, the Hand Control could be in a lock out state.
1) Wait for at least 10 seconds and press the button again.
2) If motion does not occur ensure the Hand Control is connected.
3) Unplug the piece of furniture from the wall outlet.
4) Wait at least 30 seconds.
5) Lift the back panel and locate the zipper pouch.
6) Unzip the pouch and locate the Hand Control cord
7) Ensure that there are no frayed, pinched, exposed, or otherwise
damaged wires. Do not connect the Hand Control if the cord is
damaged in any way.
8) Ensure that the Hand Control is securely connected to the Junction
with the white connectors (shown below).
9) Zip the pouch and reset the back panel.
Hand Control Connector
Error:
Headrest or Recline
motor does not
function.
If a Headrest or Back motor does not function, a motor connection could have
become disconnected.
If the Headrest or Back motor does not function:
1) Unplug the piece of furniture from the wall outlet
2) Wait at least 30 seconds
3) Lift the back panel to reveal zipper pouch.
7

4) Unzip pouch to reveal the Junction.
5) Locate the Headrest motor cord (shown on the next page).
6) Ensure that there are no frayed, exposed, or otherwise damaged
wires. Do not connect the motor if the cord is damaged in any
way.
7) Ensure that there is nothing blocking the path of the motor
or connected frame.
8) Zip the pouch and reset the back panel.
9) If the motor still does not function, contact your furniture provider so
they may replace or repair the faulty part.
Headrest/Back Motor Cord
Error:
Footrest or Lift
motor does not
function.
If the Footrest or Lift motor does not function:
1) Unplug the piece of furniture from the wall outlet
2) Wait at least 30 seconds
3) Lift the back panel to reveal zipper pouch.
4) Unzip pouch to reveal the Junction.
5) Locate the Headrest motor cord (shown below).
6) Ensure that there are no frayed, exposed, or otherwise damaged
wires. Do not connect the motor if the cord is damaged in any
way.
7) Ensure that there is nothing blocking the path of the motor
or connected frame.
8) Zip the pouch and reset the back panel.
9)
9) If the motor still does not function, contact your furniture provider so
they may replace or repair the faulty part.
Footrest/Lift Motor Cord
Error:
Lumbar Air
cushion does not
inflate.
If the Lumbar air cushion does not inflate, the air hose may be disconnected,
pinched, or damaged.
1) 1) Unplug the piece of furniture from the wall outlet
2) Wait at least 30 seconds
3) Lift the back panel to reveal zipper pouch.
4) Unzip pouch to reveal the Junction.
5) Locate the air hose connectors (shown below).
8

6) Ensure that the connector is fully mated.
7) Ensure that the air hoses are not pinched or otherwise blocked.
8) Ensure that the air hoses are not damaged in anyway.
9) Zip the pouch and reset the back panel.
10) If the Lumbar air cushion still does not inflate, control your furniture
provider so they may replace or repair the faulty part.
Air Hose Connector
9

AIR MASSAGE
Description
Standard Function
The Air Massage has three massage modes and four controllable zones. Each zone
can be turned on or off, and will disable that zone for each massage mode. If all
zones are turned off, the Air Massage will turn off.
The Air Massage is started by pressing the PWR button. The four numerical
buttons, the MODE button and the PWR button will be lit for the start of the Air
Massage. Pressing a numerical button will un-light the numerical button pressed
and turn off the corresponding zone.
While the Air Massage is active, it can be turned off at any time by pressing the
PWR button.
The Air Massage mode can be changed by pressing the MODE button. There are
three massage modes: Alternate, Pulse, and Wave. The Air Massage will always
start in the Alternate mode.
Each massage mode is indicated by the MODE button color. Alternate is Red, Pulse is
Green, and Wave is Blue.
Pressing the numerical buttons or MODE while Air Massage is not active will not cause
the system to respond. Air Massage must be active for the numerical buttons and
MODE button to control the system.
The Air Massage has a built in 30-minute timer. After 30 minutes the Air Massage
will turn off and the Hand Control buttons will be un-lighted. Pressing a numerical
button or the MODE button will reset the 30-minute timer.
10

Note Using the Lumbar function will stop all other massage features. If the massage
feature is running and either Lumbar button is pressed, the massage will stop.
Massage can be re-enabled when Lumbar buttons are not pressed.
Error:
Massage Zones do
not inflate.
If the Massage Zones do not inflate while Air Massage is active, the air hose could be
disconnected, pinched or damaged.
1) Unplug the piece of furniture from the wall outlet
2) Wait at least 30 seconds
3) Lift the back panel to reveal zipper pouch.
4) Unzip pouch to reveal the Junction.
5) Locate the air hose connectors (shown below).
6) Ensure that the connector is fully mated.
7) Ensure that the air hoses are not pinched or otherwise blocked.
8) Ensure that the air hoses are not damaged in anyway.
9) Zip the pouch and reset the back panel.
10) If the Lumbar air cushion still does not inflate, control your furniture
provider so they may replace or repair the faulty part.
Air Hose Connector
11

POWER RECLINER PARTS

Check if the green
light on power
transformer is on
Check connection
security and
components integrity
on DC socket and
power cable.
Check connection
security and integrity
of motor’s 2-pin
cable
1. Check power
cords integrity and
connection to
transformer.
2. If power cords
undamaged, and
connection
secured, replace
power transformer.
Yes
No
Power Recliner Trouble Shooting
For dual-power recliners, please check connection and integrity of Y-Cable
splitter.
This manual suits for next models
1
Other Living Spaces Massager manuals
Popular Massager manuals by other brands

Prorelax
Prorelax INTENSE BODY MASSAGER operating instructions

Panasonic
Panasonic WEDEATSU EP1060 operating instructions

Innov'SA
Innov'SA COCOON User guide and assembly instructions

Snailax
Snailax SL-256G Use & care manual

LIBERTY HEALTHCARE
LIBERTY HEALTHCARE Alaska Petite user manual

Medisana
Medisana Neck Massage 88941 instruction manual