Livingston Innovations Freedom Trax User manual

- 1 -
Freedom Trax FT1 users manuel may 2018
LIVINGSTON INNOVATIONS
User's manual
Read this manual before operating Freedom Trax™.

- 2 -
Freedom Trax FT1 users manuel may 2018
Manufacturer
Exclusive representative for Europe
LIVINGSTON INNOVATIONS
3242 W. Monroe Street
Waukegan, IL 60085,
U.S.A.
Phone:+1 847-808-0900
Email: freedomtrax@gmail.com
AMODI-FREEDOM TRAX EUROPE
3 rue des Peupliers
78450 Chavenay
France
Tel : +33 1 85 83 02 10
Email : info@freedomtrax-europe.com
TABLE OF CONTENTS
Contact information.......................................................................................................................... 2
Introduction........................................................................................................................................... 4
Safety information............................................................................................................................. 4
Parts information and identification....................................................................................... 6
Adjustments for your wheelchair............................................................................................. 8
Device width..................................................................................................................................... 8
Tensioner adjustment.................................................................................................................. 8
Front caster extension frame................................................................................................... 9
Clutch................................................................................................................................................10
Mounting and dismounting the device...............................................................................11
Controller information...................................................................................................................15
Operation..............................................................................................................................................16
Stability and balance..................................................................................................................16
General operation........................................................................................................................16
Maintenance........................................................................................................................................17
Storage and transport...................................................................................................................17
Technical specifications..............................................................................................................18
Restrictions of use..........................................................................................................................18
Warranty................................................................................................................................................19
CE Certification.................................................................................................................................20
SAVE THESE INSTRUCTIONS

- 3 -
Freedom Trax FT1 users manuel may 2018
INTRODUCTION
FREEDOM TRAX™ is a motorized track device designed as an attachment for manual wheelchairs.
When attached, Freedom Trax™ allows a manual wheelchair to traverse sand, snow, gravel and mud.
Freedom Trax™ adjusts in many different ways accommodating most wheelchairs on the market. If your
wheelchair does not fit properly to the device, please contact us immediately and we will accommodate
you the best we can.
SAFETY
DO NOT OPERATE THIS EQUIPMENT WITHOUT FIRST READING AND UNDERSTANDING THIS
MANUAL. IF YOU ARE UNABLE TO UNDERSTAND THIS MANUAL, CONTACT A HEALTHCARE
PROFESSIONAL BEFORE ATTEMPTING TO USE THIS EQUIPMENT. FAILURE TO SET UP
EQUIPMENT PROPERLY MAY RESULT IN PERSONAL INJURY OR DAMAGE TO THE
EQUIPMENT.
DANGER: Always ensure the wheelchair is mounted securely and safely to the device. Failure
to do so can result in injury or damage to the device. If your wheelchair does not fit
properly to the device or you have questions, please contact us immediately and
we will try to accommodate you.
DANGER: While this device has front and rear anti- tip wheels, shifting your weight during
operation or attempting to navigate over rocky or uneven terrain may result in
tipping over.
DANGER: Do not attempt to move up or down stairs in the device. This device is not a stair
climbing device and could result in serious injury.
WARNINGS:
-Do not attempt to drive through water, over curbs, obstacles, or terrain steeper than
10 degrees.
-Do not leave device in rain storm of any kind
-Do not use the device in the shower or leave it in a humid bathroom while taking a
shower.
-When moving the device without a user, use caution and proper lifting techniques to
avoid injury.

- 4 -
Freedom Trax FT1 users manuel may 2018
-Always turn the device off and unplug battery connection when not in use or
when mounting or dismounting device.
-Never attempt to lean or reach when attached to the device.
-Care should be taken when using oxygen in close proximity to device.
-Never attempt to adjust the device while a wheelchair is mounted.
BATTERIES:
-The batteries in this device are lithium ion and should only be serviced by a qualified
technician.
-The batteries should only be charged with the supplied charger.
-NEVER attempt to recharge the batteries by attaching cables directly to the
battery terminals.
-DO NOT attempt to recharge the batteries and operate the wheelchair at the
same time.
-DO NOT attempt to recharge the batteries when the wheelchair has been exposed
to any type of moisture.
-DO NOT attempt to recharge the batteries when the wheelchair is outside.
-DO NOT sit in the wheelchair while recharging the batteries.
-DO NOT attempt to recharge the batteries using both the on-board battery
charger and an independent battery charger (plugged into the joystick charger
port) at the same time.
Freedom Trax™ operating manual
-4-
1308-14255 Rev 1.1

- 5 -
Freedom Trax FT1 users manuel may 2018
NOTICE: The information contained in this document is subject to change
at any time without notice.
PARTS INFORMATION AND IDENTIFICATION
Please refer to the pictures below to assist in identifying the parts.
1. front caster ramp
2. front caster cradle
3. front caster lock
4. cleat axles
5. front caster extension frame
6. front caster extension adjustment screws
7. front anti-tip wheel
8. front handle/support tube
9. safety strap
10. back wheel stop
11. back wheel cradle ramp
12. back wheel cradle
13. back wheel cradle mounting plates
14. tension limiter
15. front cross brace frame
16. front cross brace lock mechanism
17. rear cross brace frame
18. rear cross brace lock mechanism
19. rear anti-tip wheel
20. track
21. battery box
22. motors
23. controller
24. tensioner
25. boogie wheels
26. sprockets
27. battery/controller connectors
Freedom Trax™ operating manual
-5-
1308-14255 Rev 1.1

- 6 -
Freedom Trax FT1 users manuel may 2018

- 7 -
Freedom Trax FT1 users manuel may 2018
ADJUSTMENT/SET UP
Please note that you should never attempt to adjust the device while a wheelchair is mounted. If
Freedom Trax™ is not properly aligned, dismount the wheelchair and make adjustments while it
is not attached to a wheelchair.
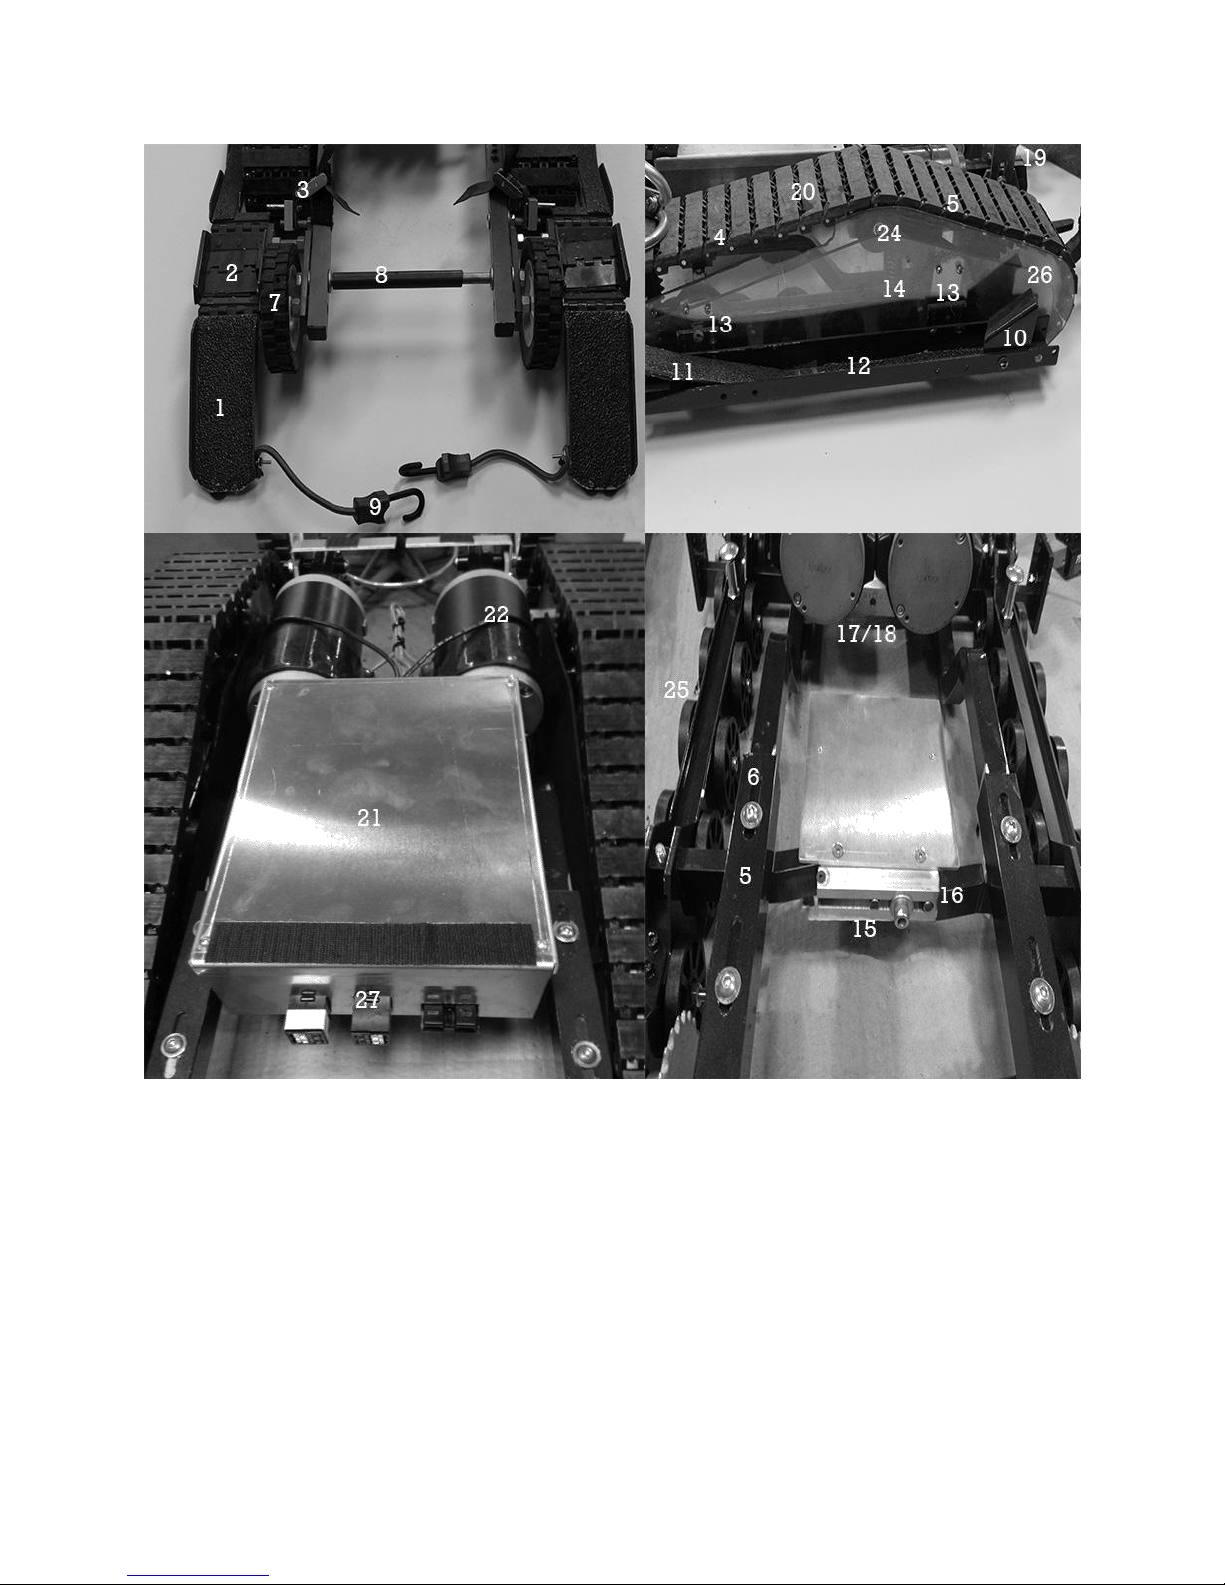
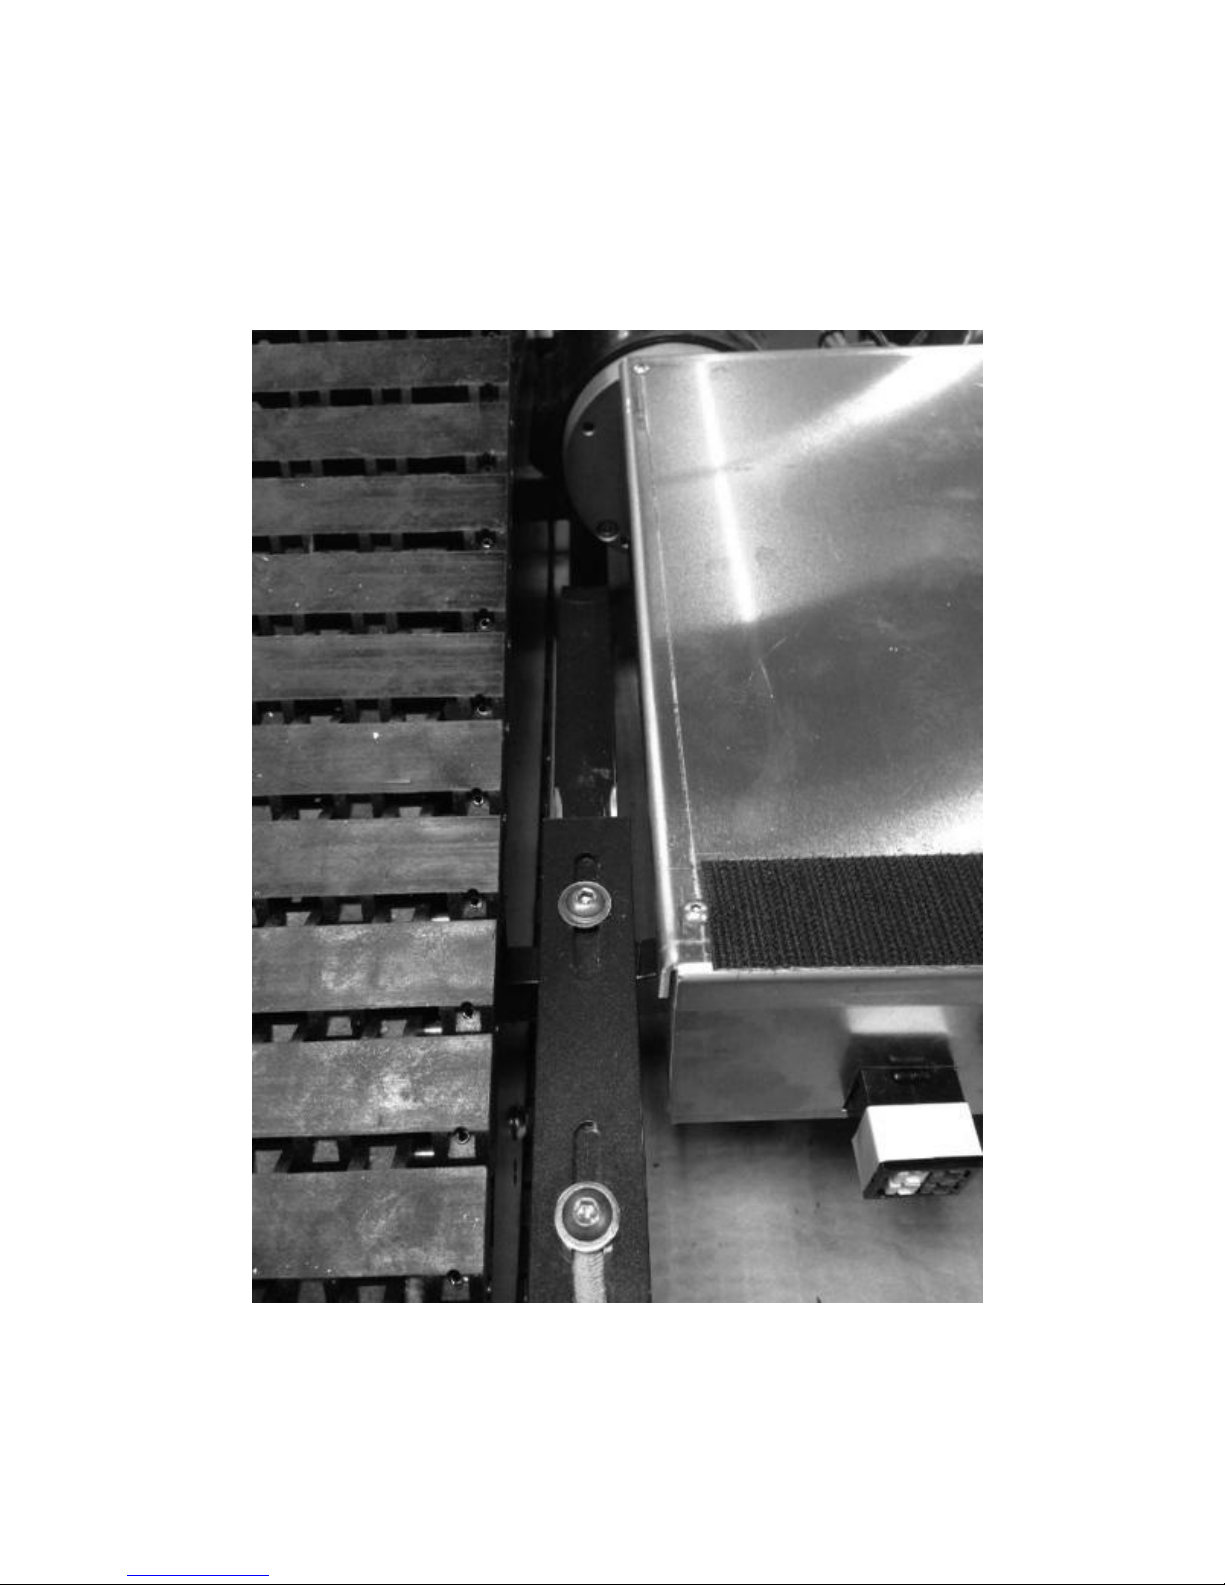
Freedom Trax adjusts in the middle by loosening (2) 5/16” bolts with a ¼” allen wrench
located on framing cross members. The thumb screws on the back motor support must
also be loosened to allow the device to adjust.
To narrow or widen the device, pull or push the front and rear of the frame back and
forth until the rear wheel cradle aligns with the measurement of the wheelchair.
Depending on the model of wheelchair, narrowing the rear wheel cradles by ¼” from the
wheelchair allows for easier mounting. For a proper fit, ensure that the rear wheel
cradles are parallel or an equal distance apart from the front to the rear of the cradles.
After adjustment, ensure that the front and rear cross brace lock mechanisms are
tightened back by hand.
The front caster cradle is not adjustable. It is designed to accommodate a range of front
caster orientations. If the wheelchair cannot fit within the parameters of the device,
contact us immediately and we can determine if modification is necessary to properly fit
the wheelchair. To maintain the front ramp/mounting assembly in proper working order,
always make sure no debris is left in the front caster cradle after use.
The front safety strap is essential to prevent the front mounting ramp from lowering
during operation. The front strap is adjustable in length and can be secured to any
convenient location on the wheelchair.
The back wheel stop must be adjusted and tightened prior to operation. The back stop
should be set to allow the wheels to rest against the backstop when the front caster is
securely fastened in the front caster cradle.
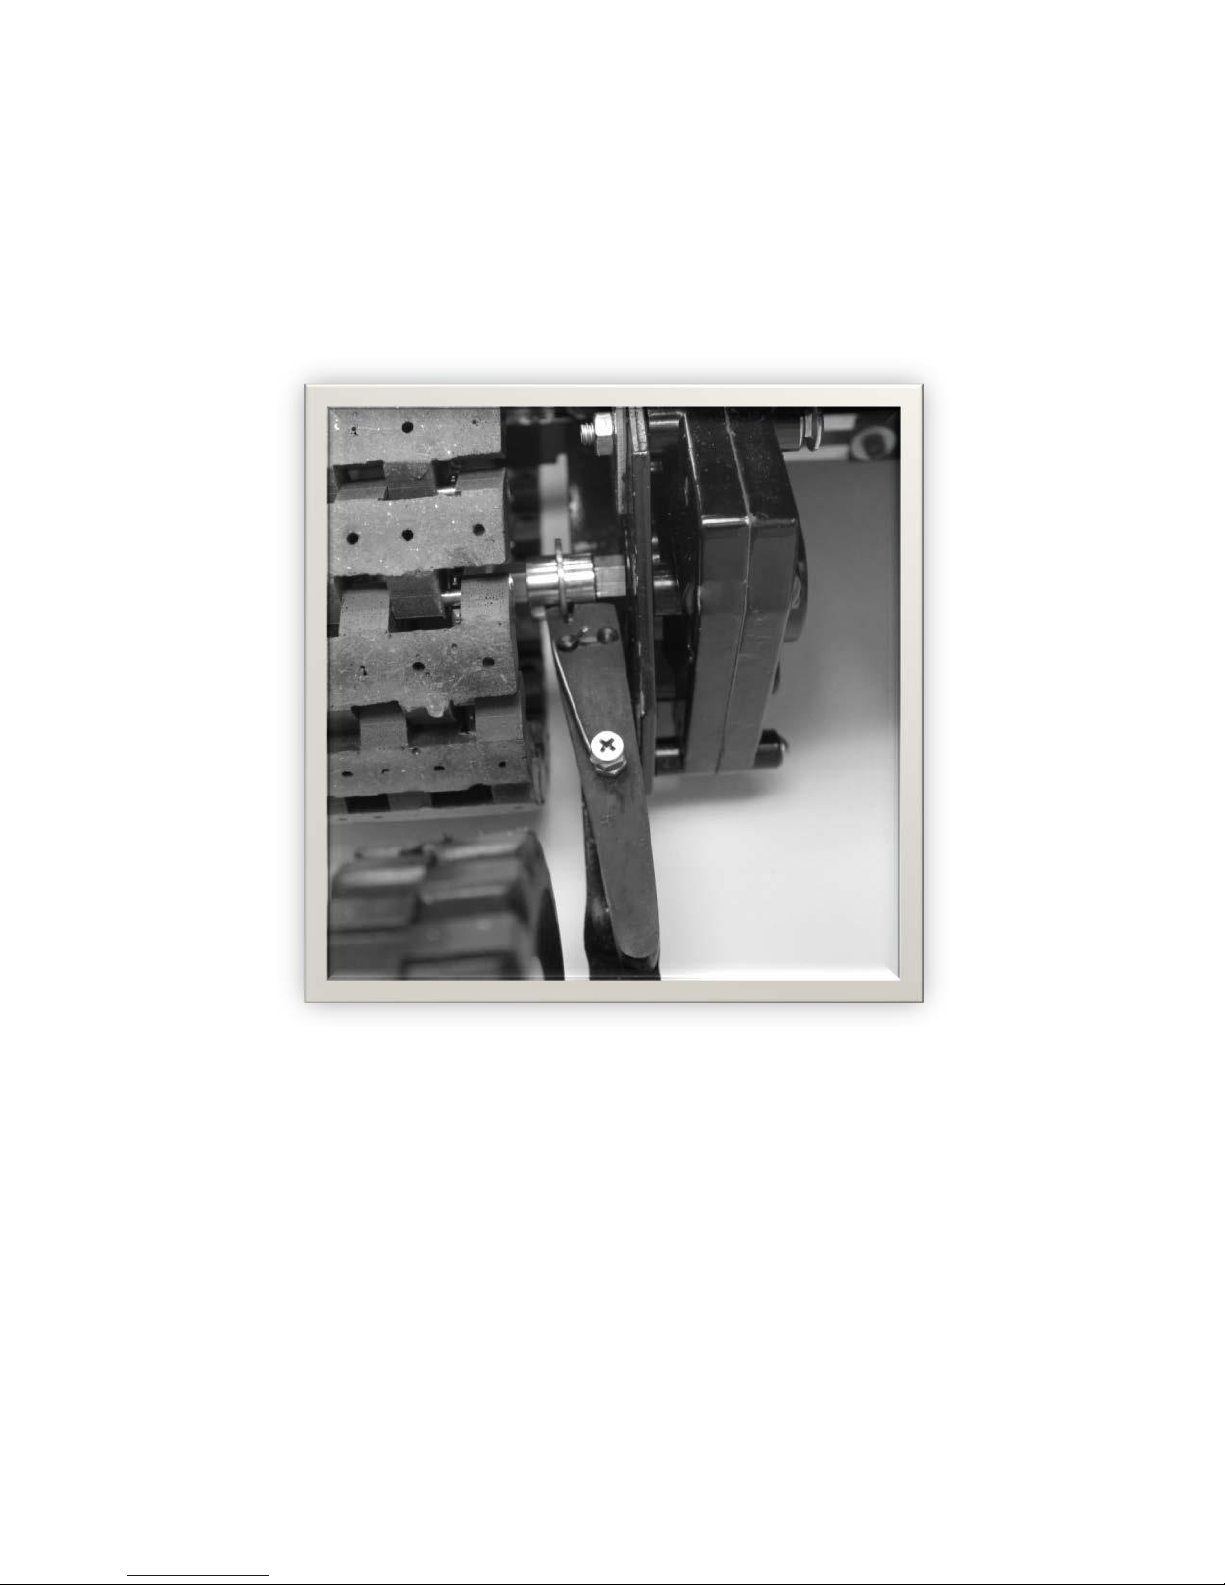
TENSIONER ADJUSTMENT
Over time, the tensioner will require adjustment as the track expands due to wear. To
adjust the tension limiter, remove the track and adjust the 3/8” nut at the base of the
spring. The track is set to the correct tension limit when the track can only depress by
.500” from top to bottom.

- 8 -
Freedom Trax FT1 users manuel may 2018
FRONT CASTER EXTENSION FRAMES
The front caster extension frames can also be adjusted front and back to change the
weight distribution over the track. Loosen the two screws on either front extension
frames and slide the entire front assembly forwards or backwards. Ensure the screws
are re-tightened prior to use. (see picture below)

- 9 -
Freedom Trax FT1 users manuel may 2018
CLUTCH
This device is designed with clutches that disengage and engage both tracks
independently from the motor system. A single lever clutch is located at the rear of both
tracks. To disengage and engage the motors from the tracks, flip the clutch lever side to
side. Some rotation of the track may need to occur before the clutch slides freely back
and forth (see picture below).

- 10 -
Freedom Trax FT1 users manuel may 2018
MOUNTING/DISMOUNTING DEVICE
•The device is designed to be mounted from the front by a manual wheelchair rolling
backwards onto the device. Practice will be required to easily mount the device. Always
ensure the battery connector is disconnected prior to mounting and dismounting. Failure
to do so could move the device unintentionally resulting in serious injury. Always have a
spotter until you are comfortable mounting and dismounting alone.
•Always mount and dismount the device on SOLID LEVEL ground. Failure to mount or
dismount the device on solid level ground may damage the device and possibly cause
injury.
•Always ensure the front casters are pivoted out towards the front of the wheelchair. The
front casters should enter the front caster ramp always pivoted out or the device will not
attach properly to the wheelchair. If the front casters have any problems ascending the
front caster ramp, exit the device and try again.
•Adjustment of the device width and front caster ramp assembly is crucial for easy
mounting. If Freedom Trax does not fit your wheelchair, please contact us immediately
and we will accommodate the best we can.
•DO NOT attempt to back off the device. While the device does have a backstop at the
back wheelchair wheel cradle, a large amount of force could propel the wheelchair
backwards off the device.
•Freedom Trax has a limited amount of adjustment. Do not attempt to modify Freedom
Trax anyway in order for your wheelchair to mount. Please contact us immediately and
we will accommodate the best we can.
•When mounting or dismounting, always ensure the lock down mechanism is out of the
way of the wheelchair and in the unlocked position allowing the front cradle mechanism
to rotate freely.
•When mounted, attach safety straps to a convenient location on your wheelchair to
ensure the front ramps do not fall down during operation. Failure to do so can result in
the ramps folding under the unit when moving forward.

- 11 -
Freedom Trax FT1 users manuel may 2018
MOUNTING
STEP 1 –Reverse onto Freedom Trax ensuring the wheelchair wheels are aligned to the rear
wheel cradle. Always reverse straight back and never at an angle. Always have a spotter until
the user can confidently mount Freedom Trax.
STEP 2 –Once the front caster are on the front ramp, reverse straight back until the front
casters fall into the front caster cradle and the wheel is stopped by the backstop. Always
ensure the front casters are pivoted away from the user.
STEP 3 –Once the front casters are in the front caster cradle and the wheelchair wheel is
against the backstop, lean forward slightly to put pressure on the front casters. This will allow
the front ramp to pop up and set the front caster in the front caster cradle. If the ramps do not
pop up, dismount the device and ensure no debris is in the front caster cradle or the front
caster is resting on another component besides the front caster cradle.
STEP 4 –Once the ramp is popped up, secure the hook to a solid part of the wheelchair frame
or front caster. Do not secure the hooks anywhere higher than 6 inches from the bottom of the
wheelchair. Failure to secure the wheelchair properly can cause serious injury or death. After
the hooks are fastened tightly to the wheelchair, secure the safety strap to a convenient
attachment on the wheelchair. The safety strap ensures that the ramps will not fold down in
operation. If the wheelchair has wheel locks, it is recommended they are in use once the
wheelchair is securely fastened.

- 12 -
Freedom Trax FT1 users manuel may 2018
DISMOUNTING
STEP 1 –Place the controller in a convenient location and UNHOOK THE BATTERY
CONNECTOR. Failure to do so may cause unintentional operation and result in injury. Unfasten
the safety strap and the hooks from the wheelchair. Move the hook and the safety strap to not
interfere when dismounting Freedom Trax. While slightly leaning back, move the wheelchair
forward slowly. This will release pressure from the front casters and lower the front ramp.
STEP 2 –Move the wheelchair straight forward very slowly. Always have a spotter until the user
can confidently dismount Freedom Trax. Depending on the configuration of the wheelchair, the
front casters may spin 180 degrees as you dismount Freedom Trax. Take great caution to learn
the shift in angle as this happens. Always ensure you are dismounting Freedom Trax on hard,
smooth level ground.
STEP 3 –Continue to roll straight forward and off the device. When the wheelchair wheel
enters the front ramp, the wheelchair will naturally roll off due to the angle of the front ramp.
Slowly proceed down the front ramp.
STEP 4 –Continue to roll straight forward until the wheelchair is away from the device.

- 13 -
Freedom Trax FT1 users manuel may 2018
MOUNT/DISMOUNT
BACKANGLE

- 14 -
Freedom Trax FT1 users manuel may 2018
LOCK DOWN MECHANISM
The safety locking mechanism is designed to accommodate many different wheelchair
configurations. The locking mechanism is a device blocking the front wheels of the wheelchair
Spread the entire frame tightening kit
Unscrew the knob to allow the horizontal axis to slide
between the spokes
Slide the kit assembly between the spokes of the front
wheel and lock the knob.
Then hook the rubber to a fixed point of the chair (eg
handrails) to raise the front ramps
BEFORE THE WHEELCHAIR CAN BE LOCKED TO THE DEVICE, ENSURE THE FRONT
CASTER WHEELS ARE FULLY SET IN THE FRONT CASTER CRADLE. TO BE FULLY SET,
BOTH FRONT CASTERS HAVE TO BE SUPPORTED BY THE FRONT AND REAR WALLS
OF THE FRONT CASTER CRADLE.
Failure to properly secure the locking mechanism could result in serious injury. Do not
hesitate to contact your dealer if you have questions or queries to properly secure the
locking mechanism
No mounting mechanism is required for the rear wheels.

- 15 -
Freedom Trax FT1 users manuel may 2018
CONTROLLER
The controller that is included with the unit is a joystick type controller with speed control and
a battery level indicator. The controller comes with a small adjustable clamp to mount in a
convenient location. Always ensure the controller cable is free and clear of the tracks when in
operation. Failure to keep the cable clear can damage the controller cable. When not in use,
the controller can be attached to the cowling with the Velcro (see picture) or be detached from
the Freedom Trax™ and stored near the device.
The controller connects to the unit with Anderson type connectors for the battery and left and
right motor. When connecting the motor connectors, match red to red and white to white for the
respective side. If the connectors are not making contact easily, wiggle the connector until both
halves lock together. Please ensure the locking tabs are fully engaged on both connectors prior
to usage.

- 16 -
Freedom Trax FT1 users manuel may 2018
OPERATION
Freedom Trax™ is a motorized track device designed as an attachment for manual wheelchairs.
When attached, Freedom Trax™ allows a manual wheelchair to traverse sand, snow, gravel
and mud. Freedom Trax™ adjusts in many different ways accommodating most wheelchairs on
the market
Freedom Trax™ is not a toy. Please use extreme caution while ascending and descending any
level of grade. Take the time to learn and practice. Practice in a safe area until you feel
comfortable with the handling of the device. Exceeding the weight limits or carrying an
unbalanced load can seriously affect the handling, braking and stability.
Before each ride, check that all the cleats are free from cracks, deformation or foreign objects.
Inspect the ladder hold down strap and ensure that no cracks or breakage has occurred to the
strap.
STABILITY AND BALANCE
This device is the first of its kind and offers a unique method for traversing terrain. While
this device is designed to be rugged and traverse outdoor terrain, use extreme caution
while traversing over obstacles and other conditions found in the outdoor environment.
GENERAL OPERATION
Although side covers are included with the device, a potential does exist for rocks or
debris to get lodged inside the track. If this occurs, slowly reverse the device and
dismount the unit. Inspect what material is causing the disruption and remove debris.
Always ensure the device is OFF and the controller is removed from the unit before
attempting to remove debris from the track. Debris embedded in the track can cause the
track to skip off the sprockets. Take caution near and around small gravel to not make
zero radius turns.
Freedom Trax™ is designed to operate in a multitude of conditions and environments.
Riding at excessive speed increases the chance of an accident. In choosing a proper
speed, you need to consider the terrain, visibility and other operating conditions, plus
your own skills and experience.
Tracked devices operate differently than wheeled devices and should be driven
cautiously until the user has a full understanding of the center of gravity and weight
transfer when traversing through uneven grade.
Freedom Trax™ is designed to be washed with a hose. Do not submerge the unit to
clean it under any circumstances. All bearings are sealed and no additional oiling is
necessary.

- 17 -
Freedom Trax FT1 users manuel may 2018
Maintenance
Normally, the only maintenance needed is to keep the keep the Freedom Trax clean. As
required wash the outside off with a hose.
Periodically inspect the track for rocks or debris that might get lodged inside the track. Remove
per the instructions in the GENERAL OPERATION section. Also inspect the track for any
cracks or chips. If a track becomes broken, contact the manufacturer to order another.
After several years, the battery will start to lose capacity. This is affected by charging method
(see “BATTERIES” above) as well as time. When the battery is no longer able to supply the
capacity needed, replace it with an identical battery. These can be ordered through your
dealer as listed above.
Storage and transport
The Freedom Trax™ should normally be transported without the wheelchair attached. If the
wheelchair must remain attached, make sure that the wheelchair is firmly attached to the
Freedom Trax™. The battery must be disconnected during transportation. The controller can
be disconnected and packed if desired. If the controller remains with the Freedom Trax™, it
must be firmly fixed to the unit so that it does not move and the battery cable detached.
If Freedom Trax™ will not be used for an extended period of time, disconnect the battery. Store
in a location that is protected from the weather.
If traveling by plane, secure the wheels of the wheelchair to the rear wheel cradle with a
strapping device (cam strap or equivalent). Failure to do so adds complication when moving
Freedom Trax without a user and can possibly damage Freedom Trax or the wheelchair.
Specifications
MODEL
FT1 Standard
FT1 Pro
Wheelchair Rear Wheel Width (inside to inside)
50 cm –58 cm
50 cm –58 cm
Weight Capacity (not including wheelchair)
115 kg
115 kg
Overall Length
120 cm
120 cm
Overall Height
23 cm
23 cm
Maximum Speed
5 km / h
5 km / h
Operating Range
up to 8 km
12 to 15 km
Anti Tip Wheels (front and back)
5" Front 6"
5" Front 6"
Back
Back
Batteries
LI 24V 20 AH
LI 24V 20 AH
Controller
Joystick
Joystick
Unit Weight
34,5 kg
(32 kg without
battery)
35,5 kg
(32kg without
battery )

- 18 -
Freedom Trax FT1 users manuel may 2018
USE RESTRICTIONS
This device will not be immersed in water or will not cross curbs over 10 cm in height.
On rough terrain, slopes should not be exceeded with more than 17% slope. You must also
make sure to use the Freedom Trax with a maximum of 14%
The user must be accompanied until he has demonstrated his competence to use the
equipment alone, and without exceeding the limits mentioned above.
The user is solely responsible for the safe use of the Freedom Trax product. Injuries resulting
from use of the Freedom Trax on rough terrain are the sole responsibility of the user.
Warranty
Freedom Trax ™ is warranted for 1 year from the date your hardware is invoiced by your
reseller.
Contact your dealer to enforce your warranty.
The warranty is void if the device is modified, used apart from the recommendations in this
manual.
The battery warranty will also be void if the battery check indicates an incorrect charge or short
circuit.
If you have any doubt about operating the Freedom, Trax contact your dealer first, and if not the
importer for Europe:
AMODI –FREEDOM TRAX EUROPE
3, rue des Peupliers
78450 CHAVENAY - France
tel.+33 1 85 83 02 10
e-mail: info@freedomtrax-europe.com
with hereunder references:
MODEL:
SERIAL NO.:
MANUFACTURED
ON:
BOUGHT ON:
DEALER:

- 19 -
Freedom Trax FT1 users manuel may 2018
CE CERTIFICATE
Table of contents
Popular Wheelchair manuals by other brands

Invacare
Invacare REA Dahlia 30 Service manual

Care & Independence
Care & Independence COMFORT VALUE CVSC/ATT user guide

Stealth Products
Stealth Products True Forming Back owner's manual

Solar Mobility
Solar Mobility liberator Service guid

Permobil
Permobil F5 Corpus user manual

Whirlwind
Whirlwind RoughRider Assembly manual

Merits
Merits P321 Series manual

Harvest Healthcare
Harvest Healthcare HMS300B user manual

DeVilbiss Healthcare
DeVilbiss Healthcare drive D-LITE Instructions for use

Travel Buggy
Travel Buggy CITY 2 PLUS manual

GODONNIER
GODONNIER 134700 manual

Invacare
Invacare IVC 9780 Assembly, installation and operating instructions