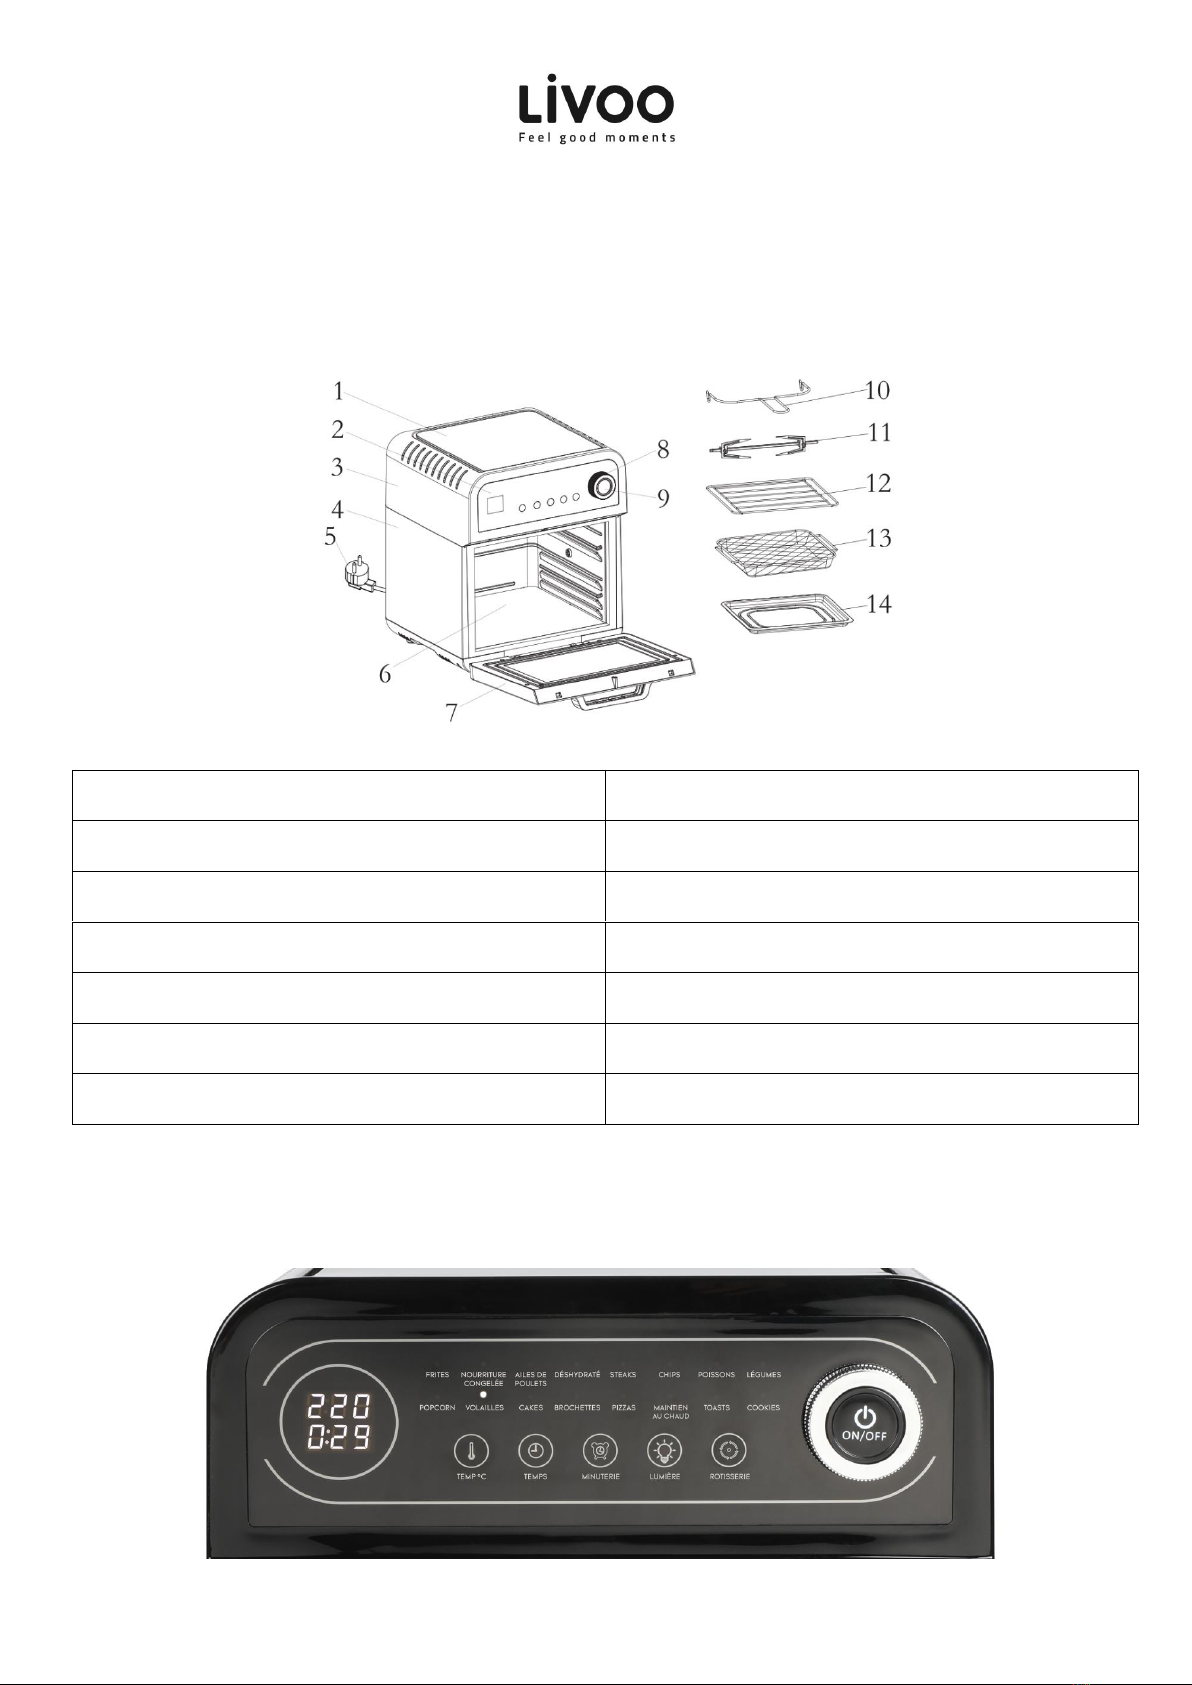
Livoo DOC255 User manual

Instruction Manual
WWW.LIVOO.FR
Reference: DOC255
Version: 1.4
Language: English
Air fryer oven

Instruction Manual
1
You have purchased a product LIVOO brand and we thank you. We take great care in design, ergonomics
and ease of use of our products. We hope that this product will give you complete satisfaction.
This instruction manual is available too on our website www.livoo.fr
SAFETY ADVICES
PLEASE READ THESE INSTRUCTIONS CAREFULLY BEFORE USING
THE APPLIANCE AND SAVE IT FOR ANY FURTHER NEED.
Incorrect operation or usage is likely to cause damage to the
appliance and injure the user. Make sure that you follow all
safety instructions. Only use this appliance for the purpose for
which
has been designed; we decline all responsibility in the
event of damage due to incorrect use or bad handing.
1. Please check the voltage of the unit corresponds to the
voltage of your installation before connecting the appliance.
2. Never immerse the appliance. Never clean the appliance by
placing it under the tap. Do not allow water or liquids enter
the unit. The appliance contains electronic components. Risk
of electric shock!
3. Always place the ingredients in the frying basket, to avoid
contact with the heating elements.
4. Do not cover the air inlet or the air outlet when the unit is
running.
5. Do not fill the oil drawer. Fire hazard!
6. Do not touch the inside of the fryer when the unit is running.
Risk of burns!

Instruction Manual
2
7. If the supply cord is damaged, it must be replaced by the
manufacturer, its service agent or similarly qualified persons
in order to avoid a hazard (*).
8. This appliance shall not be used by children from 0 year to 8
years. This appliance can be used by children aged from 8
years and above if they are continuously supervised. This
appliance can be used by people with reduced physical,
sensory or mental capabilities or lack of experience and
knowledge if they have been given supervision or
instruction concerning use of the appliance in a safe way
and understand the hazards involved.
9. Children shall not play with the appliance.
10. Cleaning and user maintenance shall not be made by
children.
11. Keep the appliance and its cord out of reach of children less
than 8 years.
12. Keep the power cord away from the hot surface of the
appliance and any other heat sources.
13. Make sure the appliance is plugged into your power outlet.
14. This appliance is not not intended to be operated by means
of an external timer or separate remote-control system.
15. Do not place the unit on or near flammable materials such
as a tablecloth or curtain.
16. Do not place the appliance against the wall or other
appliances. Keep a distance of at least 10 cm of free space at
the back and sides and a clearance of 10 cm above the unit.
Never place an object on top of the unit.
17. Never use the appliance for other purposes than those

Instruction Manual
3
described in this manual.
18. Pay attention to high temperature by removing the drawer
frying. Always use thermal gloves.
19. Surfaces are liable to get hot during use. Always use thermal
gloves.
20. Turn off the power immediately and unplug the unit if you
see black smoke coming out of the unit. Wait smoke
emission stop before removing the drawer.
21. Always place the unit on a level surface or a stable surface.
22. Make sure to always unplug the appliance after use.
23. Let cool for about 30 minutes before cleaning.
24. Always keep the appliance clean as it comes in contact with
food.
25. Regarding the details on how to clean the surfaces come in
contact with food or oil, refer to the following paragraph of
the leaflet.
26. The temperature of accessible surfaces may be high when
the appliance is operating.
27. Appliance must not be immersed.
28. Cooking appliances should be positioned in a stable situation
with the handles (if any) positioned to avoid spillage of the
hot liquids.
29. This appliance is intended to be used in household and
similar applications such as:
•staff kitchen areas in shops, offices and other working
environments
•farm houses
•by clients in hotels, motels and other residential type

Instruction Manual
4
environments
•bed and breakfast type environments
(*) Competent qualified electrician: after sales department of the producer or importer or any person who
is qualified, approved and competent to perform this kind of repairs in order to avoid all danger. In any
case you should return the appliance to this electrician.
SPECIAL SAFETY INSTRUCTIONS
Warning: Hot surface!
- Do not cover the air inlet and the air outlet when
the appliance is working.
Wear oven mitts when opening the door or
handling anything that comes out of the oven.
TECHNICAL DATA
Operating voltage: 220-240V~50-60Hz
Power: 1600W
INTRODUCTION
The hot air oven provides an easy and healthy way of preparing your favourite ingredients.
By using convection (generated with fan and heating resistance), it is able to make numerous dishes.
The best part is that the Air FRYER heats food at all directions and most of the ingredients do not need any oil.

Instruction Manual
5
DESCRIPTION
Control panel:
1.Top cover
8.Knob
2.Control panel
9.Button
3.Upper cover
10.Cage Tong
4.Housing
11.Chicken fork
5.Power cord
12.Wire rack
6.Inner case
13.mesh basket
7.Door
14.Drip tray

Instruction Manual
6
BEFORE FIRST USE
1. Remove the unit from its packaging. Remove all protective material from around the unit
and its accessories.
2. Remove all stickers and labels from the unit.
3. Use only a non-abrasive sponge to clean the interior and the various accessories.
4. Clean only the inside and outside of the unit with a damp cloth.
5. Leave 10 cm of free space on each side of the fryer.
6. Please install the air outlet panel manually.
USE
Installation of the device
1. Place the unit on a level or stable surface. Do not place the unit on a non-heat resistant
surface.
2. Never place any object on top of the unit that may interrupt the air flow and affect its
operation.
3. Please always keep the drip tray in the lowest layer to collect oil from fried food.
Automatic switch-off
This unit is equipped with a timer. When the timer countdown reaches "0", the unit will beep
several times and stop running. Then automatically shut off after 1 minutewith beep several
time. However, you can turn off the fryer yourself.
During cooking, you can open the door, the power is automatically cut off. After closing, the
oven will resume normal operation. If the door does not close after 10 minutes, the oven will
automatically turn off.
Preparing for us
1. Place the appliance on a stable, horizontal and even surface. Do not place the appliance on non-
heat-resistant surface.
2. Place the frying basket correctly in the drawer.

Instruction Manual
7
3. Never place any object on the unit that could interrupt the air flow and affect its proper
operation.
Using the appliance
1. Connect the mains plug into an earthed wall socket.
Note: We recommend that you preheat the machine before putting in the ingredients. Then wait until the
heat indicator goes off. We recommend that you preheat the machine before putting the ingredients in.
Then wait until the heat indicator goes off.
2. Then place your food in the different dishes or spits you wish to use and choose one of the 16 pre-
set programs. Once selected, press the ON/OFF button. The temperature and timer will start
automatically. Place the ingredients in the basket.
3. When the appliance has reached the programmed temperature, it will stop heating. The red cooking
indicator will turn off to indicate that the fryer has stopped heating. When the temperature inside
the fryer decreases, the fryer will then turn on again to maintain the desired temperature.
4. When you hear the beep, the cooking time is up. Remove your food from the appliance and place it
on a heat-resistant surface.
Note: You can also stop the cooking manually by simply pressing the ON/OFF button during the cycle. After
several minutes of non-use, the oven will shut down completely.
5. Check to see if the ingredients are done. If you want to cook them longer, put them back in the oven
and set the timer for a few more minutes.
After cooking, the drawer and ingredients are still hot. Depending on the different ingredients, hot steam
may escape.
Tip: You can use tongs to remove large or fragile ingredients from the basket.
6. The oven is now ready to cook your food again.
To change the temperature: once the program is chosen, if the temperature is not to your liking, you can
change it by pressing the "TEMP °C" button. Once the temperature is flashing, use the on/off button to select
the temperature you want. Once selected, press the TEMP °C button again and a beep will sound to alert
you to the temperature change.
To change the cooking time: once the program has been chosen, you can change the time pre-set in the
program. Just click on "TIME" and use the on/off button to choose the time you want. Once selected, press

Instruction Manual
8
the "TIME" button again and an audible signal will alert you to the change in cooking time.
To start the deferred cooking: select a program and then press "TIMER". Then select the time to start your
cooking and press the On/Off button. Once the time has come, your oven will start its program on its own.
The " LIGHT " button will allow you to turn on the light during the cooking process, for a better visibility.
Rotisserie: If you select rotisserie, you will need to put the spit in place. Once the spit is in place, it will rotate
at 360°C to ensure even cooking.
To mount your spit, you will need to slide the hooks onto the spit shaft. To ensure that the hooks are in
place, make sure to tighten the screws. You will then need to put the spit mounted in the spit rack inside the
oven. The rotating support is integrated in the appliance. Do not force it.
SETTINGS
You can also use the air fryer to heat up the ingredients. To reheat the ingredients, set the temperature to
150°C for up to 10 minutes.
Ingredients
Temperature (°C)
Time
Fries
220℃
25 mins
Frozen Food
80℃
10 mins
Wings
200℃
15 mins
Dehydrate
70℃
8 hour
Steak
180℃
12 mins
Chips
220℃
20 mins
Fish
180℃
15 mins
Vegetables
180℃
12 mins
Popcorn
220℃
10 mins(Need to preheat
for 2 minutes)
Chicken
220℃
30 mins
Cake
180℃
30 mins
Skewer
200℃
15 mins
Pizza
180℃
15 mins
Keep Warm
80℃
30 mins
Toast
200℃
4 mins
Cookie
180℃
12mins

Instruction Manual
9
CLEANING
1. Clean the oven after each use.
2. Unplug the power cord and allow the unit to cool for 30 minutes.
Note: Pull the drawer out of the unit to allow it to cool more quickly. Wipe the outside of the
appliance with a moist cloth.
3. Use hot water, washing-up liquid and a non-abrasive sponge to clean the frying basket and
drawer and leave to soak for 10 minutes.
4. Utilisez de l'eau chaude et une éponge non abrasive pour nettoyer la partie intérieure de
l'appareil.
5. Utilisez une brosse pour nettoyer les résidus d'aliments sur les éléments chauffants.
Note: Tray, the frying basket and the inside of the appliance have a nonstick coating. If you use metal utensils
or abrasive materials to clean the tray and the frying pan you can damage the nonstick coating.

Instruction Manual
10
Correct disposal of the unit
(Electrical and Electronic Equipment)
(Applicable in the European Union and the rest of Europe that have adopted separate collection systems
countries)
The European Directive 2012/19/EU on Waste Electrical and Electronic Equipment (WEEE), requires that old
household electrical appliances must not be disposed of in the normal household waste stream. Old appliances must be
collected separately in order to optimize the recovery and recycling of the materials they contain and reduce the impact on
human health and the environment. The symbol of the crossed out dustbin is marked on all products to remind the obligations
of separate collection. Consumers should contact their local authority or retailer for information concerning the correct disposal
of their product.
•Non contractual illustration
•Product information is subject to change without prior notice.
LIVOO
BP 61071
67452 Mundolsheim - FRANCE
Table of contents
Other Livoo Fryer manuals
Popular Fryer manuals by other brands

Rohnson
Rohnson R-2843 instruction manual

Dean
Dean SR52 Series Installation & operation manual

REMOSKA
REMOSKA Vento Plus RE 21001 Instructions for use

Frymaster
Frymaster GEN II LOV BIGLA30 Series Operator's manual

Midea
Midea MF-TN35D2 instruction manual

Cookworks
Cookworks XJ-10302 Care & instruction manual