Livoo DOC194 User manual

Instruction manual
WWW.LIVOO.FR
Reference : DOC194
Version : 1.4
Language : English
Gas plancha 4 urners

Instruction manual
1
You have purchased a product LIVOO rand and we thank you. We take great care in design, ergonomics
and ease of use of our products. We hope that this product will give you complete satisfaction.
This instruction manual is availa le too on our we site www.livoo.fr
SAFETY ADVICES
READ THE INSTRUCTIONS BEFORE USING THE APPLIANCE.
USE OUTDOORS ONLY.
WARNING ACCESSIBLE PARTS MAY BE VERY HOT.
PLEASE KEEP YOUNG CHILDREN AWAY.
RETAIN FOR FUTURE REFERENCE.
DO NOT MOVE THE APPLIANCE DURING COOKING.
IMPORTANT:
Read the following instruction carefully and e sure your
ar ecue is properly installed, assem led and cared for. Failure
to follow these instructions may result in serious odily injury
and/or property damage.
Never fit the cylinder right to next the ar ecue. Always place
the cylinder at the left hand rear of the appliance. The cylinder
should e sited as far away from the appliance as possi le
without straining the hose.
Never light the grill with the lid closed.
The appliance and cylinder must e placed on level surface and
must not e used whilst alight
.

Instruction manual
2
USE AND CHARACTERISTICS
1. The ar ecue grill is safe and easy to use. Please ensure you
only use your ar ecue at the correct pressure the appliance
is designed for.
2. Food can e ar ecued on the cooking grid either with or
without the lid eing closed. When the lid is closed for 5
minutes, the lid must e open for 1 minute to release heat.
3. With a grease tray and a grease cup under the case.
4. Adequate ventilation is vital for com ustion and efficiency
performance of the ar ecue. This will ensure the safety of
the user and other people in the vicinity of the area where
the appliance is eing used. Never use the appliance in any
enclosed covered area.
5. When the wind speed is a ove 2m/s, don’t use gas grill
facing to the wind.
6. The appliance is designed for use outdoors only.
7. Warning! Accessi le parts may e very hot. Keep young
children away.
8. Do not move the appliance while in use.
9. Turn off the appliance at the cylinder valve or regulator after
use.
10. Any modification to the appliance may e dangerous and
may cause injury or property damage.
11. The parts sealed y the manufacturer or his agent shall not
e manipulated y the user.
12. Any unauthorised modification of the appliance will
invalidate the guarantee on this appliance.

Instruction manual
3
13. Do not modify the appliance
14. Never mount the cylinder under the ar ecue on the ase
shelf as this could result in serious injury to the user, other
people and/or property.
15. Use protective gloves when handling particularly hot
components.
16. The appliance must not have any overhead o struction. E.g.
trees, shru s, lean to roofs. The appliance must e installed
with a clearance of 1 m around the appliance.
17. Prior to installation, ensure that the local distri ution
conditions (nature of the gas and gas pressure) and the
adjustment of the appliance are compati le
18. The adjustment conditions for this appliance are stated on
the la el (or data plate).
19. This appliance is not connected to a com ustion products
evacuation device. It shall e installed and connected in
accordance with current installation regulations. Particular
attention shall e given to the relevant requirements
regarding ventilation.
20. The appliance must not e used near flamma le materials.
(Petroleum ased products, thinners or any other solid
o ject that carries a flamma le warning la el.)
21. Close the valve of the gas cylinder or the regulator after use.
22. The use of this appliance in enclosed areas can e dangerous
and is PROHIBITED.

Instruction manual
4
23. Your gas ar ecue should never e used y children.
Accessi le parts of the ar ecue may e very hot. Keep
young children away while it is in use.
24. It is a solutely necessary to keep this appliance clean at all
times as it comes into direct contact with food.
25. Regarding the instruction for cleaning surfaces in contact
with food thanks to refer to the elow paragraph “cleaning”
in manual
•Use only spare parts supplied y your distri utor. The failure to respect the modifications or the
replacements of spare parts would pull the cancellation of the guarantee.
•Never connect your appliance directly on your gas cylinder; use a regulator and a NF typical pipe.
•Never cover the device efore it is not completely cooled.
•Use no spray near your device.
•Use no product of ignition while you light the device.
Information :
- Think of controlling the state of the urner efore any use, especially if you do not use your device
frequently.
- Before the first use, clean your appliance with a clean wet cloth, let it dry completely.
Make warm your outdoor appliance during at least 10 minutes. This can release a light smell during a
few moments.
TECHNICAL INFORMATION

Instruction manual
5
ASSEMBLY INSTRUCTIONS
Model DOC194
CS Number
CS - - - - - - ( = “CS” + our or er N° - ex: CS111584)
Description:
Gas plancha 4 burners
Max power 10kW
( 726.0g/h)
0063-19
Pin: 0063CN7292
gas category I
3+(28-30/37)
I
3B/P(30)
I
3B/P(50)
I
3B/P(37)
Gas type
Butane
(
726.0 g/h)
Propane
(712.0 g/h)
LPG GAS MIXTURES
(726.0 g/h)
gas pressure: 28-30 mbar 37 mbar 30 mbar 50mbar 37 mbar
size of the injector 0.76 mm 0.76 mm 0.66 mm 0.70 mm
Number and Code 20191230
To be use only outsi e the premises
This evice must be installe in accor ance with existing regulations an use in a well
ventilate area
Consult the instructions before use.
CAUTION: accessible parts can be very hot.
Keep young chil ren away
Equipment must be away from flammable materials uring use
Do not move the evice uring use
Close the gas container valve after use. Do not change the evice
Destination lands :
I
3+(28-30/37)
:
BE, CH, CY, CZ, ES, FR, GB, GR, IE, IT, LT, LU, LV, PT, SK, SI.
I
3B/P(30)
:
BE, CY, DK, EE, FI,FR, HU, IT, LT, NL, NO, SE, SI, SK, RO, HR, TR, BG, IS, LU, MT.
I
3B/P(50)
:
AT, CH, DE, SK
I
3B/P(37)
:
PL
DELTA - BP61071 - 67452 Mundolsheim - FRANCE

Instruction manual
6

Instruction manual
7
INSTRUCTIONS FOR USE
Follow these instructions carefully to avoid seriously damaging your ar ecue and causing injury to
yourself and to property.
1. Assem le the ar ecue following the assem ly instructions carefully.
2. Connect the gas hose to the ar ecue. Connect the regulator to the hose.
3. Connect the regulator to the cylinder valve following the regulator instructions supplied with the
regulator.
4. Turn all of the control kno s to the ‘OFF’ position efore turning on the gas supply to the appliance.
5. Operate the regulator in accordance with the instructions supplied with the regulator.
LIGHTING INSTRUCTIONS: MAIN BURNERS
1. Connect the gas cylinder to the ar ecue following the instructions supplied with the regulator.
2. Turn all the control kno s to the ‘OFF’ position.
3. Turn ‘ON’ the gas supply at the cylinder or regulator switch following the regulator connection and
operating instructions. Check the cylinder to regulator connection and hose to ar ecue hose inlet
connection for leakage using soapy water. Any leakage will show as u les in the area of the leak. If
leak is found, do not use the ar ecue and turn off the gas supply. Consult your gas or ar ecue
supplier for advice.
4. Before ignition, open the lid if there is .To light the urners of left side, turn one of the left control kno
anticlockwise to the 90° position (Full rate position), at the same time quickly press the left utton of
ignition (situated etween oth uttons) 4 times in succession and. An audi le click will e heard, this
should light the urner. Check that the urner is alight. If the urner has not lit, repeat this process.
Then do the same for the other left kno .
5. If the urners have not lit after two attempts, turn ‘OFF’ the gas tap and wait 5 minutes efore retrying
the ignition sequence.
6. When the urners have lit, the urners rate can e adjusted y turning the kno s anticlockwise to any
position etween the full and low rate positions.
7. Light the remaining urners from left to right in sequence.
8. To switch on the urners of right side, turn one of the right control kno you have chosen anticlockwise
to the 90° position (Full rate position), at the same time quickly press on the right utton of ignition
(situated etween oth uttons) 4 times in succession. This will switch on the right urner. If it does
not work repeat the operation. Then do the same for the other right kno .
9. If the urners do not ignite after 2 tries, cut the gas inlet y turning the utton on "Stop" and wait 5
minutes efore re-trying to switch on it.
10. If the urners do not remain switched on, repeat the stage 8.
11. When the urners are switched on. Adjust the power y turning the utton to the positions " small
flame " or the " ig flame " .re- trying to switch on it.

Instruction manual
8
12. To switch off the plancha, cut the gas inlet y turning the utton of the valve or the regulator in position
"Stop", y following the instructions supplied with the regulator. Turn the uttons of all the urners in
the directions of watch hands, in position "Stop" switched off,(faded), when flames are switched off.
Warning: If any urner fails to ignite, turn the control kno off (clockwise) and also turn the cylinder valve
off. Wait five minutes efore attempting to relight with ignition sequence.
After use, close the gas supply y either turning ‘OFF’ the switch on the regulator or turning ‘OFF’ the
cylinder valve.
In the event of light ack whilst the appliance is in use. Turn all the controls, cylinder valve and regulator
switch to the ‘OFF’ position. Wait 5 minutes efore attempting to relight the appliance. If the pro lem
persists after relighting, consult your gas dealer, or the store where you purchased the ar ecue, or a
qualified gas engineer for assistance or repair. Never try to rectify the pro lem yourself as this could result
in serious injury and/or property damage.
Clean the appliance of excess fat, efore storage, with a damp cloth using a mild detergent solution as the
cleaning agent.
Store the appliance in a clean dry environment.
Do not store your gas cylinder indoors. Store in a well ventilated area away from direct sunlight.
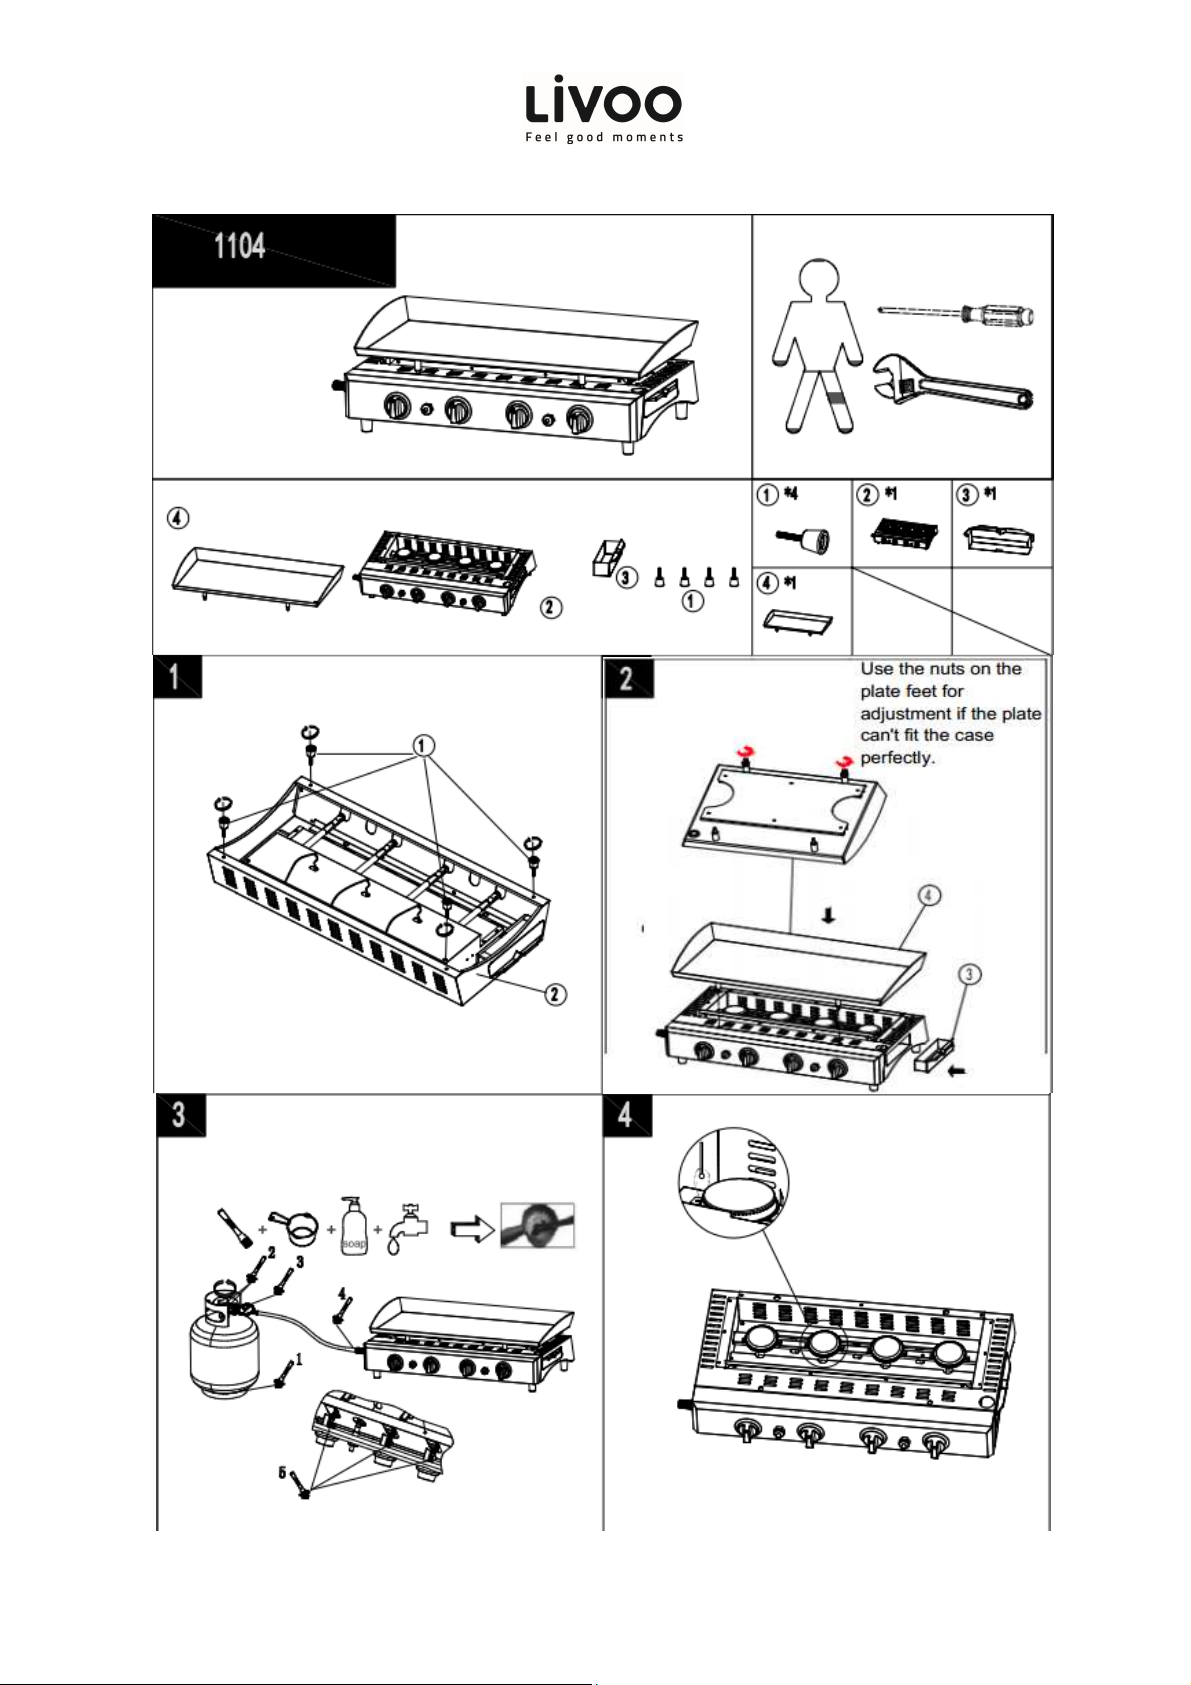
CONNECTING THE GAS CYLINDER TO THE APPLIANCE
This appliance is only suita le for use with low-pressure utane, propane or their mixture gas and used with the
appropriate low-pressure regulator via a flexi le hose. The hose should e secured to the regulator and the
appliance with hose clips.
- Using 28-30m ar regulator with category I3+ for utane gas and a 37m ar regulator with category I3+
for propane gas;
- Using a 30m ar regulator with category I3B/P (30);
- Using a 37m ar regulator with category I3B/P (37);
- Using a 50m ar regulator with category I3B/P (50);
Use a suita le regulator certified to BSEN 12864:2001.
Please consult your LPG dealer for information regarding a suita le regulator for the gas cylinder.
BEFORE USE PLEASE CHECK FOR LEAKS
Never check for leaks with a naked flame, always use a soapy water solution
TO CHECK FOR LEAKS
Make 2-3 fluid ounces of leak detecting solution y mixing one part washing up liquid with 3 parts water.
Ensure the control valve is “OFF”.
Connect the regulator to the cylinder and connect regulator with hose and outdoor gas grill, ensure the
connections are secure then turn ON the gas.
Brush the soapy solution on to the hose and all joints. If u les appear you have a leak, which must e
rectified efore use.Turn off the gas supply in the event of gas leak.
Retest after fixing the fault. Turn OFF the gas at the cylinder after testing.
If detected leakage cannot e rectified, do not attempt to cure leakage ut consult your gas dealer.

Instruction manual
9
REGULATOR AND HOSE
Use only regulators and hose approved for LPG at the a ove pressures (See Page 2). The life expectancy
of the regulator is estimated as 10 years. It is recommended that the regulator is changed within 10 years
of the date of manufacture.
The use of the wrong regulator or hose is unsafe; always check that you have the correct items efore
operating the ar ecue.
The hose used must conform to the relevant standard for the country of use. The length of the hose must
e 1.5 meters (maximum). Worn or damaged hose must e replaced. Ensure that the hose is not
o structed, kinked, or in contact with any part of the ar ecue other than at its connection. Change
the hose when the national conditions require it and/or depending on it validity.
The hose should not e twisted or kinked when attached to the regulator and outdoor gas grill. No part of
the hose should touch any part of the appliance. So site the cylinder out to the left hand side of the
appliance at the maximum distant permitted y the hose length.
STORAGE OF THE APPLIANCE
Storage of an appliance indoors is only permissi le if the cylinder is disconnected and removed from the
appliance. When the appliance is not to e used for a period of time it should e stored in its original
packaging in a dry dust free environment.
GAS CYLINDER
The appliance can e used with any gas cylinder of weights etween 4.5KGS and 15KGS utane and 3.9KGS
to 13KGS propane. The gas cylinder should not e dropped or handled roughly! If the appliance is not in
use, the cylinder must e disconnected. Replace the protective cap on the cylinder after disconnecting the
cylinder from the appliance. The maximum weight of cylinder is 6.75KGS.
Cylinders must e stored outdoors in an upright position and out of the reach of children. The cylinder
must never e stored where temperatures can reach over 50°C. Do not store the cylinder near flames,
pilot lights or other sources of ignition. DO NOT SMOKE.The cylinder should e changed away from any
source of ignition.
CLEANING AND CARE
CAUTION:
All cleaning and maintenance should e carried out when the ar ecue is cool and with the fuel supply
turned OFF at the gas cylinder.
We would recommend that this gas grill should e serviced y your local
gas retail outlet at least once a year y a competent engineer. Do not attempt to service this appliance
yourself.
CLEANING
“Burning off” the ar ecue after every use (for approx 15 minutes) will keep excessive food residue to a minimum.

Instruction manual
10
OUTSIDE SURFACE
Use mild detergent or aking soda and hot water solution. Non-a rasive scouring powder can e used on
stu orn stains, then rinse with water.
If the inside surface of the ar ecue lid has the appearance of pealing paint, aked on grease uild up has
turned to car on and is flaking off. Clean thoroughly with strong hot soapy water solution. Rinse with
water and allow to completely dry. Never use oven cleaner.
INTERIOR OF BARBECUE BOTTOM
Remove residue using rush, scraper and/or cleaning pad then wash with a soapy water solution. Rinse
with water and allow dry it.
PLASTIC SURFACES
Wash with a soft cloth and hot soapy water solution. Rinse with water. Do not use a rasive cleaners,
degreasers or a concentrated ar ecue cleaner on plastic parts.
COOKING GRID
Use a mild soapy water solution. Non-a rasive scouring powder can e used on stu orn stains then rinse
with water.
GREASE TRAY AND GREASE CUP
Please do not open the grease tray during use.
When clean the grease tray, take away the grease cup first then pull out the grease tray.
Please check the grease cup on time and take away the oil when 1/3 full.
Method: after the grease cup cold, make grease cup up in horizontal line and move it with hook reverse
horizontally, this could take out the grease cup.
CLEANING THE BURNER ASSEMBLY
Turn the gas OFF at the control kno and disconnect the cylinder.
Remove cooling grate.
Clean the urner with a soft rush or low clean with compressed air and wipe with a cloth.
Clean any clogged ports with a pipe cleaner or stiff wire (such as an opened paper clip).
Inspect urner for any damage (cracks or holes). If damage is found, replace with a new urner. Reinstall
the urner, check to ensure that the Gas valve orifices are correctly positioned and secured inside the
urner inlet (venturi).
In some cases your ar ecue will light ack ecause of an insect crawling inside the urner venturi or a
spider spinning its we inside the urner. This can e rectified y using a ottle rush inserted through the
urner venturi and pushing it into the urner over the urner length. If condition persists consult your gas
dealer.
SERVICING
Your gas ar ecue should e serviced annually y a competent registered person.

Instruction manual
11
Correct isposal of the unit
(Electrical an Electronic Equipment)
(Applica le in the European Union and the rest of Europe that have adopted separate collection systems
countries)
The European Directive 2012/19/EU on Waste Electrical and Electronic Equipment (WEEE), requires that old household
electrical appliances must not e disposed of in the normal household waste stream.
Old appliances must e collected separately in order to optimize the recovery and recycling of the materials they contain and
reduce the impact on human health and the environment.
The sym ol of the crossed out dust in is marked on all products to remind the o ligations of separate collection.
Consumers should contact their local authority or retailer for information concerning the correct disposal of their product.
•Photo no contractual
•Worried a out the quality of his products the manufacturer reserves the right to make modifications without
advance notice
LIVOO
BP 61071
67452 Mundolsheim - FRANCE
Table of contents
Other Livoo Grill manuals
Popular Grill manuals by other brands

Napoleon
Napoleon CARBON PRO CART Assembly, use and care manual

PERMASTEEL
PERMASTEEL PG-50506SRLA user manual

ROYAL GOURMET
ROYAL GOURMET ZH3002SN owner's manual

Napoleon
Napoleon BIP500RB instruction manual

FireMagic
FireMagic Aurora C2-446 quick start guide

Tower Hobbies
Tower Hobbies T27019 Safety and instruction manual with recipes