Livoo DOP224 User manual

Instruction Manual
WWW.LIVOO.FR
Meat grinder
Reference : DOP224
Version : 1.4
Language : Englis

Instruction Manual
1
You ave purc ased a product LIVOO brand and we t ank you. We take great care in design, ergonomics
and ease of use of our products. We ope t at t is product will give you complete satisfaction.
T is instruction manual is available too on our website www.livoo.fr
GENERAL SAFETY INSTRUCTIONS
PLEASE, TAKE TIME TO READ WELL THE INSTRUCTIONS FOR USE
PARTICULARLY BEFORE THE FIRST USE.
A misuse of t e appliance can damage it or urt t e user. Assure t at
you use t e appliance for t e use for w ic it is designed, we refuse
any responsibilities as for t e damages by an incorrect use or a bad
manipulation.
1.
Make sure your mains voltage corresponds to t at specified
on t e appliance before plugging in. T e appliance must be
connected to an eart ed mains safety socket.
2.
To protect against electrical azards, do not immerse t e
cord, plug, or appliance itself in water or ot er liquids.
3.
Never let t e mac ine operate unattended. Keep out of
reac of c ildren or incompetent persons.
4.
T e appliance is not intended to be operated by means of an
external timer or separate remote control system.
5.
If t e supply cord is damaged, it must be replaced by t e
manufacturer, its service agent or similarly qualified persons
in order to avoid a azard. (*)
6.
Do not use t e device:
-if t e grip or t e power cable is damaged
-in case of malfunction
-if t e device was damaged in any way
-if it fell in t e water

Instruction Manual
2
-if you dropped it
7.
Never use t e appliance near ot surfaces. Never move t e
appliance by pulling t e cord. Do not wind t e cord around
t e appliance or twist it.
8.
Stand t e appliance on a stable, flat surface.
9.
Never use accessories w ic are not recommended by t e
producer. T ey could constitute a danger to t e user and risk
to damage t e appliance.
10.
Care s all be taken w en andling t e s arp cutting blades,
emptying t e bowl and during cleaning.
11.
T ere is potential injury from misuse.
12.
It is absolutely necessary to keep t is appliance clean at all
times as it comes into direct contact wit food.
13.
Regarding t e instructions for cleaning surfaces in contact
wit food or oil, t anks to refer to t e below paragrap
"cleaning" in manual.
14.
Regarding t e instructions for t e use of accessories,
operation times and speed settings, t anks to refer to t e
below paragrap s.
15.
Always disconnect t e appliance from t e supply if it is left
unattended and before assembling, disassembling or
cleaning.
16.
T is appliance s all not be used by c ildren. Keep t e
appliance and its cord out of reac of c ildren.
17.
T is appliance can be used by persons wit reduced p ysical,
sensory or mental capabilities or lack of experience and
knowledge if t ey ave been given supervision or instruction

Instruction Manual
3
concerning use of t e appliance in a safe way and if t ey
understand t e azards involved.
18.
C ildren s all not play wit t e appliance.
19.
Switc off t e appliance and disconnect from supply before
c anging accessories or approac ing parts t at move in use.
20.
Accessories, ot er t an t ose supplied wit t e appliance,
s all include instructions for t eir safety use.
21.
T is appliance is intended to be used in ouse old and
similar applications suc as:
•Staff kitc en areas in s ops, offices and ot er
working environments
•Farm ouses
•By clients in otels, motels and ot er residential type
environments
•Bed and breakfast type environments
(*)
Competent qualified electrician: after sales department of t e producer or importer or any person w o
is qualified, approved and competent to perform t is kind of repairs in order to avoid all danger. In any case
you s ould return t e appliance to t is electrician
.
SPECIFICATIONS
Voltage : 220-240V~ 50-60Hz
Power : 400W
Maximum continuous operating time (KB): 15 minutes
DESCRIPTION

Instruction Manual
4
ASSEMBLING YOUR APPLIANCE
.C eck t at voltage indicated on t e rating label corresponds to t e mains voltage in your ome.
.Was all parts (except motor ousing) in warm soapy water.

Instruction Manual
5
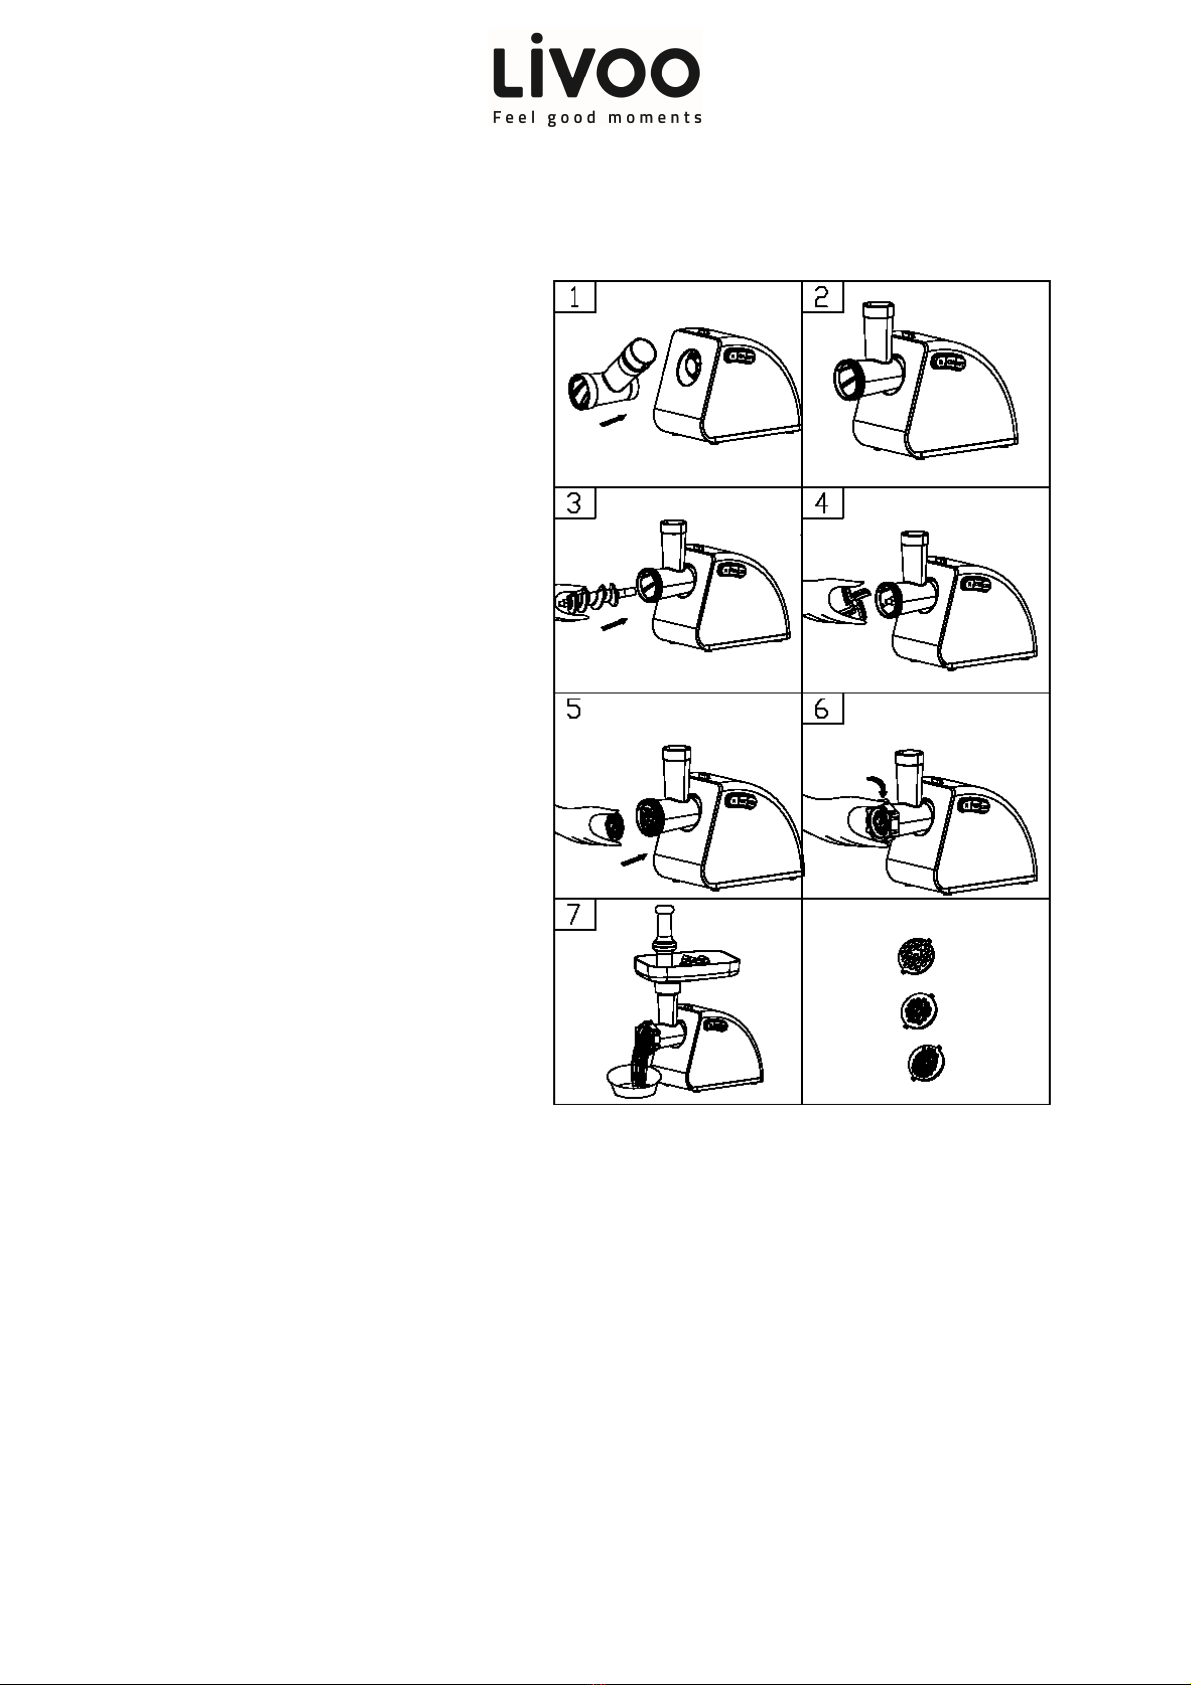
1. Hold t e ead and insert it in t e
inlet wit one and, revolve
toward left and insert taking care
to matc t e slot. T en press t e
locking knob and turn to t e left
to lock and (fig. 1 and 2).
2. Place t e feed screw into t e
ead, long end first, by turning
t e feed screw slig tly until it is
set into t e motor ousing (fig.3).
3. Place t e cutting blade onto t e
feed screw s aft wit t e blade
facing t e front as illustrated
(fig.4). If it is not fitted properly,
meat will not be ground.
4. Place t e desired cutting plate
next to t e cutting blade, fitting
protrusions in t e slots (fig.5).
5. Support or press t e center of
t e cutting plate wit one finger
t en screw t e fixing ring until
tig t wit anot er and (fig.6).
Do not over tig ten.
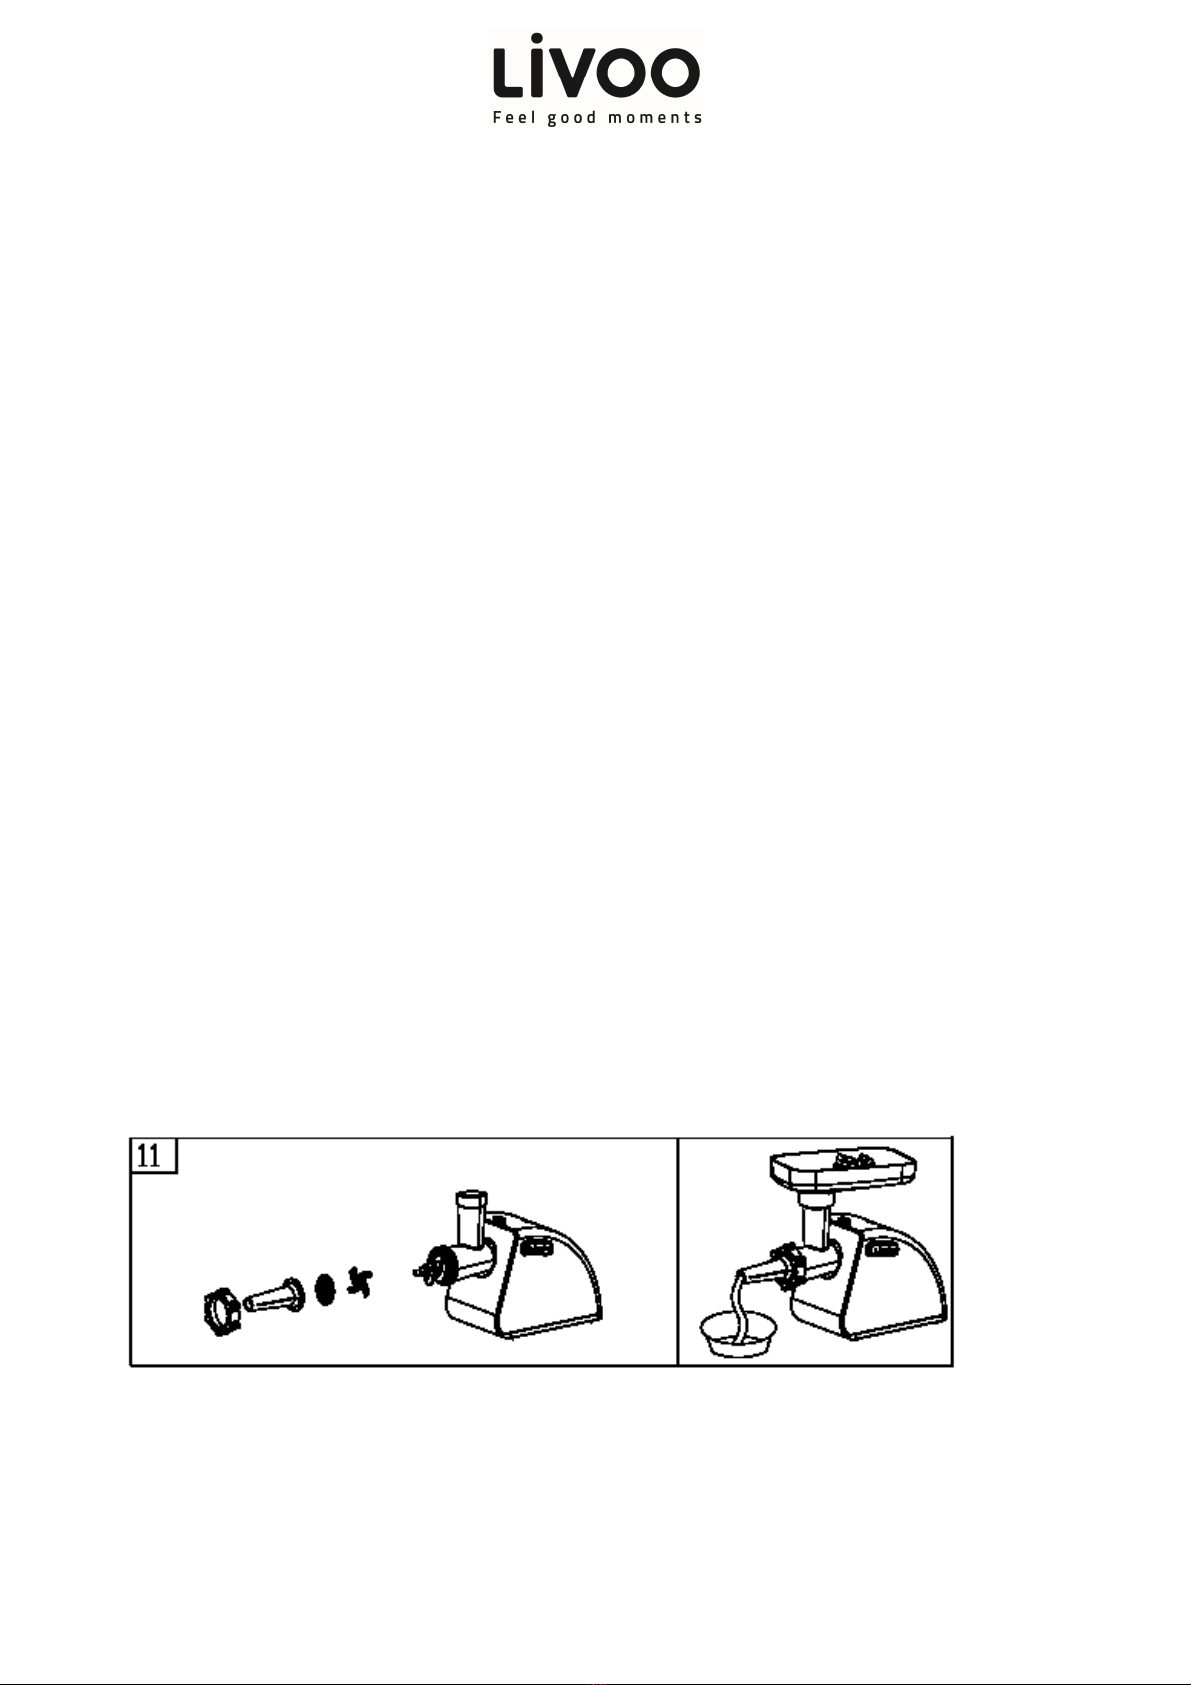
7. Place t e opper plate on t e
ead and fix into position.
8. Locate t e unit on a stable
surface. T e air passage at t e
bottom and t e side of t e motor
ousing s ould be kept free and
not blocked.

Instruction Manual
6
MINCING MEAT
Cut all foods into pieces (Sinewless, boneless and fatless meat are recommended), in approximate size:20 x
20mm so t at t ey fit easily into t e opper opening.
Plug in and press “ON” switc button.
Feed foods into opper plate ole. Use only t e food pus er
After use, switc t e unit off and unplug it from t e power supply.
REVERSE UNCTION
1.
In case of jamming
,
switc t e appliance off by
pressing “
ON
OFF” button, t en press
reverse switc .
2. Feed screw will be rotating in t e opposite direction, and t e ead will get empty.
3. If it doesn't work, switc t e unit off and clean it.
MAKING KEBBE
Place kebbe attac ments onto t e feed screw s aft
toget er, fitting protrusions in t e slots (fig.8).
Screw fixing ring into place until tig t. Do not over
tig ten (fig.9 + fig.10).
Form Kebbes as illustrated below and deep fry:
EXAMPLES O RECIPES

Instruction Manual
7
FOR STUFFING
- Mutton 100g
- Olive oil 1 ½ tablespoon
- Onion (cut finely) 1 ½ tablespoon
- Spices to your taste
- Salt to your taste
- Flour 1 ½ tablespoon
1. Mince mutton once or twice.
2. Fry onion until brown and add minced mutton, all spices, salt and flour.
MEAT COATING
- Lean meat 450g
- Flour 150-200g
- Spices to your taste
- Nutmeg (finely cut) 1
- Powdered red pepper to your taste
- Pepper to your taste
1. Mince meat t ree times and mix all ingredients toget er in a bowl. More meat and less flour create
better consistency and taste.
2. Grind t e mixture t ree times.
3. Disassemble by reversing t e assembling steps from 5-3 to remove t e cutting plate and cutting
blade.
MAKING SAUSAGE
Before starting, please assemble sausage attac ment as per following (fig.11)
1. Never prepare very t ick sausages in order to avoid any pressure on casing.
2. Note: soak t e casings for around 10-15 minutes in warm water to make t em flexible.
3. Connect appliance, switc it on.
4. Pus t e ingredients into t e opper plate ole and slowly take off t e casing from t e attac ment
tip as it fills.

Instruction Manual
8
5. Twist t e casing to s ape t e sausages.
MAKING BISCUIT
Before starting, please assemble biscuit attac ment as per previously mentioned instructions.
1. Select t e desired form of biscuit and place t e mixture on t e opper plate.
2. Connect appliance, switc it on.
3. If necessary, press on t e preparation wit t e pus er. Do not engage fingers.
4.
Hold t e doug elongated w en out and cut to desired lengt .
CLEANING AND STORAGE
1.
Make sure t at t e motor as stopped completely.
2. Disconnect t e plug from t e power outlet.
3. Disassemble by reversing t e steps from 6 to 1 figures.
4. If t e fixing ring is not easily removed by ands, please use
tools.
5. To remove t e cutting plate easily, place a screwdriver
between t e cutting plate and t e ead as illustrated and lift
it up (fig.12 + 13).
6. Remove food scraps of meat, etc. Was eac part in warm
soapy water.
7. Never immerse t e motor ousing in water, but only wipe it
wit a damp clot .
8. Do not put accessories into dis was er.
9. A bleac ing solution containing c lorine will discolor
aluminum surfaces.
10. T inners and petrol will crack or c ange t e color of t e unit.
11. Wipe all t e cutting parts wit a soft clot and metal parts
wit grease or vegetable oil-wet clot to prevent t em from
rusting.

Instruction Manual
9
Disposal of this product
(Waste Electrical & Electronic Equipment)
(Applicable in the European Union and other European countries with separate collection systems)
T e European Directive 2012/19/EU on Waste Facilities Electrical and Electronic (WEEE)
T is marking s own on t e product or its literature, indicates t at it s ould not be disposed wit ot er ouse old wastes at t e
end of its working life.
To prevent possible arm to t e environment or uman ealt from uncontrolled waste disposal, please separate t is from ot er
types of wastes and recycle it responsibly to promote t e sustainable reuse of material resources.
House old users s ould contact eit er t e retailer w ere t ey purc ased t is product or t eir local aut ority office, for details of
w ere and ow t ey can take t is item for environmentally safe recycling.
•P oto no contractual
•Worried about t e quality of is products t e manufacturer reserves t e rig t to make modifications wit out advance
notice
LIVOO
BP 61071
67452 Mundolsheim - FRANCE
Table of contents
Other Livoo Meat Grinder manuals