LOBSTER EH-19PCU System manual

Model EH-19PCU Electric-Hydraulic Rebar Cutter
Read safety and instructions carefully before using this tool.
SAVE THIS OWNERS MANUAL & OPERATING INSTRUCTIONS
Fascut Industries Inc.
7248 Inama Rd., Sauk City, WI 53583
Phone: (608)643-6678 Fax: (608)643-2682
www.fascut.com
Specifications and prices shown in this document are subject to change at any
time. For the latest detailed information, please contact Fascut Industries.
Max. Cutting Capacity #6 (3/4") - Grade 60 rebar
Voltage 110-120 Volts AC, 50/60 Hz
Power Consumption 800 Watts / 7.2 amps
Weight 22 pounds
Dimensions (L x W x H) 17" x 4½” x 8½"

Safety Requirements
For your own safety and protection, do not attempt to operate this tool until it is
completely assembled and installed according to the instructions… and until you
read and understand all the safety requirements.
FOR POWER TOOLS
WARNING
Indicates a potentially hazardous situation which, if not avoided, could result
in death or serious injury.
1. Always keep work area clean.
Cluttered areas and benches invite accidents.
2. Check work area conditions.
Do not use the tool in a damp or wet location. Do not expose the tool to rain.
Keep work area well lit.
Do not use the tool in the presence of flammable liquids or gasses.
3. Be careful of Electric Shock.
Do not touch the power plug using wet hands.
Always unplug the tool from outlet before maintenance or cleaning.
Do not use water or a damp cloth for cleaning.
4. Keep children away.
Do not let unauthorized personal handle the tool or cord.
Unauthorized personal should be kept away from the work area.
5. Store tool properly.
When not in use, store tool in a dry location out of children’s reach.
6. Do not use tool for purposes other than designed for.
7. Wear proper apparel.
Do not wear loose clothing or jewelry that can get caught in moving parts.
Wear gloves and nonskid footwear.
Wear protective hair covering for long hair.
8. Think Safety.
Use goggles to comply with ANSI Z87.1. Also use a face or dust mask in dusty
environments. Foresight is better than no sight.
9. Do not abuse the electric cord.
To reduce risk of damaging plug and cord, always pull by the plug rather than the
cord when disconnecting from outlet.
Keep cord away from heat, oil and sharp edges.
Make sure cord is located so it will not be stepped on, tripped over, or otherwise
subjected to damage or stress.
10. Do not over reach.
Keep proper footing and balance at all times.
11. Maintain tool with care.
If the electric cord of the tool is damaged, replace immediately.
Keep tool dry, clean and free from oil and grease.
12. In the following circumstances, unplug the tool from the outlet.
When servicing or when not in use.
When changing accessories such as cutting blades etc.
When any other dangers can be anticipated.

13. Avoid unintentional starting.
Do not carry the tool with finger on the switch.
Be sure switch is off when plugging in.
Use switch lock behind trigger switch when not in use.
14. Avoid using an extension cord.
An extension cord should not be used unless absolutely necessary.
Use of an improper extension cord could result in a risk of fire and electric shock.
If an extension cord must be used, make sure the cord is properly wired, has a
wire size that is large enough for the amperage rating of the tool, and is in good
electrical condition.
15. Always keep alert.
Do not allow familiarity gained by frequent and long use cause a careless
mistake.
Always remember that a careless fraction of a second is enough to inflict severe
injury.
Watch what you are doing. Use common sense.
Do not operate the tool when you are tired or under the influence of drugs or
alcohol.
16. Check for damaged parts.
Before use of the tool, check for any damaged parts. Carefully determine that all
parts operate properly.
17. Use only accessories and attachments that come with this tool.
Use of accessories or attachments not listed in this manual may result in a risk of
accident such as fire, electric shock or personal injury.
18. Return tool to Fascut Industries for repair.
Other than the remedies shown in the Trouble Shooting table, do not attempt to
disassemble or repair the tool.
Do not modify the tool. Any modifications will void the warranty and may cause a
hazardous situation.
FOR ELECTRO-HYDRAULIC REBAR CUTTERS
WARNING
Indicates a potentially hazardous situation which, if not avoided, could result
in death or serious injury.
1. Tool should only be plugged into a power supply that satisfies the power
rating as indicated on the tool.
2. Never touch the blades and piston during operation.
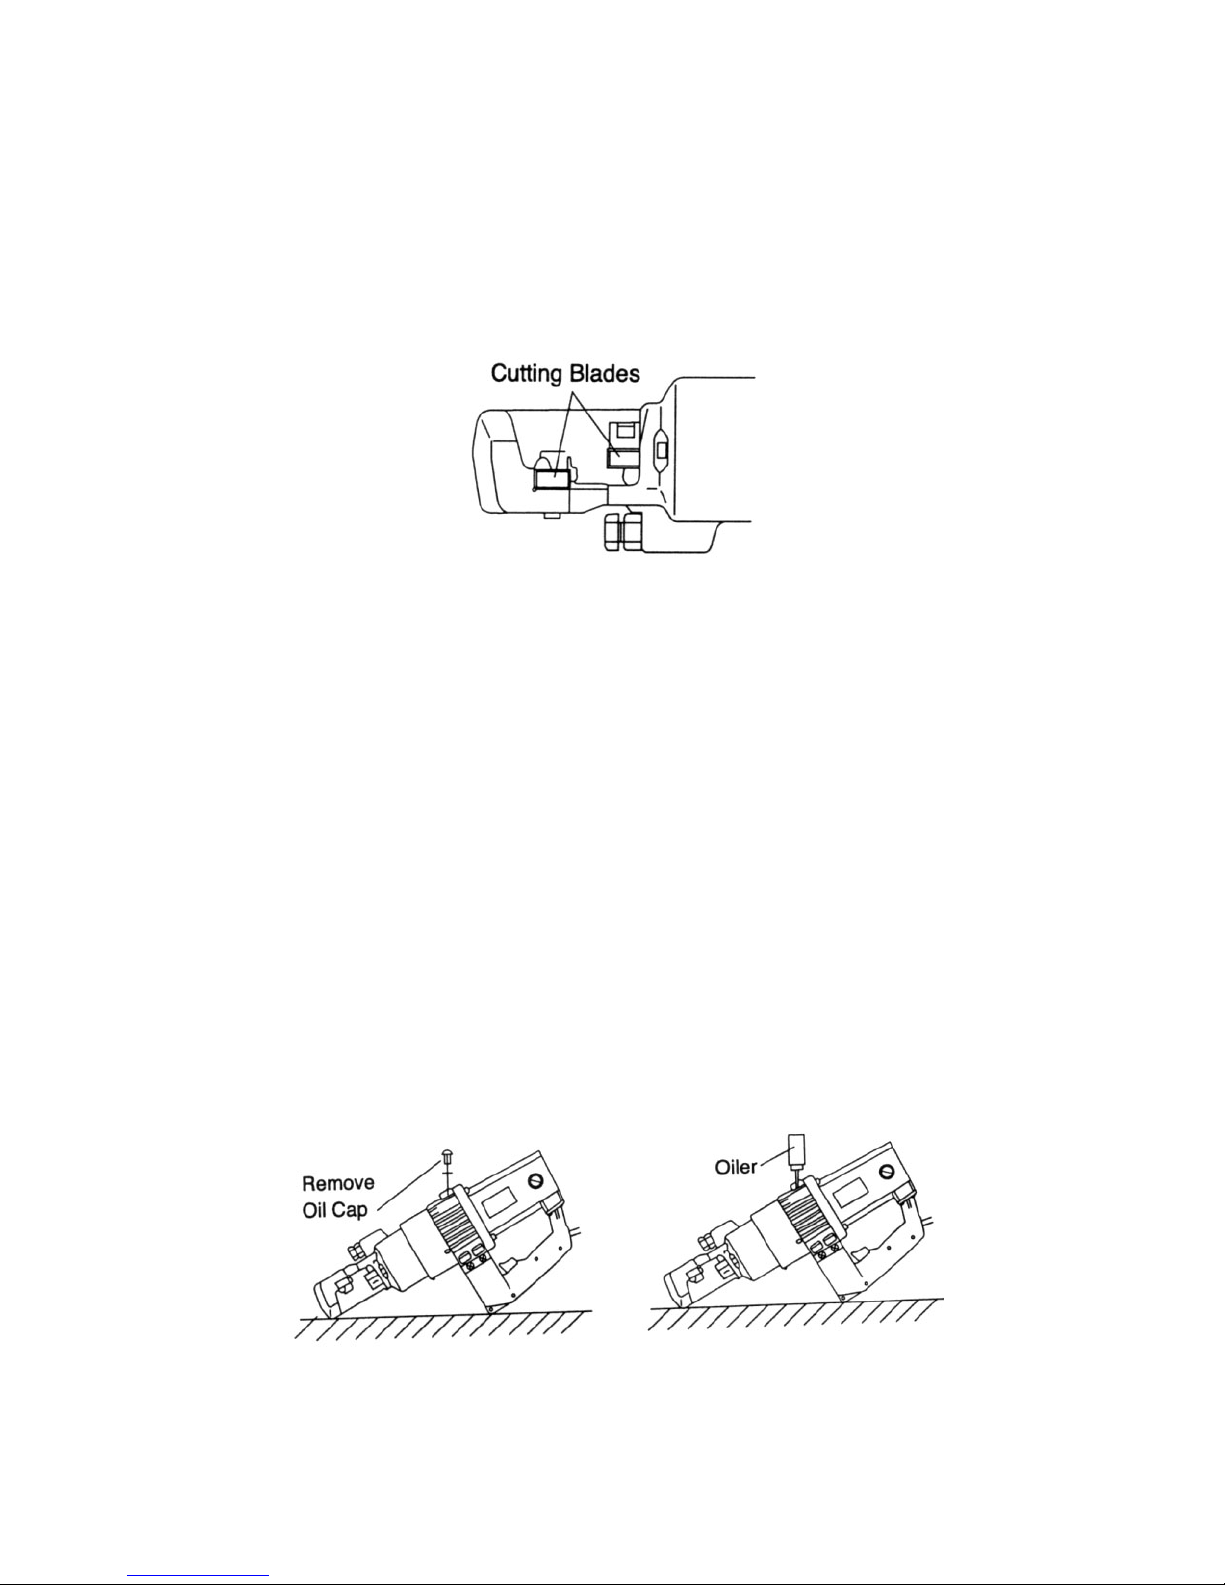
3. Make it a habit to check that the cutting blades are securely tightened before
operation.
4. Unplug the tool from outlet before starting any maintenance.
5. Never operate the tool before confirming the DANGEROUS ZONE as shown
in the Operation Procedure section of this manual.
Do not point the cutting head towards any person when operating.
Cut pieces may fly off with tremendous force and are dangerous.
Avoid cutting off small or short pieces of material.
6. Do not attempt to cut material with a size and/or hardness exceeding the
maximum cutting capacity.
7. When working in high places, check to make certain no person is under you.
Serious injury could result from dropped rebar pieces.

8. If the tool makes an abnormal sound during operation, discontinue use
immediately. Return the tool to Fascut Industries for repair.
9. Do not add hydraulic oil if the tool is warm or immediately after heavy duty
operation. Oil will be under a slight pressure when tool is warm.
10. Avoid skin contact, eye contact and inhalation or ingestion of hydraulic oil.
11. Handle tool with care.
This rebar cutter is composed of many precision parts, so do not drop or handle
roughly. If the tool has been dropped or has received a sharp blow or otherwise
damaged in any way, send it to Fascut Industries for repair.
12. Never operate the tool resting upright on its motor.
13. Be sure to hold the tool tightly during operation.
Parts Identification
1 – Cutter Head 7 – Oil Cap 13 – M5 Hex Key
2 – Cutting blades 8 – Motor 14 – M6 Hex Key
3 – M6 Cap screw 9 – Brush Cap 15 – Open end wrench
4 – Adjusting Screw 10 – Power cord 16 – Spring Plate
5 – Piston 11 – Trigger Switch 17 – Handle
6 – Release Valve 12 – Switch Lock
Check Points for Operation
#1 – Safe Work Area Environment? Never use this power tool in the
Using this power tool in rain or a wet presence of flammable liquids or
location may result in a risk of gases. As with all power tools,
electric shock. sparks are generated and can be
very dangerous.
#2 - Are Cutting Blades sharp and tight?
Make it a habit to double check that the cutting blades are sharp and securely
tightened before operation. Tighten blade securing bolts if they are loose. Be
sure to unplug the tool before servicing.

#3 - Is the electrical power supply correct?
Use this tool only with a power supply that meets the rating indicated on the tool.
#4 - Using an extension cord?
An extension cord should not be used unless absolutely necessary.
Use of an improper extension cord could result in a risk of fire and electric shock.
If an extension cord must be used, make sure the cord is properly wired, has a
wire size that is large enough for the amperage rating of the tool, and is in good
electrical condition.
AWG Size of Cord 16 14
Max Length of Cord 15 feet 25 feet
Operation Procedure
1. Below 32°F, the movement of the cutting blade will be slow and sluggish.
Keep the tool in a warm room at 60°or above for about one hour before use.
An alternative is to carry out a warming up procedure. To do this, use the
Spring Plate (part #16) to continuously run the tool for about 5 minutes
without making any cuts. During this time keep unauthorized persons away
from the tool. Never use the spring plate for continuous cutting operation.
2. Adjust the swivel head to the most convenient operating position.
(Max. turning angle is 180°clockwise)

3. Position the rebar to be cut at a right angle to the tool head and secure by
adjusting the adjusting screw. This will hold the rebar at a right angle to the
cutting direction.
4. Confirm where the dangerous range is. Cut pieces may fly off with
tremendous force within the dangerous range as shown. Operate only after
confirming that no one is located in the area of the dangerous range. Avoid
cutting material too short.
5. Unlock the switch lock if it is locked. Hold the tool firmly and press the trigger
switch. The moving cutting blade will advance to cut the rebar.
6. The moving cutting blade will automatically retract once fully extended.
Release the trigger switch after fully extended and the moving blade will
return to the starting position. The tool is now ready for the next cut.

Emergency Manual Release
For emergency reasons, it may become necessary to manually retract the
moving cutting blade. To do this, loosen the Release Valve no more than ¼ turn
using the M5 Hex Key Wrench. The moving blade will return to its starting
position. Securely retighten the valve.
Strictly avoid the following:
1. Do not point the head towards any person during operation. Do not touch the
blades during operation. Do not cut materials too short. Do not cut materials
having a hardness exceeding the maximum cutting capacity.
2. Do not operate or rest the tool upright on a work surface. The tool can easily
fall over and result in injury or tool damage. Blocking motor fan can result in
overheating of the motor.

Maintenance
1. Changing the blades. If a blade is dull or damaged, immediately replace
with a new blade. Cutting with dull or loose blades WILL damage the tool.
Unplug the tool before starting maintenance of any kind.
2. Check the length of the carbon brushes every six months. Unplug the tool
and loosen the brush caps using a screw driver. Replace if worn to less
than ¼” long. Sparks will be generated and the motor will be damaged if
operated with bad carbon brushes.
3. Check the oil every six months. Only use hydraulic oil with a VG 46
weight rating. If not available in your area, order from Fascut Industries.
a. Make certain moving cutting blade is fully retracted.
b. Unplug the tool and position so the oil cap faces upward.
c. Remove the oil cap using an M8 Hex Key Wrench.
d. Fill the oil to the point of over flow.
e. Replace oil cap and tighten.
Caution – Care should be taken to prevent hydraulic oil from entering the motor
housing.

Storage Method
The tool should be stored in a dry, high or locked up place out of reach of
children. Clean prior to long term storage. Coat metal parts with a rust inhibitor.
Trouble Shooting
If the remedy listed below does not solve the problem, the tool MUST be returned
to Fascut Industries for service. This tool requires special tools and training to
disassemble. Disassembly of tool by unauthorized personal will void the
warranty.
TROUBLE PROBABLE CAUSE REMEDY
Motor will not start. 1. No power to unit.
2. Power cord or plug
damaged.
3. Trigger switch bad.
4. Carbon brushes worn or
damaged.
1. Check supply cord, fuses or
circuit breaker.
2. Replace power cord.
3. Replace trigger switch.
4. Replace carbon brushes.
Moving blade does not
return to the starting
position.
1. Moving blade has not
reached fully extended
position.
2. Chip contaminants are
jammed in the blade area.
3. Moving blade is broken or
damaged.
4. Oil piston is bent.
1. Pull trigger again until fully
extended; then release trigger.
2. Remove blades and clean the
blade area and blade sockets.
3. Replace moving blade.
4. Send back to Fascut Industries
for repair.
No power to cut. 1. Emergency release valve
is open.
2. Moving blade is not fully
returning to starting
position.
1. Close the emergency release
valve.
2. See trouble remedies listed
above.
Cutting speed is slow. 1. Emergency release valve
is open.
2. Hydraulic oil is too hot.
1. Close the emergency release
valve.
2. Stop using tool. Allow it to cool
down.


Lobster EH-19PCU
Fascut Industries Inc. March 1, 2011
Index # Description Code Price Ea. Qty.
Req.
1 Cutter Head 40626 $662.61 1
2 Washer, Spring Lock, M6 25592 $0.20 4
3 Screw, Socket Head Cap, M6x20 25593 $0.45 2
4 Cutting blade w/washers & screws 29044 $37.50 2
5 Rod Seal 25595 $18.29 2
6 Oil Piston 40618 $180.02 1
7 Spring, Returning 25597 $18.56 1
8 Inserter 25598 $27.06 1
9 Spring, Kick Valve 25599 $2.40 1
10 Return Valve 40620 $48.88 1
11 Spring, Valve Keep 25601 $2.40 1
12 Backup Ring, Frame, P-80 27957 $9.33 1
13 O-ring, Frame Seal, P-80 27958 $8.69 1
14 Backup Ring, Piston, P-62 25604 $6.78 1
15 O-ring Seal, Piston, P-62 25605 $5.94 1
16 O-ring Seal, Body, G-80 10211 $5.94 1
17 Bearing, Ball, 636 25607 $16.38 1
18 Magnet 25608 $5.19 1
19 Washer, Plate 25609 $4.00 1
20 Bearing, Needle 25610 $39.38 1
21 Screw, Hex Socket Button Head, M10x16 20362 $2.40 1
22 Washer, Sealing 25591 $4.80 1
23 Motor Housing Unit, includes #61 & #63 28079 $157.00 1
24 Oil Tank 25613 $19.03 1
25 Cylinder Cap 25614 $3.78 3
26 O-ring, P-7 10149 $0.73 1
27 Spring, Exhaust Valve 25615 $0.96 3
28 Exhaust Valve 25616 $8.82 3
29 Spring, Plunger 25617 $1.20 3
30 Plunger (XL) (choose best fit) 25618 $16.00 3
30.1 Plunger (L) (choose best fit) 25635 $16.00 3
30.2 Plunger (M) (choose best fit) 25636 $16.00 3
30.3 Plunger (S) (choose best fit) 25637 $16.00 3
31 Washer, Plate 26697 $4.00 1
32 Screw, Flat Head Phillips, M3x6 28250 $0.20 3
33 Spacer Plate 25620 $24.06 1
34 Spring, Inserter 25621 $2.40 1
35 Screw, Socket Head Cap, M3x6 25622 $0.25 2
36 Key 27826 $4.60 1
37 O-ring, Inserter, P-10A 10337 $2.40 1
38 Backup Ring, Inserter, P-10A 16030 $4.20 1

39 Screw, Support, M12x35 25623 $5.20 1
40 Support Screw locking nut, M12 25624 $1.30 1
41 Key, Piston 25628 $5.10 1
42 Pump Frame (frame only) 25625 $415.50 1
43 Steel Ball, 4.8 mm (3/16) 12360 $0.20 1
44 O-ring, Relief Valve, P-3 10333 $0.35 1
45 Relief Valve 25606 $14.13 1
46 Label, Name Plate 40622 $1.86 1
47 Washer, Sealing 20356 $2.70 6
48 Screw, Socket Head Cap, M5x30 25627 $0.50 6
49 Label, (Max #6) 40624 $1.71 1
50 Label (adjust screw) 26062 $3.30 1
51 Screw, Socket Head Cap, M6x16 25629 $0.40 2
52 Safety Valve Seat Seal 20348 $3.90 1
53 Safety Valve Assembly (complete) 27837 $89.16 1
54 Safety Valve (part of #53) xxx $0.00
55 Safety Valve (part of #53) xxx $0.00
56 Safety Valve (part of #53) xxx $0.00
57 Wrench, Hex Key, 4mm 22872 $1.20 1
58 Wrench, Hex Key, 5mm 25777 $1.53 1
59 Wrench, Locknut, 19mm 25778 $15.14 1
60 Carbon Brush 28063 $18.00 2
61 Carbon Brush holder (part of #23) 28064 $15.50
62 Carbon Brush Cap 12879 $2.85 2
63 Screw, Socket Set, M5x6 25676 $0.25 2
64 Fan Guide 28066 $12.90 1
65 Rubber Pin 24322 $1.50 1
66 Armature, 120-volts 40353 $496.00 1
67 Bearing, Ball, 6301VV 28069 $23.40 1
68 Bearing, Ball, 608ZZ 24294 $12.18 1
69 Stator, 120-volts 40357 $172.00 1
70 Screw, Stator, M4x80 w/lockwasher 28019 $1.80 2
71 Switch Handle (R) 27915 $34.90 1
72 Switch Handle (L) 27916 $34.90 1
73 Screw, Phillips Head Tapping, M4x20 24313 $0.25 4
74 Screw, Phillips Head Tapping, M5x16 24321 $0.80 4
75 Screw, Phillips Head, M5x20 24312 $0.30 4
76 Power Cord 24320 $11.22 1
77 Rubber Grommet 24319 $3.30 1
78 Cord Securing Bracket 24318 $2.40 1
79 Screw, Phillips Head Tapping, M4x10 24317 $0.25 2
80 Trigger Switch Stopper 26072 $4.80 1
81 Condenser 12843 $11.10 1
82 Trigger Switch 22917 $29.76 1
83 Insulated Closed-end Connector 24315 $0.60 1
84 Wire Terminal 24314 $0.30 2

85 Cable Tie 24316 $0.30 1
86 Oil Tank Case Housing 40354 $327.12 1
87 O-ring, Oil Tank, P-32 25813 $3.20 1
88 Oil Seal, 12-28-7 28071 $13.28 1
89 Washer, M5 28032 $0.10 4
90 Screw, Socket Head Cap, M5x30 w/lock 28033 $0.50 4
91 Trigger Switch Spring Plate 26698 $8.10 1
92 Grab Handle 40627 $44.80 1
93 Oil, 12-oz ISO-46 Oil48 $9.00
Table of contents