Lofrans Dorado User manual

(1*/,6+
'HDU&XVWRPHU
7KDQN \RX IRU FKRRVLQJ D /RIUDQV
SURGXFW
/RIUDQVVUOLVDOHDGHUFRPSDQ\LQWKH
SURGXFWLRQ DQG ZRUOGZLGH GLVWULEXWLRQ
RI QDXWLFDO V\VWHPV PDQXIDFWXUHG
DFFRUGLQJ WR WKH PRVW PRGHUQ
WHFKQRORJLHV LQ FRPSOLDQFH ZLWK
LQWHUQDWLRQDO UHJXODWLRQ UHTXLUHPHQWV
DQG WKH PRVW LPSRUWDQW FHUWLI\LQJ
ERGLHV $OO RXU SURGXFWV DUH
PDQXIDFWXUHG ZLWK H[FHOOHQW PDWHULDOV
VXLWHG IRU RSHUDWLRQV LQ PDULQH
HQYLURQPHQWV DQG DUH VXEMHFW WR
FRQWLQXRXV FKHFNV WR LPSURYH WKH
TXDOLWDWLYH OHYHOV DQG PDNH WKHP
ZLWKRXW DQ\ PDQXIDFWXULQJ GHIHFWV
7RJHWKHU ZLWK VXFK UHTXLUHPHQWV
/RIUDQV VUO DQFKRU ZLQGODVVHV DUH D
V\QWKHVLV RI UHOLDELOLW\ DQG HIILFLHQF\
E\ JXDUDQWHHLQJ WKH PD[LPXP
SHUIRUPDQFHV GXULQJ HDFK SKDVH RI
PRRULQJ HYHQ LQ WKH PRVW GLIILFXOW
:LWK D /RIUDQV VUO SURGXFW \HDUV RI
UHOLDEOHRSHUDWLRQVDUHJXDUDQWHHG
/RIUDQVVUOGHFOLQHVDQ\OLDELOLW\IRU
SRVVLEOHLQDFFXUDFLHVGXHWRSULQWHUURUV
LQWKLVPDQXDODQGUHVHUYHVWKHULJKWWR
LQWURGXFHDQ\FKDQJHVGHHPHG
DSSURSULDWH
)RU WKLV UHDVRQ /RIUDQV VUO GRHV QRW
JXDUDQWHH WKH DFFXUDF\ RI WKH PDQXDO
DIWHU WKH GDWH RI LVVXH DQGGHFOLQHV DOO
OLDELOLW\ IRU SRVVLEOH HUURUV DQG
RPLVVLRQV
,1752'8&7,21
3XUSRVHRIWKHPDQXDO
7KLVPDQXDOZLOOVXSSO\LQIRUPDWLRQRQ
VDIHW\DQGFRUUHFWXVHRIWKHSURGXFW
)ROORZ WKHVH ZDUQLQJV FDUHIXOO\ WR
DYRLGSRVVLEOHDFFLGHQWVRUGDPDJHV
'$1*(5
$ ZDUQLQJ VXFK DV WKLV
LQGLFDWHV WKH H[LVWHQFH RI D
VHULRXV ULVN WKDW KDV KLJK
SUREDELOLWLHV WR FDXVH GHDWK RU
D VHULRXV DFFLGHQW LI
DSSURSULDWH SUHFDXWLRQV DUH
QRWWDNHQ
$77(17,21
$ZDUQLQJVXFKDVWKLVLQGLFDWHV
DUHIHUHQFHWRWKHDSSOLFDWLRQRI
VDIHW\SUDFWLFHVRUGUDZVWKH
DWWHQWLRQ RQ XQVDIH EHKDYLRXUV
WKDWPLJKWFDXVHSHUVRQDO
LQMXULHVRUGDPDJHVWRWKHERDW
$VVLVWDQFH
7KH /RIUDQV VUO SURGXFWV DUH EDFNHG
WKURXJKRXW WKH ZRUOG E\ D QHWZRUN RI
DXWKRULVHG GLVWULEXWRUV DQG DVVLVWDQFH
,Q FDVH RI QHHG SOHDVH FRQWDFW \RXU
ORFDO/RIUDQVVUOGLVWULEXWRU
5HFHLSWDQG6WRUDJH
8SRQ UHFHLSWRIWKHSDFNDJHYHULI\WKH
LQWHJULW\ RI SDFNLQJ 6KRXOG LW EH
QHFHVVDU\ WR VWRUH WKH SURGXFW IRU D
SURORQJHG SHULRG NHHS LW LQ D GU\ DQG
SURWHFWHGSODFH
•Anchor windl
asses used in an
LQDSSURSULDWH ZD\ FDQ FDXVH GDPDJHV
WRSHUVRQVDQGRUWKLQJV
• Pay the utmost attention during the
XVHRISRZHUIXOHTXLSPHQW
• Even the most careful use can be a
VRXUFHRIGDPDJHVHYHQVHULRXV
• Lofrans products are supplied
H[FOXVLYHO\ IRU UHFUHDWLRQDO QDXWLFDO
XVH /RIUDQV GHFOLQHV DOO UHVSRQVLELOLW\
IRULPSURSHUXVHV
• Pay the utmost attention so that arms,
OHJV ILQJHUV KDLU DQG FORWKHV GR QRW
JHWHQWDQJOHGLQWKHFKDLQRUJLSV\
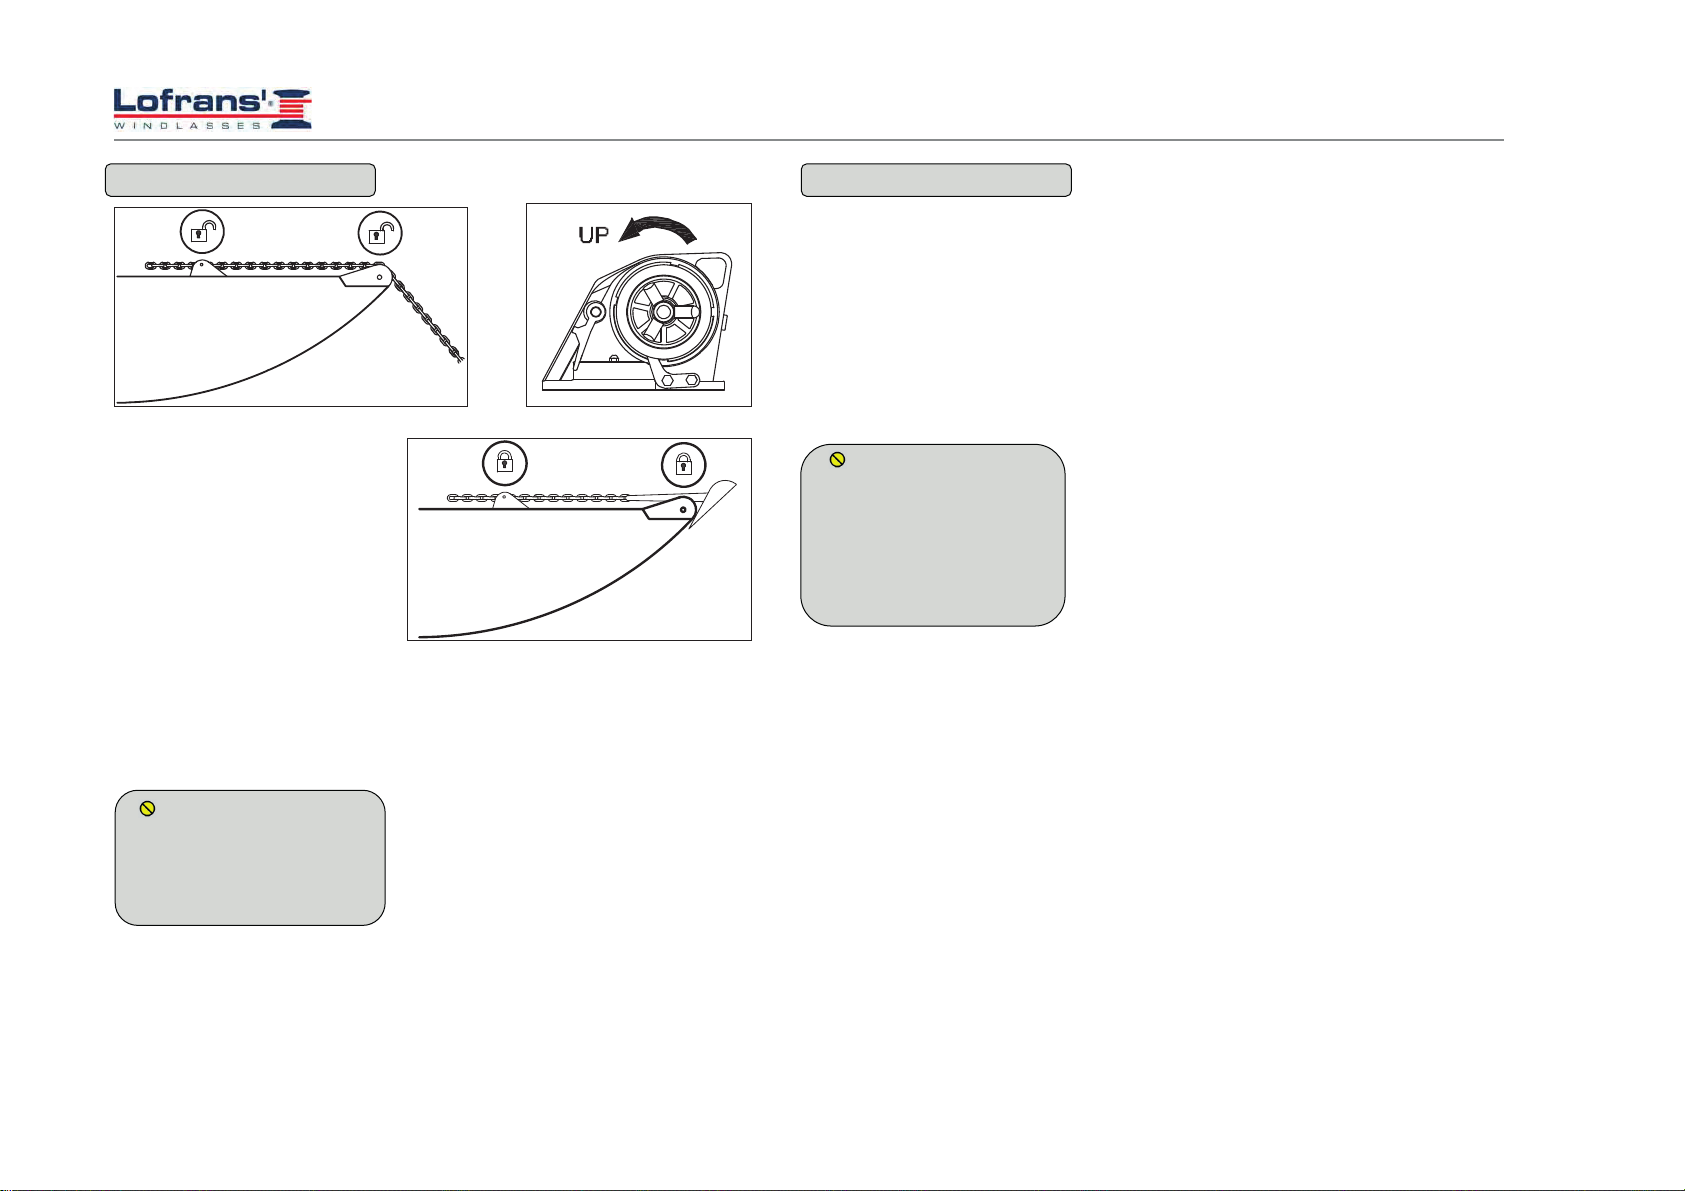
• Before operating the capstans, make
VXUH WKDW WKHUH DUH QR SHUVRQV LQ ZDWHU
LQWKHYLFLQLW\
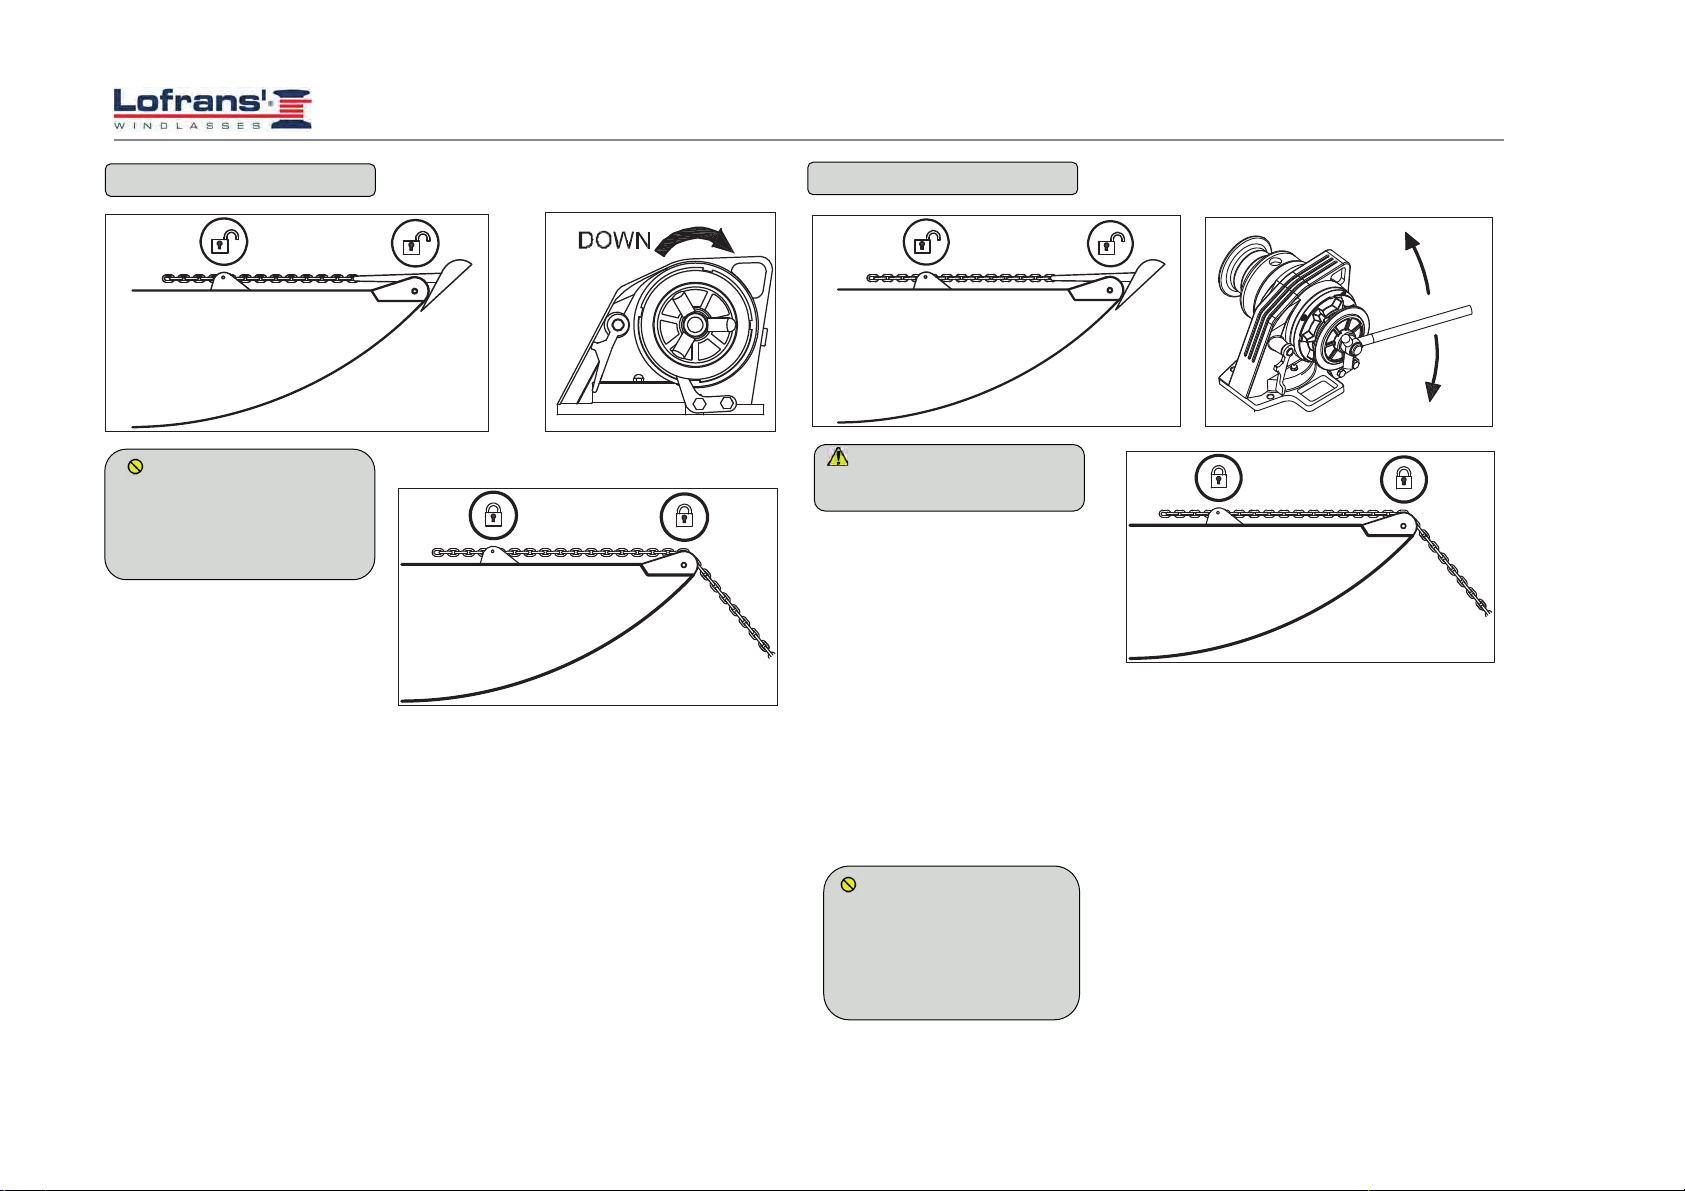
•• hen the capstan is not used, the
• The anchor windlass must never be
XVHG DV PRRULQJ SRLQW 7KH ORDG PXVW
DOZD\V EH KHOG E\ D VSHFLILF OHDW RU
VROLGSRLQW
• The capstan must not be used for
IXQFWLRQV RWKHU WKDQ SD\LQJ RXW RU
ZHLJKLQJWKHDQFKRU
• The chain must never be used on the
ZDUSLQJGUXP
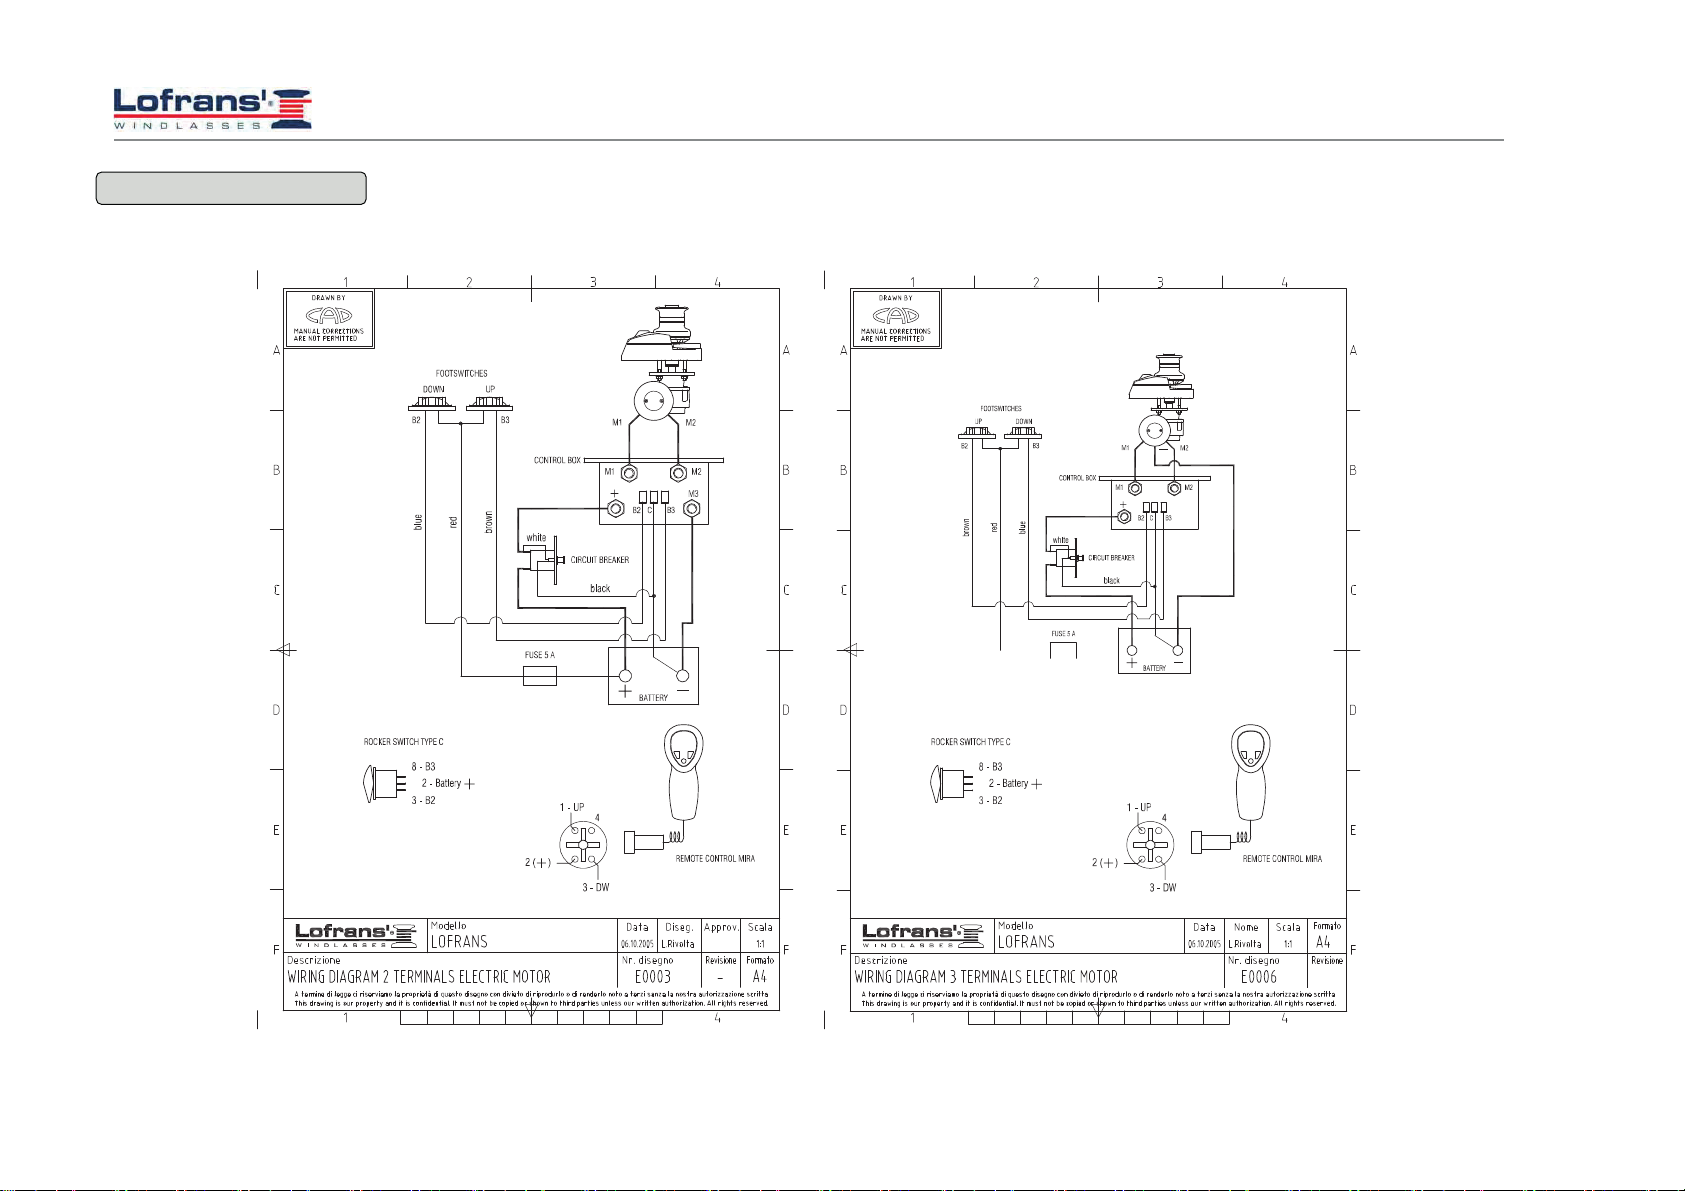
• The system must always be protected
E\DVXLWDEOHFLUFXLWEUHDNHU
WKHFLUFXLWEUHDNHUZKHQWKHDQFKRU
ZLQGODVVLVQRWLQXVH
• Disconnect always the circuit through
6$)(7<,1)250$7,21
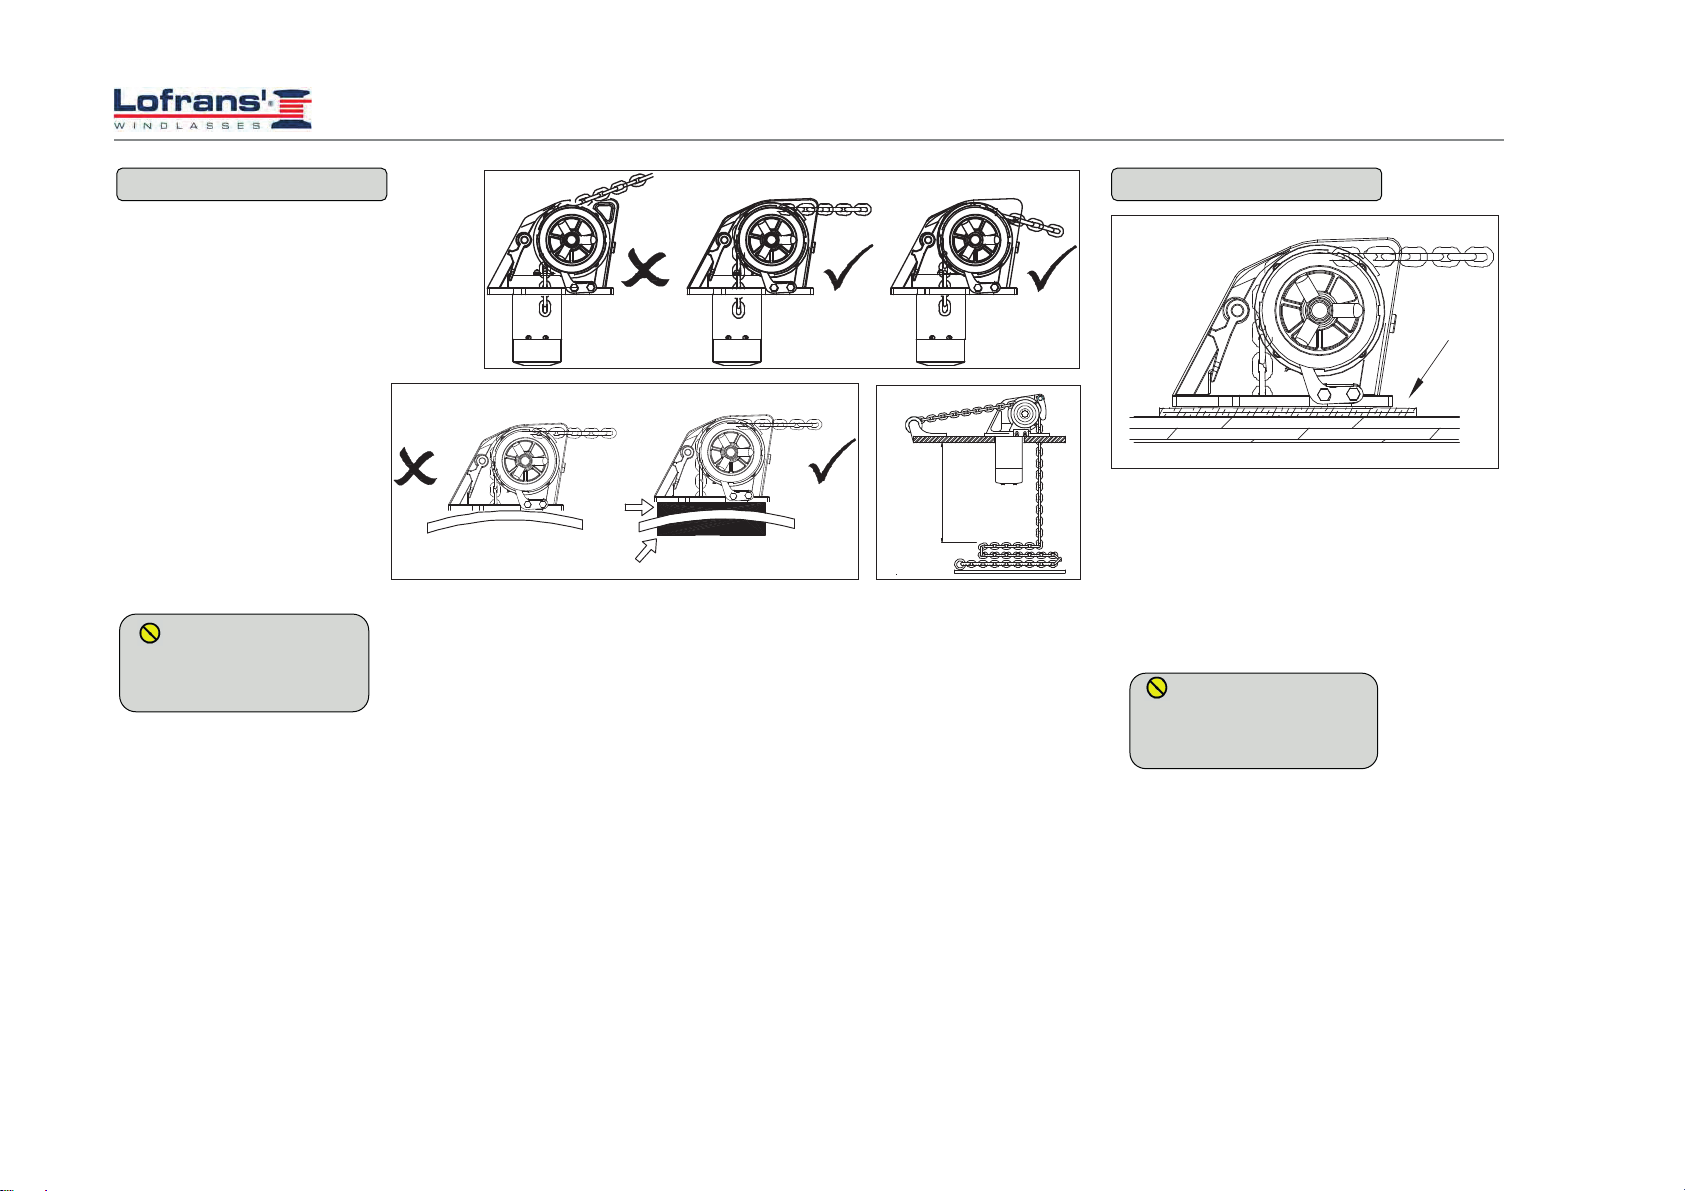
6DIHW\ VWDQGDUGV DQG FHUWLI\LQJ ERGLHV
UHTXLUH SHUHPSWRULO\ WKDW GXULQJ WKH
VWDQGLQJRIWKHDQFKRUWKHORDGPXVWEH
KHOG E\ D FKDLQ VWRSSHU RU D KLJK
UHVLVWDQFHIL[LQJSRLQW
7KHXVHULVUHVSRQVLEOHIRUJXDUDQWHHLQJ
WKDW GXULQJ QDYLJDWLRQ WKH DQFKRU LV
SURSHUO\ VWRZHG DQG IL[HG 7KLV
SUHFDXWLRQ LVPRUH LPSRUWDQW ZKHQ WKH
QDYLJDWLRQ VSHHG LV KLJKHU DQG VHD
FRQGLWLRQVDUHZRUVH,QGHHGDQDQFKRU
SDLG RXW E\ PLVWDNH GXULQJ QDYLJDWLRQ
FDQ KDYH YHU\ VHULRXV HIIHFWV
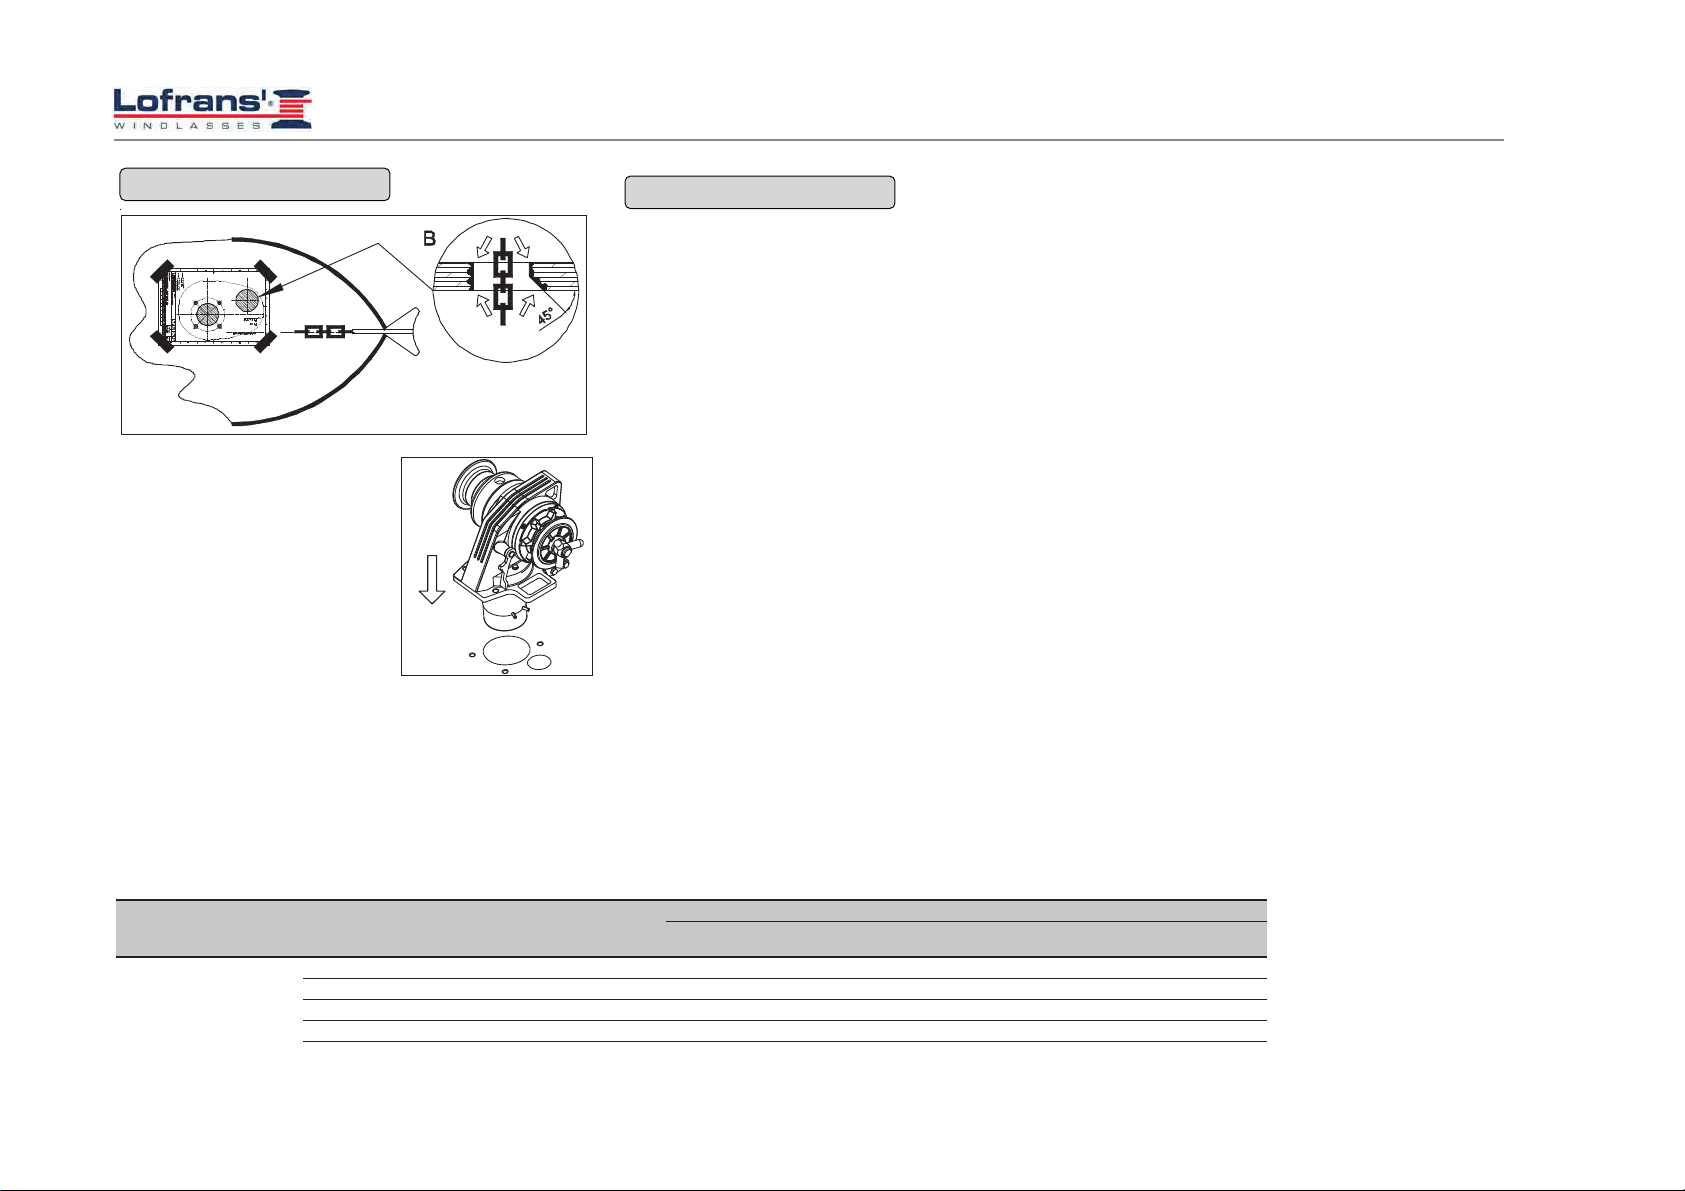
&RQVLGHULQJLWVSRVLWLRQDQGQRWDOZD\V
IUHTXHQW XVH WKH DQFKRU ZLQGODVV LV
SDUWLFXODUO\ H[SRVHG WR R[LGDWLRQ DQG
FRUURVLRQULVNWKHUHIRUHLWLVQHFHVVDU\
WR DUUDQJH D FRQVWDQW LQVSHFWLRQ RI LWV
SDUWVDQGDGXHPDLQWHQDQFH
0DNHVXUHWRKDYHUHDGDQGXQGHUVWRRG
HYHU\ SDUW RI WKLV PDQXDO EHIRUH
SURFHHGLQJ ZLWK LQVWDOODWLRQ DQG XVH
2QO\SHUVRQVZKRNQRZKRZWRRSHUDWH
VKRXOG EH DXWKRULVHG WR XVH WKH DQFKRU
ZLQGODVV6KRXOGWKHUHEHGRXEWVRQLWV
LQVWDOODWLRQ RU XVH UHIHU DOZD\V WR D
VNLOOHGFRQVXOWDQW
6$)(7<,1)250$7,21
DQFKRUPXVWDOZD\VEHIL[HGWRDVROLG
SRLQWLQRUGHUWRDYRLGGDPDJHV
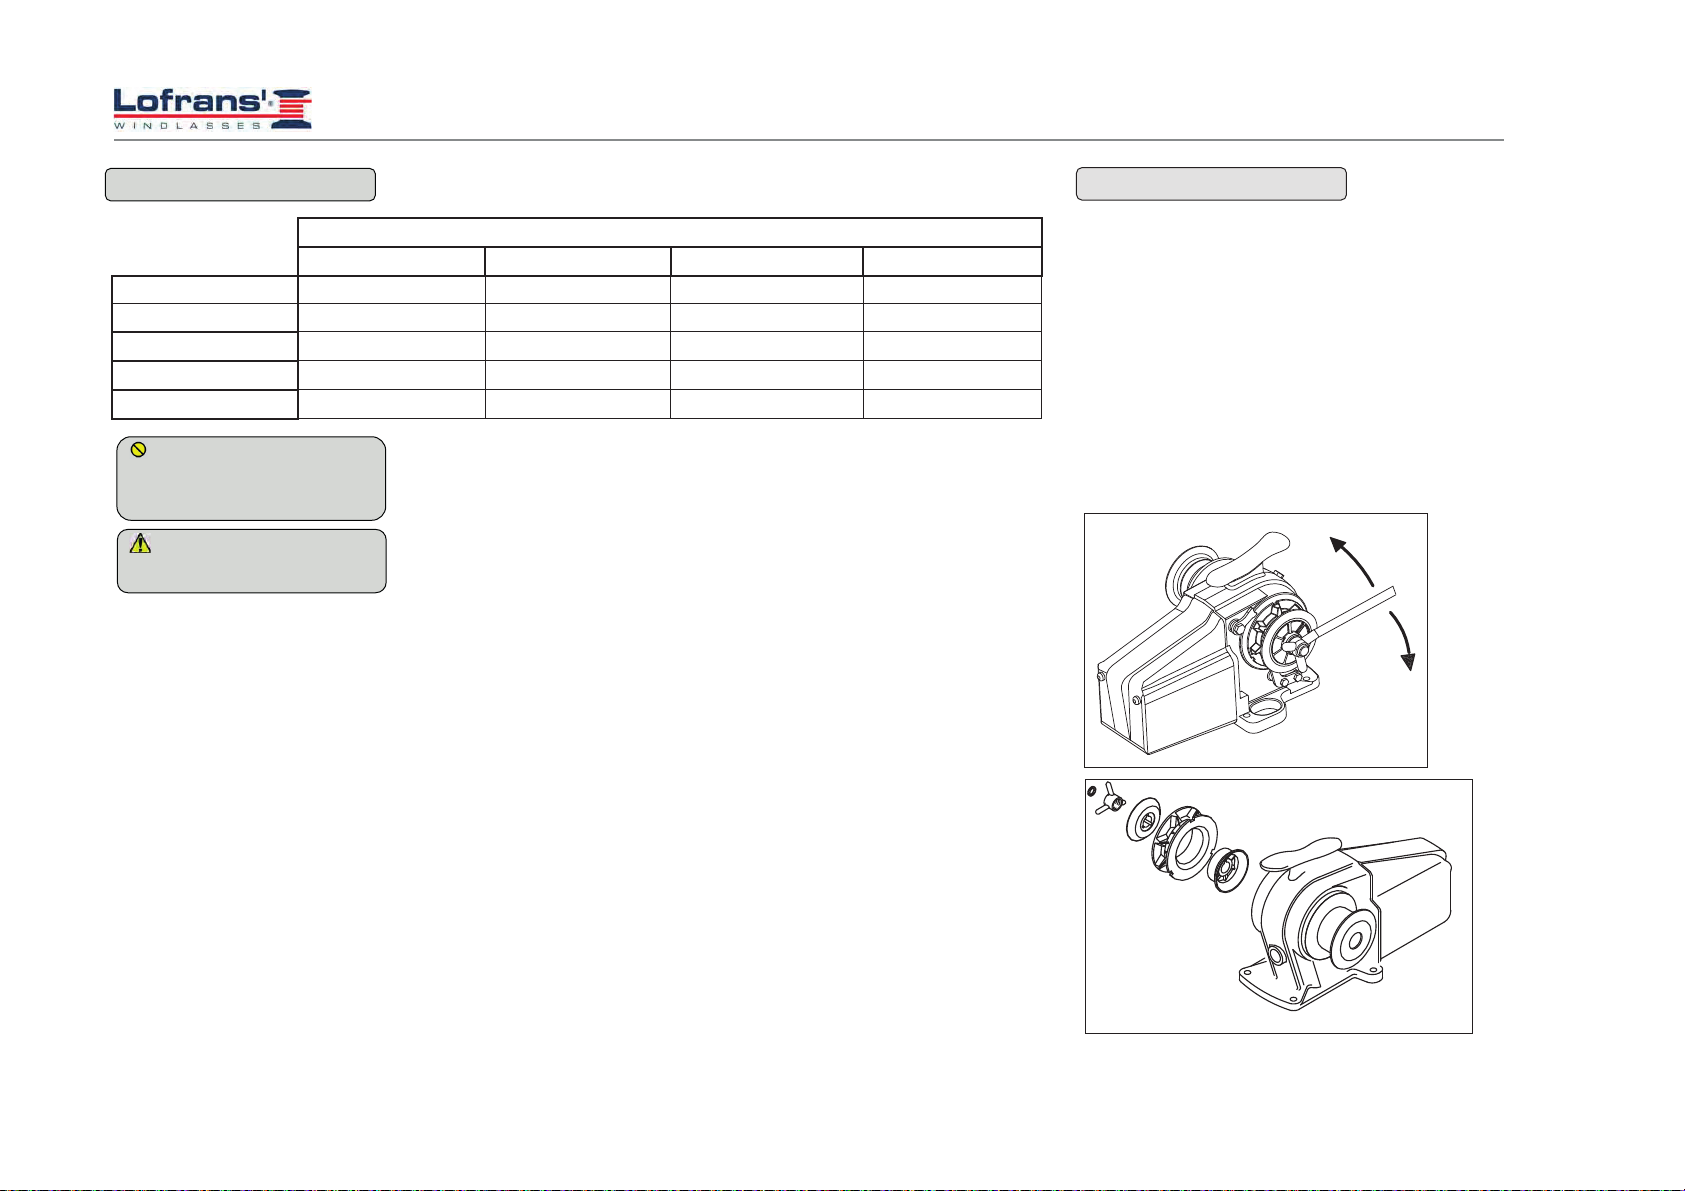
,167$//$7,21
&RQWHQWVRIWKHSDFNDJH
In addition to the present manual, the
package contains:
- Anchor windlass complete with motor
reducer
- Remote control switch/remote control
reverser box
- Drilling template
- Handle
- Screws
(TXLSPHQWQHFHVVDU\IRU
LQVWDOODWLRQ
- Drill
- 10 mm bit for wood and steel
- 10 mm., 13 mm., and 17 mm. hexagon
keys
5HFRPPHQGHGDFFHVVRULHV
Use exclusively original Lofrans
accessories and spare parts, designed
and manufactured to ensure
performances, duration and for keeping
valid the warranty.

,167$//$7,21
30 cm
*HQHUDOUHTXLUHPHQWVIRU
LQVWDOODWLRQ
In order to operate the anchor windlass
correctly, it must be installed to meet
the following conditions:
1 – Bow roller height: it must be such
to guarantee a chain inclination lower
than 90 degrees.
2 – The parallelism between deck
floors must be guaranteed; should it not
occur, duly compensate the difference.
3 – Chain locker depth: the chain fall
into the chain locker must be such that
when the chain is completely stored,
there must be a minimum of 300 mm.
between the underside of the deck and
the top of the heaped chain.
Non-observance of these
requirements will cause the
malfunctioning of the anchor
windlass.
1
2
3
,167$//$7,21
3UHYHQWLRQIURPHOHFWURO\VLV
For aluminium boats, it is essential that
the anchor windlass be insulated from
the deck through a non-conductive
gasket (not supplied). In addition, it is
important that also the anchor and the
chain be insulated from the hull,
including chain locket and fixing
systems.
Without these precautions,
the electrolysis phenomenon will
lead to a rapid corrosion of the
anchor windlass.

'HFNLQVWDOODWLRQ
1 –Place carefully the drilling template
on the deck, by ensuring the correct
alignment with the bow.
2 - Mark and drill as indicated in the
figure. Let the edges of the holes sharp,
while the edge side of the holes of the
chain towards the bow must be
smoothed for an angle of 45° degree.
3 - Place carefully the upper part of the
anchor windlass on the deck.
4 - Connect the wires from the battery
to the electrical engine.
Note:
It is recommended to seal the base of
the anchor windlass to the deck by
means of silicone glue.
1 2
3
,167$//$7,21
(/(&75,&$/6<67(0
(OHFWULFDOFDEOHVHFWLRQ
In order to obtain the maximum
performances from the anchor windlass
and safeguard the electrical system, it is
essential that the anchor windlass be
wired with cables of sufficient section as
suggested in the table.
6ROHQRLGYDOYHV&RQWURO%R[
The solenoid valves box must be of the
delayed intervention type. Observe the
capacity values indicated in the table.
Place it in a dry place near the capstan.
&LUFXLWEUHDNHUV
The circuit breakers recommended by
Lofrans have an intervention curve and
not a simple plate value. The switches
selected for each model guarantee the
correct operation of the system.
5HPRWHFRQWUROHOHFWULFSDQHOERDUG
The remote control electric panel board
must be mounted in a comfortable
position (such as the deck, the rudder or
the cockpit), so that the operator can see
the capstan during the manoeuvre.
Mount and seal the electric panel board
so that the terminals remain in a dry
place.
Model
Motor
Power
(W)
Voltage (V) Contactor (A)
Cable sizing according lengh of cable (positive + negative)
15-25 m 50-75 ft
'RUDGR PP $:*
'RUDGR PP $:*
.REUD PP $:*
.REUD PP $:*

(/(&75,&$/6<67(0
:LULQJ'LDJUDP

86(2)7+(:,1'/$66
During the use of the anchor
windlass, do not change directly
from one direction to the other
but wait until the anchor windlass
stops before manipulating the
control into the opposite direction
/RZHULQJWKHDQFKRU
Lowering of the anchor can be carried
out through the electric control or by
gravity:
/RZHULQJWKHDQFKRUHOHFWULFDOO\
1 – Make sure that the clutch is
tightened and the brake is disengaged.
Disengage all chain fixing devices.
2 – Activate the safety switch
3 – Press the DOWN button from the
control at your disposal. In this way, the
lowering of the chain will be perfectly
controllable and the unwinding of the
chain regular.
4 – Once the chain is lowered,
deactivate the safety switch.
5 – Engage the chain fixing devices.
86(2)7+(:,1'/$66
. Make sure the anchor windlass
is not powered before carrying
out manual interventions.
/RZHULQJWKHDQFKRUE\JUDYLW\
1 – Make sure that the clutch is
tightened and then disengage the chain
stopper or safety stops. Disengage the
brake.
2 – Disengage the clutch gradually
through the manoeuvre handle.
Note: to adjust the descent speed of the
chain act, through the handle, on the
clutch. By turning it clockwise, the
braking speed of the chain will increase
(until complete stop), while by turning
it anticlockwise, braking will be
reduced.
3 – Fix the chain (or the rope) to a
strong point.
By disengaging completely the
clutch, the anchor will be lowered
at high speed. Consequently, the
fast passage of the chain into the
hood and bow roller could
damage them. It is recommended
always to check the speed.

:HLJKLQJWKHDQFKRU
1 – Make sure that the hydraulic
magnetic circuit breaker is activated.
2 - Make sure that the clutch is well
tightened and the brake is disengaged.
Take out the manoeuvre handle from
the drum or gipsy.
3 – Disengage the chain stopper and
safety stops.
4 – Press the UP button from the control
at your disposal until the anchor reaches
its position inside the bow roller.
5 – Deactivate the hydraulic magnetic
circuit breaker.
6 – Fix the chain with the chain stopper.
In this way a potential damage of the
anchor windlass will be avoided as well
as unexpected chain releases.
If possible, do not carry
out the anchor recovery operation
by relying only on the onboard
batteries. Start the motor of the
boat (or the generator) to obtain
the necessary electromotive force.
86(2)7+(:,1'/$66
To safeguard the anchor windlass, the
hydraulic magnetic circuit breaker is
sized so that it comes into action when
the anchor windlass is subjected to
higher loads than those for which it has
been designed. Should it get released
owing to an overload reactivate it again
and wait some minutes before operating
it; waiting for the operation after an
overload is necessary to allow the
circuits to cool and recover their
functionalities.
The hydraulic magnetic
circuit breaker does not protect
against an excessive increase in
the motor temperature due to a
prolonged operation of the
anchor windlass. Therefore, give
the motor the necessary time to
cool, to avoid possible damages to
the motor thereof.
8VHRIWKHPDQXDORYHUULGH
Make sure that the clutch is engaged.
Disengage the brake, chain stopper, and
safety stops. Insert the manoeuvre
handle into the hand-wheel and turn
clockwise by overcoming the strength
of the spring contained in the reducer.
In case of deep sea, the effort will turn
out to be significant.
86(2)7+(:,1'/$66

83
8VHRIWKHZDUSLQJGUXP
The warping drum can be used
regardless of the gipsy, to help the
mooring manoeuvres.
1 – Tighten the brake and make sure
that the anchor is appropriately blocked.
2 - Disengage the clutch. This operation
will make the drum independent of the
gipsy.
3 – Turn clockwise around the drum
with three laps of rope.
4 – By keeping the end of the rope,
press the UP button and carry out the
mooring manoeuvre.
5 – Once the manoeuvre is ended,
remove the rope from the drum and
fasten it to a bollard.
6 – Deactivate the safety switch.
Always remove the manoeuvre
handle when not in use.
86(2)7+(:,1'/$66
'2:1
83
1RWHVIRUXVH
During mooring, the load
on the chain can be very high
due to current, wind
and waves.
mooring, do not use the anchor
windlass as strong point but always
use a chain stopper.
If during recovery, the anchor
windlass should block, slip or turn
into self-protection mode, check the
cause before proceeding.
1 – By paying out the chain, it is
necessary to manoeuvre so that the
chain is laid down on the seabed
without heaping on itself.
2 - To ease the recovery and not
overloading the capstan, steer up in a
way that the boat slowly moves on the
vertical of the anchor.
3 – When the anchor is in the vicinity of
the bow roller, slow down the recovery
to check at best the insertion of the
anchor into the seat.

0$,17(1$1&(
USE OF THE YACHT (MONTHS)
LESS THAN 2 FROM 2 UP TO 6 MORE THAN 6 CHARTER
EVERY 3 MONTHS $% $%
EVERY 6 MONTHS $%
EVERY 12 MONTHS $%& & & &'
EVERY 24 MONTHS ' ' (
EVERY 36 MONTHS '(((
Follow strictly the maintenance
programme. Not meeting the
maintenance programme will cause
forfeiture of the warranty.
Disconnect power to the
anchor windlass before any
maintenance.
0DLQWHQDQFHSURJUDPPH
For obtaining the best performances and
the utmost efficiency of the anchor
windlass, it is necessary to follow
strictly the maintenance programme
indicated hereby.
A. Clean all external surfaces and
hidden points with fresh water and
remove all salt layers.
B. Grease the rotating parts.
Particularly, the main shaft threads and
clutch cones. Check for evidences of
corrosion and mechanical stresses.
C. Check the terminals of the electric
motor. Test the voltage drop at the
terminals.
D. Replace all gaskets.
E. Remove the anchor windlass from
the deck to clean the salt under the base
and seal again.
6 MAINTENANCE
6.2 Gipsy maintenance/replacement
1 – By turning anticlockwise, remove
the gypsy through the manoeuvre
handle.
2 – Slip off from the shaft the upper
clutch cone, the gipsy, and the lower
clutch cone.
3 – Wash with running water. DO NOT
USE WATER UNDER PRESSURE.
4 – Check that there is no evidence of
corrosion or mechanical stresses.
5 – Reassemble by proceeding in the
reverse order, remembering to lubricate
threads and all moving parts with
grease.

7528%/(6+227,1*
Problem Possible causes Solution
The anchor windlass does not
work when a control is
operated
-Protection switch in OFF position
-Lack of voltage in the system
-Failure of the control box
- Failure of the control
-Failure of the electric motor
- Check the protection switch and set it in the ON position
- Check the charge status of the battery, check connections
- Check and possibly replace the control box
- Check and possibly replace the control
- Measure the electric motor voltage; if it is OK, check the brushes and clean them. If it does not
work, replace the electric motor
The chain jams frequently
-The chain locker is not deep enough with respect to the
quantity of chain chosen
-The chain is not suitable for the gipsy
-The chain is not calibrated
-Position the anchor windlass in the deepest point of the chain locker or reduce the quantity of
chain
- Change the gipsy
-Check the chain: if it does not meet the tolerances, it must be replaced
The protection switch is
released frequently
-The protection switch is not of a delayed response curve
type - Change the protection switch
The anchor windlass turns
slowly
-Unsuitable cable sections
-Deck floors not parallel
- Bad electrical connections
-Dirty brushes
- Water infiltrations in the electric motor
-Increase cable section
- Make floors parallel by interposing thicknesses
- Check connections
- Clean brushes
- Replace the electric motor

7(&+1,&$/'$7$
Motor Power
Dorado 500W Dorado 700W Kobra 1000W
Vessel Lenght Heavy Duty (ft)
Vessel Lenght Light Duty (ft)
Power Supply
12V 12V 12V 24V
Maximum linear Load/Pull (Kg)
Maximum linear Load/Pull (lb)
2750
Maximum lift Load/Pull (Kg)
Maximum lift Load/Pull (lb)
1375
Max Lift Working Load (Kg)
Max Lift Working Load (lb)
352
/Amps Work Load (A)
60 117
Max Line Speed (mt./min.)
Max Line Speed (ft/min.)
105
Line Speed (mt./min.)
Line Speed (ft/min.)
75
Net weight with Drum (Kg)
Net weight with Drum (lb)
47
Dorado
'ŝƉƐLJ
ϲŵŵ ϳŵŵ ϴŵŵ
ŚĂŝŶ ƐƵƉƉŽƌƚĞĚ
PP PP PP PP PP PP
,62 ',1 %%% ,62 ',1 * %%% ,62 ',1 * %%%
ZŽƉĞƐƵƉƉŽƌƚĞĚ
PP PP PP
Kobra
'ŝƉƐLJ
ϲŵŵ ϴŵŵ ϭϬŵŵ ϭϬ/Eϳϲϲ
ĂƚĞŶĂƐƵƉƉŽƌƚĂƚĂŚĂŝŶ
ƐƵƉƉŽƌƚĞĚ
PP PP PP PP PP PP
,62 ',1 ,62 ',1 * %%% ,62 * ',1 %%%
ŝŵĂƐƵƉƉŽƌƚĂƚĂZŽƉĞƐƵƉƉŽƌƚĞĚ 1$1$ 1$1$

3$57/,67

3$57/,67

3$57/,67

3$57/,67

:,1'/$66(6
5
10 OVERALL DIMENSIONS

:,1'/$66(6
5
10 OVERALL DIMENSIONS

'5,//,1*7(03/$7(
This manual suits for next models
1
Table of contents
Other Lofrans Marine Equipment manuals
Popular Marine Equipment manuals by other brands

SmartCell
SmartCell SC-31-0100-0001-99 installation guide

UniPOS
UniPOS FD7204 instruction manual

Furuno
Furuno FCV-291 Specifications

Thrane&Thrane
Thrane&Thrane TT-3026L easyTrack Getting started

Guidance Navigation
Guidance Navigation RadaScan Operator's guide

PYLE Audio
PYLE Audio PLCD16MRWB owner's manual