manuals.online logo
Brands
  1. Home
  2. •
  3. Brands
  4. •
  5. Harken
  6. •
  7. Marine Equipment
  8. •
  9. Harken 3387 User manual

Harken 3387 User manual

Sideplate beta
Deadend
post
Roller cage
assembly
Sheave with side balls
Sideplate alpha
Isolator
Screw
Heli-Coil®
threaded insert
INSTRUCTIONS
Loop Block
3214, 3230, 3245, 3255, 3386, 3387, 3388
N15W24983 Bluemound Road, Pewaukee, WI 53072-4974
Telephone: (262) 691-3320 •Fax: (262) 701-5780 •Web: www.harken.com •Email: [email protected]
Parts
You Must Supply
Part
No.
Sheave
Ø
Max working load
(MWL)
Breaking load
(BL) Max line Ø
that fits
through mouth
lb kg lb kg
3214, 3386, 3387 57 mm 2500 1134 5000 2268 5 mm
3230, 3388 75 mm 5000 2268 10000 4536 8 mm
3245 100 mm 7500 3402 15000 6804 11 mm
3255 125 mm 11000 4990 22000 9977 14 mm
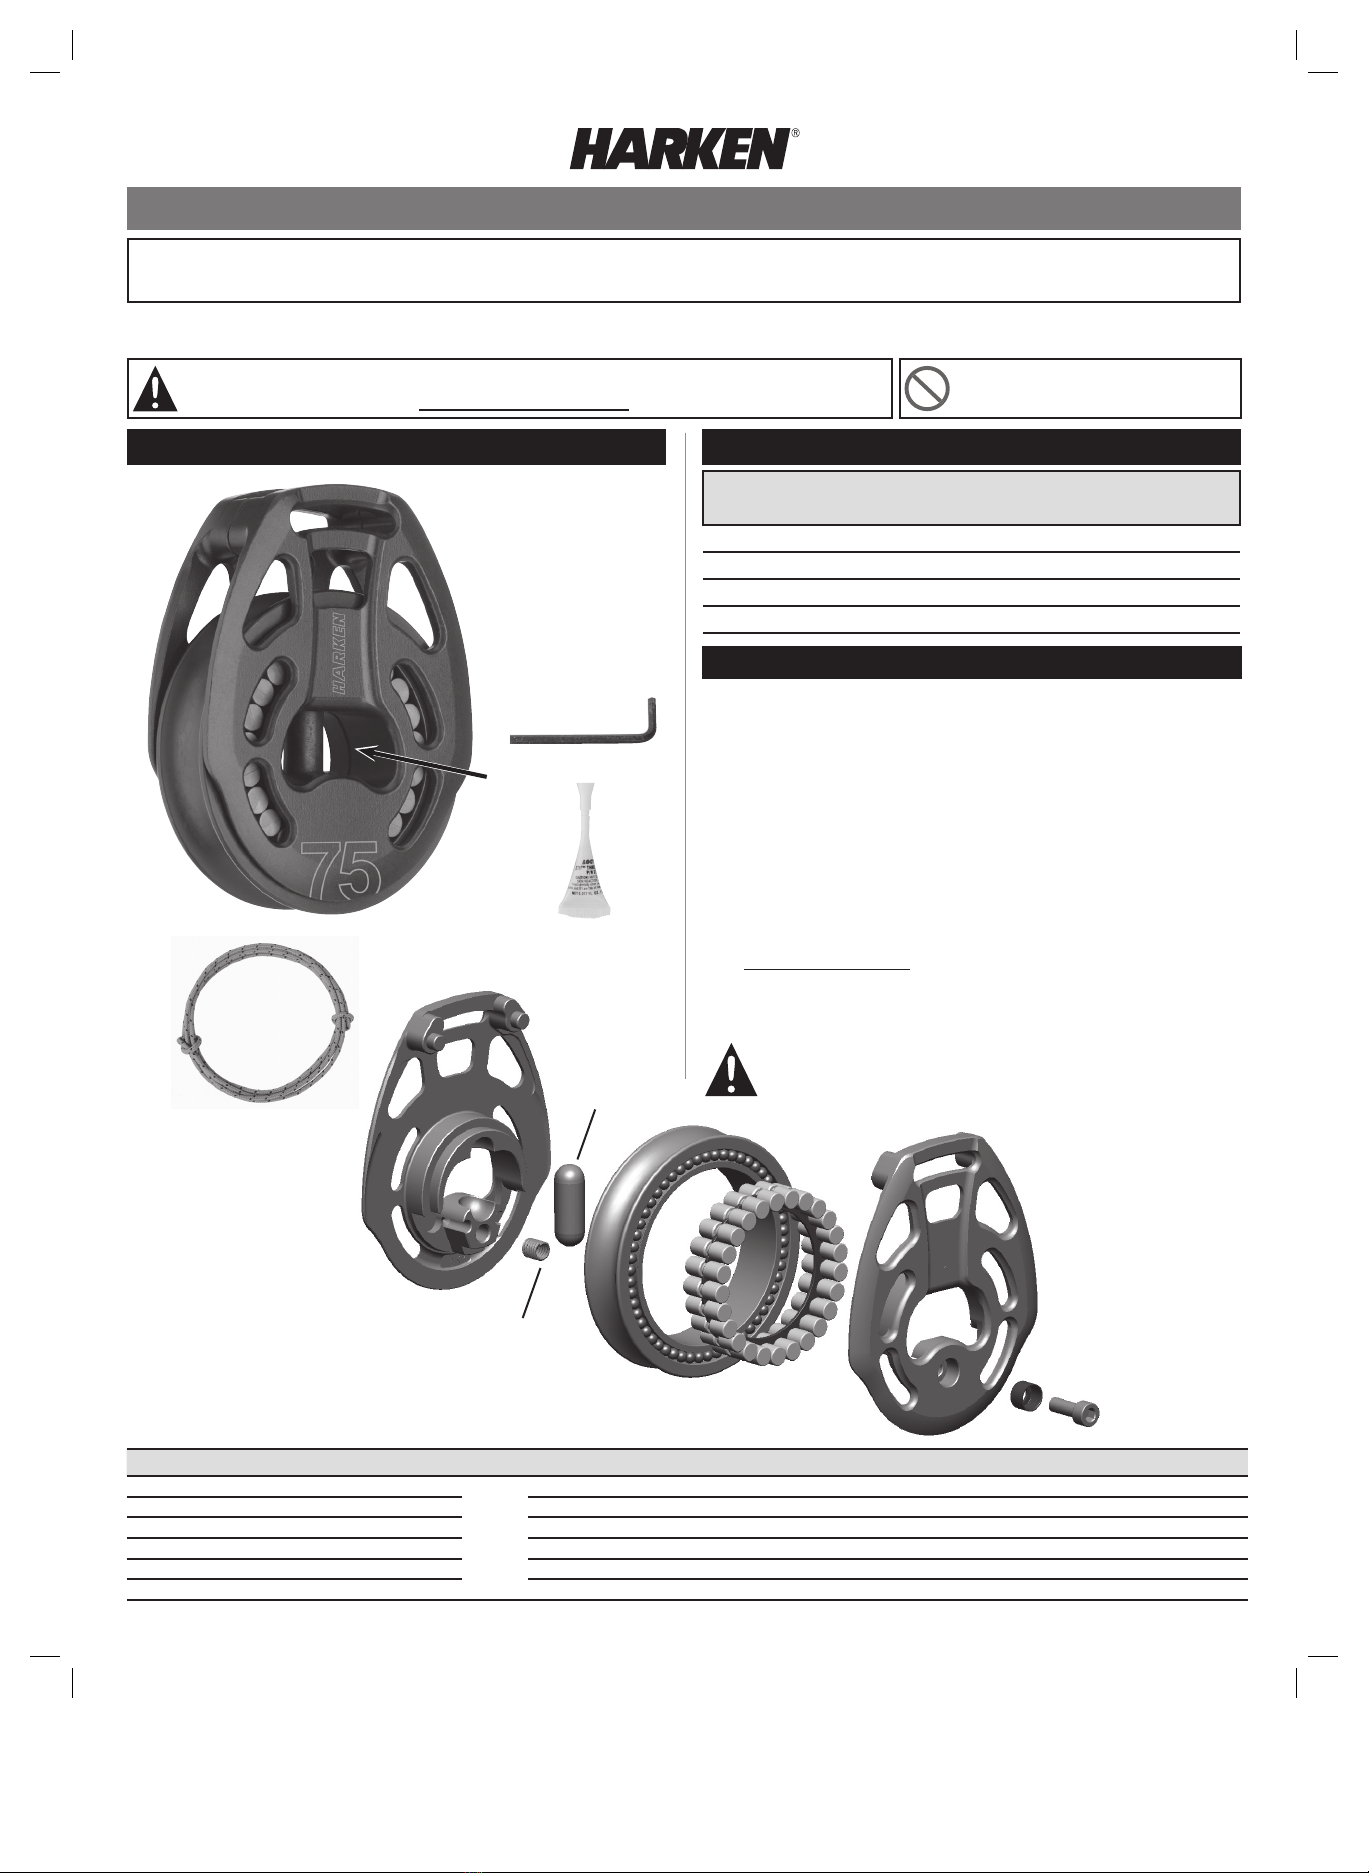
1) Head
2) Sideplates
3) Sheave
4) Deadend post
5) Mouth
6) Hex key
7) Blue Loctite® adhesive
8) Head securing line
6
Loop and/or high-strength lashing line
When choosing a Harken Loup®soft-attach, be sure the Loup maximum
working load in basket configuration exceeds the maximum working load
of the block.
When choosing a lashing line, use a breaking load that is double the block's
breaking load to account for strength loss from:
1. Knots slipping or breaking at a much lower load than line breaking load.
Spectra®or Dyneema®-type lines require specialized knots.
2. Splices slipping or failing due to incorrect type or execution.
3. UV damage increasing with each passing year.
4. Chafing seriously reducing strength.
Go to www.harken.com/knots for additional information. If you are not
comfortable choosing line, work with a qualified rigger.
Note: See chart for maximum line diameter that will fit through mouth.
Specifications
WARNING! Knots weaken line considerably. Consult qualified rigger
or line manufacturer for advice on securing line. Use high-strength
loops or consult rigger for recommendations on lashing. Using the
wrong line, or securing the line improperly, can cause an accident.
WARNING! Strictly follow all instructions to avoid an accident, damage to your vessel,
personal injury, or death. See www.harken.com/manuals for additional safety information. = Incorrect. Avoid to prevent accidents.
Block Sheave Ø Head securing line Sideplate alpha Heli-Coil Deadend post Sheave w/side balls Roller cage assembly Sideplate beta Isolator Screw
3214 57 mm HCP1438 AL-3700
Alpha sideplate
includes Heli-Coil
MS-210 AL-3238 H-34389A HBB85 AL-3701 MP-3020 HFS796
3387 57 mm HCP1438 H-85960 MS-210 AL-3238 H-85962 + (88) MP-124 HBB85 H-85961 MP-3020 HFS796
3230 75 mm HCP1419 AL-3726 MS-221 AL-3336 H-34390A HBB86 AL-3727 MP-3021 HFS806
3388 75 mm HCP1419 H-85872 MS-221 AL-3336 H-85875+ (96) MP-119 HBB86 H-85873 MP-3021 HFS806
3245 100 mm HCP1419 AL-3751 MS-251 AL-3427 H-34391A HBB87 AL-3752 MP-3022 HFS1271
3255 125 mm HCP392 AL-3769 MS-259 AL-3515 H-34392B HBB88 AL-3770 MP-3023 HFS1275
8
7
1
2
34
5
#5004 rev1
4 page booklet instruction
Final folded size: 4.25 x 5.5"
Black ink only
Prints all four pages
Loctite is a registered trademark of Henkel AG & Company KGaA.
LOUP is a registered trademark of Yale Cordage.
Spectra is a registered trademark of Honeywell International, Inc.
Dyneema is a registered trademark of DSM Dyneema.
Heli-Coil is a registered trademark of Emhart Teknologies Inc.,Worldwide
See 3386 double on next page
Head securing line
Terminating to Deadend Post
5. Open sideplates without
pulling line through block.
Terminating to deadend post lets you attach block to a closed bail such
as a padeye.
1. Remove screw.
2. Remove deadend post.
Remove plate on post side to
deadend to double. 6. Part legs of loop and
insert deadend post.
Make sure deadend
post is seated straight
in sideplate. Put
sideplates together.
7. Pull loops to seat ends
on deadend post.
Loop
Deadend post
Deadend post
WARNING! Webbing or smaller lashings can be damaged by
being pinched between post and sideplate. Damaged webbing
or lashings can part suddenly under load. Use only loops when
terminating at deadend post.
Tip: With shorter loops, place loop at the side of the head to allow more
room to insert the deadend post.
4. Pass loop ends through
mouth so loops extend
beyond block's sideplates
as shown.
3. Insert loop into block
mouth as shown.
Block Sheave Ø Screws Isolators* Sideplate beta Roller cage assemblies Sheaves w/side balls Deadend post* Helicoil®Center plate Head securing line
3386 57 mm (2) HFS796 (2) MP-3020 (2) AL-3701 (2) HBB85 (2) H-34389A AL-3238 (2) MS-210 AL-3700 HCP1438
* AL-3701 sideplates include isolators. AL-3700 center plate includes Helicoil threaded inserts.
Deadend post
3386 Double Block Parts
Double block uses all
components of single and a
center plate.
Center plate
3386
Sideplate beta Sideplate beta
Heli-Coil is a registered trademark of Emhart Teknologies Inc.,Worldwide
Mouth
9. Secure loop to head of
block with head securing
line using a Carrick bend.
For knot tying resources:
www.harken.com/knots.
Terminating Loop Outside Block or Using Lashing
1. Use hex key to
remove screw.
If terminating line outside block or lashing using multiple strands
of smaller-diameter line, remove the deadend post.
2. Remove deadend post.
Do not use post with
multiple lashing lines.
10. Further secure knot by
carefully melting line
ends with a hot knife.
3. Reassemble block. Use blue Loctite®
adhesive on screw.
5. Secure lashings or loop
to the head using a
securing line tied in a
Carrick bend. For
knot tying resources:
www.harken.com/knots
WARNING! If head-securing line comes loose, block can flip
and cause line to jam, resulting in loss of control. Inspect
head-securing line often and redo if necessary.
WARNING! Attaching line to block head will considerably weaken
block so it can easily break under load. Attach loop/lashing only
through mouth of sheave.
Do not attach
to head.
Mouth
4. Lash or run loop through mouth of block.
Loctite is a registered trademark of Henkel AG & Company KGaA.
8. Reassemble block using
blue Loctite®adhesive
on screw.
Loctite is a registered trademark
of Henkel AG & Company KGaA.
Harken equipment is designed for minimal maintenance, but some maintenance
is required to give the best service and to comply with the Harken limited warranty.
Cleaning: Flush blocks, loops and lashing lines thoroughly with fresh water.
Periodically, disassemble the blocks and clean with detergent and fresh water. When
assembling block, make sure screws and holes are dry. Use blue Loctite
adhesive to secure screw before assembling.
IMPORTANT! Exposure to some teak cleaners and other caustic solutions can
result in discoloration of part and is not covered under the Harken warranty.
Printed in USA. 5004 v1 03-21
Warranty
Inspect Parts Every Time you Sail
1. Inspect block to make sure that screw is secure. If screw is loose, remove
it. Apply blue Loctite®adhesive and retighten.
3. Inspect loops and lashings. Replace if there are signs of wear, or if the
colored tracer fades from UV damage. Pull loop out of mouth and inspect
loop/lashing carefully for any signs of wear, UV damage, fatigue, or
strand separation. Replace loop if it shows signs of UV damage or wear.
4. Inspect head securing
line to make sure knot
is holding tightly.
For additional safety, maintenance, and warranty information:
www.harken.com/manuals or the Harken catalog.
ALL INSTALLATIONS
Anchor Point Chafing or Cutting
Loops must be attached to round bails such as those found on padeyes
or pins. Sharp edges on many perforated toerails will cut loop, severely
weakening it. When loop is attached to a plate, it must be at least 25 mm
(1/4") thick and have rounded edges to keep loop from being damaged.
Sharp edges will
damage loop.
Round edges prevent
damage to loop.
WARNING! Failure to inspect block, loops, and lashing,
and correct any problems, may result in block breaking under load.
Inspect parts each time you sail. If blocks are under load during
long passages inspect them carefully while in use.
WARNING! Loops or lashings running over a sharp edge can cause
part to break under load. Attach to fitting with a rounded edge.
WARNING! Failure to replace damaged or weakened parts can
cause block to break under load. Replace all loops and lashings
every year or if there is any sign of wear, UV damage, fatigue,
or strand separation. If in doubt, replace. Consult chart to match
strength of loop/lashing to block and load.
Maintenance
WARNING! Using a loop in a “choker-style” weakens the
loop connection. Do not use choker-style connection.
Loctite is a registered trademark of Henkel AG & Company KGaA.
Choker

This manual suits for next models

6

Other Harken Marine Equipment manuals

Harken 35.2 ST E Manual

Harken

Harken 35.2 ST E Manual

Harken Black Magic Series User manual

Harken

Harken Black Magic Series User manual

Harken 20 STA Manual

Harken

Harken 20 STA Manual

Harken Carbo Air 79735 User manual

Harken

Harken Carbo Air 79735 User manual

Harken Ti-Lite Carbo AirBlock 351 User manual

Harken

Harken Ti-Lite Carbo AirBlock 351 User manual

Harken GT326S User manual

Harken

Harken GT326S User manual

Harken MKIV Unit 3 User manual

Harken

Harken MKIV Unit 3 User manual

Harken 3195 User manual

Harken

Harken 3195 User manual

Harken T2 User manual

Harken

Harken T2 User manual

Harken 394 Assembly instructions

Harken

Harken 394 Assembly instructions

Harken 1851 User manual

Harken

Harken 1851 User manual

Harken FlatWinder 250 Manual

Harken

Harken FlatWinder 250 Manual

Harken Carbo OneTouch User manual

Harken

Harken Carbo OneTouch User manual

Harken HC7906 User manual

Harken

Harken HC7906 User manual

Harken 3386 User manual

Harken

Harken 3386 User manual

Harken E2750HB User manual

Harken

Harken E2750HB User manual

Harken 1624 Assembly instructions

Harken

Harken 1624 Assembly instructions

Harken C14526 Operating manual

Harken

Harken C14526 Operating manual

Harken 9000 User manual

Harken

Harken 9000 User manual

Harken R27.1M User manual

Harken

Harken R27.1M User manual

Harken 1561 User manual

Harken

Harken 1561 User manual

Harken 3299 User manual

Harken

Harken 3299 User manual

Harken Cam-Matic 412 Assembly instructions

Harken

Harken Cam-Matic 412 Assembly instructions

Harken UNIT 2 MKIII User manual

Harken

Harken UNIT 2 MKIII User manual

Popular Marine Equipment manuals by other brands

Lowrance ActiveTarget 2 installation manual

Lowrance

Lowrance ActiveTarget 2 installation manual

Orbit OceanTRx7 Technical notes

Orbit

Orbit OceanTRx7 Technical notes

Furuno FE-700 installation manual

Furuno

Furuno FE-700 installation manual

CDI FF4 instructions

CDI

CDI FF4 instructions

Scosche ACM3 quick start guide

Scosche

Scosche ACM3 quick start guide

Furuno FI-302 Operator's manual

Furuno

Furuno FI-302 Operator's manual

Klaxon Nexus 105 installation instructions

Klaxon

Klaxon Nexus 105 installation instructions

Argonaut M7 Installation and operation guide

Argonaut

Argonaut M7 Installation and operation guide

Furuno SC-33 Operator's manual

Furuno

Furuno SC-33 Operator's manual

Magnadyne M5100CD Installation and operation manual

Magnadyne

Magnadyne M5100CD Installation and operation manual

Simrad CS90 quick start guide

Simrad

Simrad CS90 quick start guide

Jefa Steering Systems LD100 Test data and installation instructions

Jefa Steering Systems

Jefa Steering Systems LD100 Test data and installation instructions

GUIDANCE MARINE SceneScan user guide

GUIDANCE MARINE

GUIDANCE MARINE SceneScan user guide

Ros PT-10 Operating and maintenance manual

Ros

Ros PT-10 Operating and maintenance manual

jotron Tron AIS TR-8000 Quick reference guide

jotron

jotron Tron AIS TR-8000 Quick reference guide

Standard Communications Horizon WS45 owner's manual

Standard Communications

Standard Communications Horizon WS45 owner's manual

B&G HERCULES installation guide

B&G

B&G HERCULES installation guide

Simrad EM - TECHNICAL NOTE 2000 manual

Simrad

Simrad EM - TECHNICAL NOTE 2000 manual

manuals.online logo
manuals.online logoBrands
  • About & Mission
  • Contact us
  • Privacy Policy
  • Terms and Conditions

Copyright 2025 Manuals.Online. All Rights Reserved.