Logic LEVCA User manual

Intelligent Charging
FOR LEVCA MODELS DESIGNED TO CHARGE
LI-ION / LIPO TWO-WAY RADIO BATTERIES
User Manual
Part Number Descripon
LEVCA-M Mul-direconal dash mounng bracket with 4-hole AMPS mounng paern.
LEVCA-MHD Heavy duty oor mounng bracket with 4-hole AMPS mounng paern.
TWC6M-VPA Vehicle power adapter to connect LEVCA to a 12V or 24V outlet. Allows LEVCA
to be used “plug-and-play.”

Introducon
Thank you for purchasing a Logic in-vehicle charger (LEVCA). This ultra-rugged
product features intelligent charging and is designed for rapid charging two-
way radio baeries from a 12V - 24V source in a vehicle, trailer, or train. LEVCA
models are radio specic and provide a precision t with the baery. The model
you have purchased is chemistry specic and will charge Li-Ion or LiPo baeries
only. The label on the front of the LEVCA conrms the baery chemistries this
model is designed to charge. If you have quesons about your LEVCA model,
contact your Power Products dealer or call 800-529-1618.

1
Topic Page
Important & Cauon 2
Features 4
Installaon 6
Charging A Baery 8
Status LED Summary 10
Baery Fault Condions 11
Specicaons 12
Warranty 13
Table of Contents

2
Important
1. Read all Cauon statements below and this User Manual before aempng
to install the LEVCA or charge a baery.
2. Check to make sure the LEVCA model is compable with your radio baery
and baery chemistry before installing.
3. Always charge new baeries completely before inial use. Recycle baeries
when they can no longer be used.
Cauon
1. Do not charge a baery unless it is designed with overcharge protecon.
2. Do not discard unwanted baeries in the trash or incinerate. Baeries
exposed to re or excessive heat may explode.

3
3. Install the LEVCA where it will be protected from rain or moisture.
4. Make sure contacts on the radio holder and baery are clean. Do not allow
wire or metal objects to touch the contacts.
5. Do not open or make any modicaons to the LEVCA. Use only the DC power
cable supplied.
6. Always secure the radio (or baery) in the radio holder with the e-down
strap before the vehicle, trailer, or train goes in moon.
7. Make sure that the e-down strap securely holds the radio or baery, but
is not too ght. An over-tensioned strap could cause injury when released.
Cauon (connued)

4
LEVCA Features
6
54
2
3
7
8
9
1

5
LEVCA Features
1. Integrated radio holder and charging electronics.
2. Holes for fastening to dash or mounng bracket (see Oponal Accessories).
3. Connecon point for DC power cable.
4. Alpha contact™ for reliable baery charging.
5. Status LED (orange, red, green).
6. Hook for connecng e-down strap.
7. Tie-down strap.
8. Screws and spacers for fastening LEVCA to vehicle.
9. DC power cable with locking connector plug.

6
Installaon
Before installing the LEVCA, conrm that the model is compable with the radio
baery you want to charge and the baery’s chemistry.
1. Select an area in the vehicle to mount the charger. The LEVCA’s compact size
allows it to be installed in areas where other in-vehicle chargers will not t.
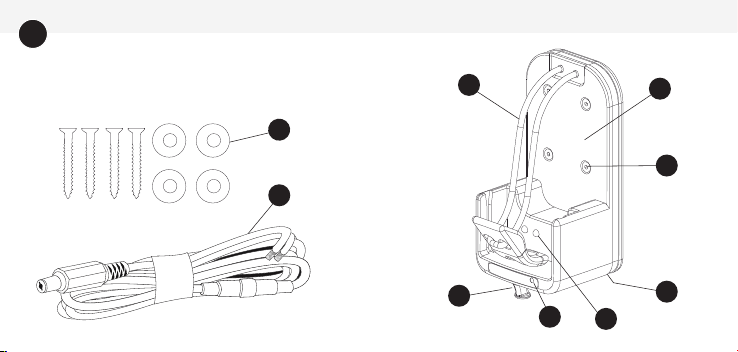
2. Run the DC power cable from the charger and connect it to the vehicle’s 12V
or 24V source. Fully insert the DC cable plug into the connecon point on
the boom of the charger, then rotate the plug slightly to lock it in place.
3. Place the baery in the charger to conrm it will properly charge. If there
are no issues, fasten the charger to the vehicle and secure the power cable.

7
4. Use the 4 screws provided to fasten the LEVCA to the dash or wall of your
vehicle. Place a rubber spacers over each screw on the back side of the
charger to help stabilize the unit.
5. The e down strap is properly sized to secure the radio in the charger. Place
the elasc cord over the top of the radio and aach the plasc clip to the
retaining hook. When charging a baery only, the e-down strap can be
made ghter by sliding the plasc clip up slightly and pulling the looped end
of the elasc strap over the retaining hook.
Installaon (connued)

8
Charging A Baery
A baery may be charged while on or o the radio. Always use the e-down strap
to secure the radio or baery before your vehicle is driven.
1. Aer the LEVCA is installed, switch vehicle power on and place a baery in
the charger. The status LED will illuminate ORANGE briey, then RED conn-
uously to indicate normal charging.
2. If the charge status LED is RED and ashes, a fault has been detected. The
ash paern represents a specic fault condion. See Fault Condions for
details.
3. When the baery is charged to 80% of capacity, the charge status LED will

9
change to GREEN and ash. The charge status LED will illuminate GREEN
with no ashing when the baery is fully charged.
4. A fully charged baery may be le in the LEVCA and a full charge will be
maintained. This maintenance feature will not damage the baery.
5. The LEVCA will charge a baery when its temperature is between 0ºC and
45ºC. When a baery’s temperature is outside this range, the LEVCA will
monitor the temperature and resume charging once the baery temperature
is within the 0ºC to 45ºC range.
Charging A Baery (connued)

10
Status LED Summary
LED Color Status
Solid ORANGE Diagnosc stage - LED illuminates briey when baery is inserted.
Flashing ORANGE Baery cannot be charged because: (1) temperature is below 0°C (32°F)
or above 45°C (113°F), or (2) chemistry is not compable with charger.
Solid RED Normal baery charging.
Flashing RED See Fault Condions.
Flashing GREEN Baery charge level approximately 80%.
Solid GREEN Baery fully chaged and in maintenance mode.

11
Fault Condions
Flash Paern (RED) Fault Type
1 Time Charging is complete, but baery is under charged. Baery
voltage is below the minimum level required.
2 Times Baery contact is ‘open’ and current is not passing
through the posive and negave terminals of the
baery. Check compability of the baery.
3 Times Over current condion caused by baery short circuit.
Charging immediately terminates.

12
Specicaons
Compable Baery Chemistries Li-Ion / LiPo (7.2V-10.8V)
Operang Temperature 0ºC - 45ºC / 32ºC - 113ºC
Charger Input 10V - 30V DC @ 1.0A (minimum)
Charge Rate Up to 1000 mA
DC Power Cable 16AWG / 3A in-line fuse / 3.0m (9.8’)
Charger Contacts High impact and vibraon tolerant alpha contact™
Contact Cycle Life Minimum 20,000
Weight 245g / 0.5 lbs.
Dimensions (L x W x D) 113mm x 66mm x 57.3mm / 4.4” x 2.7” x 2.3”

Warranty & Service During Warranty
Power Products Unlimited, Inc. (PPU) warrants this product to be free from defects in workmanship
and materials for three years from date of purchase by the end user. This warranty applies to the
original purchaser and is void if the product has been altered, misused, damaged, neglected, or if
repair is required because of normal wear and tear. This is the only warranty made by PPU. In no
event will PPU, its aliates, subsidiaries, related enes, or their respecve directors, ocers, or
employees, be liable for any damages beyond repair or replacement as described above, including
without limitaon, indirect, incidental, or consequenal damages. For service under warranty, return
the product along with dated proof of purchase to the dealer where purchased or to Power Products.
If returning directly to Power Products, follow these instrucons:
Send to Power Products - Warranty Service Department, 2170 Brandon Trail, Alpharea, GA 30004.
Obtain proof of delivery for your shipment. Include with product, dated proof of purchase, your
name and dayme telephone number, email address and return address (street address only; no
P.O. boxes please).

©2016 Power Products Unlimited, Inc. Power Products, Logic, and Charging Solutions For Professionals are trademarks of Power Products
Unlimited, Inc. All rights reserved.
Part Number Descripon
LEVCA-M Mul-direconal dash mounng bracket with 4-hole AMPS mounng paern.
LEVCA-MHD Heavy duty oor mounng bracket with 4-hole AMPS mounng paern.
TWC6M-VPA Vehicle power adapter to connect LEVCA to a 12V or 24V outlet. Allows LEVCA
to be used “plug-and-play.”
Oponal Accessories
Charging Solutions For Professionals™
Logic Chargers By Power Products
™
2170 Brandon Trail • Alpharetta, GA 30004
www.powerproducts.com
™
Table of contents
Popular Batteries Charger manuals by other brands

Circutor
Circutor Wallbox eNext Series installation guide

GreenWorks Pro
GreenWorks Pro Ultapower 60V CAC801 Operator's manual

Schumacher
Schumacher SS-51A-PE owner's manual

ABB
ABB A101-H Series Original assembly instructions

Hama
Hama 46667 operating instructions

Webasto
Webasto Next Operating and installation instructions