Logik LTL55S12 User manual

Tall Silver Larder Fridge
Instruction Manual
LTL55S12


Contents
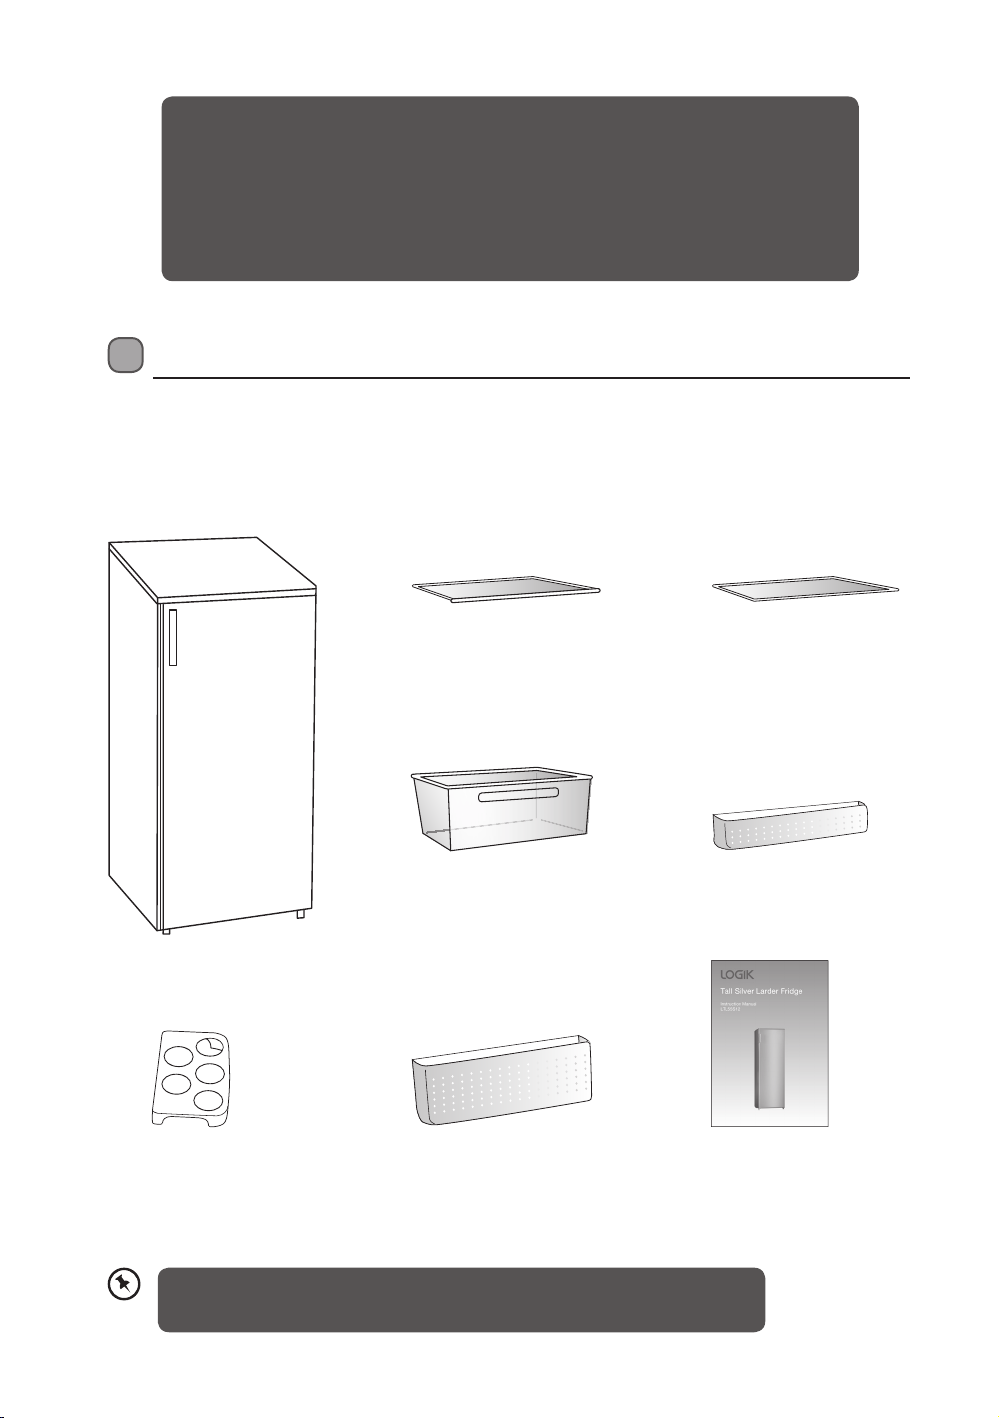
Unpacking.................................................................................................................................... 4
Location ..................................................................................................................................................................... 5
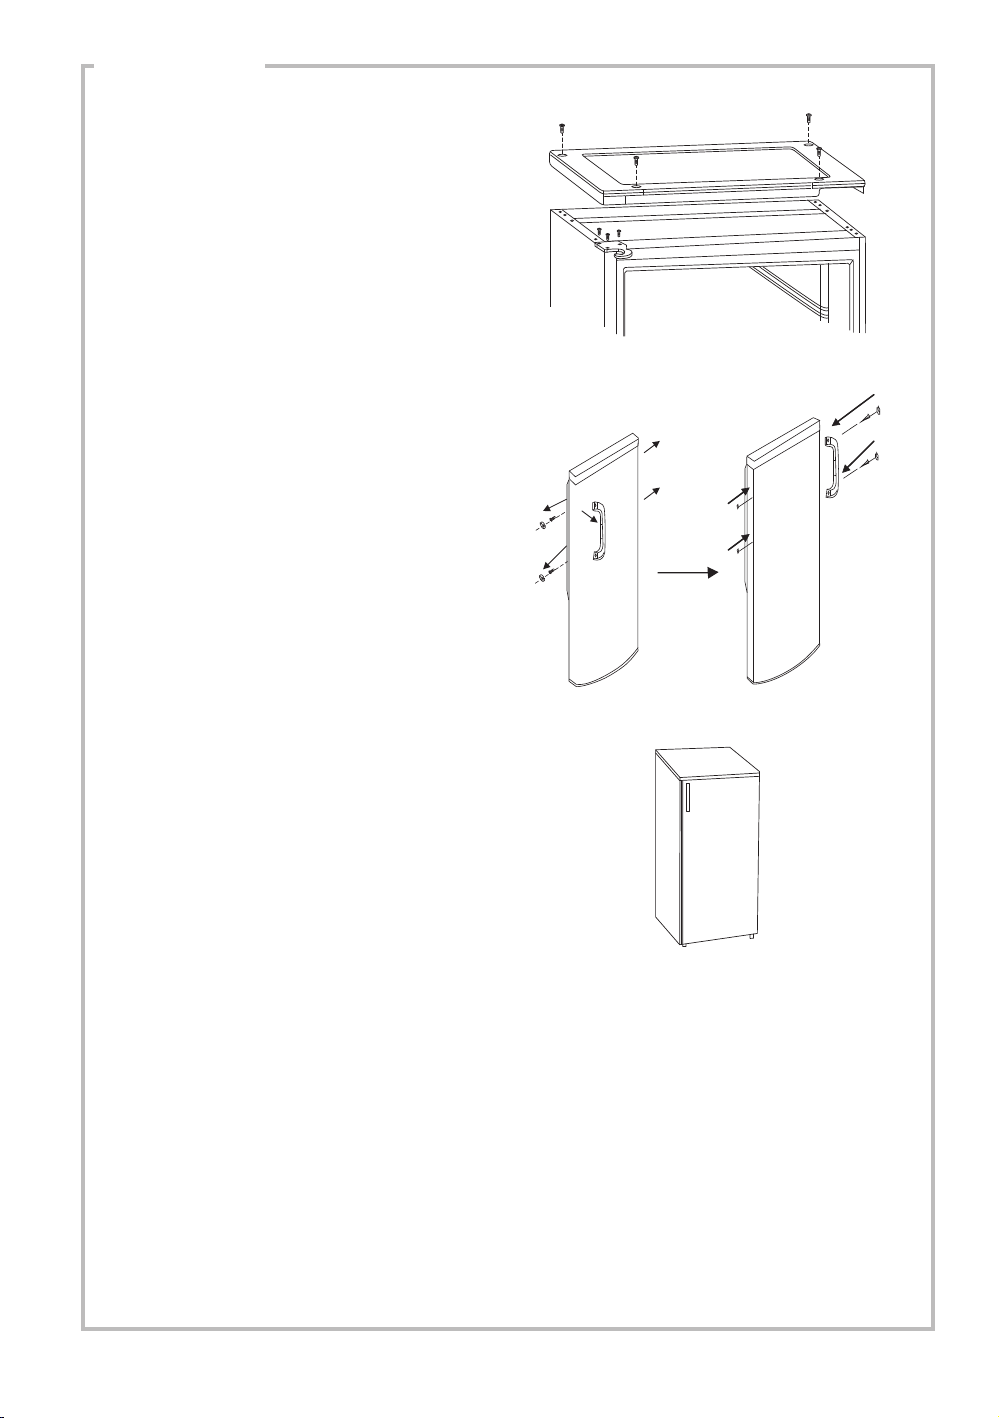
Reversing the Door Swing................................................................................................................................... 5
Levelling the Unit ................................................................................................................................................... 9
Cleaning Before Use .............................................................................................................................................. 9
Before Using Your Unit.......................................................................................................................................... 9
Interior Accessories................................................................................................................................................ 9
Product Overview...................................................................................................................... 10
Operation ................................................................................................................................... 11
Switching On Your Unit ......................................................................................................................................11
Adjusting the Temperature...............................................................................................................................11
Noises Inside the Unit!........................................................................................................................................11
Shopping for Chilled Foods..............................................................................................................................12
Tips for Keeping Food in the Unit...................................................................................................................12
Cleaning ..................................................................................................................................... 13
Defrosting ...............................................................................................................................................................13
Cleaning the Interior and the Exterior of the Unit....................................................................................13
Cleaning Tips..........................................................................................................................................................13
Maintenance .............................................................................................................................. 14
Changing the Internal Light .............................................................................................................................14
Care When Handling / Moving Your Unit.....................................................................................................14
Servicing..................................................................................................................................................................14
Switching O for Long Periods of Time........................................................................................................14
Disposal...................................................................................................................................... 14
Specication .............................................................................................................................. 15
Safety Warnings......................................................................................................................... 16

Unpacking
Remove all packaging from the unit. Retain the packaging. If you dispose of it please do so
according to local regulations.
The following items are included:
The Main Unit
Salad Bin Cover
P.N.: 1055221
Upper Door Shelf x 4
P.N.: 1051907
Adjustable Glass Shelf x 5
P.N.: 1055271
Salad Bin
P.N.: 1110574
Instruction Manual
P.N.: DSGLTL55S12
Thank you for purchasing your new Logik Larder.
We recommend that you spend some time reading this instruction manual in
order that you fully understand all the operational features it offers.
Read all the safety instructions carefully before use and keep this instruction
manual for future reference.
If items are missing or damaged please contact Partmaster (UK only).
Tel: 0844 800 3456 for assistance.
Lower Door Shelf
P.N.: 1051908
Egg Tray x 2
P.N.: 1051976
4

Location
When selecting a position for your unit you should make sure the floor is flat and firm, and
the room is well ventilated with an average room temperature of between 16°C and 38°C.
Avoid locating your unit near a heat source, e.g. cooker, boiler or radiator. Also avoid direct
sunlight as it may increase the electrical consumption. Extreme cold ambient temperatures
may also cause the unit not to perform properly. This unit is not designed for use in a garage
or outdoor installation. Do not drape the unit with any covering.
When installing the unit, ensure that 100 mm of free space is left at both sides, 75 mm at
the rear and 100 mm at the top of the unit. The door can be opened to the right or the left,
depending on what better suits the location. Please ensure there is adequate space for the
door to fully open.
• Ensure the unit is unplugged and empty.
• Adjust the two levelling feet to their highest position.
• To take the door off it is necessary to tilt the unit backwards. You should rest the
unit on something solid so that it will not slip during the door reversing process.
• All parts removed must be saved to do the reinstallation of the door.
• Do not lay the unit flat as this may damage the coolant system.
• We recommend that 2 people handle the unit during assembly.
1. Tilt the unit slightly towards the rear and
prop it securely. Two people are required
to tilt the unit during the door reversal
process.
• If you want to have the door swing reversed, we recommend that you contact a
qualified technician. You should only try to reverse the door yourself if you believe
that you are qualified to do so.
• All parts removed must be saved to do the reinstallation of the door. You should
rest the unit on something solid so that it will not slip during the door change
process. Do not lay the unit flat as this may damage the coolant system. Ensure
the unit is unplugged and empty.
Reversing the Door Swing
Tools required: Phillips style screwdriver / Flat bladed screwdriver / Hexagonal spanner
Installation
INSTALLATION
5

2. Stand the refrigerator, use a flat bladed
screw driver to remove the 4 screw
covers at the rear of the refrigerator lid.
3. Unscrew and life the refrigerator lid from
the rear and remove it, then lift it.
4. Remove the supporting of top cover
plate from the left side as illustrated and
transfer it to the uncover hole at the
another side.
5. Remove the three bolts, then remove
the upper hinge that hold the door in
place. Lift the upper door and place it
on a padded surface to prevent it from
scratching.
INSTALLATION
6

B
A
6. Remove both adjustable feet and remove
the bottom hinge bracket by unscrewing
the bolts.
7. Unscrew and remove the bottom hinge
pin, turn the bracket over and replace it.
Refit the bracket fitting the bottom hinge
pin. Replace both adjustable feet.
8. Transfer the lower door to the property
position. Secure the door’s level, make
the bottom hinge pin into the lower hole
of the door, then tight the bolts.
9. Move the accessory B from the upper
cover of upper door and fit the accessory
A that is a small detachable part from a
small bag.
INSTALLATION
7

10. With the reassembled top hinge located
in the hole in the top inside left corner of
the upper door, fix the top hinge using
the 3 screws. Remove the decorative
block of top cover to the other side.
Replace the top cover using screws,
replace the circular hole plugs.
11. Move the handle from the left side of
upper door to the right side.
12. With the doors closed, check that the
doors are aligned horizontally and
vertically and that the seals are closed
on all sides before finally tightening the
bottom hinge. Re-adjust the levelling feet
as needed.
INSTALLATION
8

Levelling the Unit
To do this adjust the two levelling feet at the front of the
unit.
If the unit is not level, the door and magnetic seal
alignments will not be covered properly.
Cleaning Before Use
Wipe the inside of the unit with a weak solution of bicarbonate soda. Then rinse with warm
water using a ‘wrung-out’ sponge or cloth. Wash the shelves, drawers and salad bin in warm
soapy water and dry completely before replacing in the unit. Clean the exterior of the unit
with a damp cloth.
If you require more information refer to the Cleaning section.
• Before Plugging in YOU MUST
Check that you have a socket which is compatible with the plug supplied with the
unit.
• Before Turning On!
Do not turn on until two hours after moving the unit. The coolant fluid needs time
to settle.
Before Using Your Unit
Before placing any food in your unit, turn it on and wait for 24 hours, to make sure it is
working properly and to allow it time to fall to the correct temperature. Your unit should not
be overfilled.
Interior Accessories
Various glass or plastic storage shelves are included with your appliance – different models
have different combinations.
You should always slide one of the full size glass storage shelves into the lowest set of
guides, above the fruit and vegetable containers, and keep it in this position. To do this, pull
the storage shelf forward until it can be swivelled upwards or downwards and removed.
Please do the same in reverse to insert the shelf at a different height.
In order to make the most of the volume of the fresh food storage compartment
and frozen-food storage compartment, the user can remove one or more shelves,
drawers, out of the appliance, according to your daily use.
INSTALLATION
9

Product Overview
Internal
Light And
Thermostat
Control Dial
Lower Door
Shelf
Salad Bin
Cover
Salad Bin
Adjustable
Feet
Egg Tray
Adjustable
Glass Shelves
Upper
Door
Shelves
10

Operation
Switching On Your Unit
1. Connect the mains cable to the mains socket. The
internal temperature of your unit is controlled by
a thermostat. There are seven settings, of which
position 7is the coldest and position 0turns the
unit off.
2. Adjust the thermostat control dial to the desired
position, bear in mind that the higher the
number, the lower the temperature. Position 3
recommended setting when operating at normal
room temperature (between 16°C and 38°C).
3. The unit may not operate at the correct
temperature if it is in a particularly hot or a
particularly cold room, or if you open the door
often.
4. To ensure that the unit is cool enough to sufficiently
chill your food, wait 24 hours before filling it with
food.
5. If you are concerned that your unit is not being kept
cold enough and wish to check the temperature,
you will need a special fridge/freezer thermometer.
These are available from most supermarkets and
hardware shops.
Place the thermometer in the centre of the unit,
where it can be read easily. Leave overnight, the
temperature in the unit should be an average of
5°C.
Adjusting the Temperature
The internal temperature of the unit is controlled by a thermostat. The recommended position
is between 1to 4for colder working environments (i.e. during winter) and between 5to 6for
hotter environments. Please adjust according to the environment.
Noises Inside the Unit!
You may notice that your unit makes some unusual noises. Most of these are perfectly normal,
but you should be aware of them!
These noises are caused by the circulation of the refrigerant liquid in the cooling system. It has
become more pronounced since the introduction of CFC free gases. This is not a fault and will
not affect the performance of your unit. This is the compressor motor working, as it pumps the
refrigerant around the system.
11

Shopping for Chilled Foods
• Take a quick look at the chilled food package and make sure it is in perfect condition.
• Try to keep chilled food together whilst shopping and on the journey home as this will help
to keep the food cold.
• Don’t buy chilled food unless you can chill it straight away. Specially insulated bags can be
bought from most supermarkets and hardware shops. These bags can keep chilled food cold
for longer while transporting.
• Food that has been left in a car or at room temperature for a prolonged period of time could
raise the food temperature to a dangerous level, which allows harmful bacteria to grow.
• Always unpack and place chilled food in the unit before storing dry food.
Tips for Keeping Food in the Unit
• Cooked meats/fishes should always be stored on a shelf above raw meats/fishes to avoid
bacterial transfer. Keep raw meats/fishes in a container which is large enough to collect
juices and cover it properly. Place the container on the lowest shelf.
• Leave space around your food, to allow air to circulate inside the unit. Ensure all parts of the
unit are kept cool.
• To prevent transfer of flavours and drying out, pack or cover the food separately. Fruit and
vegetables do not need to be wrapped.
• Always let pre-cooked food cool down before you put in the unit. This will help to maintain
the internal temperature of the unit.
• To prevent cold air escaping from the unit, try to limit the number of times you open the
door. We recommend that you only open the door when you need to put food in or take
food out.
12

Cleaning
Defrosting
Frost may accumulate on the inner rear surface of the
appliance which will automatically defrost during the off
cycle of the compressor.
Water is channelled via the drain hole to the collection tray
above the compressor where it will evaporate.
Please ensure the drain hole is checked and cleaned on a
regular basis so water can exit the storage compartment.
Cleaning the Interior and the Exterior of the Unit
• Remove all the shelves, drawers and salad bin. To remove the salad bin first remove the lower
door shelf.
• Wipe the inside of the unit with a weak solution of bicarbonate soda and then rinse with
warm water using a ‘wrung-out’ sponge or cloth. Wipe completely dry before replacing the
shelves, drawers and salad bin.
• Use a damp cloth to clean the exterior, and then wipe with a standard furniture polish. Make
sure that the door is closed to avoid the polish getting on the magnetic door seal or inside
the unit.
• The grille of the condenser at the back of the unit and the adjacent components can be
vacuumed using a soft brush attachment.
Cleaning Tips
Condensation may appear on the outside of the unit. This may be due to a change in room
temperature. Wipe off any moisture residue. If the problem continues, please contact a qualified
technician for assistance.
13

Maintenance
Changing the Internal Light
1. Before carrying out the bulb replacement always
adjust the thermostat control dial to Position 0,
then disconnect the mains supply.
2. Hold and unscrew the light bulb cover.
3. Remove the plastic light bulb cover.
4. Remove the old bulb by unscrewing in an anti-
clockwise direction.
5. Replace with a new bulb (10W SES). Please make sure that it is secure in the bulb cover.
6. Refit the light bulb cover and reconnect the unit to the mains supply and switch on.
Care When Handling / Moving Your Unit
Hold the unit around its sides or base when moving it. Under no circumstances should it be
lifted by holding the edges of the top surface.
Servicing
The unit should be serviced by an authorised engineer and only genuine spare parts should be
used. Under no circumstances should you attempt to repair the unit yourself. Repairs carried
out by inexperienced persons may cause injury or serious malfunction. Contact a qualified
technician.
Switching O for Long Periods of Time
When the unit is not in use for a long period of time, disconnect it from the mains supply,
empty all food and clean the appliance, leaving the door ajar to prevent unpleasant smells.
Disposal
Old units still have some residual value. An environmentally friendly method of disposal will
ensure that valuable raw materials can be recovered and used again. The refrigerant used in
your unit and insulation materials require special disposal procedures. Ensure that none of the
pipes on the back of the unit are damaged prior to disposal.
Up to date information concerning options of disposing of your old unit and packaging from
the new one can be obtained from your local council office.
When disposing of an old unit break off any old locks or latches and remove the door as a
safeguard.
14

Specication
Model LTL55S12
Fresh Food Storage Compartment 300L
Storage Temperature 0-8 °C, average ≤ 4°C
Energy Consumption 0.388 kWh / 24h
Energy consumption 141 kwh per year, based on standard test results for 24 hours.
Actual energy consumption will depend on how the appliance is used and where it is located.
Household Appliances Category Category 1 (Refrigerator)
Energy Grading A+
EU Ecolabel N/A
Defrosting Type Auto Defrost
Climate Class N/ST
This appliance is intended to be used at an ambient temperature between 16°C and 38°C.
Airborne Acoustical Noise 43dB(A)
Rated Voltage 220-240V~
Rated Current 0.45A
Overall Dimension (W x D x H) 554 x 613 x 1687 mm
Features and specifications are subject to change without prior notice.
15

Safety Warnings
For your continued safety and to reduce the risk of injury or electric shock, please follow all the
safety precautions listed below.
• Read all instructions carefully before using the unit and keep them for future reference.
• Retain the manual. If you pass the unit onto a third party, make sure to include this manual.
• Keep ventilation openings in the appliance enclosure clear of obstructions.
• Do not use mechanical devices or other means to accelerate the defrosting process, other
than those recommended by the manufacturer.
• Do not use electrical appliances inside the food storage compartments of the unit, unless
they are of the type recommended by the manufacturer.
• If the mains cable is damaged, it must be replaced by the manufacturer, its service agent or a
qualified technician in order to avoid a hazard.
• Choose a location for your unit away from heat sources such as radiators or fires as
refrigerant and vesicant are burnable.
• Young children should be supervised to ensure that they do not play with the unit.
• Do not damage the refrigerant circuit (applicable only for appliances with refrigeration
circuits which are accessible to the user).
• The unit must be maneuvered by a minimum of 2 persons.
• This unit is not intended for use by persons (including children) with reduced sensory or
mental capabilities, or lack of experience and knowledge unless they have been given
supervision or instructions concerning the use of the unit by a person responsible for their
safety.
• If your unit is fitted with a lock to prevent children being trapped inside, keep the key out of
reach and not in the vicinity of the unit.
• Do not store volatile or flammable substances in the unit.
WARNING
IT IS HAZARDOUS FOR ANYONE OTHER THAN AUTHORISED SERVICE PERSONNEL TO
CARRY OUT SERVICING OF REPAIRS WHICH INVOLVE THE REMOVAL OF COVERS.
TO AVOID THE RISK OF AN ELECTRICAL SHOCK DO NOT ATTEMPT REPAIRS YOURSELF.
16

Normal energy
consumption
Increased energy
consumption
Installation site In a ventilated room. In an enclosed, unventilated room.
Protected from direct sunlight. In direct sunlight.
Not situated near to a heat source
(radiator, oven).
Situated near to a heat source
(radiator, oven).
Where the ideal ambient room
temperature is approx 20°C.
Where there is a high ambient
room temperature.
Use Only open the doors when
necessary and for as short a time
as possible.
Frequent opening of the doors for
long periods will cause a loss of
coldness.
Store food in an organised way. If food is not stored in an
organised way, searching for an
item will mean the door is open
for longer.
Allow hot food and drinks to cool
down before placing them in the
unit.
Placing hot food in the unit will
cause the compressor to run
for a long time, as the unit will
have to work harder to lower the
temperature.
Store food covered or packaged. The evaporation or condensation
of liquids will cause a loss of
coldness in the unit.
Do not over-fill the appliance to
allow air to circulate.
17

NOTE: If you require a replacement for any of the items listed below, please quote their
corresponding part numbers:
Replacement Part Part Number
Adjustable Glass Shelf 1055271
Salad Bin Cover 1055221
Salad Bin 1110574
Upper Door Shelf 1051907
Lower Door Shelf 1051908
Egg Tray 1051976
DSG Retail Ltd • Maylands Avenue • Hemel Hempstead
Herts • HP2 7TG • England
(P.N.: DSGLTL55S12)
This symbol on the product or in the instructions means that
your electrical and electronic equipment should be disposed at
the end of its life separately from your household waste. There
are separate collection systems for recycling in the EU.
For more information, please contact the local authority or
your retailer where you purchased the product.
Visit Partmaster.co.uk today for the easiest way to
buy electrical spares and accessories. With over
1 million spares and accessories available we can
deliver direct to your door the very next day. Visit www.partmaster.co.uk or call
0844 800 3456 (UK customers only). Calls charged at National Rate.


Table of contents
Other Logik Refrigerator manuals

Logik
Logik LUC50S11 User manual

Logik
Logik LUC50S17 Parts list manual

Logik
Logik LFC55W12 User manual

Logik
Logik LUL55S10 User manual

Logik
Logik LFC55S11 User manual

Logik
Logik LUF55S16 User manual

Logik
Logik LTT68S10 User manual

Logik
Logik LFC60W10 User manual

Logik
Logik LUR55W15E User manual

Logik
Logik LFC50S12 User manual

Logik
Logik LFC60W11 User manual

Logik
Logik LTL2488GS User manual

Logik
Logik LTT68S12 Parts list manual

Logik
Logik LUL55W14E Quick guide

Logik
Logik LTL60W14 User manual

Logik
Logik LFC60W10 User manual

Logik
Logik LFC50S10 User manual

Logik
Logik L200CFW14 User manual

Logik
Logik LFC50S16 User manual

Logik
Logik LUL55S12 Parts list manual